ace
Statesman

Posts: 528
|
Post by ace on Aug 30, 2008 23:27:28 GMT
Whilst waiting for the next ME exhibition in October to stock up on materials and bits etc to finish my other loco I decided to start work on a few bits for my new loco the Green Arrow. I have part of an old chassis that was being built by someone but has now seen better days. Have now purchased the plans and received detailed drawings and pics from baggo ( to whom I very grateful) and I can now look forward to a few winter months of work building my second engine. I'm not sure if I will use the original frames or to make new ones due to the extent of the rust that has left deep pit marks and there is a slight twist in it too. Here are a few bits I've done over the last couple of weeks.  Main frame stretcher. (completly hand filed to the finish) 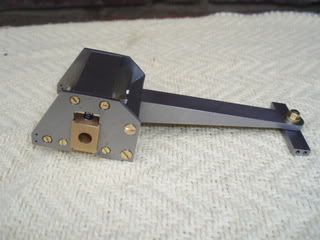 Pony truck assembly. 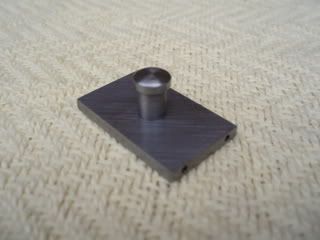 Main frame stretcher for the pony truck. 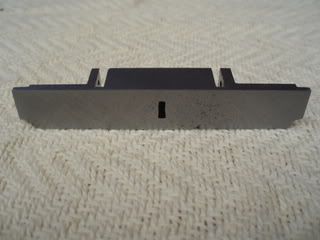 Front buffer.  Drag beam. ace |
|
|
|
Post by spamcanman on Aug 31, 2008 8:40:55 GMT
|
|
ace
Statesman
Posts: 528
|
Post by ace on Aug 31, 2008 19:28:48 GMT
Hi spamcanman
Cheers
Yes I've seen this site and the prices for laser cut frames and other parts seems quite good, also they do the complete boiler too. ;D
ace
|
|
|
|
Post by AndrewP on Aug 31, 2008 23:26:05 GMT
I've had laser cut parts from there and whilst excellent do check the material thickness - mine were under spec, metric plate as opposed to imperial I suspect, which didn't matter for the Rob Roy coupling and connecting rods but frames, especially since you have made the stretchers and buffer beams are a different matter.
|
|
ace
Statesman
Posts: 528
|
Post by ace on Sept 1, 2008 20:33:43 GMT
Many thanks for the warning Andrew. I still would like to make the frames by hand really but having them laser cut makes sense. Are they paired well or do they require any fettling after. I am wondering about riveting one of the old frames to some new steel and cutting them out that way but the price of the steel will probably be as dear as it is to buy them laser cut.  Don't know what happened with the size of the photos, they where larger than that when I copied them.  ace |
|
|
|
Post by AndrewP on Sept 2, 2008 11:43:39 GMT
Pairing and sizing of the parts I got was excellent. To expand on the size issue - the Rob Roy drawings call for 1/4" rods and the laser cut parts are from 6mm plate so are 237 thou. Malcolm does point this out in big red letters on the home page of his site. Fettling is a bit of an understatement, the process leaves a ridged finish which is near glass hard, it can be filed off but the files don't like it! As my rods were laser cut to size they are undersize when fettled. A close up of the un-fettled edges 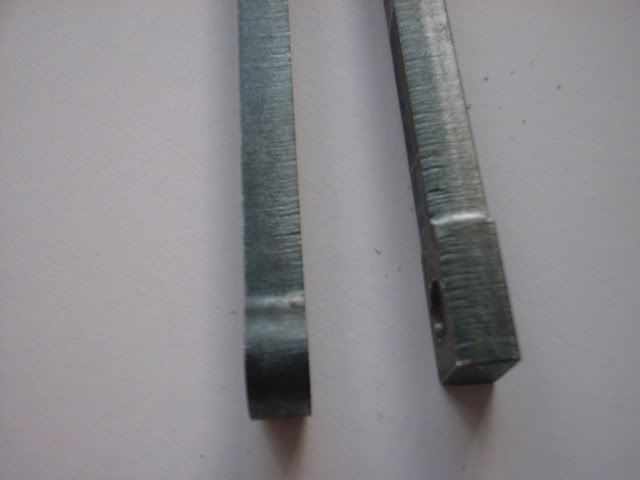 and a few more here for good measure. Hope this helps. |
|
|
|
Post by Jo on Sept 2, 2008 12:40:03 GMT
Hi Ace, I believe that you will find hand cutting the main frames for the Green Arrow by hand very rewarding, remarkably quick and good practice in case you have problems bending the trailing frames to the right shape and need to make another  . I would not look to use the existing frames as a template but mark out from scratch. You never know if the original builder got their layout right. By all means once you have layed them out use the originals to confirm you have got it right. I did consider buying the laser cut body work... but having seen the price  that they were asking and knowing what I pay for sheet brass opted for cutting even the body work by hand. Jo |
|
|
|
Post by baggo on Sept 2, 2008 17:52:13 GMT
Hi Ace, Looking at what you've done so far, you'll have no trouble with making the frames from scratch so go for it Save a lot of money and give you a lot more satisfaction as well. I looked at the laser cut kit for the Simplex superstructure but, like Jo, soon changed my mind when I saw the price  Malcolm did do a talk at our club earlier this year and the thin stuff looked very good but I wasn't impressed with the laser cut con rods etc at all  By the time you've cleaned up the edges etc, you could have cut them from the solid. You're still going to have to flute them and thin them down between the bosses if necessary anyway. Andrew - I would have expected items such as those to be cut oversize to allow for finishing? John |
|
|
|
Post by AndrewP on Sept 2, 2008 18:41:42 GMT
I might have expected that John, If I'd thought about it but no matter, I have fitted the coupling rods, might use the connecting rods and made new valve "rods" from 1/16 gauge plate.
A piercing saw is second nature to me so that is the way I'll go in the future.
Ace, I agree wholeheartedly with John, your stretchers and pony truck look super, you'll have no problem with the frames.
It might just be what I am used to but I find sawing at a jeweller's bench pin much easier and more accurate than in the vice - break less blades too. A simple one isn't difficult to set up - try it, you might like it.
|
|
ace
Statesman
Posts: 528
|
Post by ace on Sept 2, 2008 20:14:57 GMT
OK thats that sorted then, hand made they will be. ;D I much more prefer to do it by hand as like you chaps say 'more rewarding'. Metal-mart tomorrow to pick up the plates, the chaps there are great they will cut the frame plates to size for me and will let me raid the off-cut bins as well so its two birds with one stone. Thanks for the encouragement chaps, will post pics of the frames when done. ace |
|
Prowe
Involved Member

Posts: 89
|
Post by Prowe on Sept 3, 2008 6:45:53 GMT
Ace
Who is this Metal-Mart organisation? Sounds to me like an absolute God send to model engineers, bet they don't have a branch in East Anglia.
Phil
|
|
abby
Statesman
Posts: 927
|
Post by abby on Sept 3, 2008 10:49:33 GMT
Just a thought if you have a steel stockholder or sheet metal worker in your area they will usually have off-cuts at the back of the guillotine or in the skip , I get my 1/16" well 1.5 mm by this means for free , worth a try as they rarely say no !
|
|
ace
Statesman
Posts: 528
|
Post by ace on Sept 3, 2008 12:28:34 GMT
Prowe Its a company called Metal super market up here in Manchester but I believe they have branches across the country. I assume they will be as friendly over there. I been using them for a few years now and got to know them well and they know about my hobby so that helps a bit as well I think. ace www.metalsupermarkets.com/MSC-home.aspx |
|
ace
Statesman
Posts: 528
|
Post by ace on Sept 7, 2008 22:11:02 GMT
Well after a few minutes of filing, cutting and drilling etc the frames are finally done. Well actually it was more like two days and one late evening. But as said before it is rewarding to see the end results when made by hand.  The pump and stretcher offered up for trial. 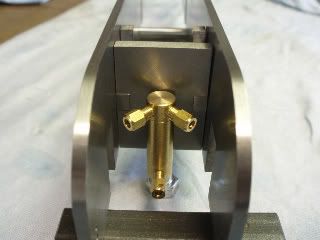 None of the pump parts or stretcher have been soldered yet, will do a job lot later. The trailing frame needs to be affixed yet as well. |
|
|
|
Post by baggo on Sept 9, 2008 12:44:05 GMT
They look really good Steve. You've got a brilliant finish on the edges  John |
|
ace
Statesman
Posts: 528
|
Post by ace on Sept 9, 2008 21:31:21 GMT
Cheers John
Trust me when I say it took ages to hand finish the frames with medium emery paper and a small rubbing block to ensure that the surfaces were flat. I am though very 'chuffed' with the results it was worth it although my finger tips are a bit sore. The trailing frame is now fitted but it was very fiddly trying to get it squared up as it just butts up to the frame without any kind of way of ensuring that it is central. Ended up rigging up a jig to hold it and the frame in place whilst I marked up the holes. I am going to start work on fixing the main frame stretcher to the chassis, this I think will also be a fiddly job ensuring that it is squared up and in line with the holes in the frames. I left the marking out lines on this bit visible as an aid. I do have one issue with the stretcher though and that is the drawings don't show which way the stretcher should face, I assume that it should face with the pump to the rear.
ace
|
|
ace
Statesman
Posts: 528
|
Post by ace on Sept 13, 2008 23:47:24 GMT
A few more hours spent cutting out the motion plate and valve gear brackets. Its going to take a while to get the finish I want on them being small and fiddly. I know it will end up eventually being painted but I'm determined to up my presentation skills on this loco. 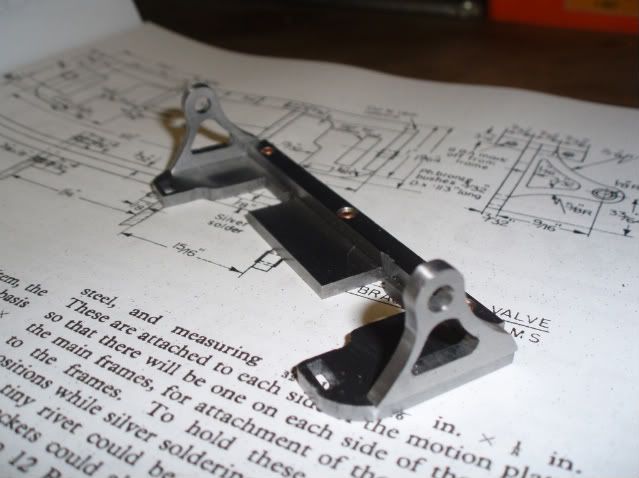 |
|
ace
Statesman
Posts: 528
|
Post by ace on Sept 14, 2008 22:28:49 GMT
Forgot that this was just to past time whilst waiting for materials for the 'Project' loco. Just getting carried away. Anyway after filing the motion plate to near finished I decided to leave a bit more material on the gear brackets than specified on the drawing's just in case and I am clad I did, as the picture shows the holes will need aligning but not by much so I can file a small amount from the face edge of the bracket to bring the holes in line. 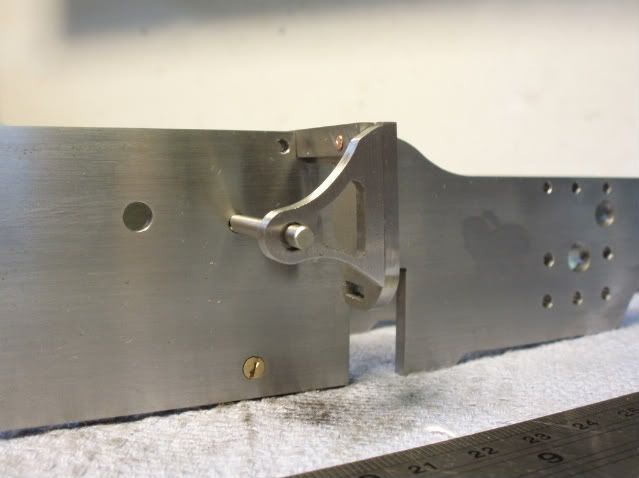 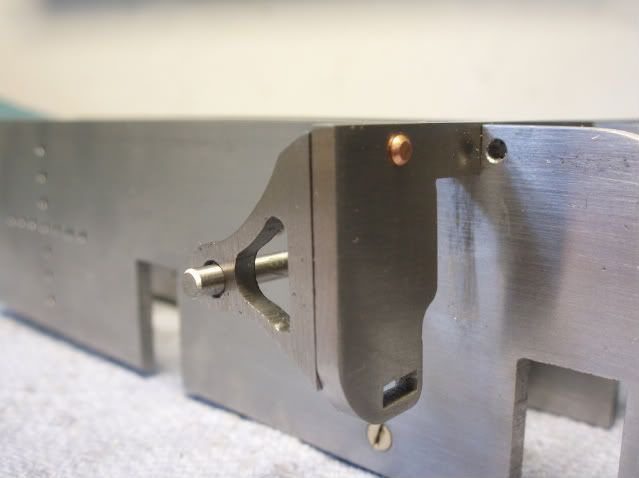 |
|
ace
Statesman
Posts: 528
|
Post by ace on Sept 16, 2008 21:31:51 GMT
Had ago at making my first horn block, set up and milling went well and I am confident that I can now reproduce the next four without making the error as can be seen in the pics. Can you spot it!   ace |
|
ace
Statesman
Posts: 528
|
Post by ace on Mar 29, 2009 20:43:20 GMT
Had a go at silver soldering the water pump body today and I am slowly getting the knack of soldering a good clean joint, one that doesn't involve filling the surplus solder off anyway.   The first attempt on the lower pipe union ended in disaster as I overheated the threaded union and melted it so I had to make a new one hence the slightly rough finish to that end.  |
|


 that they were asking and knowing what I pay for sheet brass opted for cutting even the body work by hand.
 By the time you've cleaned up the edges etc, you could have cut them from the solid. You're still going to have to flute them and thin them down between the bosses if necessary anyway.


