|
|
Post by Deleted on Nov 26, 2016 0:00:54 GMT
on it now Roger...nearly finished, just awaiting a few bits and I'll be ready to give details as to how I've done it, I'll also give a list of parts which I have bought from eBay, LED's, heat shrink, bulb holders etc...for anyone who may wish to follow suit...
Pete
|
|
61962
Seasoned Member

Posts: 129 
|
Post by 61962 on Nov 26, 2016 0:41:40 GMT
Pete,
Just for clarity the GL5MLA doesn't own anything. All the locomotives, wagons, coaches, lineside equipment, signals, trackwork etc used at GL5 events are owned by individual members. If you join the Association, and I think you should sooner rather than later (see the website) I'm sure your vacuum operated turntable when it's built would be a welcome addition to the facilities, as will your locomotive. There are quite a few GL5 locomotives that could power it. Have a look on YouTube for GL5 at Shildon or Locomotion. GL5 holds a shunting demonstration at Shildon in March each year, the trackwork having been built almost from scratch by Members over the past four years. They have added working scale BR semaphore signals to the inventory for this event and they should be fully commissioned for the event in 2017. On vacuum brakes, GL5 members have put together a fitted freight train and it has been trialed at the Main Line Rally.
I have had Tipton lamps lit up for a few years. They have been used on night runs on occasion, but a couple of weeks ago I was privileged to join Ryedale MES at Gilling for such an event and it was awesome with all the semaphore signals lit and the site in complete darkness and enshrouded in mist. Only intimate route knowledge allows drivers to run in such conditions.
4472 is progressing well, and I think you are soon to get ahead of my K3s. I'm about to write the next build installment for the TSMEE website.
I've just seen Rogers post. My self contained lamps use 2 AG4 batteries with warm white leds and will run for 24 hours at least. I don't use red leds, they use more current, so I colour the white ones for tail lamps.
Eddie
|
|
pault
Elder Statesman

Posts: 1,497
|
Post by pault on Nov 26, 2016 1:02:05 GMT
Something that often gets missed is that the original paraffin lamps were used to identify the type of train, not to illuminate the way ahead for the driver. When you think about it a paraffin lamp would need to light up the track anything up to the best part mile to be of any use to a driver hoping to stop before an obstruction. As such by today’s standards the loco lamps were actually quite dim.
|
|
|
|
Post by Deleted on Nov 26, 2016 9:00:43 GMT
Hi guy's Thank's Eddie, I look forward to reading the next instalment of your lovely K3 builds. Yes, I was aware that it's the members who supply the stock for GL5, I love what they do, it certainly fits into my mindset. You never know perhaps I may get around to a turntable one day, think I'd need to get into my 90's to do it, though, I still have many years on 4472 and then I want some teaks. I do think though that a fully operating turntable using vacuum would be something to behold, it would certainly be a talking topic while having a cup of tea...  Regarding lamps, yes I agree Paul that they weren't for lighting up the rails ahead but for identification purposes, IIRC an express has two outer edged lamps on the front and one tail lamp on the tender, not sure if that's removed or not when hauling a train, though, I have a diagram somewhere that gives all of the configurations. btw back in the 20's 4472 used to have two lamp irons on the right-hand side, giving a total of 4 irons. When choosing LED's I bought a selection to see what works best, including some RED ones, however, I have gone with a warm white (as Eddie)LED that has a flat face so that I can still use the lens as supplied in the kit for the both the front and tail lamps. I am very happy with the colour and look of the finished lamp, very flame-like imho...details will follow next week.. Pete |
|
pault
Elder Statesman
Posts: 1,497
|
Post by pault on Nov 26, 2016 9:24:49 GMT
Hi Pete
The tail lamp would only be on the tender if the loco was running light, when coupled to anything else the tail lamp would on the rear most vehicle. If I remember correctly Chris Vine has working paraffin lamps on his B1.
On the subject of LED’s for a project at work I spent some time playing with LED’s and various resistor values to get the desired effect. Some of the warm whites when run at a lower current than their rated, one do take on a useful yellowy tinge.
Regards
Paul
|
|
|
|
Post by Deleted on Nov 26, 2016 9:44:19 GMT
Hi Pete The tail lamp would only be on the tender if the loco was running light, when coupled to anything else the tail lamp would on the rear most vehicle. If I remember correctly Chris Vine has working paraffin lamps on his B1. On the subject of LED’s for a project at work I spent some time playing with LED’s and various resistor values to get the desired effect. Some of the warm whites when run at a lower current than their rated, one do take on a useful yellowy tinge. Regards Paul Thank's Paul, that makes sense, it had occurred to me that the tail lamp wouldn't be needed on the tender with a train attached so thank's for confirming that. Yes they do take on a nice yellow tinge, so far I've found the best voltage at around 4.5v so 3 batteries....once I have received the heat shrink I'll be able to test it properly... Pete |
|
|
|
Post by Cro on Nov 26, 2016 10:28:33 GMT
I would agree the John Tipton lamps are superb. I had to make a non standard scale lamp for my 3.5"g Linda FR loco. Very fiddly. John doesnt do LBSCR lamps in 5"g (which have a distinctive corrogated cover to the lamp) so unless John gets a bulk order or Adam is interested, I will have to tool up and make my own, and the LBSCR used lots of lamps and strange head codes! Cheers, Julian Happy to help if a drawing can be provided or if you have one even better when it comes to lamps! Many little details that are hard to dimension on a drawing. I have got some SECR(?) ones to look at for a friend at some point but again I got stuck on the drawing with a few missing dimensions. Look forward to seeing your lamps Pete, i have done models for the ones you have but at the time direct printing was too expensive for this sort of thing and I never looked further at tooling up as, as you show, the current offerings are very good at a sensible price so why compete? Adam |
|
|
|
Post by chris vine on Nov 28, 2016 21:23:39 GMT
Hi Paul and Pete,
Yes you are right, I did make some working paraffin lamps on the B1. They are great fun but go out if a butterfly passes too close!
The trouble is that you need to get the air through and there is very little "chimney effect" height to drive it through. Anything you do to shield the flame just stops the flow of air. I tried countless schemes!!
One thing I discovered was that you need to burn a heavy oil. This sounds counter-intuitive, but the light oils burn so cool that they just blow off the top of the wick. whereas the heavy oils get the wick really hot and it will keep the flame going, a bit like a glowplug.
The best oil for staying alight (that I found) was steam oil! However after a while, bits built up on the wick and put it out...
There is plenty of room for experimenting here!!
Chris.
|
|
mbrown
Elder Statesman
Posts: 1,720
|
Post by mbrown on Nov 28, 2016 22:23:13 GMT
I have made a working headlamp with a LED, a small battery and a switch - all accessed by opening the door in the side of the lamp. It is to 1.25" to 1', so a tad larger than 5"g size, but I will take some pictures and put them up on this thread later this week when I am home.
Malcolm
|
|
pault
Elder Statesman
Posts: 1,497
|
Post by pault on Nov 29, 2016 19:26:45 GMT
I do have some red/white 5mm LEDs if anyone wants a few, and you can get 3mm ones from the USA
|
|
|
|
Post by joanlluch on Nov 29, 2016 19:34:30 GMT
I do have some red/white 5mm LEDs if anyone wants a few, and you can get 3mm ones from the USA I don't think you need to get LEDs from the US. That's pretty a very common stuff nowadays in all sizes and shapes. I bet they have them all at your nearest electronic components store. |
|
|
|
Post by Deleted on Nov 29, 2016 21:17:33 GMT
evening chaps I see that we have a discussion regarding the LED's, I haven't finished yet as I want to try another battery but can share this picture and the idea that I'm working on, which does work although a little bit fiddly which I think I can solve using another smaller battery. This is one of the pictures that i had taken to describe what I've been up to, you can't see all of the components here but basically, I'm using 5mm warm LED's (a nice fit with a bulb holder in the lamp opening) which give a nice yellow light. A suitable bulb holder, A turned up piece of PTFE that fit's into the roof of the casting to insulate from the body. The LED's as seen here although I have changed them slightly and for the long negative tab I have replaced this with a strip of brass shim soldered on, both terminals covered with heatshrink. The casting body is tapped 10mm and I have bought from ebay some 10mm plastic grub screws again to insulate from the body. The idea being that with the battery pushed up from the bottom it touches the top positive terminal as it presses it against the PTFE insulating spacer in the top of the lamp(there's a nice recess here that a turned spigot of PTFE can be pushed tightly up into. The negative brass shim which slides down the side of the battery is then folded under the bottom of the battery so that when the plastic grub screw is fitted both terminals make contact as the grub screw is tightened. The batteries that I have tried are the small LR44 types which are 1.5v, you need 2 of these to work, you can use 3 but it's a little bright and not really enough room in the lamp. I made up battery packs of two using heatshrink to hold them together, they are a little too delicate for soldering together. Now this does work but it's a little temperamental due to space, that is it turns on ok but needs the grub screw removed to turn off, it's also a bit tight against the LED which can try to push the LED out, The holders might hold the LED in place if the opening was made a little bigger, currently they push in if you cut the securing tabs off the back, however if the opening was reamed out a little this may work better. However, before I start cutting the casting I have since discovered that you can get other batteries around the same size that are 3v lithium and I think that these should work perfectly as you only need one and so they won't be trying to push the LED out. It just needs a little more R&D to get a reliable system, once I have the batteries I'll take another look.  You could, of course, saw the top off at it's neck, drill and tap, modify and have a screw top that screws down to make a contact, that's a little more work although might be the best solution for ease of operation, I don't want to spend too much time on these right now as I've got plenty of more important things to be getting on with but thought that I'd share this info now while we are on the subject.. Cheers Pete |
|
mbrown
Elder Statesman
Posts: 1,720
|
Post by mbrown on Nov 29, 2016 21:43:36 GMT
These little LNER lamps put my home-brewed one to shame, but as I promised some pictures here they are... 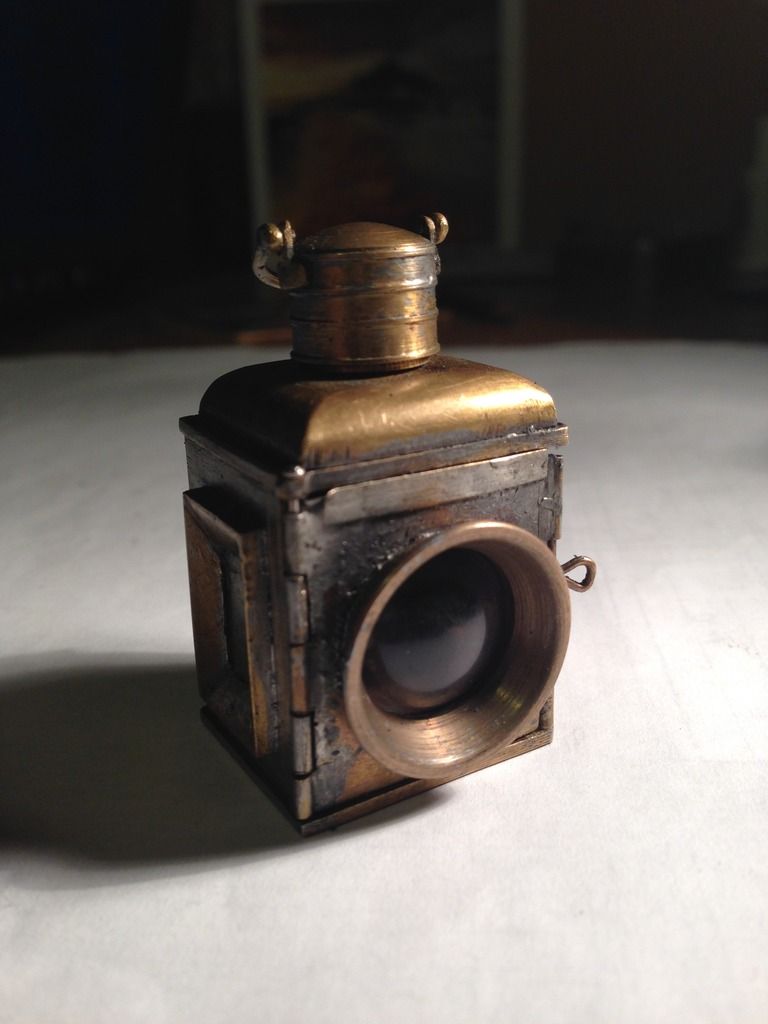 The lamp body started as a short piece of 1" sq brass tube with one side cut back to give the correct depth and a top and bottom piece silver soldered on. All the other bits and bobs were soft soldered in place. The catch is modelled on the prototype and the bent bronze wire slides up and unbolts the door. 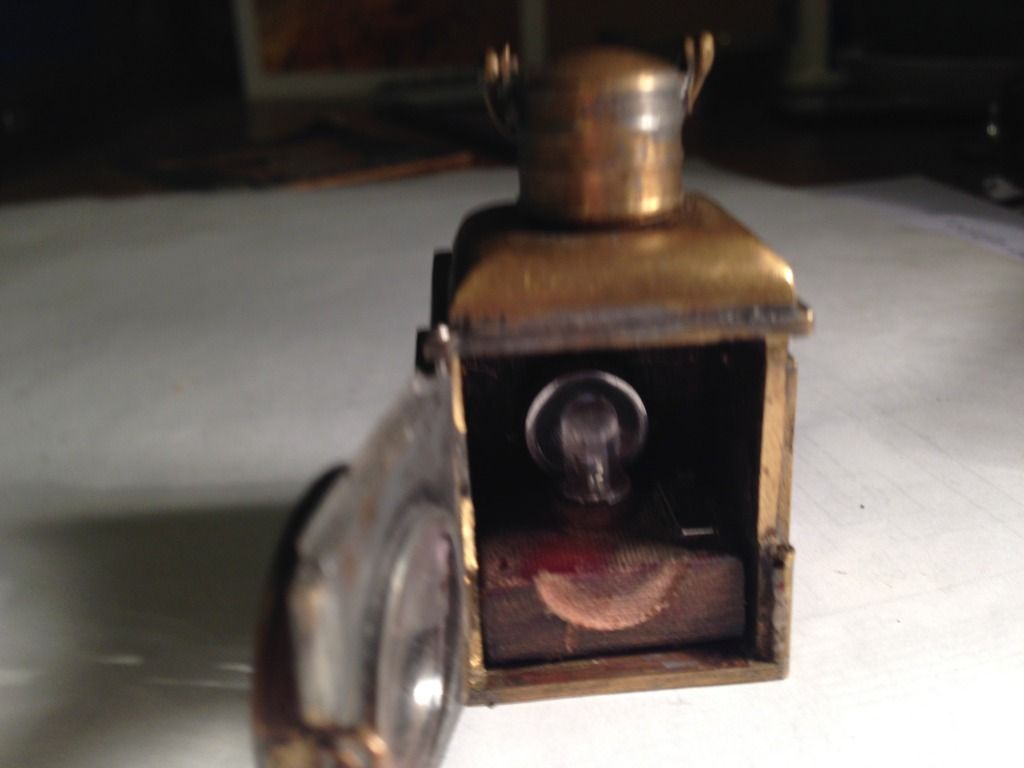 The LED and battery are mounted on a small square of Tufnol intended to represent the oil chamber and wick etc. It slides out of the body when the door is opened. The tiny switch came from some cheapo bit of kit - I think a tiny torch that came in a Christmas cracker. You can see how the battery is recessed into the Tufnol and the switch is wired in. 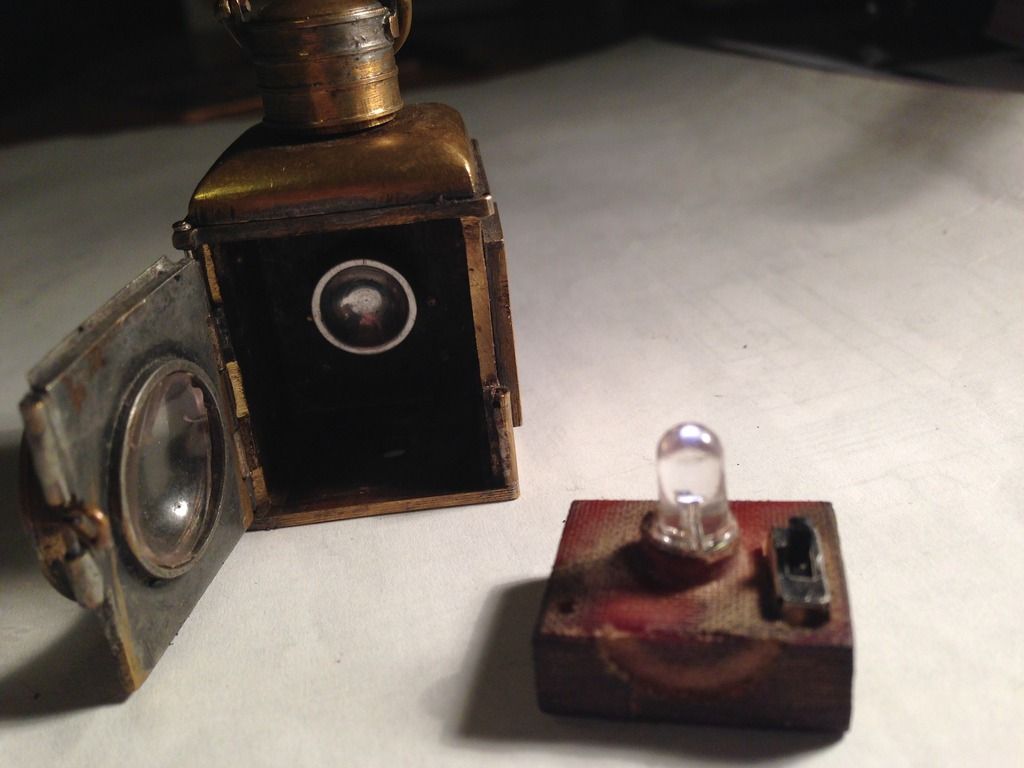 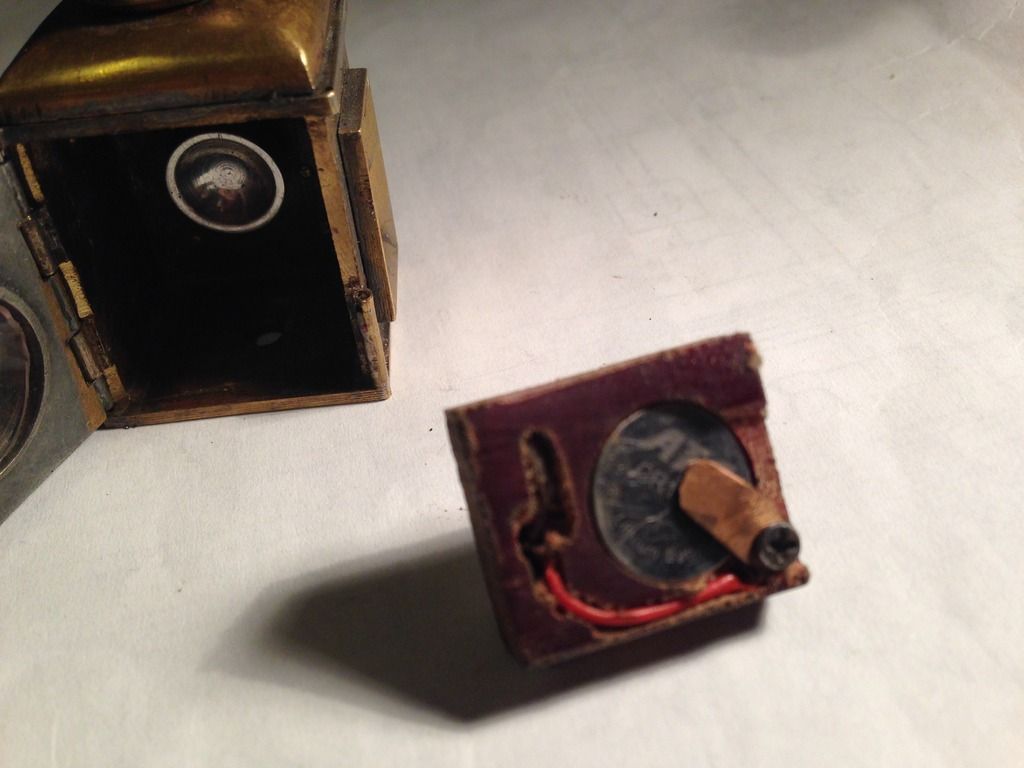 I couldn't get a very good shot showing the light it emits - the LED isn't at its brightest in this configuration and ought to be pointing out through the lens, but I was trying to get the effect of a small paraffin flame and it actually looks more realistic this way. The reflector in the back of the lamp, turned from aluminium and polished, helps.  Anyway, it looks the part, was quite satisfying to make and - most important - gives me something to play with until the loco is properly finished.... Malcolm |
|
|
|
Post by Jim on Nov 29, 2016 22:45:02 GMT
The lamps look fantastic Malcolm and if the lamps are anything to go by your loco will be a cracker. Hope you start a thread detailing the build.
Jim
|
|
61962
Seasoned Member
Posts: 129
|
Post by 61962 on Nov 29, 2016 23:03:11 GMT
Pete,
Don't cut the top off!! If you look inside you will see that the cap is actually on a spigot that's pressed into the chimney. If you set the lamp on the vice on two bits of 4mm rod you can gently drive the cap out. A bit of fiddly machining to reduce and shorten the spigot will allow you to silver solder it to a brass 2BA screw and you have just enough meat in the chimney to tap it 2BA.
Eddie
|
|
|
|
Post by Deleted on Nov 29, 2016 23:15:22 GMT
Thank's Eddie... I had assumed that it was a solid casting, I'll take a closer look at that method then....
cheers
Pete
|
|
|
|
Post by silverfox on Nov 30, 2016 9:00:30 GMT
Peter
Order has been placed for three lamps for Xmas. if you get time could you let us know who you got what from please, so i can follow your words music and light!!
Ron
|
|
|
|
Post by Deleted on Nov 30, 2016 9:56:00 GMT
will do Ron, I have kept all of the details...most of which I got off eBay...company name 'bright components' once I have a final solution I'll post details, new batteries are on order...iirc they are CR297 3V lithium cells which are 9.5mm dia and around 3mm high which is half the height of the packs that I made up before so will give much more room.
regards
Pete
|
|
|
|
Post by Jim on Nov 30, 2016 12:48:08 GMT
|
|
|
|
Post by Roger on Nov 30, 2016 13:18:43 GMT
A bit of an open question on this Pete.... do you think the use of a small PCB to connect the elements together would make for an easier solution? There are tiny surface mounted LEDs which would either allow more battery space or possibly allow for a switch or even control the brightness. I have a PCB design package that could be used for this, and China suppliers can supply boards very cheaply. Prototypes can even be engraved directly onto copper clad board.
Do you use a current limiting resistor for the LED? Generally you have to do this to prevent excess current destroying the device. The forward voltage of the LED is usually lower than 3V, so the current is likely to be too high.
Could you tell me what type of 3V cell you've found that will fit? I see there's a CR927 but it's 9.5mm diameter so that may be too big.
|
|


