|
|
Post by Geoff (Carlisle) on Apr 9, 2012 16:14:18 GMT
Hi all Got a bit of a disappointment this afternoon when i repainted the front bufferbeam on the Enterprise loco. Last week i applied the DECAdry letters ie.V3 , and Gateshead.This afternoon i decided to clear varnish over the bufferbeam and the V3 letters started to dissolve, so my advice is don't brush back and forth, just strait on or end up like me disappointed. Geoff (Carlisle)  |
|
|
|
Post by Jim on Apr 9, 2012 21:39:36 GMT
I had the same thing happen with some Fox transfers Geoff and I was using a spray varnish too. I wasn't all that impressed I must say. I have used clear Shellac with success on some old water slide transfers. Another alternative is to get some Inkjet decal paper and make your own decals. They need to be sealed with a clear spray varnish to protect them during application. I made these samples for my BR Mk1 Full Brake. finally opting for the larger F16 font 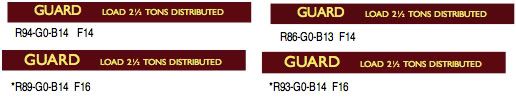 Jim |
|
jma1009
Elder Statesman

Posts: 5,900
|
Post by jma1009 on Apr 10, 2012 19:23:14 GMT
sorry to hear of your problems, geoff and jim
i have never varnished over transfers, partly because varnish alters the paint finish and colour, and ive never had a problem with waterslide transfers being affected by cleaning the loco ( i use Mr Sheen spray polish ).
i have never heard of anyone varnishing waterslide transfers before, and i'm not surprised you had a problem! at least it was only the bufferbeam!
i have always painted by hand numerals etc on the buffer beam. on my 3.5"g LINDA i even painted by hand the ffestiniog railway crest on the tender.
cheers,
julian
|
|
|
|
Post by Jim on Apr 10, 2012 21:27:11 GMT
I'm not sure of Geoff's reasons but in my case I was applying a clear varnish to the coach to give a uniform paint finish and 'colour' following lining out etc. Normally there shouldn't be a problem with sealing decals/transfers and it's not one I've had in the past. As with the old transfers I found the shellac both sealed aided adhesion.
Jim
|
|
Andrew C
Part of the e-furniture

Posts: 447
|
Post by Andrew C on Apr 10, 2012 22:19:09 GMT
Hi I too have had waterslide transfers dissolve under brushed on varnish. On a tender side . They are ok if you dab the varnish and don't work it in any way at all.
The engine in question is my 5 ins Atlantic Dolly Stephens which was last painted 25 years ago and steamed 5 or 6 times a year till about 4 years ago. I used a ship varnish who's is very hard wearing. It went slightly orange the first time it was steamed but each time after that the discolouration became less and less.
My father has 56xx 0-6-2T that he painted about 10 years after I did Dolly Stephens and has been used less.. The paint work is in much worse condition
So I say varnish but dab vanish over the transfers
Try again. I just managed to post this on the wrong thread I have no idea how! Hopefully it correct this time
Andrew
|
|
|
|
Post by Geoff (Carlisle) on Apr 11, 2012 16:09:31 GMT
Dear Julian I clear varnished the bunker and the side tanks as seen on my thread with no trouble at all and still looks good. The problem this time was the small tranfers on the front bufferbeam as seen on the head on view thread now this was all scaped down and repainted and given the red paint a few weeks to dry, so i think Andrew has the right idea and don't play around with the brush !  Geoff (Carlisle ). |
|
|
|
Post by Geoff (Carlisle) on Apr 11, 2012 16:17:05 GMT
Dear Julian I clear varnished the bunker and the side tanks as seen on my thread with no trouble at all and still looks good. The problem this time was the small tranfers on the front bufferbeam as seen on the head on view thread now this was all scaped down and repainted and given the red paint a few weeks to dry, so i think Andrew has the right idea and don't play around with the brush ! Geoff (Carlisle ). |
|
|
|
Post by Geoff (Carlisle) on Apr 15, 2012 21:04:02 GMT
Hi all, Well back to the Clan,here it shows the smokebox door and ring. Both turned from steel except the latch which is a piece of brass angle super- glued on to hold it while drilling it with a 3/64" drill. then get two 3/64" brass rivets and slighty squashing them in the vice making them slightly oval then tapping them in and they'll never come come out. The only thing to make is the shed plate 12A to complete the door. The lamp iron is brought down as they were when the electric wires went up.  Geoff (Carlisle). Attachments:
|
|
|
|
Post by Deleted on Apr 15, 2012 21:20:28 GMT
The lamp iron is brought down as they were when the electric wires went up. Interesting to see that you're depicting the engine as it was in its final days. Does that mean you're going the whole hog and fitting dummy AWS? |
|
|
|
Post by Geoff (Carlisle) on Apr 16, 2012 17:43:48 GMT
Hi Supersevern,yes the battery box will go on the running board.
But HELP! The size of the regulator cover on the smokebox may not be the same size on the Clan as is on the Britannia. Somebody out there is just itching to tell me and i would be very obliged if you could help me.
Geoff (Carlisle).
|
|
|
|
Post by Jim on Apr 16, 2012 21:37:13 GMT
Geoff, Your smoke box assembly looks magnificent and the smoke door hinges have turned out perfectly, even to the nice beveled edges.
You must be well pleased. I certainly would be.
Jim.
late edit:
Geoff,
I've just had a look through my stuff and found a very nice plan view of a Clan in Locomotives in detail 5 by D Clarke. Riddles Class 6/7 Standard Pacifics.
The text suggests the cover would be the same, the visible difference being that on the Clan it is equidistant across the centre line rather than offset slightly to the driver's side as on the Britannia.
If it would be of help I could try and scan an image for you and PM it to you.
Jim.
|
|
|
|
Post by Geoff (Carlisle) on Apr 17, 2012 13:46:40 GMT
Hi Jim,thank you for those kind remarks,I also have the book you mention and I had a look at the line drawing and true enough it does show the cover being in the centre but the size still bothers me.The height of the cover going by JP is 1/4" which I think would look a trifle over size on the Clan, I've had a look at a lot of photo's and they appear to be a lot flatter than drawn. Since the photo was taken the number plate has been altered slightly as the 2 and 8 were floated off with a little heat,and the tail of the 2 was reduced, and the 8 was remade with two larger holes. now its time you had a soothing ale! All the best Jim. Geoff (Carlisle).  |
|
Andrew C
Part of the e-furniture
Posts: 447
|
Post by Andrew C on Apr 17, 2012 21:12:10 GMT
Geoff looks good. I like the support bracket opposite side to the hinge that loos spot on  Just a thought had you thought of using Diane Carney plates? She custom etches any plate in any size. I asked her do do a set for my Brit smoke box number and shed plate, name plates, builder plates plus tender number capacity and filter box plate for about £120. You can't fault them they are superb worth every penny. She even worked out the tender number for me. Just a thought Regards Andrew |
|
|
|
Post by Deleted on Apr 17, 2012 22:50:17 GMT
The height of the cover going by JP is 1/4" which I think would look a trifle over size on the Clan, I've had a look at a lot of photo's and they appear to be a lot flatter than drawn. 1/4" x 11.3 = 2.825" in full size, which sounds rather tall; I would have thought the cover was about half that. I've just been looking at some pictures of a 5" Perrier Britannia and the cover does look a bit too pronounced. A crude but effective method would be to make a dummy cover out of laminations of card. You could compare it to photos and vary the thickness until it looks about right. |
|
|
|
Post by Jim on Apr 18, 2012 5:26:13 GMT
Hello Geoff, I'd go with Andrew regarding having Diane Carney do your plates. Her work is superb and would be just right on your Clan. For Boadicea I gave her the name, number and shed number I wanted and she did the complete set including the tender plates plus a plate for the reverser drum. Regarding the smoke box cover for the regulator valve. I can't add much other than to refer to the attached link which gives a good top view of the cover on Oliver Cromwell. www.flickr.com/photos/12a_kingmoor_klickr/6832351015/in/pool-1050461@N23From a purely personal view point I've found Perrier's drawings to be pretty accurate scale wise. Jim |
|
|
|
Post by Geoff (Carlisle) on Apr 18, 2012 17:55:35 GMT
Hi all and Jim, The information I was asking for was hanging up on my notice board. It is a photo that was taken at York Museum of the works drawings. It was then blown up to scale size on paper and therefore makes the line drawing in that book wrong. As it is cocked to one side just like the britannia's only a lot smaller on its length,and measuring it out on the drawing it works out at 1/8" thick above the bolting plate. The photo shows the altered number plate and the door painted with high temp. paint. Geoff (Carlisle). Attachments:
|
|
|
|
Post by Geoff (Carlisle) on Apr 18, 2012 17:59:03 GMT
And here's the painted door. Attachments:
|
|
|
|
Post by Jim on Apr 18, 2012 21:37:08 GMT
Hi Geoff, I'm glad I'm not the only one that finds the much needed info sitting under my nose. Much to my acute embarrassment it's usually the boss who finds it.  The fact, that like the Britannia the cover is offset puts a new dimension on things and just goes to show you can't beat looking at the real thing. The smoke box door looks very nice, a coat of paint just brings everything to life doesn't it? Jim |
|
|
|
Post by Geoff (Carlisle) on Apr 30, 2012 19:50:15 GMT
Hi all especially Jim. This time I'm in my other workshop where the B.R.1 tender is being constructed as there is no machinery in this one. This photo shows the underside of the tender and the WPU which could be made to work fully if we had troughs. A few componants had to be removed to get it to fit but eventually I'll get it. Geoff (Carlisle) Attachments:
|
|
|
|
Post by Geoff (Carlisle) on Apr 30, 2012 19:58:05 GMT
And another shot . Geoff ( Carlisle). Attachments:
|
|


