|
|
Post by delaplume on Aug 18, 2019 20:03:31 GMT
quote}---"I'm guessing that the curved sheet metal item is some sort of heat shield to protect the driver from the heat of the fire"......yes and NO.
It's the air deflector shield that sits in the top half of the firehole......and helps direct secondary air over to top of the firebed.......As you see it in the photo it is standing on its' flanged outer end that eventually engages within the top half of the Firehole and inside of the main doors....I'll see if I can conjour up a photo in a moment or so
Alan
|
|
|
|
Post by Roger on Aug 18, 2019 20:04:11 GMT
This is the rocking grate arrangement on 1501. The idea is to use this as the grate release mechanism.
 20180110_111016 20180110_111016 by Timothy Froud, on Flickr This is the forked part which comes up out of the footplate at an angle.  20190817_204134 20190817_204134 by Timothy Froud, on Flickr I should have machined it all using the tilting rotary table but I didn't think of that at the time. Here I'm resting a small piece of HSS on the face and eyeing it up against some parallels.  20190817_210346 20190817_210346 by Timothy Froud, on Flickr I then realised I could put a bigger one on top of that and get a longer length to view. Clocking it is a challenge because the length is so short that the pressure of the clock moves the HSS  20190817_210531 20190817_210531 by Timothy Froud, on Flickr Getting the distance from the corner is not the easiest of things to use the wobbler on... 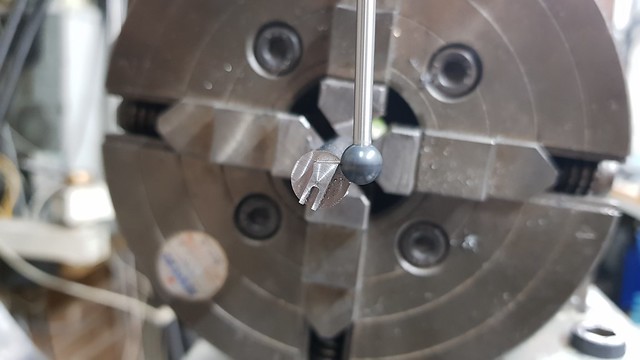 20190817_210828 20190817_210828 by Timothy Froud, on Flickr ... but it's good enough. Here's the M1.6 fixing thread going in.  20190817_212106 20190817_212106 by Timothy Froud, on Flickr Parted off long, and now it needs getting to the right length. Usually I'd file it...  20190817_213033 20190817_213033 by Timothy Froud, on Flickr ... but this time I thought I'd bond it to the end of a piece of Steel with Loctite...  20190817_214203 20190817_214203 by Timothy Froud, on Flickr ... like this...  20190818_085133 20190818_085133 by Timothy Froud, on Flickr ... so I could face it off gingerly in the lathe.  20190818_090424 20190818_090424 by Timothy Froud, on Flickr The end was then dipped in flux and heated until it came off easily with a pair of pliers.  20190818_090745 20190818_090745 by Timothy Froud, on Flickr I made a pair of filing buttons to assist in adding the radii to the end.  20190818_142322 20190818_142322 by Timothy Froud, on Flickr |
|
jma1009
Elder Statesman

Posts: 5,901
|
Post by jma1009 on Aug 18, 2019 20:06:03 GMT
Hi Roger,
I think that plate is just to keep the dust and crap off on the reverser stand.
On the left hand side of the extended quadrant 'bolt' some kind of foot rest seems to be missing in fullsize. I have not seen this on GWR locos with lever reverse, so far as I can recollect, but 'Calbourne' on the IOWSR has this of 1891 vintage, though the fullsize practice was to deftly close the regulator when notching up, then smartly re-open the regulator - but that is with a slide valve loco and Stephensons valve gear.
In theory, the piston valve 15XX ought to have been much easier to 'notch up' with Walshaerts compared to a heavy Stephensons gear loco with slide valves.
Cheers,
Julian
|
|
|
|
Post by delaplume on Aug 18, 2019 20:08:12 GMT
|
|
|
|
Post by Roger on Aug 18, 2019 20:11:09 GMT
|
|
|
|
Post by Roger on Aug 18, 2019 20:13:46 GMT
This is the flip catch that stops the grate actuator from moving accidentally. This time I remembered to do it all on the tilting rotary table... 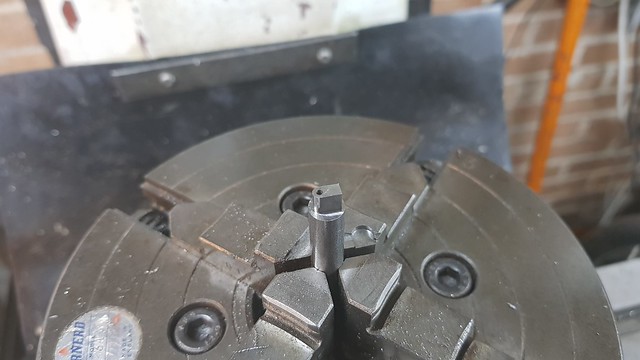 20190818_151256 20190818_151256 by Timothy Froud, on Flickr ... so I could flip it over 90 degrees and do these details.  20190818_163325 20190818_163325 by Timothy Froud, on Flickr  20190818_170900 20190818_170900 by Timothy Froud, on Flickr This is all of it together so far. The Phosphor Bronze block drops down into the cab stretcher so that just the top part is above. There's also a 2mm thick footplate to go on top of that, so in the end it ought to look similar to the way it is on 1501.  20190818_214928 20190818_214928 by Timothy Froud, on Flickr |
|
uuu
Elder Statesman
your message here...
Posts: 2,808
|
Post by uuu on Aug 18, 2019 20:19:27 GMT
Wobblers: have you seen them with a cylinder instead of a ball, so they're easier to use against curved workpieces (or edges, as you are doing above? As here: Ebay item The tip is swappable between the fitted ball one, and the cylinder one below. Wilf |
|
don9f
Statesman
 Les Warnett 9F, Martin Evans “Jinty”, a part built “Austin 7” and now a part built Springbok B1.
Posts: 960 
|
Post by don9f on Aug 18, 2019 20:22:36 GMT
Hi Roger, just out of curiosity, in the first photo a few posts ago, the green painted cast box seen near the reverser pole handle is part of the GWR automatic train control equipment....contains electro magnetic coils etc. and has a bell on top (not in shot). Are you intending replicating it, as it would be a fascinating bit of cnc machining with all the cast lettering / hinges etc?
Regards Don
|
|
|
|
Post by delaplume on Aug 18, 2019 20:25:38 GMT
Pure co-incidence but does anybody recognise the locomotive that the cab end is taken from in that schematic ?? |
|
|
|
Post by delaplume on Aug 18, 2019 20:31:07 GMT
|
|
|
|
Post by Roger on Aug 18, 2019 21:05:14 GMT
Wobblers: have you seen them with a cylinder instead of a ball, so they're easier to use against curved workpieces (or edges, as you are doing above? As here: Ebay item The tip is swappable between the fitted ball one, and the cylinder one below. Wilf Hi Wilf, Yes, we used to have one which had all sorts of attachments. In reality, you can set the height by eye close enough for the error to be so small as to not be a problem so I've never bothered to make any more attachments for my home made one. One problem I've found is that some of these commercial ones can become magnetised and that causes problems. I made mine with a Stainless Steel ball for that reason. |
|
|
|
Post by Roger on Aug 18, 2019 21:07:31 GMT
Hi Roger, just out of curiosity, in the first photo a few posts ago, the green painted cast box seen near the reverser pole handle is part of the GWR automatic train control equipment....contains electro magnetic coils etc. and has a bell on top (not in shot). Are you intending replicating it, as it would be a fascinating bit of cnc machining with all the cast lettering / hinges etc? Regards Don Hi Don, Yes, that's something I do intend to model. I've got some overall dimensions I took myself, but ideally I'd like to get my hands on a Works Drawing of it. I agree that it would make an interesting piece to machine and would look good in the cab. I must make sure I add some fixing holes for it. |
|
|
|
Post by Roger on Aug 18, 2019 21:11:20 GMT
That's an interesting explanation, I see what that's doing now. Please don't ask me to make it functional! |
|
|
|
Post by Roger on Aug 18, 2019 21:20:41 GMT
Hi Roger, I think that plate is just to keep the dust and crap off on the reverser stand. On the left hand side of the extended quadrant 'bolt' some kind of foot rest seems to be missing in fullsize. I have not seen this on GWR locos with lever reverse, so far as I can recollect, but 'Calbourne' on the IOWSR has this of 1891 vintage, though the fullsize practice was to deftly close the regulator when notching up, then smartly re-open the regulator - but that is with a slide valve loco and Stephensons valve gear. In theory, the piston valve 15XX ought to have been much easier to 'notch up' with Walshaerts compared to a heavy Stephensons gear loco with slide valves. Cheers, Julian Hi Julian, It would appear it goes in the firehole, now that's a surprise! It would be interesting to hear from a 1501 driver to see how hard the reverser is to move. I imagine there's still quite a lot of force required to move the piston valves when the ports are uncovered since the pressure on either side is different then. |
|
don9f
Statesman
Les Warnett 9F, Martin Evans “Jinty”, a part built “Austin 7” and now a part built Springbok B1.
Posts: 960
|
Post by don9f on Aug 18, 2019 21:23:48 GMT
Non functional would be correct for the present day anyway wouldn’t it.....wasn’t it mentioned some time ago that the former battery box on 1501 is used to store oil bottles these days?
We had a set of this ATC gear fitted to 92214 during its restoration, including all the vacuum pipework in the cab. To make it non functional, the connection to the vacuum train pipe was blanked off with a £1 coin. I never got this back when the next owner removed it all !
Cheers Don
|
|
|
|
Post by ettingtonliam on Aug 19, 2019 6:10:34 GMT
If it all relied on batteries in that box, how were they recharged, and what happened if the loco went out with flat batteries?
|
|
|
|
Post by Roger on Aug 19, 2019 7:50:30 GMT
If it all relied on batteries in that box, how were they recharged, and what happened if the loco went out with flat batteries? Good question. Presumably the locomotive came to an embarrassing stop since it's fail safe? |
|
timo
E-xcellent poster
 Completing 3 1/2 Rainhill .Building 5" Railmotor and waiting to start 3 1/2" King
Posts: 234
|
Post by timo on Aug 19, 2019 8:21:41 GMT
Roger,
The watch making precision of your work and the attention to detail continues to amaze me. It is so far ahead of anything I could produce. It reminds me of Cherry Hinds work.
Best Regards
Tim
|
|
|
|
Post by Roger on Aug 19, 2019 8:28:02 GMT
Roger, The watch making precision of your work and the attention to detail continues to amaze me. It is so far ahead of anything I could produce. It reminds me of Cherry Hinds work. Best Regards Tim Hi Tim, That's kind of you, but you have to remember that with the sort of equipment I have, it's really not that difficult. |
|
|
|
Post by silverfox on Aug 19, 2019 8:47:11 GMT
Roger, i could have your equipment and more , but i would still turn out a cows arse!
Some people have it, others eventually get it, more try hard, other try and fail.
you have it in spades
I can't make a spade
i blame the workman (me) , not the tools.
Ron
|
|


