|
|
Post by bambuko on Jan 15, 2023 15:09:51 GMT
Thank you!
Mystery solved...
|
|
|
|
Post by bambuko on Jan 15, 2023 12:09:39 GMT
|
|
|
|
Post by bambuko on Feb 19, 2021 16:28:09 GMT
Forward one (i.e. the one the screwdriver is pointing to) - looks like it is for cylinder drain system shaft.
The other one - looks like it is for valve gear suspension lever bearing.
|
|
|
|
Post by bambuko on Jan 16, 2021 13:50:49 GMT
|
|
|
|
Post by bambuko on Apr 15, 2019 13:25:30 GMT
If you needed quick pencil sketch to do the job, would you use CAD instead?
No - of course not :-)
Don't let Roger convince you that you need something you don't ...
and don't underestimate the difficulty of learning what's totally new to you.
I use pencil and paper, 2D Cad, 3D CAD as appropriate and expedient for the job at hand.
Each has it's advantages and it's drawbacks/limitations.
Only you, can decide what's best for you!
Of course, everybody is entitled to their own opinion and I am happy for others to totally disagree with me.
|
|
|
|
Post by bambuko on Apr 14, 2019 15:27:02 GMT
...Best dig out that copy of TurboCad... Eric You might be better off downloading: nanocad.com/products/nanoCAD/It's free, and so far seems to be capable of everything that DraftSight offers. |
|
|
|
Post by bambuko on Jun 10, 2018 14:21:44 GMT
Just logged in to Flickr.
Everything works fine (including your videos).
No, Flickr is not part of Yahoo anymore (acquired by SmugMug), but this didn't change either your Flickr logon or password.
|
|
|
|
Post by bambuko on Dec 31, 2017 19:20:54 GMT
Thank you joanlluch! It is always very interesting to see how others have solved the problem. Your approach seems similar. The main difference is that both you and Roger (and everybody else it seems) prefer Wallace simulator. I find Dockstader easier, perhaps because I am familiar with it more than with others. I have revised my design in the light of the discussion on this thread and now it looks as follows: 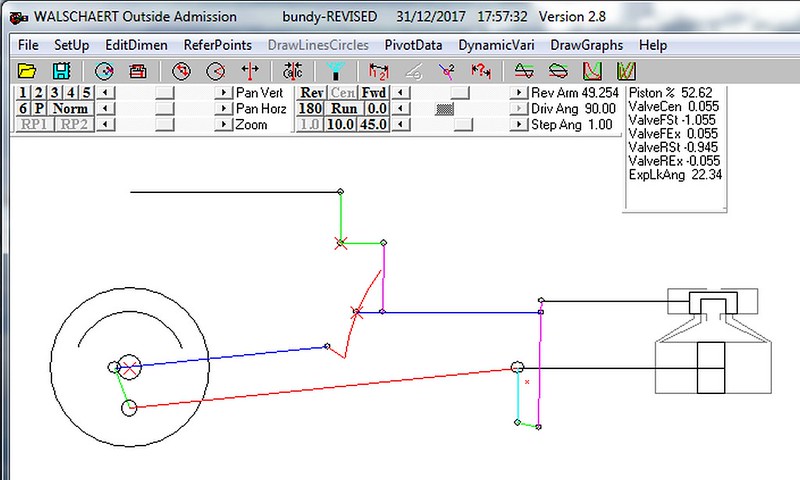 Cylinder dimensions: 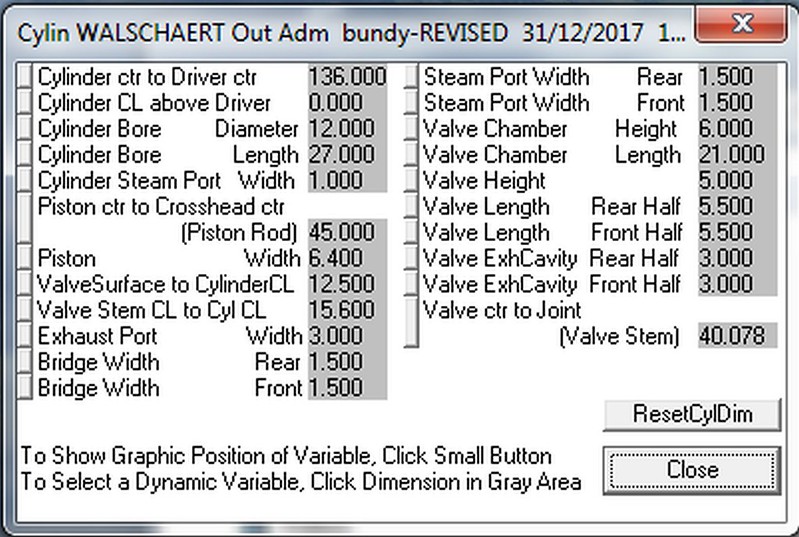 Frame dimensions: 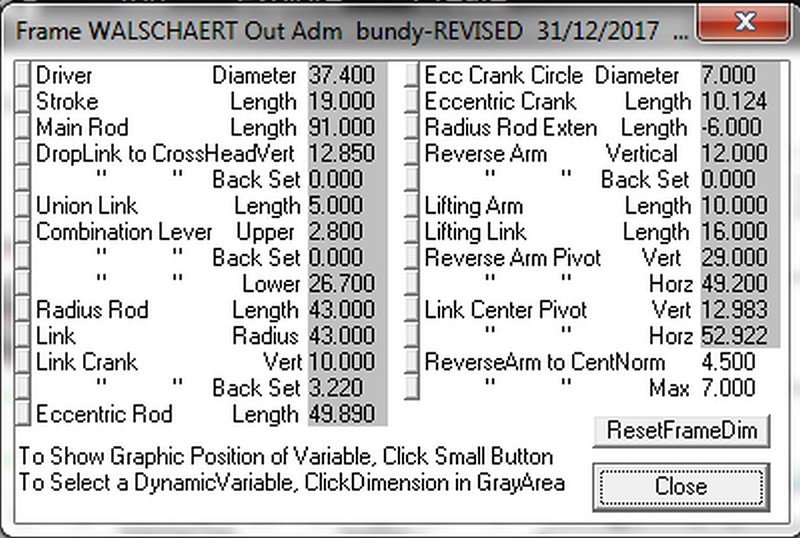 The results are as follows: 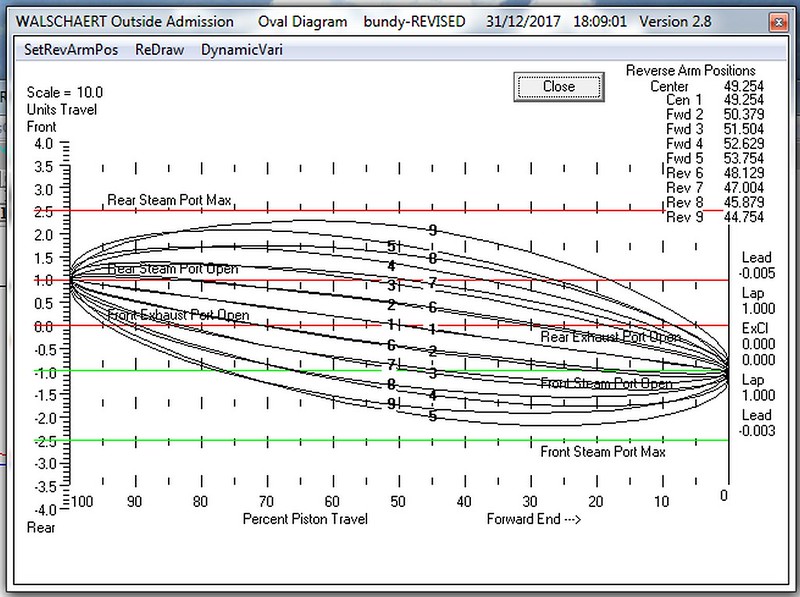 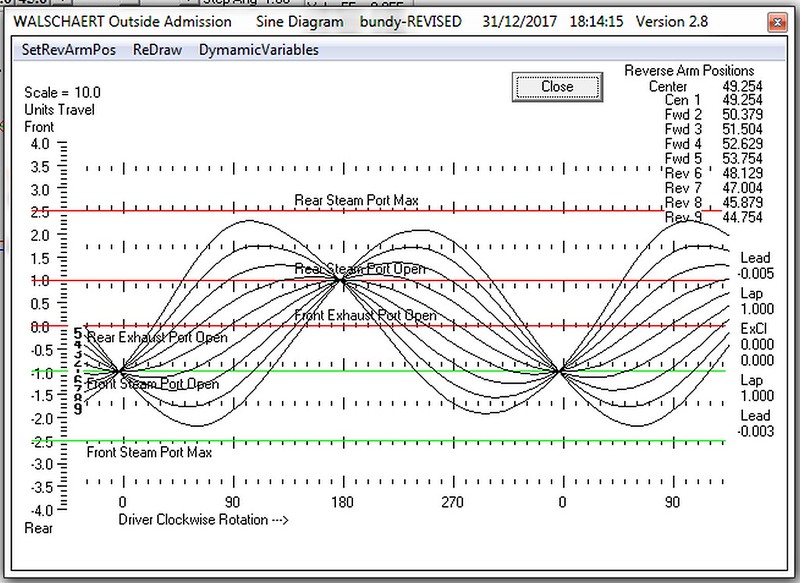 Forward port opening: 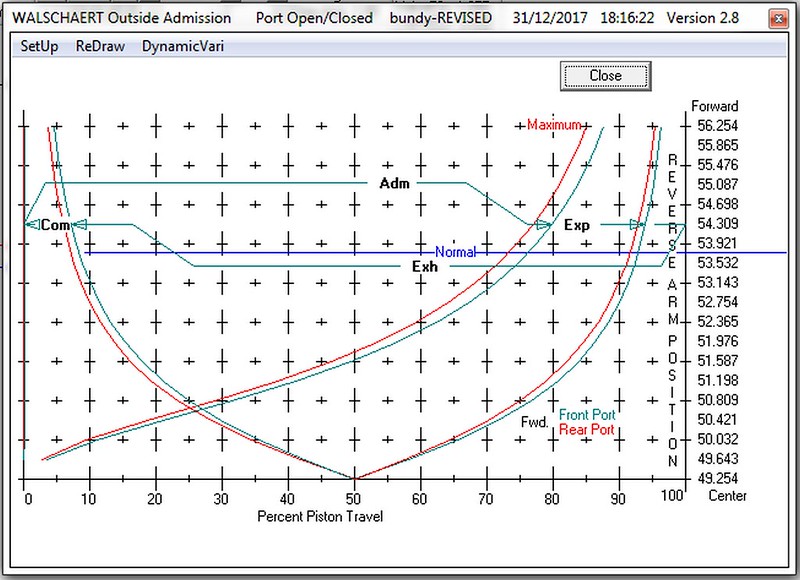 Reverse port opening: 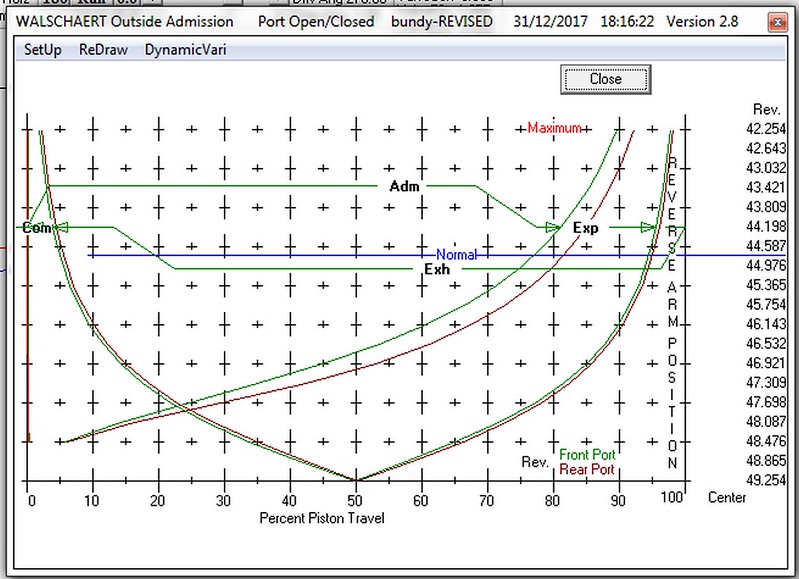 and finally steam diagram: 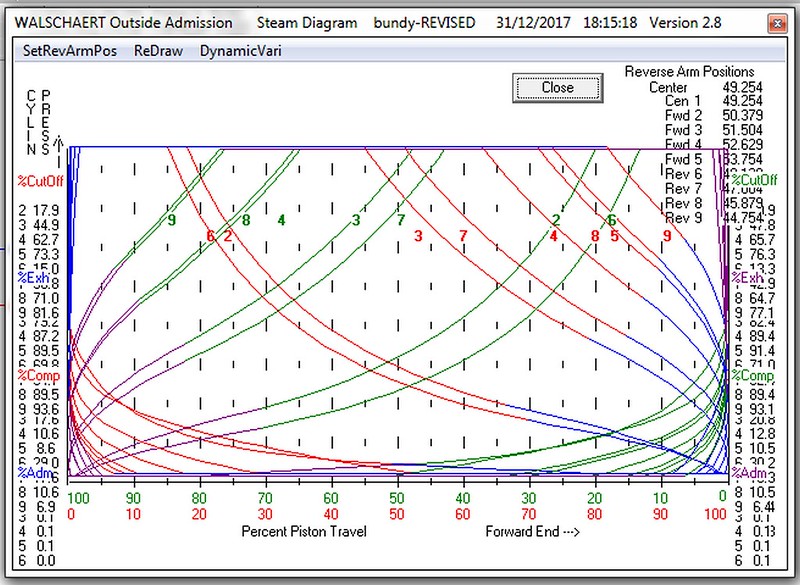 It seems (to me at least) reasonably satisfactory? and a lot better than my first posting in this thread? Happy New Year to you all! |
|
|
|
Post by bambuko on Dec 31, 2017 13:27:53 GMT
... could you post pictures of the valve gear mid travel and front dead centre? ... 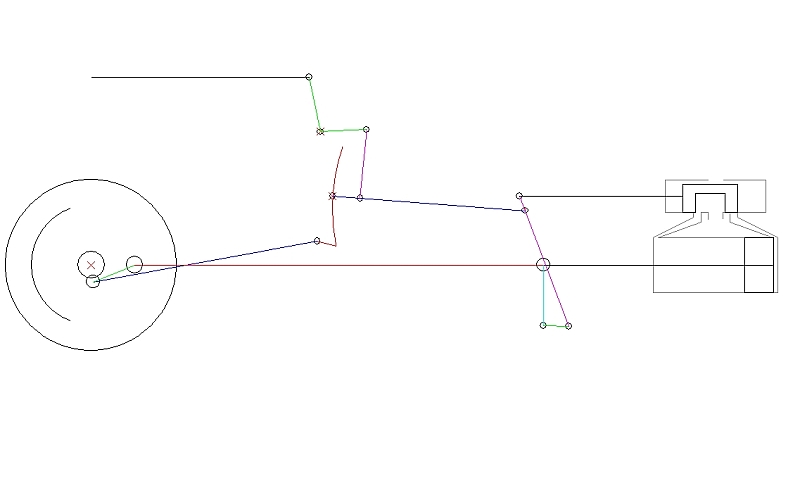 got rather hung up trying to get the diagrams perfect... Hence me bouncing it off you guys, so that I don't end up chasing my tail :-) ...How did you arrive at the back set and eccentric rod lengths? Followed Don's advice (page 6 and 7) using CAD. I think (as per p.s. in my last message) I got things wrong with placing of the expansion link pivot) - I am redrawing things as we speak to put it into simulator, be back soon... |
|
|
|
Post by bambuko on Dec 31, 2017 10:41:10 GMT
Hi Andy,
Actually the reason I am fussing about it, is exactly because I expect similar time in forward and reverse.
It's not for running in circles but for shunting :-)
See an example (not mine) here:
Yes, it is RC steam.
As Julian says, notching up is not that important, pressure is lower and the steam is wetter (although dryed), nevertheless valve events should be correct (or at least as good as can be) in both directions. If it was only for forward running at express speeds, the design would be much simpler indeed.
ps I think I have found one of my mistakes - and it is the position of expansion link pivot point (more to follow)
|
|
|
|
Post by bambuko on Dec 30, 2017 21:52:18 GMT
As I go towards mid-gear things look better (at least to my un-trained eye): 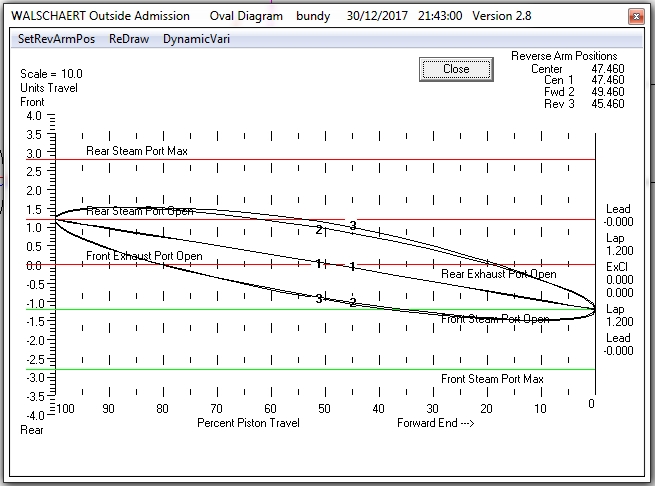 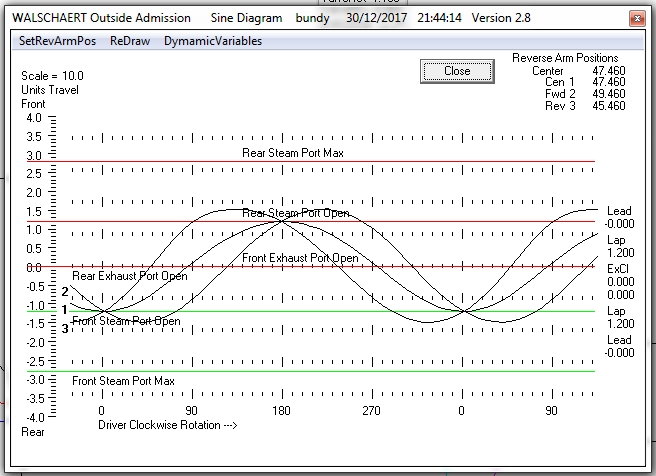 so it seems that something I have introduced into the geometry distorts the events at extremes (i.e. FG) I am trying few things at the moment... |
|
|
|
Post by bambuko on Dec 30, 2017 20:43:20 GMT
Yes, forward looks OK (at least to me...).
It's the reverse that's a bit wonky :-)
|
|
|
|
Post by bambuko on Dec 30, 2017 18:00:10 GMT
You helped anyway :-)
I am not having a good day with inserting of photos...
As Julian has said - the results are NBG (or "bizarre" :-) , even if a lot better than what I have started with...)
I've got few ideas I am playing with at the moment - good fun.
|
|
|
|
Post by bambuko on Dec 30, 2017 17:21:48 GMT
Thank you Roger and sorry for all this nonsense. Let's have another go: Using W. B. Hall's "An approximate, but logical, method of designing valve gear", followed by D. L. Ashton's "Design Procedures for Valve Gear" I have come up with a design for Walschaerts gear. Seems OK to me , but... not perfect. Tried tweaking various parameters to see if I could get it better, but all I have tried seemed to make things worse, hence my question here. Do the graphs below look reasonable to you guys? 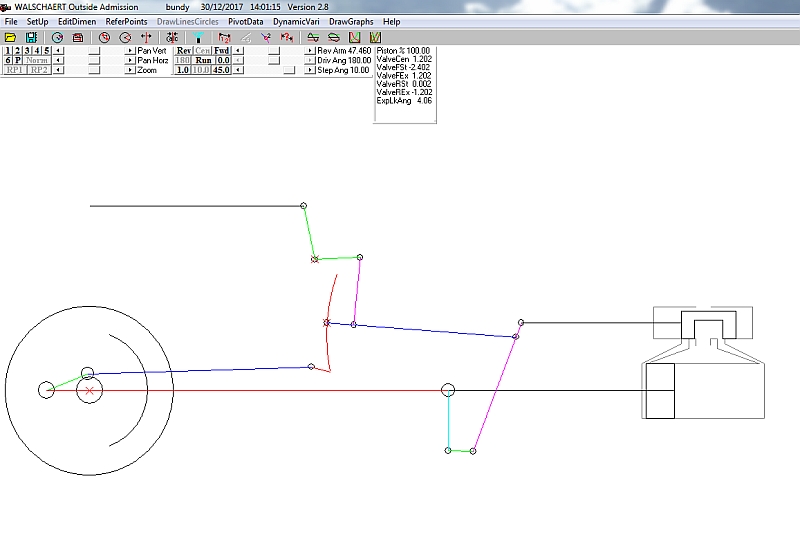 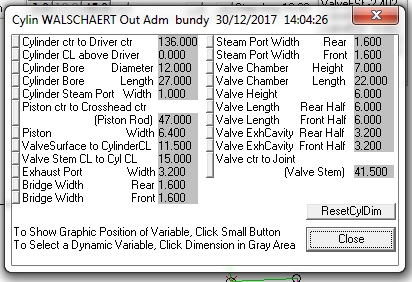 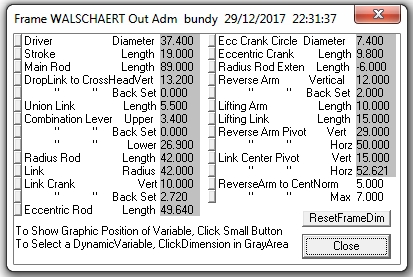 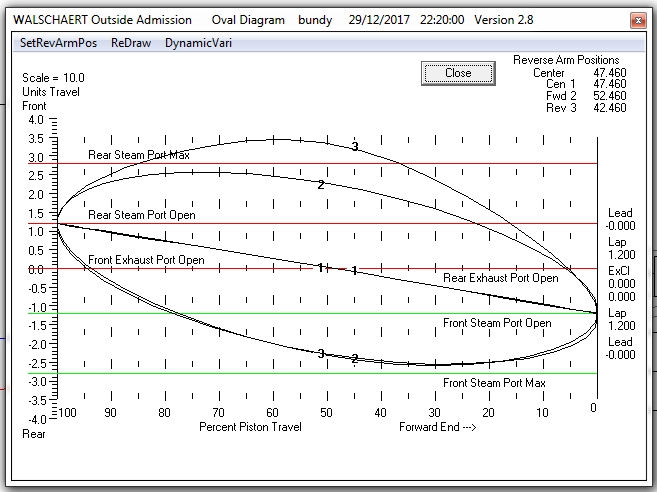 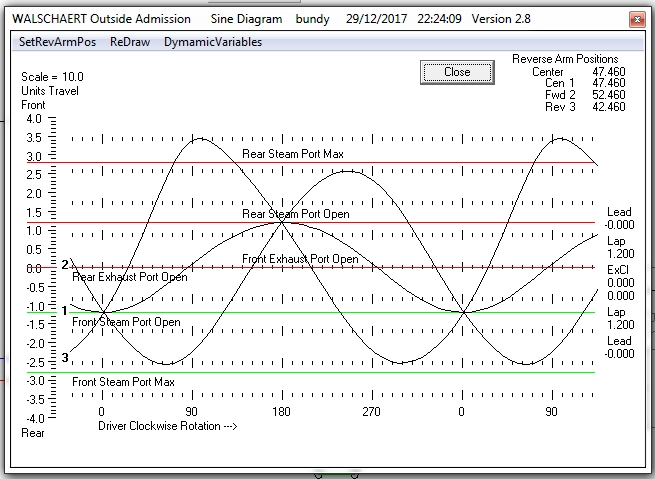 |
|
|
|
Post by bambuko on Nov 15, 2017 23:30:17 GMT
I should have asked for silver soldering should I wear welding goggles or just safety glasses? Regular welding goggles will far too dark. You will want some darkened safety glasses - some people swear by didymium safety glasses, but I am happy with just dark glasses 😂 |
|
|
|
Post by bambuko on Nov 13, 2017 21:09:58 GMT
Start with conventional nozzles. They are cheap as chips and readily available (and perfectly usable).
You can always add others later...
|
|
|
|
Post by bambuko on Nov 13, 2017 19:46:20 GMT
Hi Ed, There are few potential issues with this kit. - The thread on the torch handle (I believe) is not the same as on all the usual UK lightweight blowpipes(torches) so you will be stuck with this brand only... You will not be able to use standard mixers and nozzles with this torch afaik - Other issue is the regulators - they appear to be Welder Warehouse branded (i.e. made in PRC with just the label stuck on them) - don't know how good they are. - As mentioned previously - they are supplying standard 6mm hoses, which are no problem if you are fit and very experienced, but I know that when I started these bloody things were pain (hence my recommendation to use ligthweight ones). Once you become proficient it will not matter so much. I am using Welders Warehouse multi-jet nozzles and I am very happy with them - tested and approved. I know what I'd do but as they say YMMV  |
|
|
|
Post by bambuko on Nov 13, 2017 17:56:41 GMT
My name is Chris (usually know as bambuko) You will not get the micro hoses from "...local Hobbyweld stockist..." Until very recently you could only get them from US. The only supplier (as linked in my post) in UK afaik, is Welding Direct, link below: www.weldingdirect.co.uk/hoses-562-c.aspYes, I have been using standard nozzles as well and in the absence of anything better, would have carried on quite happily, but having tried the new nozzles I am converted. "Normal" nozzles can be temperamental in use with propane. New ones are much more easy and reliable in use. Originally developed for jewellery trade. They are available from US, link below: www.paigetools.com/Also available (cheaper for once) in UK from Welders Warehouse (as linked in my post), link again below: www.thewelderswarehouse.com/Welding-Supplies/Multi-Jet-Nozzles.htmlUnfortunately they only fit proprietory brazing torches available from Welders Warehouse (hence my bodge/mod) What I'd also recommend is quick coupling in hose lines to allow quick connect of various torches. Here is my implementation: 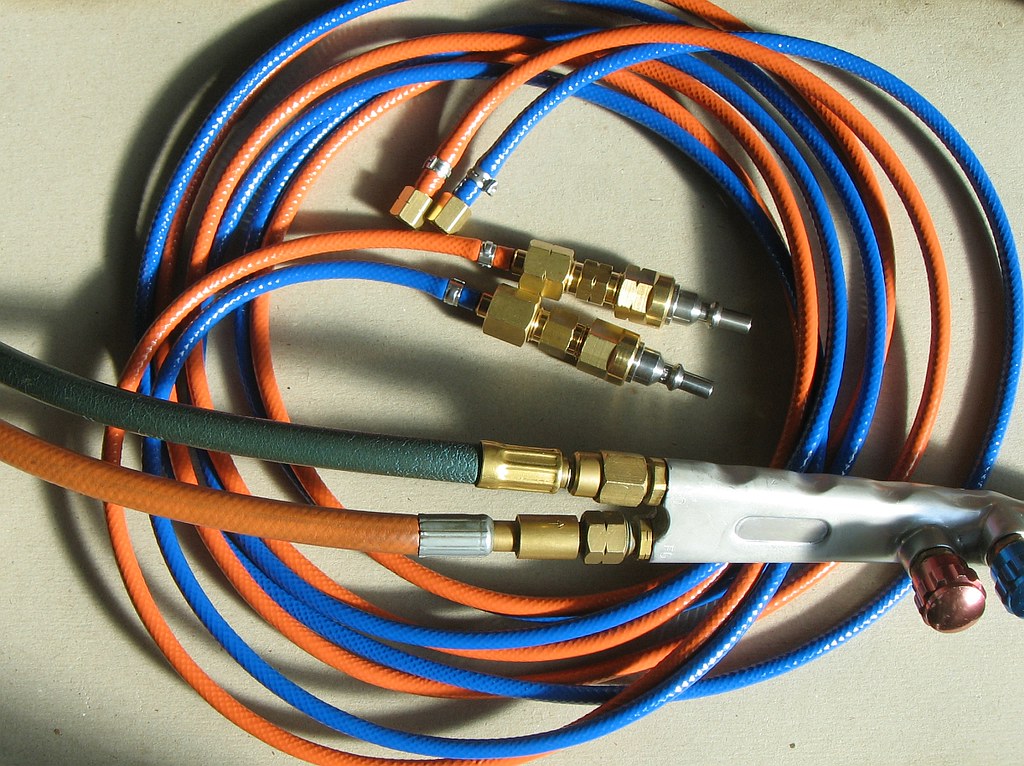 also you can see direct comparison of 6mm hoses next to 3mm hoses. |
|
|
|
Post by bambuko on Nov 13, 2017 16:50:11 GMT
Would you object to giving me the make and model of your other equipment i.e. spark arresters, regulators, and a suitable torch and nozzle set for fairly fine silver soldering... Ed no problem at all, oxygen:  I run oxygen at around 10 to 12 psi and any regulator should take care of it (Wescol is doing fine here). It's the propane (which I run at around 4 psi) that requires better quality regulator. What seem to happen is that as you start using the torch, cooling propane slows the rate of flow and your "average" regulator don't seem to cope. It's fine once you get going, but I found the faffing at beginning annoying, hence my use of (much more expensive Old "pros" just crank up the pressure at the bottle and control everything at the torch end... I wanted something better, so I bought Harris 801-4P (btw - you don't need two gauge version, since propane remains liquid in the bottle). As far as the torch is concerned, I have started with bog standard lightweight welding torch:  but they tend to be a bit temperamental as far as the lighting up goes. Since, I have discovered these beauties: www.thewelderswarehouse.com/Welding-Supplies/Multi-Jet-Nozzles.htmlYou will have to make your own tips if you want to use them with your lightweight torch, like so:  but they are a lot easier with propane than the usual welding tips. Showing before and after the mod:  If money is no object, I love these little US torches: 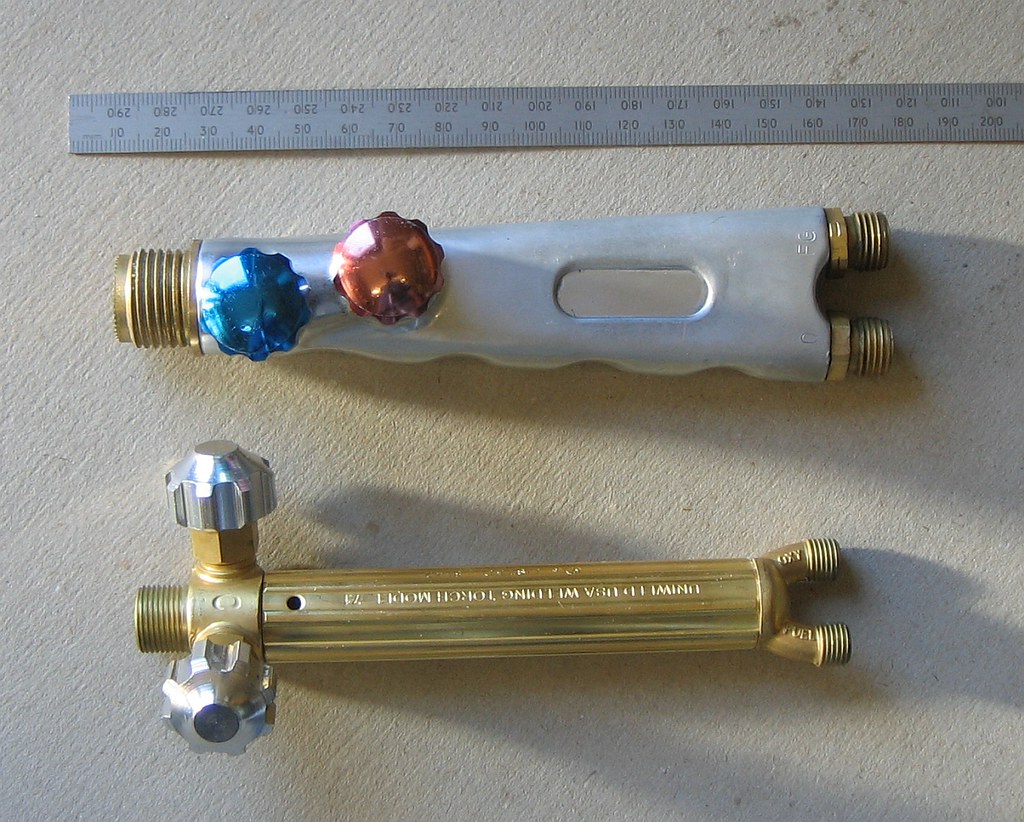 top - typical lightweight torch (UK English - blowpipe, torch is an Amercanism btw) bottom Uniweld A-71 but then you into a whole lot of sourcing problems with US threads... My personal hobby horse is the weight of the hoses. Standard UK 6mm ones are suprisingly heavy if you want to do something intricate and you are not built like a scrapyard merchant gorilla. These are great: www.weldingdirect.co.uk/micro-bore-hose-set-with-g38-fittings--open-ends-11325-p.aspWelding Direct will fit them for you with any endings you might desire. Any more questions - just ask |
|
|
|
Post by bambuko on Nov 13, 2017 11:13:45 GMT
I have both Sievert for silver soldering and oxy-propane for brazing. Given a choice, I would also use oxy-propane brazing for this job. This is my setup: 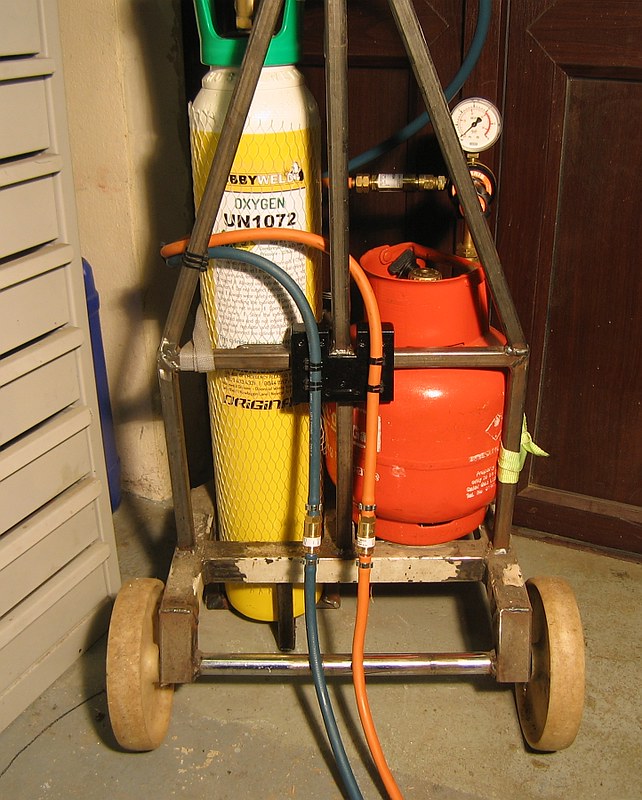 You will notice the same bottle as in your post. |
|


