|
|
Post by Cro on Jul 13, 2020 10:00:31 GMT
Tony,
That's interesting, I know a few of the guys involved with the Duke so I will see what they have, thanks!
Adam
|
|
|
|
Post by 92220 on Jul 14, 2020 7:15:05 GMT
Hi Adam.
The Duke guys have a full set of drawings for the K. The originals were not actually complete because I understand there was a fire at the Davies & Metcalfe factory and they lost some of the drawings. The casting drawing, I understand, was one of the damaged drawings and the Duke people payed for the drawings to be redrawn. That is what I have heard, rightly or wrongly. I have tried to contact them to ask if I can buy a copy of the casting drawing, but they seem to ignore my emails as I have had no answers to at least 3. Maybe, if you know the guys there, you can have better luck.
Bob.
|
|
|
|
Post by Cro on Jul 14, 2020 8:17:42 GMT
Bob,
Will see what I can do, I only have a few GA drawings which I think I showed you before which lack detail. Even with drawings it will be a sod to model but I like a challenge, the current one is the Stanier style manifold for the likes of Duchess/Black 5/8f and the like after finally (after 5 years of searching) found some drawings.
Adam
|
|
|
|
Post by Cro on Jul 30, 2020 23:13:44 GMT
Just made it out of the workshop after the final testing of the 5" Gresham & Craven Mk6 Brake Valve. Although Saturdays efforts proved successful I felt there was one last improvement to be made to the spindle that lifts the ball off a seat to open the valve (apply the brakes). This was to get a better seal to the release and down the spindle by essentially sleeving the pin with a PTFE sleeve. This worked perfectly but caused issues at lower pressure as the expansion of the PTFE meant the friction was too great for the pressure to overcome and push the pin down. In the end a little polish of the PTFE to allow a looser fit meant it seals and moves freely from 10PSI up to 110PSI. I'll get a video up tomorrow but for now I'll leave you with this. 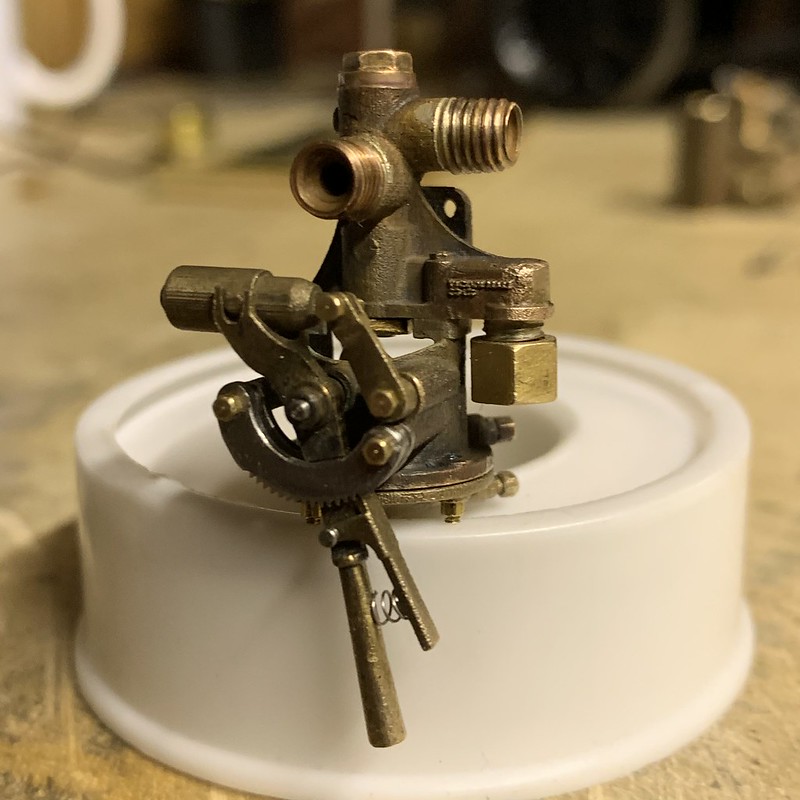 Untitled Untitled by Adam Cro, on Flickr Now where is my bed? Adam |
|
|
|
Post by Deleted on Jul 31, 2020 5:30:28 GMT
Great work Adam....regarding the PTFE issue...had you thought about using fluorosint?... I think that would do the job well and last a very long time.
Pete
|
|
|
|
Post by Cro on Jul 31, 2020 5:47:29 GMT
Pete,
No I hadn’t but this is working fine now, it was a case of working out the correct fit needed to do the job.
Adam
|
|
|
|
Post by Cro on Sept 20, 2020 20:48:39 GMT
The last few weeks have seen moderate workshop time but on something that seems to make time disappear! Firstly a little move around with a ne bench made by a friend so I could finally get the BCA in the workshop and also get the 9f out into the middle of the workshop to allow me to work on it from all sides.  Untitled Untitled by Adam Cro, on Flickr  Untitled Untitled by Adam Cro, on Flickr  Untitled Untitled by Adam Cro, on Flickr  Untitled Untitled by Adam Cro, on Flickr  Untitled Untitled by Adam Cro, on Flickr The offending item sucking up my time is a silly injecotr! A dead scale 10x to be specific. Earlier in the year I spent some time on the new design with mixed success so now it was time to revisit these and finish the job off. So far mixed results which I think is mainly me getting the hang of how to make them correctly with an error being pointed out to me a few days ago which has no improved things but still not perfection. Here we have the steam cone and tapered D bit reamer.  Untitled Untitled by Adam Cro, on Flickr And this is a video of last weeks trial. This week has seen new cones with the improved way of reaming the holes which has seen some progress but not perfectly clean when delivering against pressure.  Untitled Untitled by Adam Cro, on Flickr More progress on these as I want to crack them before I move on! Adam |
|
don9f
Statesman
 Les Warnett 9F, Martin Evans “Jinty”, a part built “Austin 7” and now a part built Springbok B1.
Posts: 960 
|
Post by don9f on Sept 20, 2020 21:25:00 GMT
Hi Adam, good to see your progress and looking to the future, do you intend to produce the Class K exhaust steam injector as well....maybe incorporating the same “innards” as your 10X ?
The semi-scale Gordon Chiverton exhaust injector on my 9F, although working, has always wasted a bit of water at the overflow, ever since new. I’ve never had it apart so don’t know what its like inside. The two injectors date from the late 1980’s.
Cheers Don
|
|
|
|
Post by Cro on Sept 20, 2020 21:40:37 GMT
Hi Don,
I do plan to make the exhaust at some stage once this one is cracked. I think it’s close it’s just down to my machining oops/tolerances.
Adam
|
|
timb
Statesman
Posts: 512
|
Post by timb on Sept 21, 2020 8:35:43 GMT
Hi Adam, can I ask what changes you have made to the reaming process - I understand if you would rather not say, competition etc.
Tim
|
|
|
|
Post by Cro on Sept 21, 2020 8:44:14 GMT
Hi Tim,
Not a problem at all, It’s more about getting the annulus dia. correct. Originally I was shown to cut the taper by measuring the depth with a blank 1 no. Drill size up from that of the throat a few thought short of the depth but now I am setting a collar on the reamer for the correct annulus Dia by setting the vernier at the given dimension and placing the collar at that point on the taper meaning I ream the hole up to the collar edge. This is how I had planned to set it up when the cones were "ready" but up till now using the other method I had been shown but on inspection done of the tapers were deep enough.
It also makes reaming the holes much much quicker and easier.
Adam
|
|
timb
Statesman
Posts: 512
|
Post by timb on Sept 21, 2020 10:30:48 GMT
Thanks Adam,
I have a couple to make and have read LBSC's discourse on ream then check with drill then ream a bit more. I was looking at making some sort of jig for repeatability and your 'Stop' idea seems a good way of setting things once the various dimensions are finalised.
Tim
|
|
tony9f
Involved Member

Posts: 95
|
Post by tony9f on Sept 21, 2020 11:29:04 GMT
Hi Adam,
I had a similar conundrum making cones for my injectors regarding depthing of the reamer. The main problem is that it is difficult to accurately determine the depth with the tailstock which even using the poking a drill up the hole method is easy to cock up.
I have modified my tailstock to carry a clock gauge to get the exact depth and if you start with an undersize hole by use of trigonometry you can determine how far extra you need to go to get the correct size orifice at the right depth, if that makes sense.
I will PM you some photos of the mod as I can't do them on here but feel free to put them up for others benefit.
Tony
|
|
|
|
Post by Cro on Oct 22, 2020 10:24:11 GMT
A recent order of jigs and patterns arrived so work has started on BR Style Vacuum Brake valves. The jigs are similar to ones I've done before as negatives of the part itself and in some case split to allow the part to be placed in and others as 1 piece to clamp on the normal turning stub/sprue of the casting. Although these parts are simple enough to hold they flex like crazy as they are thin in places and that's not so helpful on a vacuum brake valve face so the main aim is to support the thin walls which has worked well. CAD model of the jig for the valve discs, split at the back so it can be pinched in the 3 jaw chuck.  Untitled Untitled by Adam Cro, on Flickr 3D printed version in a high detail resin, the fit of these is exceptional to the castings. Just shows how accurate the shrinkage rate is and the prints themselves.  Untitled Untitled by Adam Cro, on Flickr  Untitled Untitled by Adam Cro, on Flickr  Untitled Untitled by Adam Cro, on Flickr First one skimmed, will machine to correct thickness, deburr and polish next. 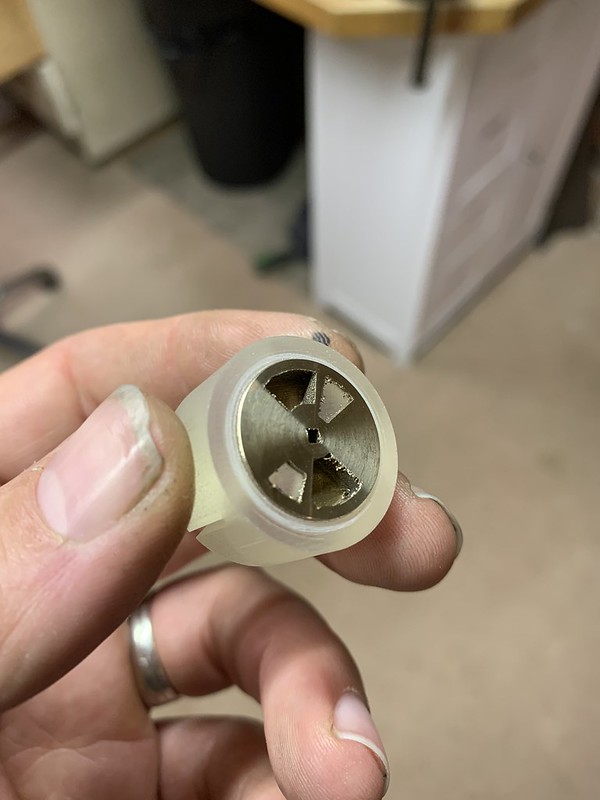 Untitled Untitled by Adam Cro, on Flickr These ones are split for the main bodies.  Untitled Untitled by Adam Cro, on Flickr  Untitled Untitled by Adam Cro, on Flickr  Untitled Untitled by Adam Cro, on Flickr A few of these on the go, machining up most of my stock to keep ahead!  Untitled Untitled by Adam Cro, on Flickr 7 1/4" 10x Injector Master pattern and core pattern ready to go to the foundry.  Untitled Untitled by Adam Cro, on Flickr And Mikes latest offering, bearing caps for eccentric rods.  Untitled Untitled by Adam Cro, on Flickr Lots of machining to do now to get these all together. Waiting to collect a surface plate from a friend to help with the lapping in soon. More development on the LMS manifolds soon so I can prototype them as I'm sure they will be really popular if I can get them right. Adam |
|
|
|
Post by 92220 on Oct 25, 2020 10:14:53 GMT
Hi Adam.
Great idea for holding the brake valves!! Any news yet, of the 5" boiler top-feed clack castings?
Bob.
|
|
oldnorton
Statesman
5" gauge LMS enthusiast
Posts: 692
|
Post by oldnorton on Oct 25, 2020 10:26:18 GMT
Interesting to see those master patterns for the 10X. This might be a dumb question, but how does the foundry use those to make the bronze castings? I am guessing that they make a wax but I cannot work out how they use a solid outer and solid core to create a hollow wax.
Interesting that you are progressing this at the same time that Roger is making one by his processes!
Norm
|
|
|
|
Post by Cro on Oct 25, 2020 11:13:15 GMT
Hi Bob, Still waiting, I will have a catch up it Mike soon when I order some more items so I'll see when he expects them to be finished. Norm, If you go to HERE This shows how the process was done for the 5" version which is identical to these. Certainly interesting seeing Rogers way of doing it and so far its working great! Adam |
|
oldnorton
Statesman
5" gauge LMS enthusiast
Posts: 692
|
Post by oldnorton on Oct 25, 2020 12:11:54 GMT
Ahh, dissolvable cores, clever.
|
|
|
|
Post by silverfox on Oct 25, 2020 12:19:41 GMT
Adam
Are those eccentric caps 5in gauge?
|
|
|
|
Post by Cro on Oct 25, 2020 17:49:47 GMT
Hi Brian,
Yes but can do any size.
Adam
|
|


