|
|
Post by springcrocus on Jul 5, 2017 18:43:59 GMT
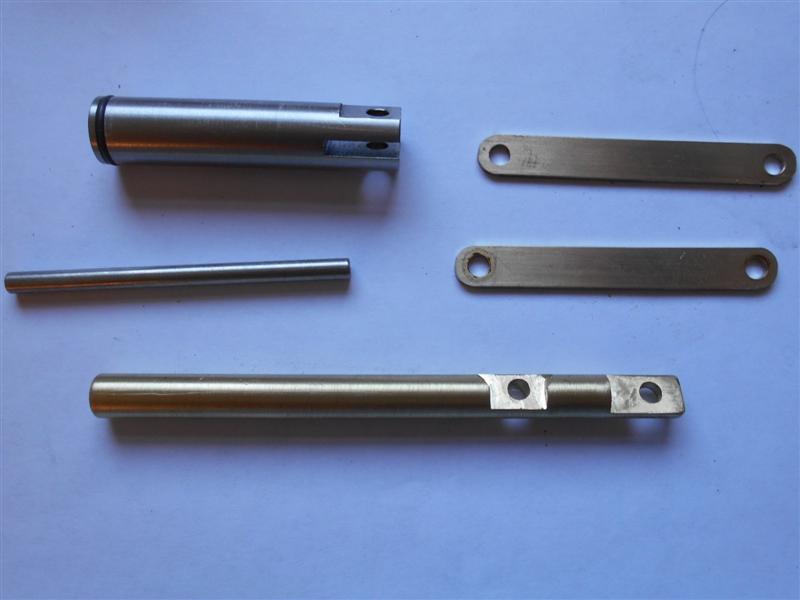
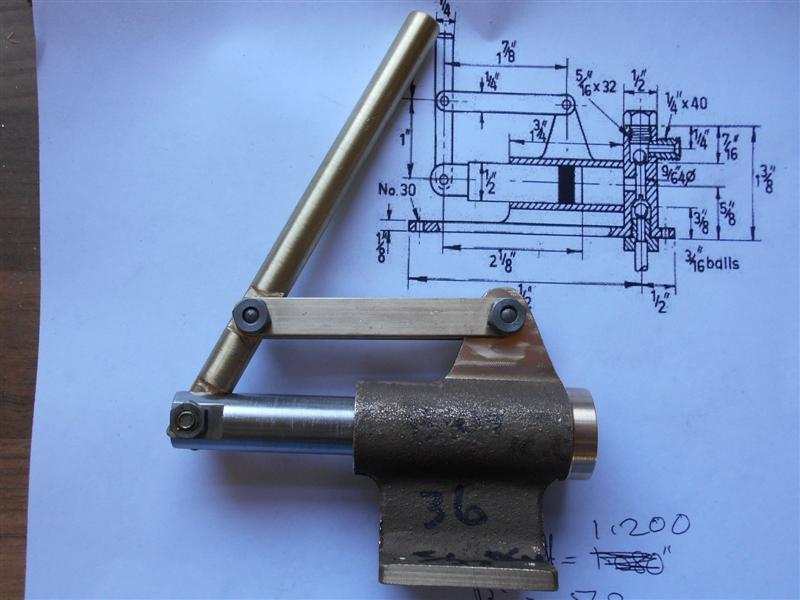
Continuing with the handpump in the tender, the mounting holes were drilled and tapped in the foot, a pitch of 1.1/16" between holes being chosen. The pump body was then rotated round 90 degrees and the fulcrum machined until cleaned up, and a further twenty thou taken off. Then it was turned through 180 degrees and the opposite side machined to the same settings, The pivot hole was also drilled and reamed 3/16" at this time.  Back on the lathe, I made the pump piston from some 5/8" dia stainless steel, turning this down to a bare 9/16" dia. An "O" ring groove was put in and the piston parted off just over 2.1/2" long. This was then taken to the mill and a 1/8" wide slot machined with a slitting saw to take the handle.  Flats were also machined either side and a cross-hole drilled and reamed 3/16" dia. Staying on the mill, the handle was made from 3/8" dia brass with flats and cross-holes machined, as before. The pivot arms were made from offcuts of 16 swg brass, milled to 3/8" wide and holes drilled and reamed at 2.7/16" centres.   For the time being, it is all assembled with 2BA nuts and bolts but the picture also shows a short length of 3/16" dia stainless steel and this will make the pivot pins when the pump is proven to work. It obviously looks nothing like the drawing, but it gave me a starting point regarding comparative dimensions.  I shall mount it in the tender in the manner shown. The handle is currently in the middle, upright position and on the centre-line. The diagonal mounting allows the driver maximum handspace when operating the pump. I may, however, put it the other way to make it easier for right-handed people.  Next, I need to make the valve arrangement for the handpump and Jim has kindly sent me some info to help design this. Thanks for looking in, Steve |
|
|
|
Post by Cro on Jul 5, 2017 19:35:14 GMT
Lovely work Steve,
Just a question on the o-ring, it may just be the photo, but is the groove done to the width of the o-ring or 1.5x? I was always told to make it 1.5 so that it rolls in the groove and reduces the wear where as if the groove is to size then it just rubs and wears out quicker.
Adam
|
|
mbrown
Elder Statesman
  
Posts: 1,793
|
Post by mbrown on Jul 5, 2017 20:27:11 GMT
I always fit a hand pump for peace of mind, so I am right with you there. On my previous locos, I have been plagued with the suction ball in the hand pump seizing up, leading to much cursing and applications of boiling water to free it.
On my current loco, I have positioned the tank drain under the suction valve so that, if it sticks, I can drain the tank and use a bit of wire, cocktail stick, etc. to free the ball. In order to bring the drain valve to a convenient position, the hand pump is mounted sideways.
I know that isn't the reason for your diagonal mounting, but it occurs to me that putting a drain plug under the suction valve would be just as convenient. Not one of these fancy "keep your fingers dry and it doubles as an overflow" drain valves, as discussed elsewhere on the forum, admittedly!
Just a thought.
Malcolm
|
|
|
|
Post by springcrocus on Jul 5, 2017 21:02:16 GMT
Lovely work Steve, Just a question on the o-ring, it may just be the photo, but is the groove done to the width of the o-ring or 1.5x? I was always told to make it 1.5 so that it rolls in the groove and reduces the wear where as if the groove is to size then it just rubs and wears out quicker. Adam Seat of the pants stuff, Adam, sorry.  I had two identical "O" rings but you try measuring them accurately (squashability). The groove is slightly wider than the "O" ring but I don't know by how much, and the ring sits a couple of thou proud of the piston. To cut the width, I just plunged in with a thin parting tool, offered up the ring, and then used the compound to adjust the width until the ring slid in. I then measured very. very gently with a digital vernier the O/D and then dug the first ring out, binned it and then took an extra cut followed by fitted the second ring. I'm a great believer in "make it fit" rather than make it to (drawing, specification, table size, whatever). After all, this is model engineering, not production engineering.  Regards, Steve |
|
|
|
Post by springcrocus on Jul 5, 2017 21:06:18 GMT
Malcolm, thank you for your thoughts on this. Since I have not yet made the valve, I may now try and incorporate some sort of anti-stick mechanism or, at least, some easy means of freeing a stuck ball.
Hmmm...........
Regards, Steve
|
|
|
|
Post by springcrocus on Jul 5, 2017 21:11:36 GMT
One other thought regarding Adam's comment comes to mind. The handpump is there for EMERGENCY purposes and, therefore, only has to work when it's (hopefully) rarely needed, not all the time. Otherwise, I would be smart to bin the whole lot and fit an electric pump!
Since I don't know how to drive a loco, it's pretty academic at this time, anyway.
Regards, Steve
|
|
|
|
Post by Cro on Jul 6, 2017 6:34:57 GMT
Each to their own Steve I was just always taught this for o-rings providing a seal on a piston. Not saying it has to be spot on accurate 1.5x but enough to allow the o-ring to roll rather than rub.
Please don't fit an emergency electric pump though, I think this is criminal other than for filling a loco to start with......
Adam
|
|
|
|
Post by springcrocus on Jul 6, 2017 7:49:14 GMT
Each to their own Steve I was just always taught this for o-rings providing a seal on a piston. Not saying it has to be spot on accurate 1.5x but enough to allow the o-ring to roll rather than rub. Please don't fit an emergency electric pump though, I think this is criminal other than for filling a loco to start with...... Adam A quick look in the Parker O-ring Handbook shows that you are probably correct. Regards, Steve |
|
|
|
Post by Roger on Jul 6, 2017 11:28:45 GMT
As long as you allow enough room for the 'O' ring to spread sideways as it's compressed then that's enough. The 'O' ring is designed to slide, not roll. Rolling is going to happen as it reverses direction to some degree, but out of little consequence. I would have thought that excessive side clearance would be counter productive. Imagine what would happen if the gap was many times the width of the 'O' ring, it wouldn't work very well on a reciprocating pump.
|
|
|
|
Post by springcrocus on Jul 8, 2017 18:34:20 GMT
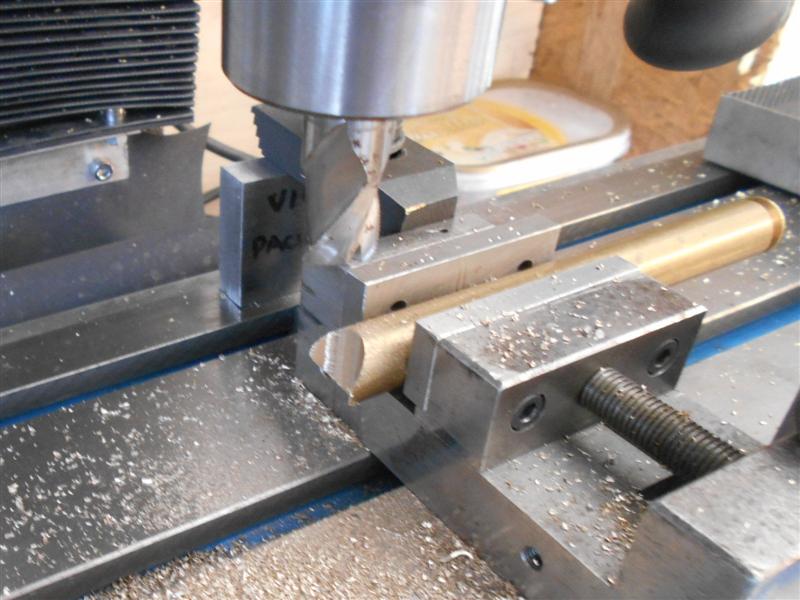
The body of the handpump valve has been made from 5/8" diameter brass and the top and bottom nuts from 1/2" hexagon brass. There is a boss that fits into the end of the pump body and this was the first part to be made. The round bar was held in a milling vice and the end milled with a 5/8" end mill to match the body of the valve.  Then the bar was taken to the lathe, the 1/8" long register was machined and the piece then parted off.  As it happens, my endmill has been reground and the diameter was a little below nominal size. To ensure a good fit, the 5/8" diameter bar was rubbed down until the boss fitted and then the boss was soldered into place.  After this, the valve body was parted off at 2"long and the bottom section machined starting with drilling at 8.5mm dia for 1/2", then 3/16" dia to the centre point and finally tapping 3/8" x 32tpi for 5/16" of thread. The valve body was then reversed in the chuck and the other end machined, almost identical to the lower section but with a flat-bottomed hole for seating the ball. A spare drill was hand-ground for this. The valve body was then taken to the mill and the cross-hole through the boss drilled 3/16" dia to meet the core. Top and bottom fittings were also made at this time and a pair of 1/4" dia balls salvaged from a damaged ballrace.  The body of the valve was then soldered to the pump body, the clamp ensuring that the earlier soldering didn't come apart.  After cleaning everything up, I assembled all the parts and tested the pump in a bowl of water and am pleased to say that the pump worked well, the trick being to use a slow, steady pumping action. I filled a coffee mug in about thirty seconds. Now proven to work, the pivot screws have been replaced with stainless steel pins, and some stainless steel balls are on order to replace the steel ones from the ballrace. After a final clean-up, here is the finished article. And I hope it's never needed, but we say that about car seat belts too.   Thanks for looking in, Steve |
|
|
|
Post by keith1500 on Jul 8, 2017 20:19:29 GMT
I would recommend have at least one pin as a nut and bolt. That way you can easily pop the piston out, service the O ring and libricate with silicon grease.
|
|
|
|
Post by springcrocus on Jul 8, 2017 21:40:22 GMT
I would recommend have at least one pin as a nut and bolt. That way you can easily pop the piston out, service the O ring and libricate with silicon grease. All the pins will press out, having a slightly domed head to one side (the last two pictures show this). The piston pin is tight to the piston, free to the operating lever. The other pins are tight to the straps and free to the lever and fulcrum. I don't intend to lubricate the o-ring as I feel that this could introduce contaminants to the boiler. The bore is highly polished and this should should be sufficient for the o-ring to work dry in a satisfactory manner. Regards, Steve |
|
|
|
Post by andyhigham on Jul 8, 2017 21:54:36 GMT
When the pump is mounted in a non submerged location it's better to have the seal at the outer end of the bore.
The water will provide adequate lubrication between ram and bore and no risk of contaminating the water. With a submerged pump the seal can be mounted an any location
|
|
stevep
Elder Statesman
  
Posts: 1,073
|
Post by stevep on Jul 9, 2017 9:52:38 GMT
Steve,
Make sure you use the pump every time you steam up. Then you can be sure it works. If you don't use it, and you have an emergency, you could find the valves stuck and been in the proverbial.
|
|
|
|
Post by Roger on Jul 9, 2017 13:34:40 GMT
Steve, Make sure you use the pump every time you steam up. Then you can be sure it works. If you don't use it, and you have an emergency, you could find the valves stuck and been in the proverbial. You could add a tiny piece of small section 'O' ring across the inlet to slightly lift the ball off it's seat like I've done on the axle pump. That guarantees it can't get stuck. I doubt if the outlet valve will be a problem. |
|
|
|
Post by andyhigham on Jul 9, 2017 14:28:28 GMT
On Chattox I use the hand pump to fill the boiler, it's a double acting pump and fills the boiler in no time at all
|
|
jma1009
Elder Statesman
  
Posts: 5,922
|
Post by jma1009 on Jul 9, 2017 21:19:32 GMT
Hi Steve,
Did you silver solder the valve box assembly to the pump body? Looks like soft solder, and a big mistake IMHO. Our mutual friend (in my case a very old friend going back over 25 years) John Helps (Johnthepump) never soft soldered the parts together.
I only ever made one hand pump back in 1983 and it never got fitted to my first loco but has been used ever since on my boiler test rig. Hand pumps are required in 2.5"g and small 3.5"g locos. In 5"g they are quite unnecessary and the unedifying sight of grown men wanking on hand pump handles on 5"g locos really ought to be a thing consigned to distant memory!
2 good injectors is all you need.
Cheers,
Julian
|
|
|
|
Post by springcrocus on Jul 9, 2017 21:36:37 GMT
Hi Steve, Did you silver solder the valve box assembly to the pump body? Looks like soft solder, and a big mistake IMHO. Our mutual friend (in my case a very old friend going back over 25 years) John Helps (Johnthepump) never soft soldered the parts together. Cheers, Julian I disagree. The solder I have used is perfectly acceptable in a cold water storage tank. Steve |
|
|
|
Post by Jim on Jul 9, 2017 21:59:28 GMT
Sadly Julian's 'humble opinions' which are nearly always backed by a famous name drop are anything but humble. Personally I just wish he'd keep his comments to his own projects.
Jim.
|
|
jma1009
Elder Statesman
  
Posts: 5,922
|
Post by jma1009 on Jul 9, 2017 22:13:55 GMT
When using a hand pump you are subjecting the parts to considerable pressure.
Soft solder has no inherent strength and certainly no strength under sheer pressure.
To soft solder such parts is fundamentally flawed.
Sorry if I have upset Steve and Jim, but soft soldering a hand pump together is not how I would do such an assembly. You can argue over the pros and cons of same, but I dont think you would disagree (as neither of you have done) as to the merits of silver soldering verses soft soldering the pump body!
Cheers,
Julian
|
|


