uuu
Elder Statesman
 your message here...
Posts: 2,807
|
Post by uuu on Aug 28, 2016 14:43:13 GMT
|
|
uuu
Elder Statesman
your message here...
Posts: 2,807
|
Post by uuu on Aug 28, 2016 14:51:35 GMT
A picture for John - to show what's been happening to his aluminium blocks:  I did hit a snag, when the air blower started spewing water out. The cutting was OK for most of the job - but up against the rebate it was eating it's own chips, so needed some air to clear. I'm not sure if water is an appropriate lubricant for aluminium. Anyway - I had a water trap (to put on John's old compressor), which seemed to fix it. Wilf |
|
|
|
Post by Deleted on Aug 28, 2016 15:08:19 GMT
Hi Wilf Thanks...Yes I've seen this, I have been busy trying to locate more info, joined the Yahoo group for 'metal shapers' too. I found there what looks like a very good article on using a shaper, tools required etc, 26 pages of info but I really do need to find a manual if I can. I have seen manuals for similar machines which show a wealth of important information. regards Pete |
|
johnthepump
Part of the e-furniture
 Building 7 1/4"G Edward Thomas
Posts: 493 
|
Post by johnthepump on Aug 28, 2016 15:15:31 GMT
Hi Wilf,
That a great link to the Adept Shaper, I'm amazed at the interest that this has one keyway has started.
As far as machining Aluminium is concerned paraffin is said to be good, but a friend of mine uses a mist spray of WD40 on his CNC.
John.
Note the misting is done by using an airline lubricator, the kind used for air driven power tools.
|
|
|
|
Post by Roger on Aug 28, 2016 15:21:38 GMT
The water certainly didn't seem to ruin the finish. Ideally you want a freeze drier, but they're expensive. We used to have terrible trouble with customers not having dry air when they were using Air Bearing Spindles. On some of them you could hear blowing bubbles, with water dripping out of the nose! That's goodbye to any warranty!
|
|
uuu
Elder Statesman
your message here...
Posts: 2,807
|
Post by uuu on Aug 28, 2016 15:56:30 GMT
Hi Wilf... As far as machining Aluminium is concerned paraffin is said to be good, but a friend of mine uses a mist spray of WD40 on his CNC. John. Yes, I use parrafin for drilling. But I find milling dry is best. Any lubricant (in the quantities I can apply it) seems to encourage the chips to hang around, rather than fly off. Then the cutter is swimming in a soup of debris. You can hear the crackle-crunch of chips being squashed - and the finish ends up pock-marked. The mist is probably better - if I could arrange it. Wilf |
|
uuu
Elder Statesman
your message here...
Posts: 2,807
|
Post by uuu on Aug 28, 2016 16:05:14 GMT
The water certainly didn't seem to ruin the finish..... John was impressed with this inserted-tip cutter on his cast iron. I found some aluminium-specific tips on ebay, so thought I'd give them a try. They do seem to cut well, and the first set is lasting much longer than a conventional end-mill. There's perhaps a trace of pick-up on the very edge, but nothing like the welded-on blobs I get with HSS. Wilf |
|
|
|
Post by Roger on Aug 28, 2016 16:44:16 GMT
I'd be interested to see a closeup of that cutter, I've not really got on with them to date. Perhaps I should get some different inserts and give mine another try.
|
|
uuu
Elder Statesman
your message here...
Posts: 2,807
|
Post by uuu on Aug 28, 2016 17:40:18 GMT
Here it is:  The red box is the aluminium tips, and the blue box is the general purpose ones. Aluminium tips still on ebay at £25 for 10, post free. Ebay item 221916012331The holder is 16mm with two tips - which is as big as the ER25 I use can go. Wilf |
|
|
|
Post by Roger on Aug 28, 2016 19:14:21 GMT
Thanks Wilf, that's almost a dead ringer for mine which has a 16mm shank and about 16mm cutting size. I think the only thing against them is the fact that they only have two flutes, so they tend to be noisy compared to a 4 flute solid cutter. Still, it's more economical way to replace worn cutting edges, so I'll try it again when I'm next machining something big.
|
|
johnthepump
Part of the e-furniture
Building 7 1/4"G Edward Thomas
Posts: 493
|
Post by johnthepump on Aug 29, 2016 8:21:31 GMT
I managed to get a little time in the Pumphouse yesterday afternoon and drilled to the horns in the other frame, the next job will be to countersink all the holes for the rivets to mount the horns. But like all jobs there is always something else to do, the horns need to have the holes in the bottom of them for the horn keeps. As the time was limited I decided to get on with the horn keeps which are now machined to size and only require the bolt holes drilling, with a bit of luck and no one else's job getting in the way we make get some riveting done on Wednesday evening. John. 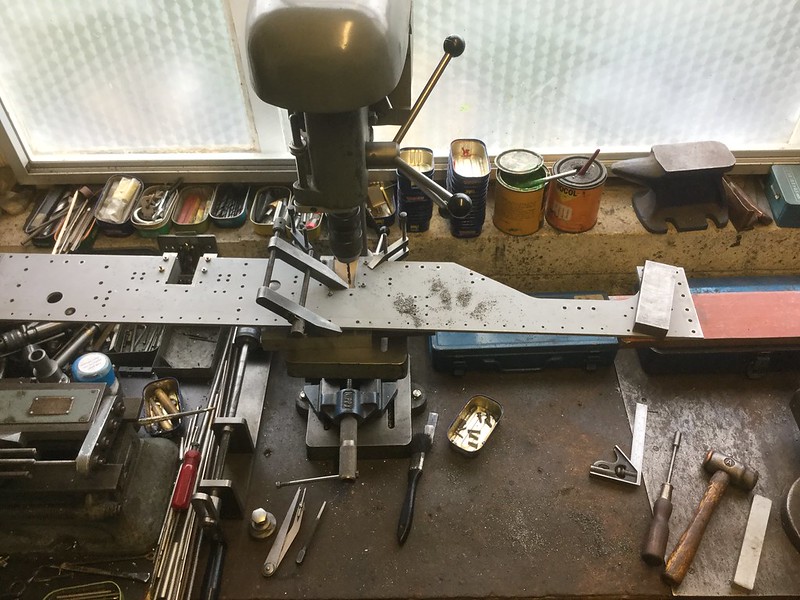 28.08.2016 28.08.2016 by John The Pump, on Flickr |
|
uuu
Elder Statesman
your message here...
Posts: 2,807
|
Post by uuu on Aug 29, 2016 8:42:03 GMT
I look forward to it.
I like the support on the right that you've rigged up (on the first frame it was my job to hold up that end).
Wilf
|
|
johnthepump
Part of the e-furniture
Building 7 1/4"G Edward Thomas
Posts: 493
|
Post by johnthepump on Aug 29, 2016 13:01:42 GMT
Hi Wilf the horn keeps are now finished.
John
|
|
|
|
Post by jordanleeds on Sept 2, 2016 13:04:41 GMT
John I have sent you a message privately regarding your loco and potential bits I have from mine and certain patterns
|
|
johnthepump
Part of the e-furniture
Building 7 1/4"G Edward Thomas
Posts: 493
|
Post by johnthepump on Sept 6, 2016 17:58:58 GMT
Back on the 2nd of March this Year Jem noted that my Myford didn't have swarf guard protecting the motor. Well after Wilf's motor problem last week when a piece of swarf shorted between one phase and the frame. We cleaned out the motor and tested it and ran it for a while with no problem, however the inverter driving the motor was damaged and no longer serviceable. So this morning before my Myford was used again I set to and made A swarf guard for the motor as I do not want the inverter driving it to meet the same fate. 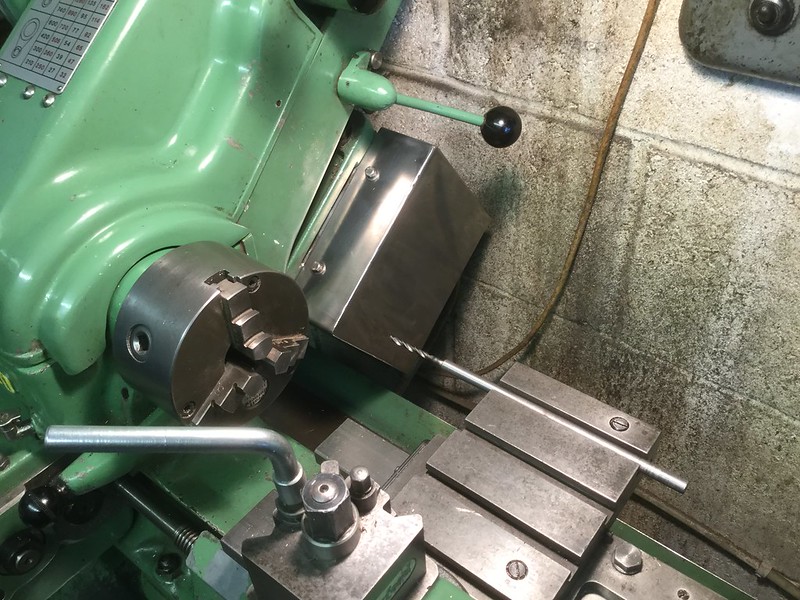 06.09.2016 Motor swarf guard 06.09.2016 Motor swarf guard by John The Pump, on Flickr The drill on the back of the cross slide I had to make longer to drill the tapping holes in the motor carrier without having to dismount the motor. John. |
|
johnthepump
Part of the e-furniture
Building 7 1/4"G Edward Thomas
Posts: 493
|
Post by johnthepump on Sept 9, 2016 20:28:16 GMT
I decided to make a start on riveting. but before riveting the horns into the frames, I have begun with the buffer beams the rear one first. I made a shouldered split bush to hold the rivet while machining it to length and once set up the result was repeatable most of the rivets were 1/8" with one row of six 5/32". On Wednesday evening I showed Wilf the progress I had made and He pointed out that he had read somewhere there was a much better way to trim the rivets to length that didn't require putting them in and out of the chuck. All that was required was piece of steel with a rivet size hole in it mounted in the lathe toolpost and an end mill in the chuck, the rivet is held in place by hand using a block of wood. Well we tried this but soon replaced the wood with a flat brass bar, this showed this method was quicker than the split bush method. As I was going to need a lot of rivets on this loco I decided to improve on the holding method, so I have fitted a lever pivoted in front rivet just clear of the head, the lever has a small recess made with a ball nose endmill. The rivet is placed in the hole then the lever is held forward this holds the rivet against the fixture and also stops it spinning round while trimming it, there is also a small 3mm recess partially under the top of the rivet head so a screwdriver can extract the rivet after milling. I found this fixture works well and a much faster way of trimming rivets, I set the rivets using my fly press, more on that another time. John. 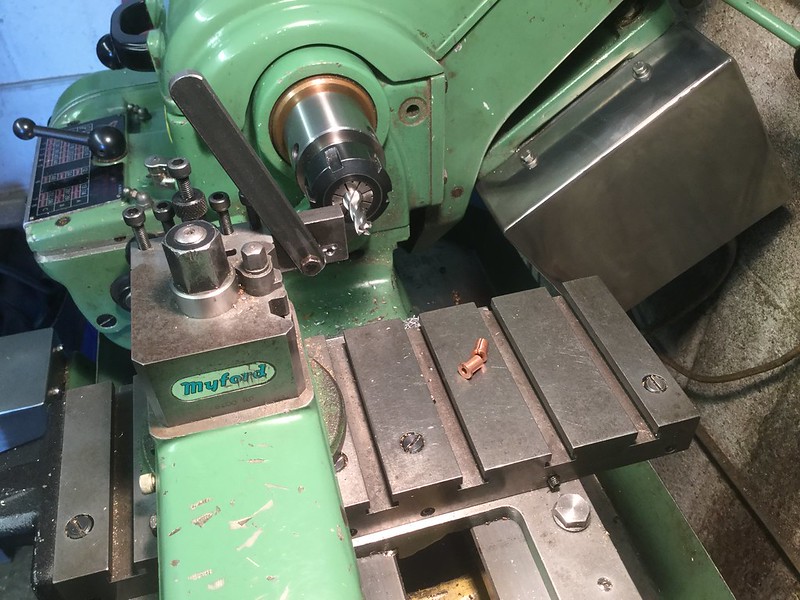 Rivet trimming fixture 09.09.2016 Rivet trimming fixture 09.09.2016 by John The Pump, on Flickr |
|
|
|
Post by springcrocus on Sept 9, 2016 21:55:29 GMT
Clever little fixture, John and Wilf. I shall steal that idea, with a slight modification, for trimming some of the smaller BA bolts to length. Thanks for sharing,  Steve |
|
|
|
Post by andyhigham on Sept 9, 2016 22:03:20 GMT
squeezing rivets is much more civilized than beating the stuff that is good for the roses out of them (and a lot less painful on arm muscles/elbows/eardrums)
|
|
johnthepump
Part of the e-furniture
Building 7 1/4"G Edward Thomas
Posts: 493
|
Post by johnthepump on Sept 10, 2016 8:28:47 GMT
Clever little fixture, John and Wilf. I shall steal that idea, with a slight modification, for trimming some of the smaller BA bolts to length. Thanks for sharing, Steve Hi Steve that's a great idea. Shortening bolts by just a small amount can be a real pain, but using a modified version of this fixture would make the job both easy and quick. John. |
|
|
|
Post by Roger on Sept 10, 2016 8:34:06 GMT
Clever little fixture, John and Wilf. I shall steal that idea, with a slight modification, for trimming some of the smaller BA bolts to length. Thanks for sharing, Steve Hi Steve that's a great idea. Shortening bolts by just a small amount can be a real pain, but using a modified version of this fixture would make the job both easy and quick. John. I agree, and a couple of sizes of a universal design like this with inserts for the size in question would be a really useful addition to the workshop, especially for the smaller sizes. The ones for bolts could be threaded so that the thread is reformed as it's unscrewed. Ok, it would still need a touch with a file. I always screw a nut onto a bolt when I'm sawing it off to achieve the same thing. |
|


