JonL
Elder Statesman
 WWSME (Wiltshire)
Posts: 2,907
|
Post by JonL on Apr 12, 2021 13:41:36 GMT
I have to say looking at Johns ashpan and the others here I just can't imagine not having a fully dropping grate. I think I will be doing something different, I just don't know what quite yet....
|
|
|
|
Post by dhamblin on Apr 12, 2021 18:10:44 GMT
If I was starting from scratch I would go for stainless steel, but it will be a standard steel set of firebars so the materials match.
It's an awkward design in full size, with the need to straddle the trailing frames, let alone in miniature. LBSC's simplified design is clearly designed to bypass that, but still has limitations. Everything has to come out down between the frames, which results in needing to remove the trailing truck to create enough space. Hopefully my planned changes will improve things.
In other news - had a go at shot blasting on Saturday. Whilst it is effective the cabinet leaks like a sieve with positive pressure (workshop now covered in dust...). Dust extractor now on order and a few other small mods planned.
Regards,
Dan
|
|
|
|
Post by tdaharvey on May 26, 2021 16:25:58 GMT
I have been working away on my Brit ash pan for the past few weeks and thought that although not finished you folks might be interested in the progress made. The sections of the ash pan are made of stainless steel which was all hand filed as I don't have a mil so it's taken a while. I have not silver soldered the component sections of the ashpan yet together yet - that will be done last. I am trying to add features beyond Curly's design to make a more realistic model so I have tried to replicate the shape of the ash pan on the big engines. I think it looks better and should be more easily cleared of ash but I admit that the jury is out on that. I have learned a lot from this thread and have incorporated your ideas including the need to remove the fire bars and drop them quickly. I know that some have adopted a slide out grate but I thought that rather complicated. I have assumed the use of three separate fire bar segments to fit the foundation ring adapter plate that I have. Instead (of a slide out grate) I have arranged a centre section in the bottom of the pan that can be removed with one screw when the trailing truck is removed. It should be relatively easy to lift out the grate so to say drop them 'down the hatch' . Again the jury is out on this but I'm hopeful it will work out ok. By the way has anybody worked out a quick release mechanism for the trailing bogie? Each section of the ashpan have drop doors - the one in the middle folds down between the bogie frame. The outer ones fold down sideways over the frame and should hopefully direct the ash away in the right direction. I intend to have simple catches on the outer doors to hold them up. I think the centre one will be controlled from the cab because of the difficult access. The extended hinge rod (see photos) on the centre door has been kept until I decide how I am going to achieve this. I have still to work out the drop mechanism for the fire bars. I am considering a lever type arrangement that can reset the bars but I may just employ a simple pull out rod. The advantage of the lever arrangement is to aid clearing the grate. I have found when driving full size engines that dampers are important for controlling combustion so I want to make functional ones on my Brit and will be working on them next - starting by increasing the size of the apertures. Curly's design of ash pan has a massive open area - I will have less opening for air flow. If I find that there is insufficient draft when running I have some ideas about adding an additional opening to the removable centre section. I guess there is scope to open the central door slightly but that will need a stop for the running state to ensure it doesn't foul the bogie truck - not ideal. I think that's all for now. As every any comments and advice is welcomed. I will provide an update when things are developed further. regards Trevor           |
|
|
|
Post by dhamblin on May 26, 2021 20:10:04 GMT
You've made a very good job of adapting the full size design there Trevor. There are subtle things I like such as the doors being sized such that they cannot get down to track level (derailment risk) and the cut outs to allow the trailing truck springs space as it rotates. You'll need to fair over those cut outs as ash will escape and get into the nearby wheel bearings.
I think you can make the removable grate sections work using the larger centre section as the access. Long nose pliers will help enormously. Keep us updated as you move on to soldering / welding everything up. An R clip and spacer might work as a quick release mechanism for the truck, but it wouldn't look very prototypical.
Work has become hectic lately and my evening workshop time has been severely eroded. Just heading down now to get a burst in taking some paint off the firebox cladding. My compressor still isn't fixed, meaning I can't use the more efficient method of blasting it off and have resorted to wire wheel combined with scraping.
Regards,
Dan
|
|
JonL
Elder Statesman
WWSME (Wiltshire)
Posts: 2,907
|
Post by JonL on May 27, 2021 17:42:27 GMT
Some engineering there!
|
|
|
|
Post by nick952 on May 27, 2021 18:01:52 GMT
Lovely job on that ash pan and the dampers.
Edit: Thought I'd mention that they are available in a range of sizes.
|
|
|
|
Post by terrier060 on May 27, 2021 20:05:10 GMT
Nice work Trevor. Quite a complicated shape to contend with.
Ed
|
|
|
|
Post by tdaharvey on May 27, 2021 20:38:08 GMT
Lovely job on that ash pan and the dampers.
Edit: Thought I'd mention that they are available in a range of sizes.
They look like they are exactly what is needed - thanks for the tip. Trevor |
|
|
|
Post by tdaharvey on May 27, 2021 21:19:52 GMT
You've made a very good job of adapting the full size design there Trevor. There are subtle things I like such as the doors being sized such that they cannot get down to track level (derailment risk) and the cut outs to allow the trailing truck springs space as it rotates. You'll need to fair over those cut outs as ash will escape and get into the nearby wheel bearings. I think you can make the removable grate sections work using the larger centre section as the access. Long nose pliers will help enormously. Keep us updated as you move on to soldering / welding everything up. An R clip and spacer might work as a quick release mechanism for the truck, but it wouldn't look very prototypical. Work has become hectic lately and my evening workshop time has been severely eroded. Just heading down now to get a burst in taking some paint off the firebox cladding. My compressor still isn't fixed, meaning I can't use the more efficient method of blasting it off and have resorted to wire wheel combined with scraping. Regards, Dan Hi Dan thanks for your comments, it's good to get feedback. I'm retired and am enjoying the luxury of having plenty of time to potter. I would not have been able to devote so much time to the Brit when I was working. I hope you get more time to carry on your grandads Brit and look forward to learning that she is back on the rails. I do of course plan to fill in the cut outs when I do the final assembly of the ashpan sections. I tried gas brazing sample stainless steel but was not happy with the risk of distorting the metal so will be silver soldering everything together. I will have to take a brave pill the day I do it as I would hate to have to redo the work if I screw its up. kind regards Trevor |
|
|
|
Post by ejparrott on May 27, 2021 21:44:35 GMT
The worst part of a Brit, Duchess, A1/2/3/4, has to be the ashpan
|
|
JonL
Elder Statesman
WWSME (Wiltshire)
Posts: 2,907
|
Post by JonL on May 27, 2021 21:58:37 GMT
The worst part of a Brit, Duchess, A1/2/3/4, has to be the ashpan I really want to try to simplify it. The standard setup looks like a right nause. |
|
|
|
Post by cplmickey on May 31, 2021 8:07:32 GMT
Lovely job on that ash pan and the dampers. Edit: Thought I'd mention that they are available in a range of sizes.
More basic (and cheaper) but probably easier to use in removing grates are these from Proops I think. The locking forcep takes away the need to squeeze and manoevre at the same time. Also useful for other jobs like getting dropped nuts out from inside the frames etc www.proopsbrothers.com/locking-forceps-3955-p.aspIan |
|
|
|
Post by dhamblin on May 31, 2021 21:14:09 GMT
All the steel boiler cladding is now stripped of paint and majority of the rust. Started on the tender and it's very noticeable how easy paint on the unprimed brass simply flakes off when scraped. Reckon a week for the tender, another week for the loco chassis then take some time off to prime everything. Finish assembling the boiler and x1.5 hydraulic test at the end of June.
Regards,
Dan
|
|
|
|
Post by dhamblin on May 28, 2022 21:41:17 GMT
Nearly a year between updates but a fair bit of progress made.  Everlasting Blowdown Valve Everlasting Blowdown Valve by Daniel Hamblin, on Flickr Blowdown valve refurbished with new custom made bronze bolts, gasket replaced with an O-ring and new stainless steel nut and washer on the spindle to replace what was left of the steel originals. 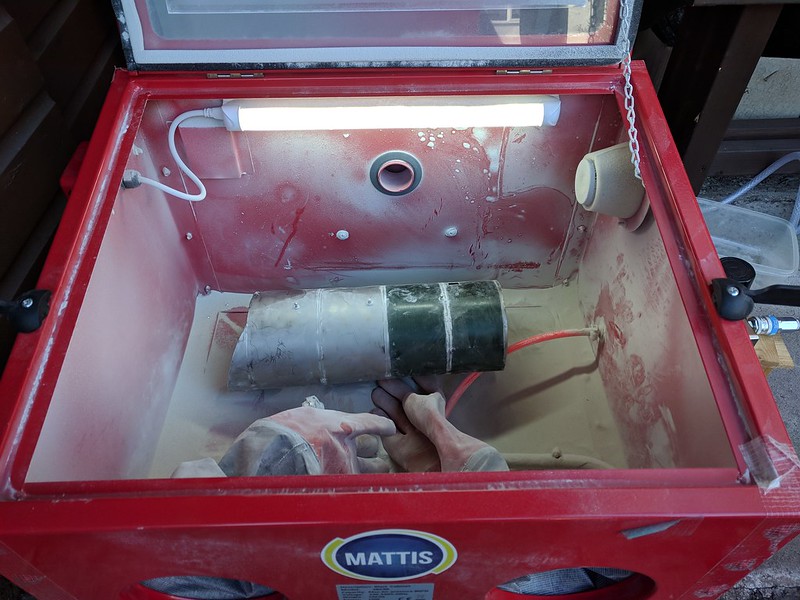 Blasting Cabinet Blasting Cabinet by Daniel Hamblin, on Flickr Saga of the blasting cabinet: added a filter unit to help generate negative pressure inside when the gun was being used, then the new compressor started playing up. After a four month saga with Hyundai technical support I fixed the errant pressure switch myself and the set-up is now giving very good service. Boiler barrel cladding seen here part way through paint stripping.  Tender Stripped Down Tender Stripped Down by Daniel Hamblin, on Flickr Tender chassis shorn of its tank and paint blasted off ready to apply primer.  Boiler Assembled Boiler Assembled by Daniel Hamblin, on Flickr Boiler assembled ready for 1.5x hydraulic test in September 2021. Having not rebuilt an engine before I do make mistakes and with hindsight I think painting the boiler and firebox cladding should have been done before assembly as I'm keen to avoid the need to keep removing the feed clacks with their 10BA tapped holes in the copper barrel. Will rectify that in the next couple of weeks.  Tender Chassis Tender Chassis by Daniel Hamblin, on Flickr Tender chassis fully repainted and awaiting the painted tank before reassembly.  Tender Tank Tender Tank by Daniel Hamblin, on Flickr First coats of BR green on the tender tank, little did I know there were problems around the corner...  Tender Tank Again Tender Tank Again by Daniel Hamblin, on Flickr As I was tacking the dust off ready for the next coat a large section of paint came away completely. After a few tests it was obvious that I I hadn't got the prep and application of the etch primer correct (some of you will have seen the posts in the 'What I've Done Today' thread). Only solution was to strip it all off again.  Leading Bogie Leading Bogie by Daniel Hamblin, on Flickr Leading bogie reassembled on Christmas Eve 2021 after the frames were repainted and wheelsets overhauled with new axles and reprofiled wheels. Just need a fresh coat of black paint on the wheels. 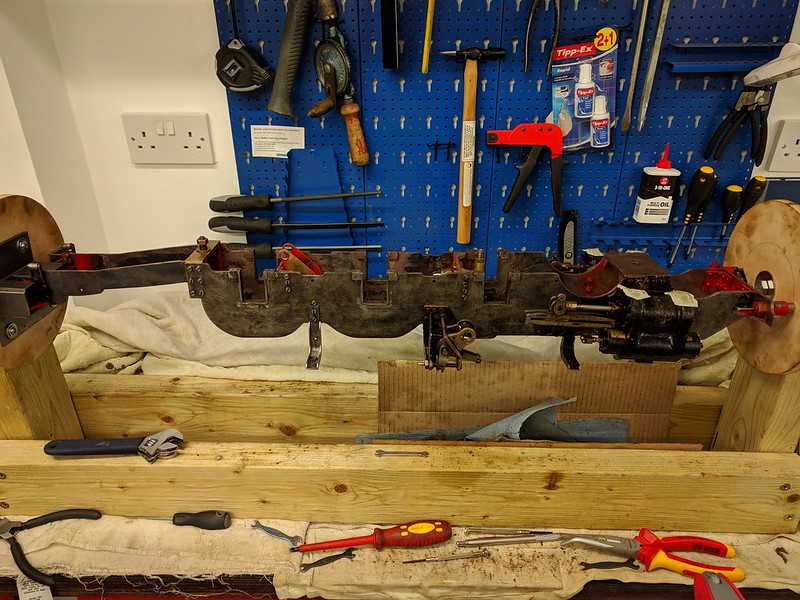 Loco Chassis Loco Chassis by Daniel Hamblin, on Flickr Loco chassis being stripped of paint ready for repainting. As I took the locomotive apart it was obvious that no primer had been used previousy and there were areas of corrosion that needed addressing, hence the full repaint.  Loco Chassis and Tender Tank Loco Chassis and Tender Tank by Daniel Hamblin, on Flickr Loco chassis and tender tank after being sprayed with etch primer. It stuck this time!  Loco Chassis Painted Loco Chassis Painted by Daniel Hamblin, on Flickr Loco chassis painted and ready for reassembly. Little details - the front end of the frames are gloss black to blend with the gloss black running boards.  Footplate Footplate by Daniel Hamblin, on Flickr Cab footplate painted and ready for reassembly. The photo doesn't do the BR green justice - looks pretty good in natural light.  Cleaned Components Cleaned Components by Daniel Hamblin, on Flickr Lately it has been a case of paint stripping components to get them primed and painted while the temperatures are in the ideal window. Here running boards, a smoke deflector and cab roof have been stripped.  Cleaned Components Cleaned Components by Daniel Hamblin, on Flickr Right up to date: today the penultimate batch of components were stripped - the front footsteps, dome, chimney, cylinder covers and top front firebox cladding. Just the smokebox to do. Next few weeks will be a painting spree, followed by modifying the grate and ashpan (as outlined on previous pages) and making a new petticoat pipe. Get the 1.5x hydraulic test done on the boiler then it is reassembly for steam test. Sounds easy doesn't it! We've got our annual running day coming up in August - the loco is 60 years old and Croydon SME 90 years old therefore things are going to step up a notch or two to try and get Britannia there and running. Regards, Dan |
|
|
|
Post by dhamblin on Sept 4, 2022 7:22:27 GMT
So near, yet so far...Ok, wasn't anywhere close to getting it steamed in August but if a job's worth doing it's worth doing well. Progress so far: 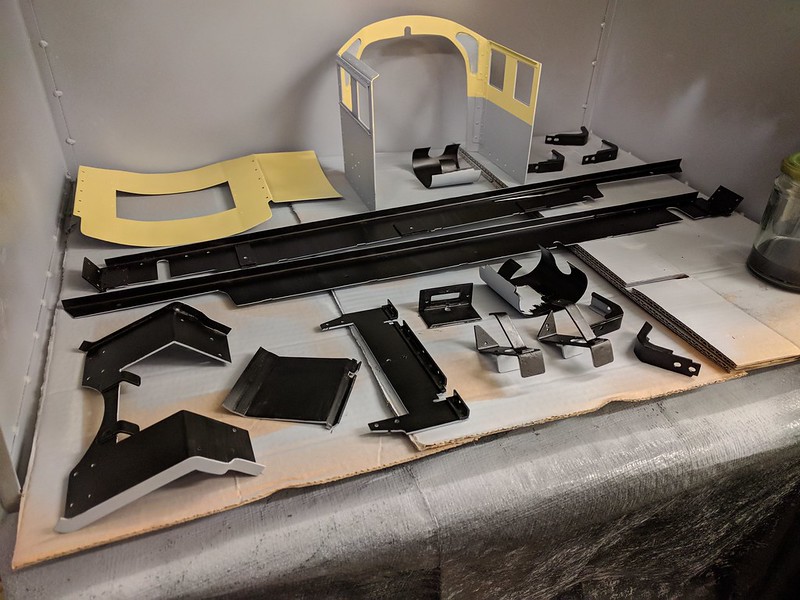 Painting Progress Painting Progress by Daniel Hamblin, on Flickr Collection of components receiving their first coats of black satin paint. The cab has already had interior faces painted cream as per the full size version.  Soft Solder Repairs Soft Solder Repairs by Daniel Hamblin, on Flickr Tender to injector feed pipe and right hand cylinder rear draincock pipe all required soft solder repairs to reattach them. First time soft soldering with a gas torch was interesting but the connections have all held and tidied up nicely.  Chassis Reassembly Chassis Reassembly by Daniel Hamblin, on Flickr Loco chassis being reassembled in the rollover rig. Driving wheelsets and valve gear assembled and the front bogie plus trailing truck ready to go on.  Firebox Cladding Firebox Cladding by Daniel Hamblin, on Flickr Modifications underway to the firebox cladding to close the yawning gap without need for filler. The steel outer wrapper has had the leading edge re-formed to bend down to the copper firebox top front cladding piece.  Painting Progress Painting Progress by Daniel Hamblin, on Flickr Firebox outer cladding and boiler barrel cladding primed. Tender tank with first coat of black on underside.  Smokebox Strip Smokebox Strip by Daniel Hamblin, on Flickr Smokebox paint removed by hand as the blasting cabinet couldn't clear it off.  Firebox Cladding Firebox Cladding by Daniel Hamblin, on Flickr Top front cladding modified with JB Weld High Heat epoxy putty to fill the original feathered edge with brass infill pieces added to cover the join to the throatplate cladding piece.  Britannia at Leatherhead Britannia at Leatherhead by Daniel Hamblin, on Flickr Britannia's chassis on display in the steaming bays at the Leatherhead track for the Croydon Society of Model Engineers 90th anniversary.  Leatherhead Steaming Bays Leatherhead Steaming Bays by Daniel Hamblin, on Flickr General view of the steaming bays at Leatherhead with three other Croydon SME locos.  CSME 90th Anniversary Photo CSME 90th Anniversary Photo by Daniel Hamblin, on Flickr Group shot of most Croydon SME members for the societies 90th anniversary. All loco have historic links to the society - 'Pop' on bottom left was the societies portable track engine and completed in the mid 1950s. The Southern L1 ('Maid of Kent') was owned by a late member and has been recently rebuilt to look more like a L1. My Grandad was a member of the society and Britannia used to run on the former track at Lindfield Road before it was closed. The 5" gauge 'Netta' is the societies main working locomotive, built by Don Cottle of the Guildford club and it has the distinction of having been to Japan for the 1979 Mini Steam Loco International Festival. 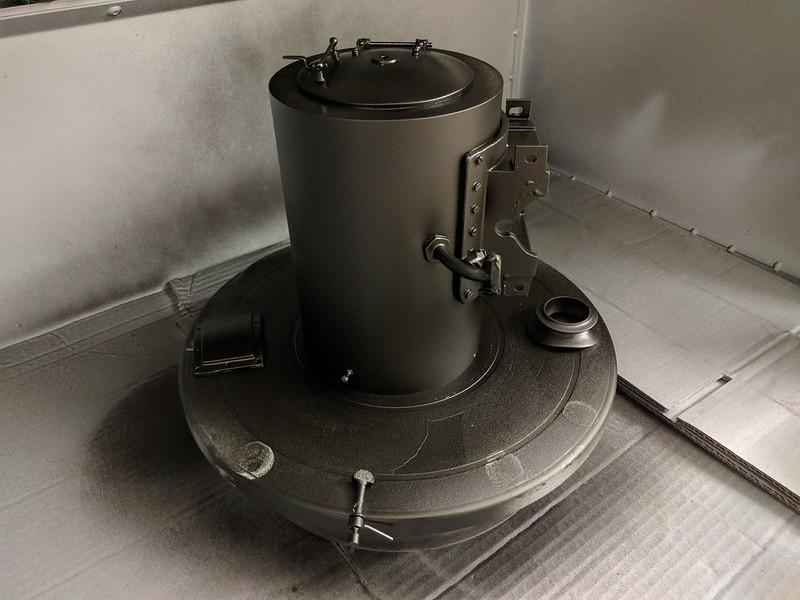 Smokebox Paint Smokebox Paint by Daniel Hamblin, on Flickr Smokebox, chimney, door dart and inspection cover all spray painted with Thermacure black satin enamel. 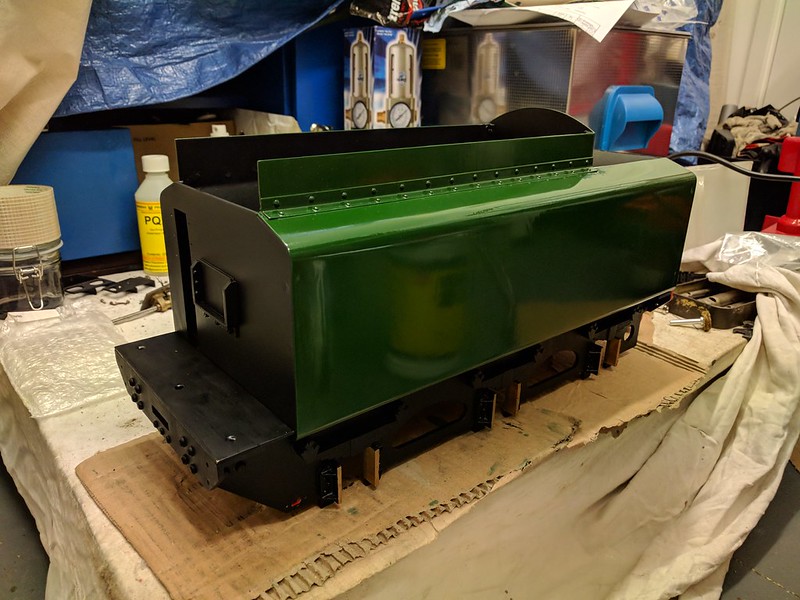 Tender Reassembly Tender Reassembly by Daniel Hamblin, on Flickr Repainted tender tank being reattached to the chassis - this uses twenty 8BA countersunk screws and nuts, with each screw having to be pushed through from inside the tank.  Britannia Chassis and Tender Britannia Chassis and Tender by Daniel Hamblin, on Flickr Britannia on display at the Sanderstead and Selsdon Rotary Club Hobby Fair on 3rd September 2022. First time loco and tender have been coupled together since 2000. Smokebox loosely attached for show and the tender still needs the pipework reattaching plus the hand pump refitted. I not stating a finish date now, just going to plough on and get it finished as soon as possible! Regards, Dan
|
|
|
|
Post by runner42 on Sept 4, 2022 8:15:08 GMT
Well there was much to like about this post. Cladding is next on my list and you have given me a means to undertake the contouring around thhe firebox.
Thanks.
Brian
|
|
|
|
Post by dhamblin on Sept 4, 2022 21:23:12 GMT
Thanks Brian, hopefully the High Heat putty temperature range is suited to this area, it should be at over 200 deg C. I did get some JB Weld Extreme Heat but I think the gaps have to be significantly smaller and its ability to stick surfaces together has been questioned in reviews. I actually used a round file to then sculpt it further to allow the barrel cladding to tighten up against it. There will also be some smaller screws holding the main firebox cladding to the throatplate piece to pull it all together.
Should be putting the third coat of paint on those bits in the morning.
Regards,
Dan
|
|
|
|
Post by dhamblin on Dec 18, 2022 17:36:00 GMT
The last quiet day before the temperatures become more acceptable in the workshop; time for an update.  Ashpan Door Ashpan Door by Daniel Hamblin, on Flickr New door added to the base of the ashpan with hinges at the backhead end and a locking pin arrangement at the throatplate end. This will allow me to remove the grate sections through the door when the trailing truck is run out.  Grate Supports Grate Supports by Daniel Hamblin, on Flickr Original grate supports modified to take a full width bar at the throatplate end and two shorter bars at the backhead end. The latter ones have small slots milled in the underside to lock them in the support slot.  Firebars Milling Firebars Milling by Daniel Hamblin, on Flickr Milling the two special firebars that go on the outside of the grate centre section. Should have normalised them first to prevent bowing as long section was milled, but it didn't prevent the assembly from lining up.  Firebars Filing Firebars Filing by Daniel Hamblin, on Flickr I wanted to put a V section on the firebars to allow any unburnt lumps falling between the bars from wedging and choking the fire. This was achieved by filing each one (except the two specials) by eye.  Grate Trial Assembly Grate Trial Assembly by Daniel Hamblin, on Flickr Right hand grate section assembled and placed in position to test for levelness of the supports. Centre section firebars on left hand side awaiting assembly.  Ashpan and Grate Assembled Ashpan and Grate Assembled by Daniel Hamblin, on Flickr All modifications complete with a silver steel long pin installed to support the rear of the centre grate piece and allow the fire to be dumped simply by unscrewing the pin and removing it. The firebars were further fettled after this photo to make everything fit in the firebox with a bit of clearance for expansion.  Boiler Reassembly Boiler Reassembly by Daniel Hamblin, on Flickr Boiler substantially reassembled ready for the 1.5x hydraulic test complete with painted cladding.  Superheater Reassembly Superheater Reassembly by Daniel Hamblin, on Flickr Superheater reattached to the steam pipe fitting on the smokebox tubeplate. New viton ball installed in the snifting valve (left hand side) and plugs still attached to the cylinder pipes. Where the two pipes come down to the wet header they had broken through the screw holes in the inlet block. I tried to repair this with JB Weld Extreme heat, but it was difficult to properly prep and clean the surfaces without risking stuff falling down those pipes into the wet header, so unfortunately I've had to resort to lots of Stag A and PTFE tape on the screws. Passed a separate 1.5x hydraulic test like this though so should be ok under steam.  Smokebox Plates Prototyping Smokebox Plates Prototyping by Daniel Hamblin, on Flickr Smokebox numberplate and shedcode plates prototyped in PLA using my 3D printer and models designed in Tinkercad. Shedcode plate will use 12BA hex screws and the numberplate seen here was going to use 8BA, but they look a bit oversize so will switch to 12BA on the final versions. These will be etched in brass. 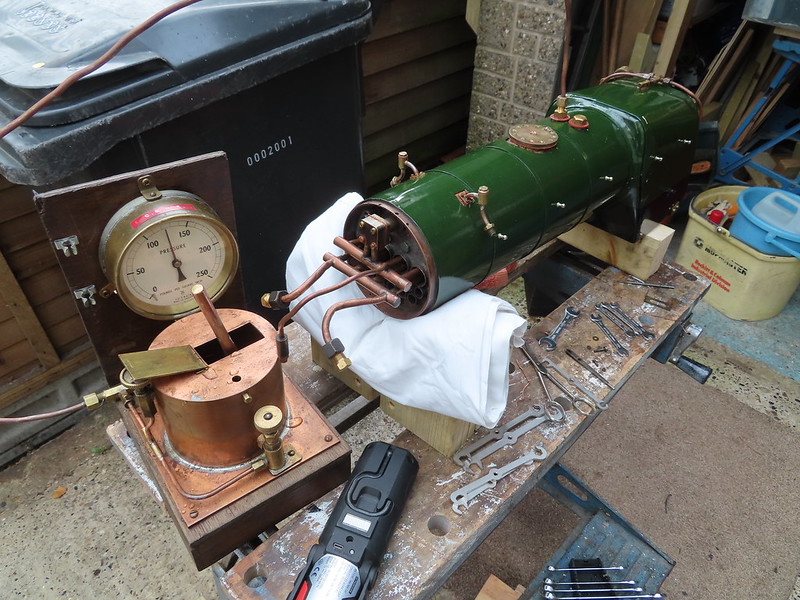 1.5x Hydraulic Test 1.5x Hydraulic Test by Daniel Hamblin, on Flickr Boiler was subjected to 1.5x hydraulic test on 2nd December and passed with a few small jobs to do. Regulator gland needed re-packing (now done) and the pressure gauge either needs replacing or repair.  Pressure Gauge Pressure Gauge by Daniel Hamblin, on Flickr Back of Britannia's pressure gauge showing the bourdon tube (left) and part of the mechanism for the needle spindle. This has now been thoroughly cleaned and oiled ready for it to be tested to confirm it is reading correctly. I really want to try and fix this as the 270 degree clockface in this small size looks better than the standard 90 degree version commercially available. The bourdon tube is definitly flexing and can turn the needle, but need to see if it can work the whole range on the gauge face at the correct pressures.  Lowfit Wagon Lowfit Wagon by Daniel Hamblin, on Flickr While the workshop temperatures have been close to freezing I've been further playing with the 3D printer to test print a 3 1/2" gauge version of Andrew Wildish's 5" gauge BR Lowfit wagon, as published on Thingiverse. Chassis is shown here about 80% complete plus all the components for the simplified brake gear and suspension. These have all been printed in black PETG. The first job tomorrow is to knock up two silver steel axles for this wagon so I can take the chassis to our Christmas meeting. Then it is drilling holes in the smokebox door for the two plates before assembling the boiler on the chassis. Once that is accomplished I can measure up the blastpipe and chimney in situ so I can design and make a new petticoat pipe that conforms with the 1/3 1/6 taper principles and a few other tweaks as per Jos Koopman's work. Finish reassembling the tender, add some transfers to that and cab, reassemble everything and steam test. Oh plus etch and fit those plates somewhere in the middle of it all. Sounds simple?  Regards, Dan |
|
|
|
Post by dhamblin on Jan 7, 2023 22:27:03 GMT
The boiler is back on the frames Drilling the Smokebox Door Drilling the Smokebox Door by Daniel Hamblin, on Flickr Adding holes to the smokebox door to mount the numberplate and shedcode plate. Smokebox is mounted on the independent four jaw chuck, mounted on a Myford threaded spindle on the rotary table attached to the vertical slide on the cross slide. Bit convoluted but it allowed me to use the accuracy of the lathe DRO and level the smokebox door a little more precisely. 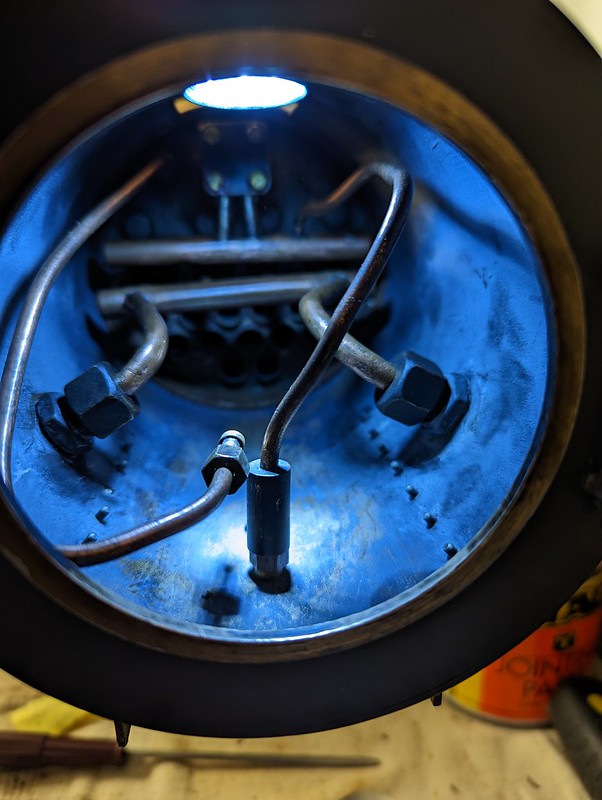 Smokebox Plumbing Smokebox Plumbing by Daniel Hamblin, on Flickr Reattaching the main steam pipes, blower steam pipe and snifting valve. Right hand cylinder pipe was very difficult to get the nut to pick up on the thread so I ended up loosening it on the lock nut to get it aligned for tightening up.  Chassis and Boiler Chassis and Boiler by Daniel Hamblin, on Flickr Rejigging the work area to get ready for final assembly of the locomotive. Chassis sitting on a section of mixed gauge PNP display track and boiler temporarily on the loco rollover rig. I'll switch it to the lifting table when I get closer to assembling the final bits and preparation for the steam test.  Tender Reassembled Tender Reassembled by Daniel Hamblin, on Flickr Tender completely reassembled with the last two feed pipes spray painted and refitted. Just needs paint touch up and transfers for the lining and BR totem adding.  Grate Modification Grate Modification by Daniel Hamblin, on Flickr An extra firebar fitted to the centre section of the grate and tweaked the other two sections to make it fit the firebox more fully.  Cab Backhead Cab Backhead by Daniel Hamblin, on Flickr Cab backhead reassembled and only waiting for the pressure gauge to be refitted or the new one fitted. I've refitted the brake valve but after having realised it is not a practical device in 3 1/2" gauge therefore it will stay disconnected from the brake cylinder but plumbed in to the isolation valve on the backhead.  Ashpan Refitted Ashpan Refitted by Daniel Hamblin, on Flickr Preparations for boiler fitting - ashpan reattached and reassembly of the drag beam bits. Hand pump feed clack has had stainless steel ball swapped for a viton one and the axle pump pipe clip reattached.  Boiler Refitted Boiler Refitted by Daniel Hamblin, on Flickr After just over 5 years the boiler goes back on the frames. The cab footplate has been off even longer at 17.5 years. Some more pipework to add and the footplate support then I can get the new petticoat pipe design, machined and installed. Regards, Dan
|
|
|
|
Post by dhamblin on Jan 28, 2023 22:03:01 GMT
Random ProgressDoes this happen with most model engineering builds / restorations when they near the end - lots of seemingly random and unconnected jobs that need ticking off the list?  Whistle and Drag Beam Whistle and Drag Beam by Daniel Hamblin, on Flickr Whistle reinstalled along with remaining pipework and the shroud under the footplate. The whistle originally had two P clips securing it, no idea where the other one went but I'll try with one for the time being. The screw heads will be painted black as part of the tidying up works.  Axlepump Bypass Valve Axlepump Bypass Valve by Daniel Hamblin, on Flickr Axlepump bypass valve reinstalled and the valve spindle passed through the footplate.  Nameplates Nameplates by Daniel Hamblin, on Flickr Nameplates receive a fresh coat of gloss red paint background. Still need to clean up the metal, which will probably be polished before running in trials.  Vinyl Resists Vinyl Resists by Daniel Hamblin, on Flickr I am indebted to Chris (coniston) for his method of acid etching plates, which I have used here to create the new numberplate and shedcode plates for the smokebox door. Here, the vinyl resists have been generated on the Silhouette 4 cutter and the etching areas already removed ready for transferring to the brass plates.  Etching Float Etching Float by Daniel Hamblin, on Flickr Numberplate and shedcode plate brasses masked and attached to a closed foam block for floating upside down in the etchant. Note the two detentes on the numberplate that are to help with machining the mounting holes in the correct position.  Post Etching Post Etching by Daniel Hamblin, on Flickr Brass plates post etching and washing. Some of the resists fell off - the "S" during etching and the "0" during washing, but they are pretty good for a first ever attempt. Suspect, despite best endeavours, there were some air bubbles on the surface given the stippled effect in the etched areas.  Etched Plates Etched Plates by Daniel Hamblin, on Flickr Close up showing the amount of material removed by the etching process. If you wondered why I did more than one of each type, it was precisely because I wanted to hedge my bets on success!  Test Fit Test Fit by Daniel Hamblin, on Flickr Both plates cut and filed to shape with mounting holes for 12BA hex head screws. Confession time - the shedcode plate had the second hole drilled 1mm out of position. Currently adding JB Weld Extreme Heat to it to fill the area before dressing and then painting. I have also made a small round spacer to stand the numberplate off on the left side as seen here (but not fitted).  Petticoat Pipe Machining 1 Petticoat Pipe Machining 1 by Daniel Hamblin, on Flickr On to the last big job - the new petticoat pipe. The basic design owes a lot to Tom Parham's work to improve the draughting on his Britannia model, but rather than use the 1:3 / 1:6 tapers to set the geometry I've attempted to follow Jos Koopmans guidance, which seems to be hitting the right ratios without having to shorten the blastpipe, which I was trying to avoid having gone to the effort of reassembling the boiler in order to get the geometry here correct. The design is being machined from solid bar and here I am machining the chimney end, which has to match the existing chimney casting bore and hole in the smokebox crown.  Petticoat Pipe Machining 2 Petticoat Pipe Machining 2 by Daniel Hamblin, on Flickr Both securing 'rings' cut and the bore being enlarged to the choke diameter. As the largest drill in my collection is a 12mm one the bore was enlarged using a boring bar down the entire length to the 21mm choke diameter. The next operation, after this photo was taken, was to swing the top slide across about 3.5 degrees, which left a 0.5mm thick wall at the chimney top but a decent taper down to the choke point. It's not the smoothest of finishes, I think more learning is required on the boring bar set-up and speeds, but it'll do.  Petticoat Machining 3 Petticoat Machining 3 by Daniel Hamblin, on Flickr A steel rod was then put in the tailstock drill chuck to run down the bore, allowing the whole pipe to be parted off at roughly the correct length at the bell mouth end without it then dropping down onto the cross slide and bed. After a quick skim across the face the bell mouth was formed by hand using a bearing scraper as the tool (again, as per Tom's video above). A steel bar was secured in the quick change tool holder to provide a rest.  Petticoat Pipe Trial Petticoat Pipe Trial by Daniel Hamblin, on Flickr Temporarily installed in the smokebox to validate the design geometry. I had considered using four separate discs to pick up the original mounting holes (just about visible) to secure the pipe in place, but instead I'm going to use a 3mm thick brass plate with a hole in the middle to match the groove diameter, then cut the plate in two with one half at the front and one at the rear. That way I can put angled threaded holes into each plate that come from opposite directions, thus providing a little more rigidity to the arrangement. The plates were cut earlier today but I'll share a photo once everything is finished, also the large diameter section had a taper added to the top to make it easier to get at the plates when they are fitted. The pressure gauge has unfortunately been damaged during the pressure test to prove my fixes had got it reading correctly - the threaded spigot sheared half way down. The new Polly Models sourced gauge and siphon will be fitted to get running but I'm trying to work out a recovery method that involves fitting a new bronze threaded spigot into the block at the base of the bourdon tube, but not sure if soldering it in place will soften the existing solder joint between block, tube and gauge plate. Once the petticoat pipe is sorted I've got the transfers to add to the cab and paint to apply on the reverser wheel assembly before that can be completely assembled and the running boards plus smoke refitted. After the plates are painted and fitted to the smokebox door I think we're then good to go on the steam test. Regards, Dan
|
|


