|
|
Post by terrier060 on Nov 4, 2017 23:35:01 GMT
Hi Everyone
I am new to this website, but have already found it very helpful, reading through the various posts.
I am building a couple of 7.25 inch gauge "Terriers" and wonder if anyone can tell me where I might get some stainless tubing for the handrails? Most firms I have looked at only sell large lengths to industry. I require four lengths about 18" long 5/32 diameter and an inside diameter to allow a 3/32 rod to pass through. Sorry about the imperial measurements but I am an old guy with imperial equipment.
I should have said that I am based in the UK.
Many thanks in advance for any help
Ed
|
|
jma1009
Elder Statesman

Posts: 5,900
|
Post by jma1009 on Nov 4, 2017 23:50:59 GMT
Hi Ed,
Welcome to the forum!
I need to check this but I don't recall any evidence of the fullsize Terrier handrails being burnished and am aware they were originally hollow, and no doubt remained so. I think they were always painted black including the stanchions.
5/32" or 4mm KS thin wall copper tube painted should serve your purpose.
Cheers,
Julian
|
|
|
|
Post by 92220 on Nov 5, 2017 9:09:39 GMT
Hi Ed.
Welcome to the forum.
Ebay has 4mm OD (5/32") x 1mm wall, stainless tube, in short lengths, if that will do. If a particular supplier can't help, they are often able to suggest a source. Just search 4mm od stainless steel tube and a lot comes up. Are you referring to the vertical handrails at the cab entrance? If so, what is the 3/32" up the middle rod for? If these are the handrails you refer to, then you are correct. My information was that they were polished steel. When I ran Phoenix Paints, I produced a Livery Data Sheet for the Terriers and checked my data against the model of Como, in Brighton museum. It should be right because it was made and painted by LBSCR Stroudley apprentices. I have all my originals so I will see if I can get the pages into a form I came post on here, for you to see.
Bob.
|
|
|
|
Post by chris vine on Nov 5, 2017 10:51:27 GMT
Como was built by Dr Bradbury Winter.
I am sure he got the livery exactly correct though!
Chris.
|
|
|
|
Post by 92220 on Nov 5, 2017 11:28:44 GMT
I've managed to locate the info. Hope it helps:
This is the text and drawings that I did for the Boxhill livery data sheet. This was produced using the model of Como in the Brighton Museum as a reference, and Boxhill. Como was built and painted by the LBSCR Stroudley apprentices so it is highly unlikely to be incorrect! Lining dimensions were also taken from Boxhill while she was still in storage up in York, while the new museum was being built, and while she was still in the old, and very cracked paint.
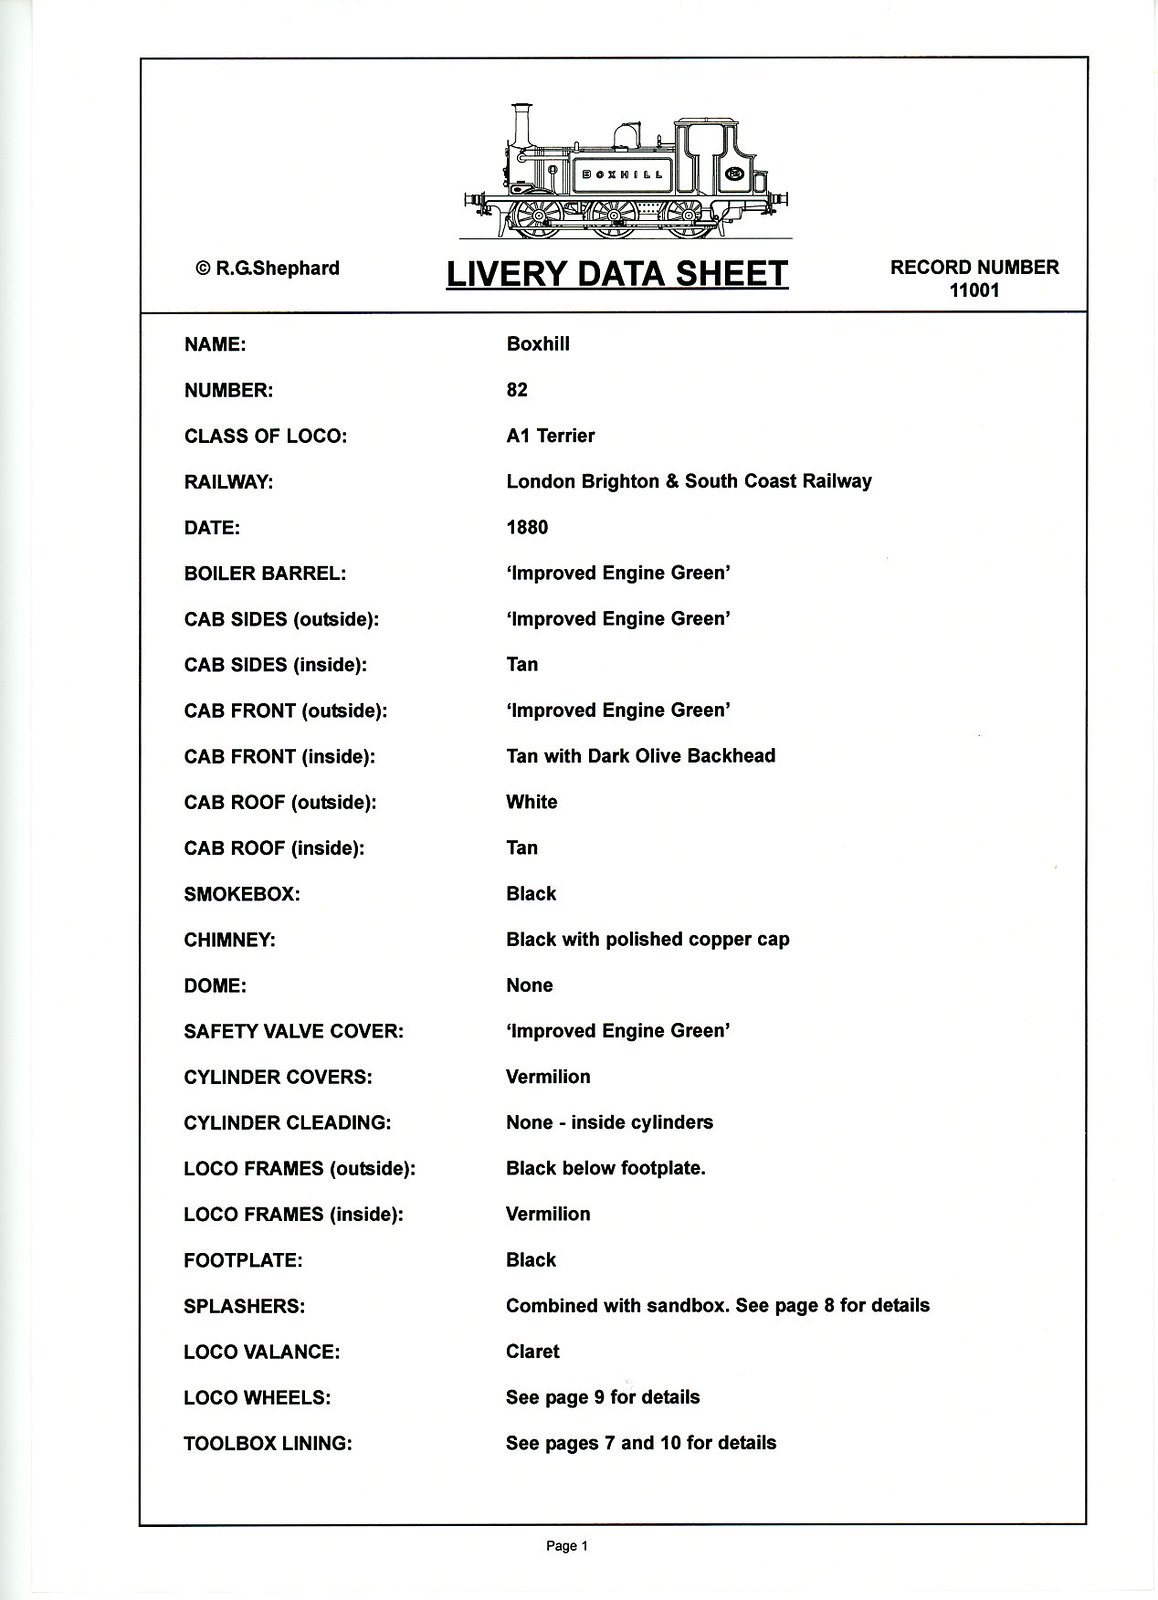 Image1 by Robert Shephard, on Flickr Image1 by Robert Shephard, on Flickr
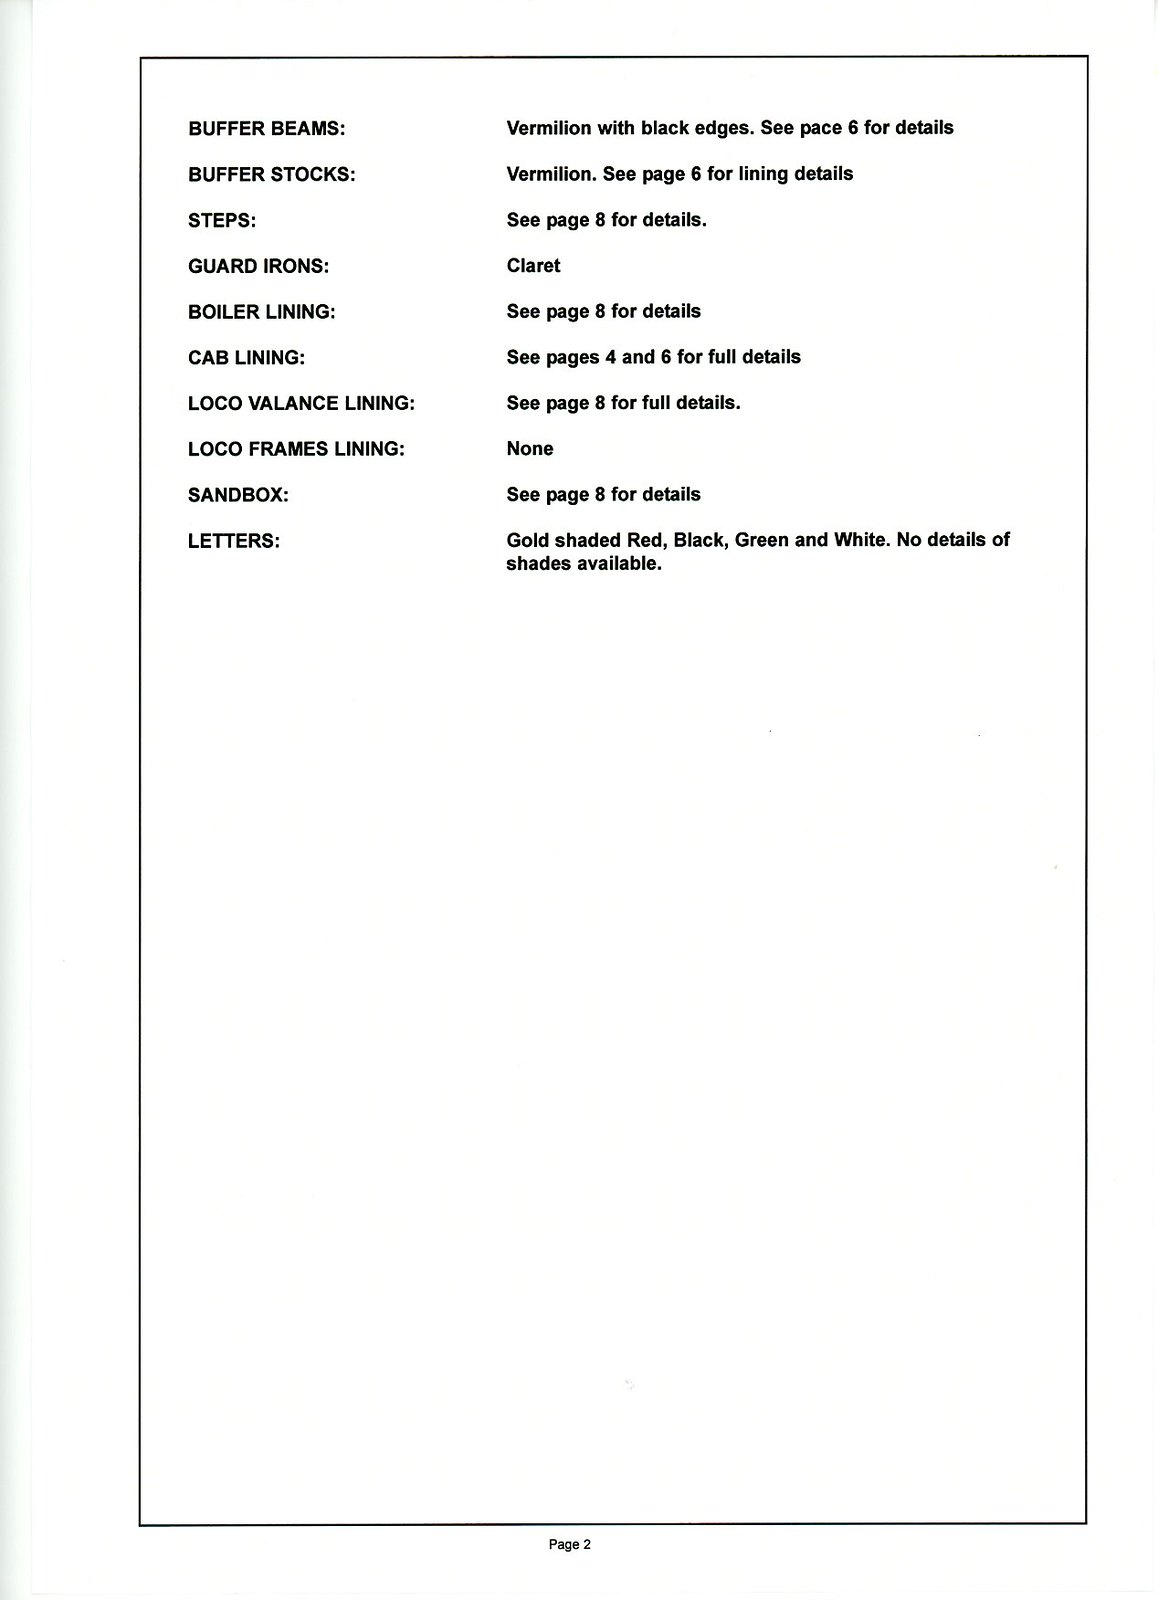 Image2 by Robert Shephard, on Flickr Image2 by Robert Shephard, on Flickr
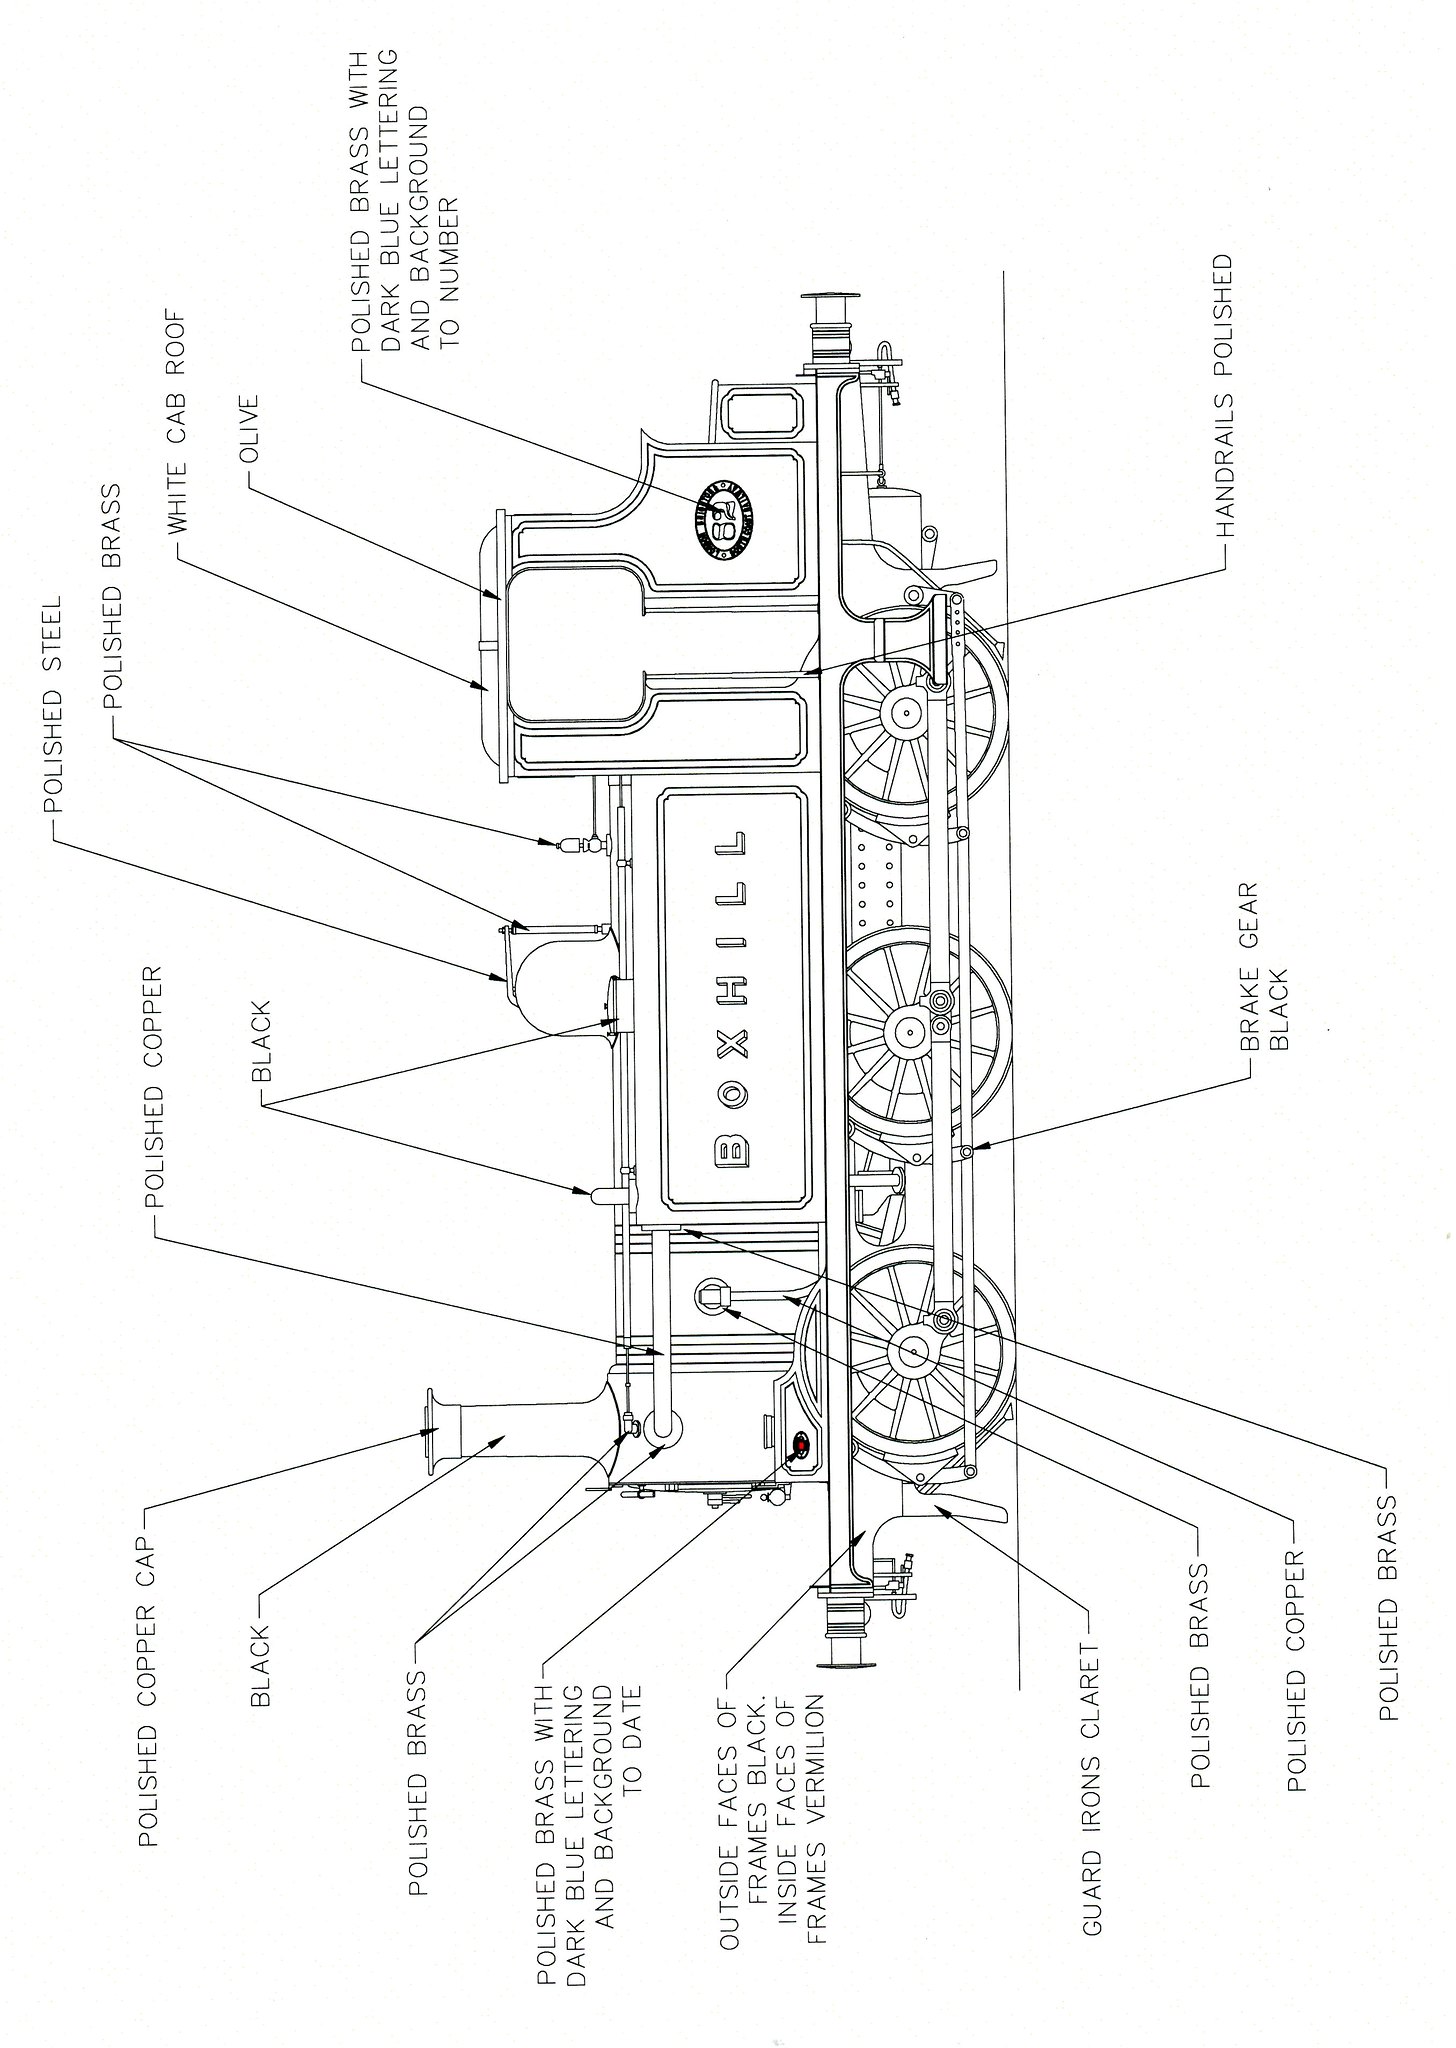 Image3 by Robert Shephard, on Flickr Image3 by Robert Shephard, on Flickr
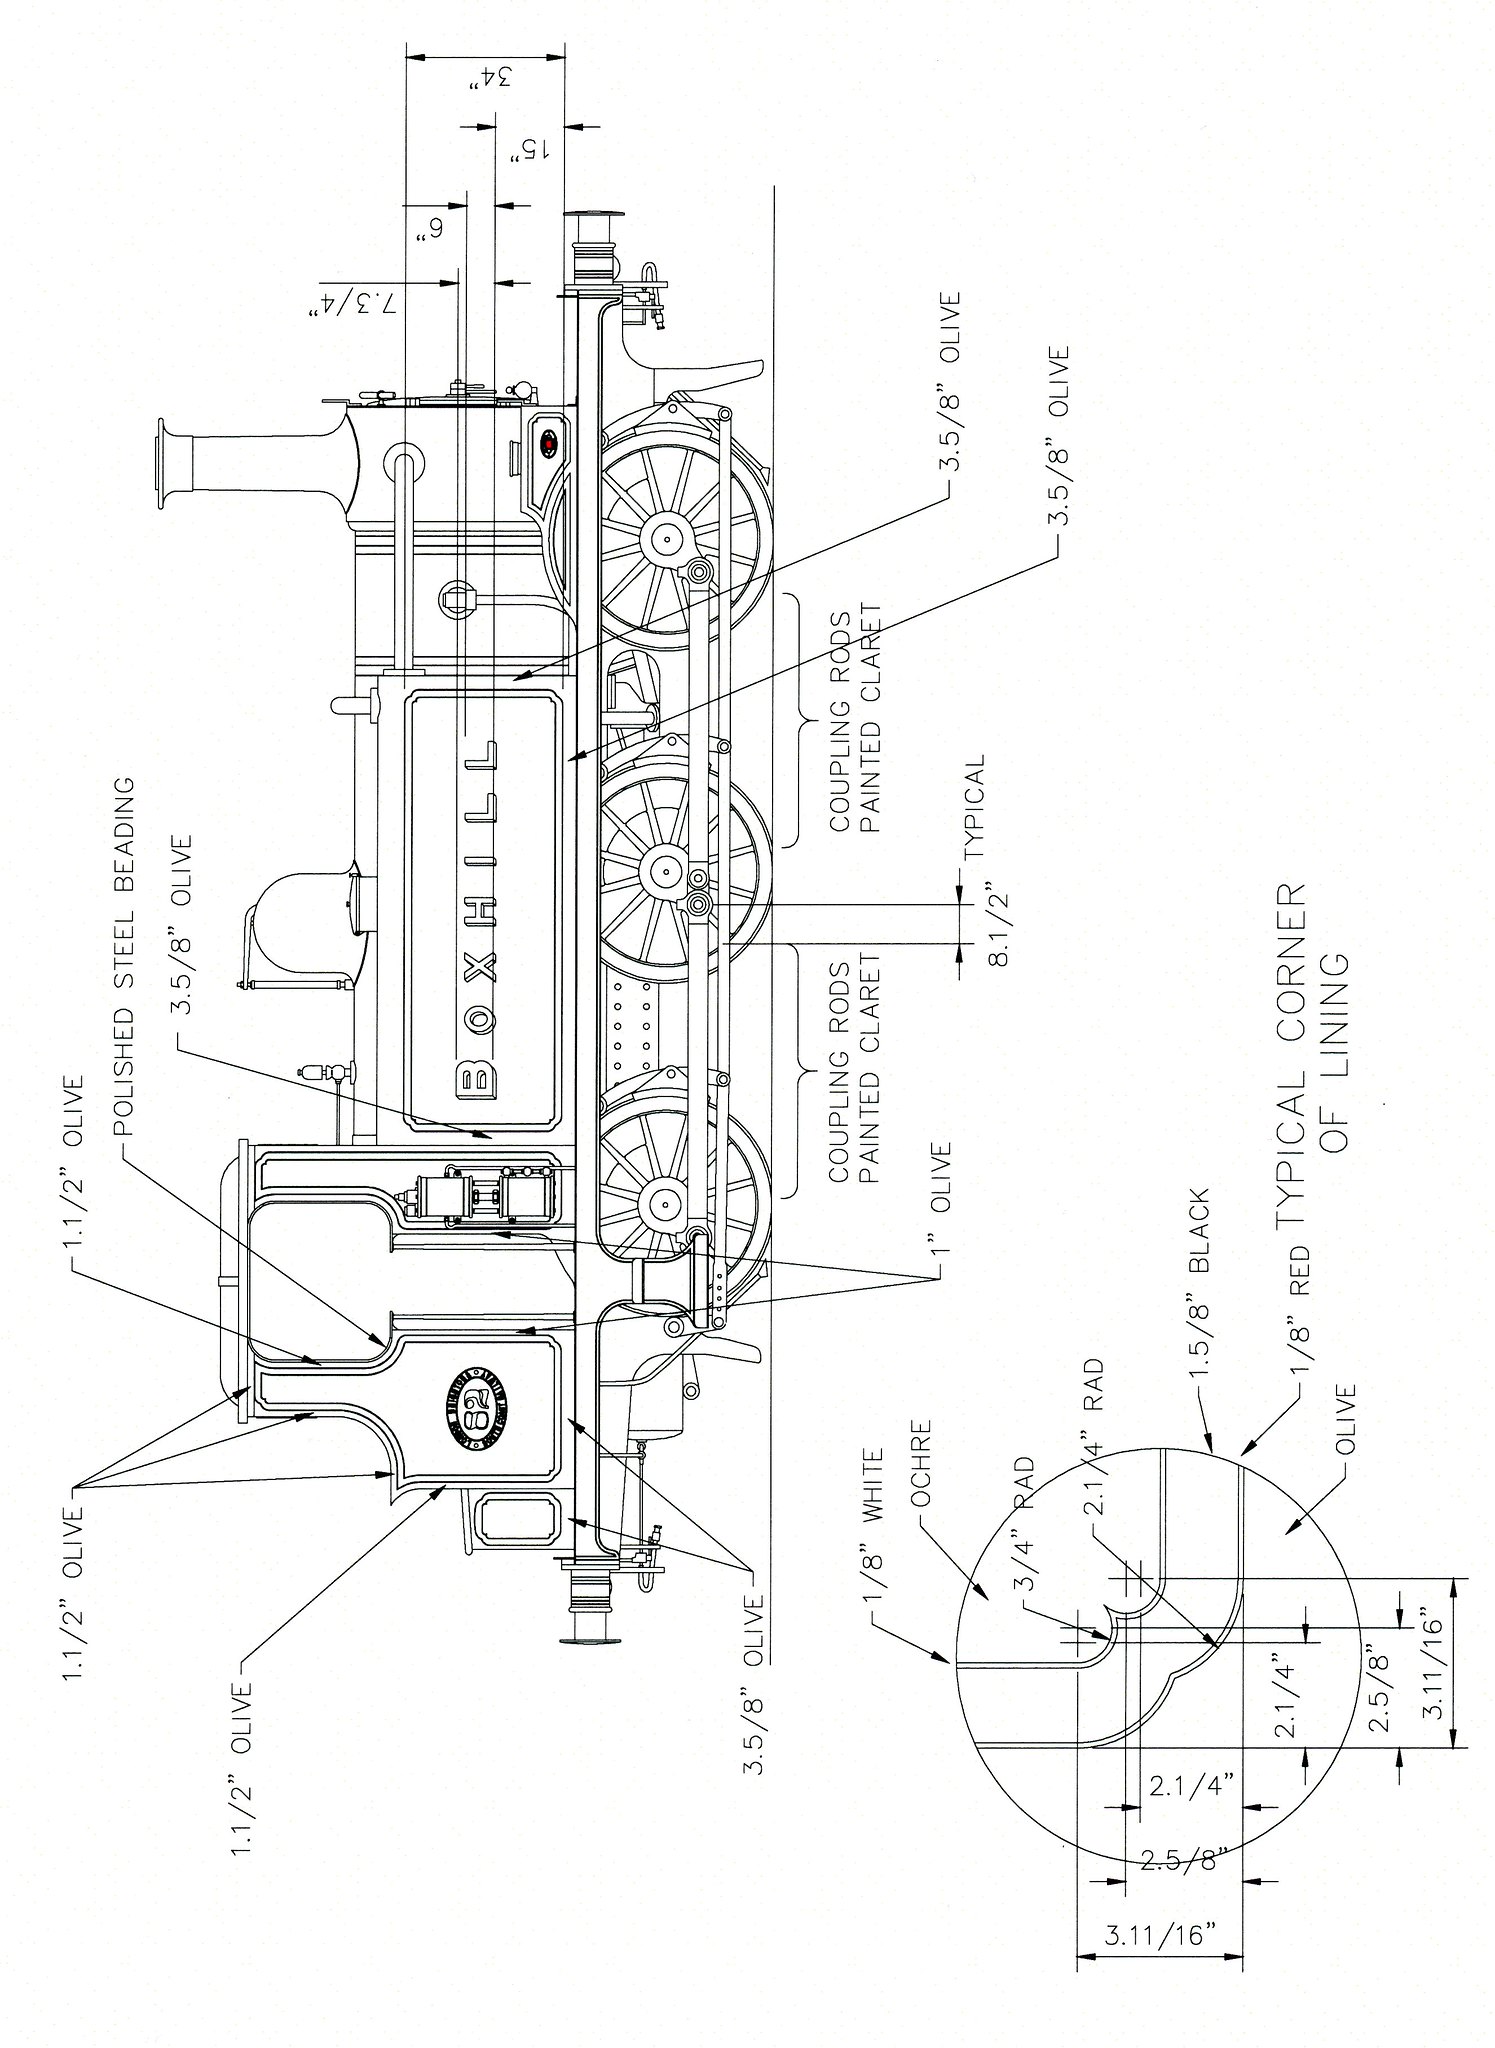 Image4 by Robert Shephard, on Flickr Image4 by Robert Shephard, on Flickr
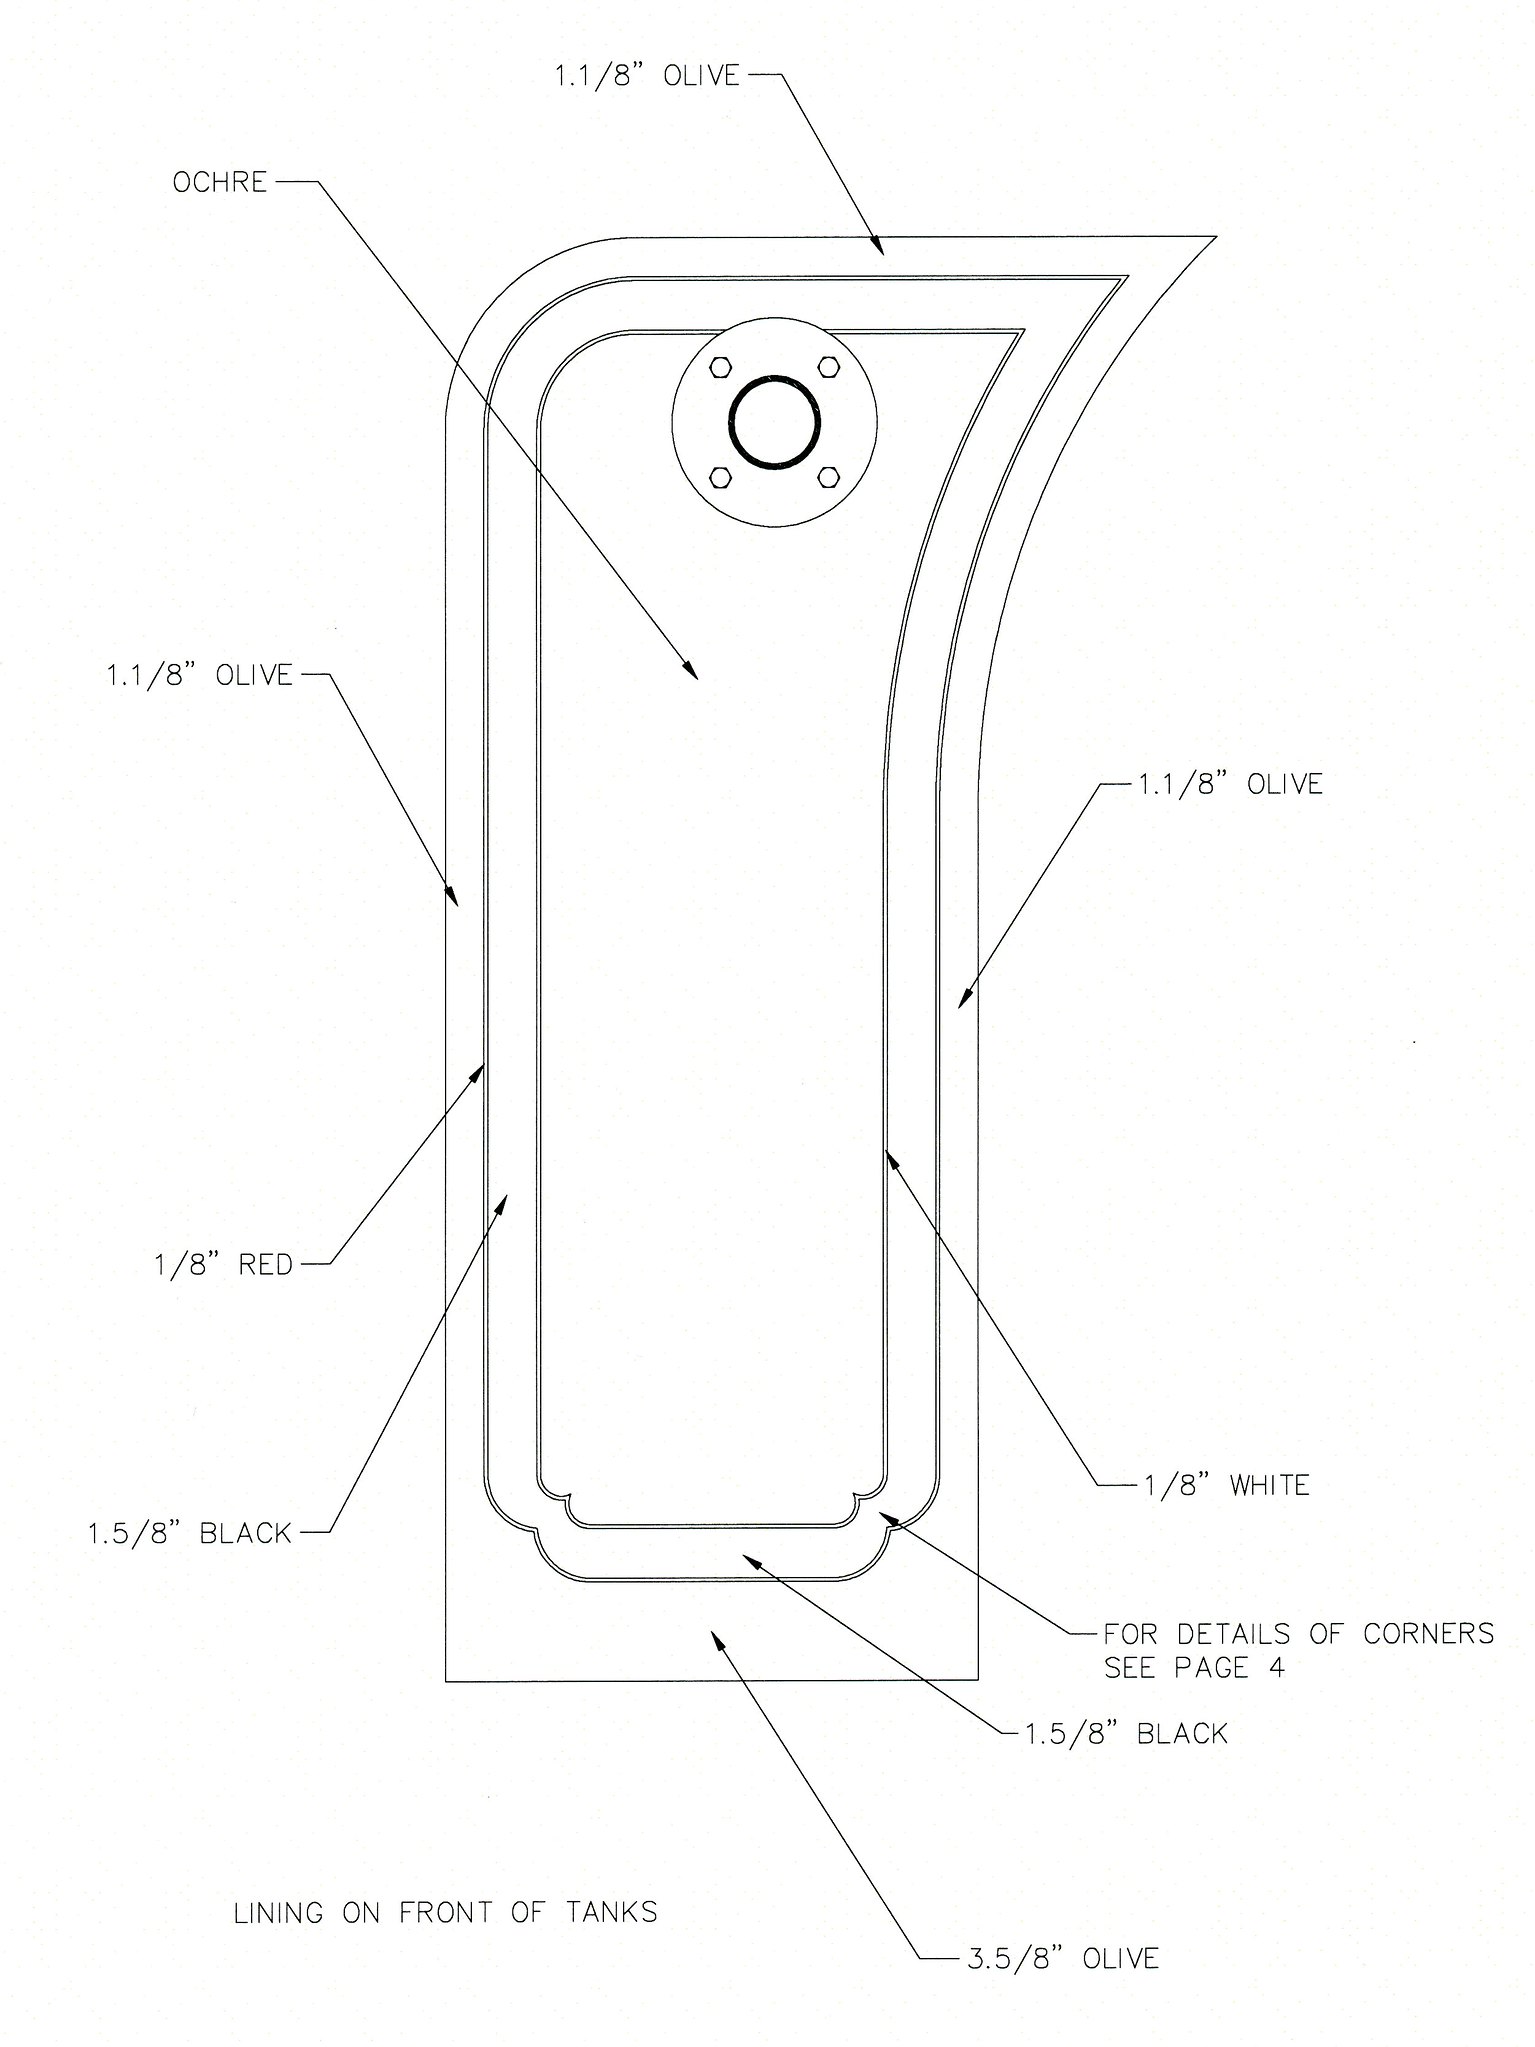 Image5 by Robert Shephard, on Flickr Image5 by Robert Shephard, on Flickr
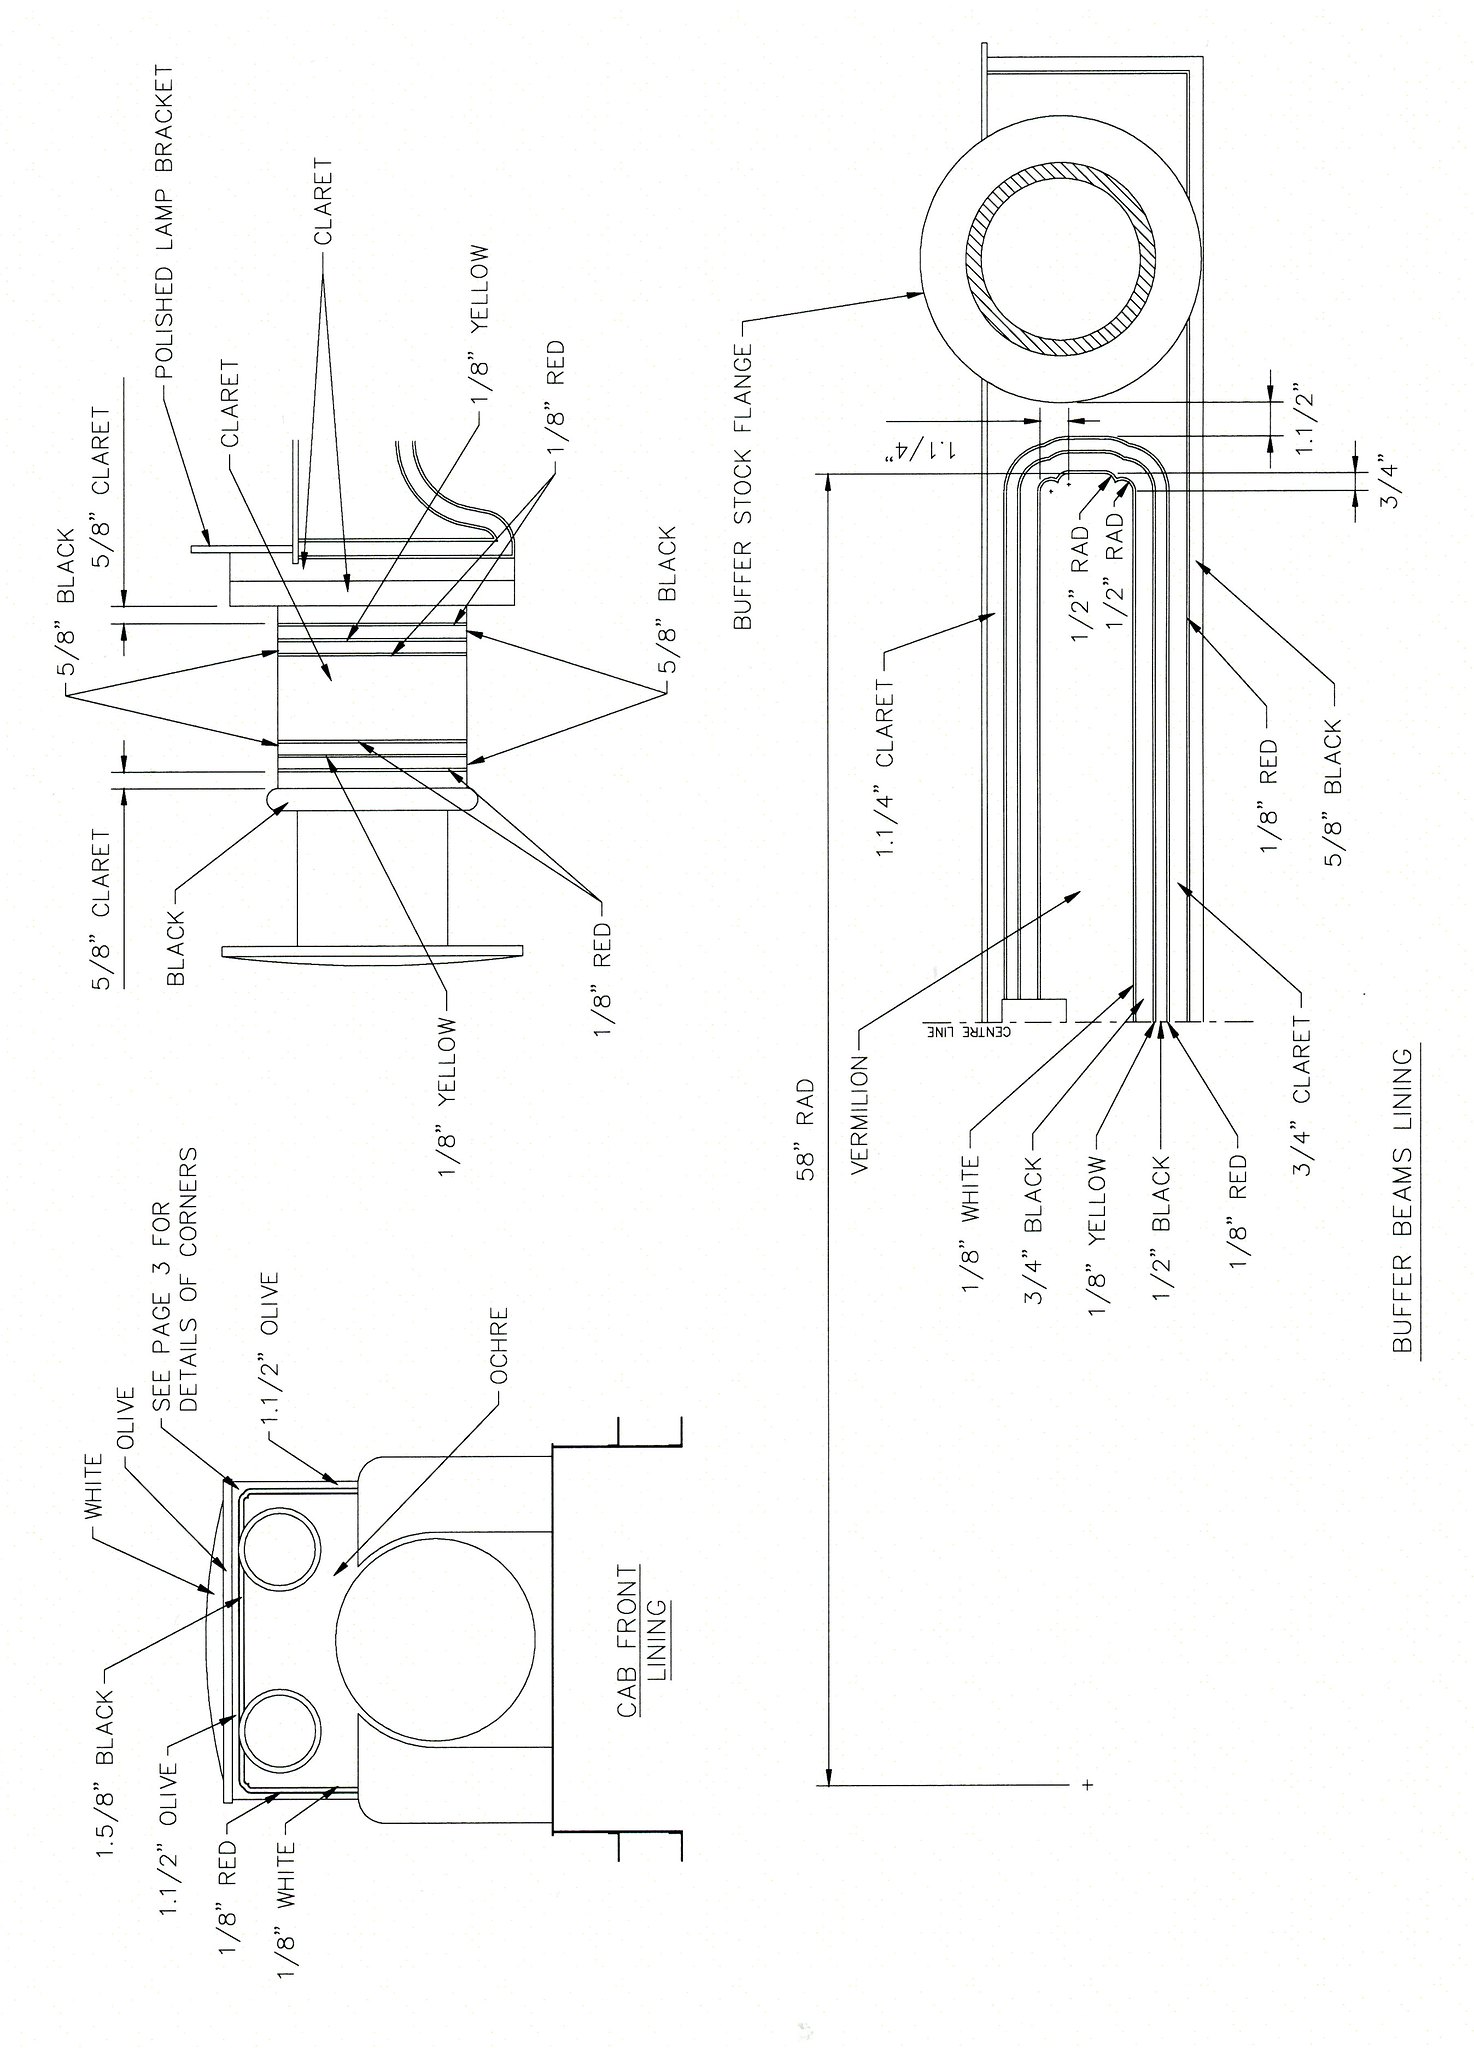 Image6 by Robert Shephard, on Flickr Image6 by Robert Shephard, on Flickr
Note: the 58" dimension, on the following drawing, is not an error. It is the dimension inside the buffer beam lining panel.
Image6 by Robert Shephard, on Flickr
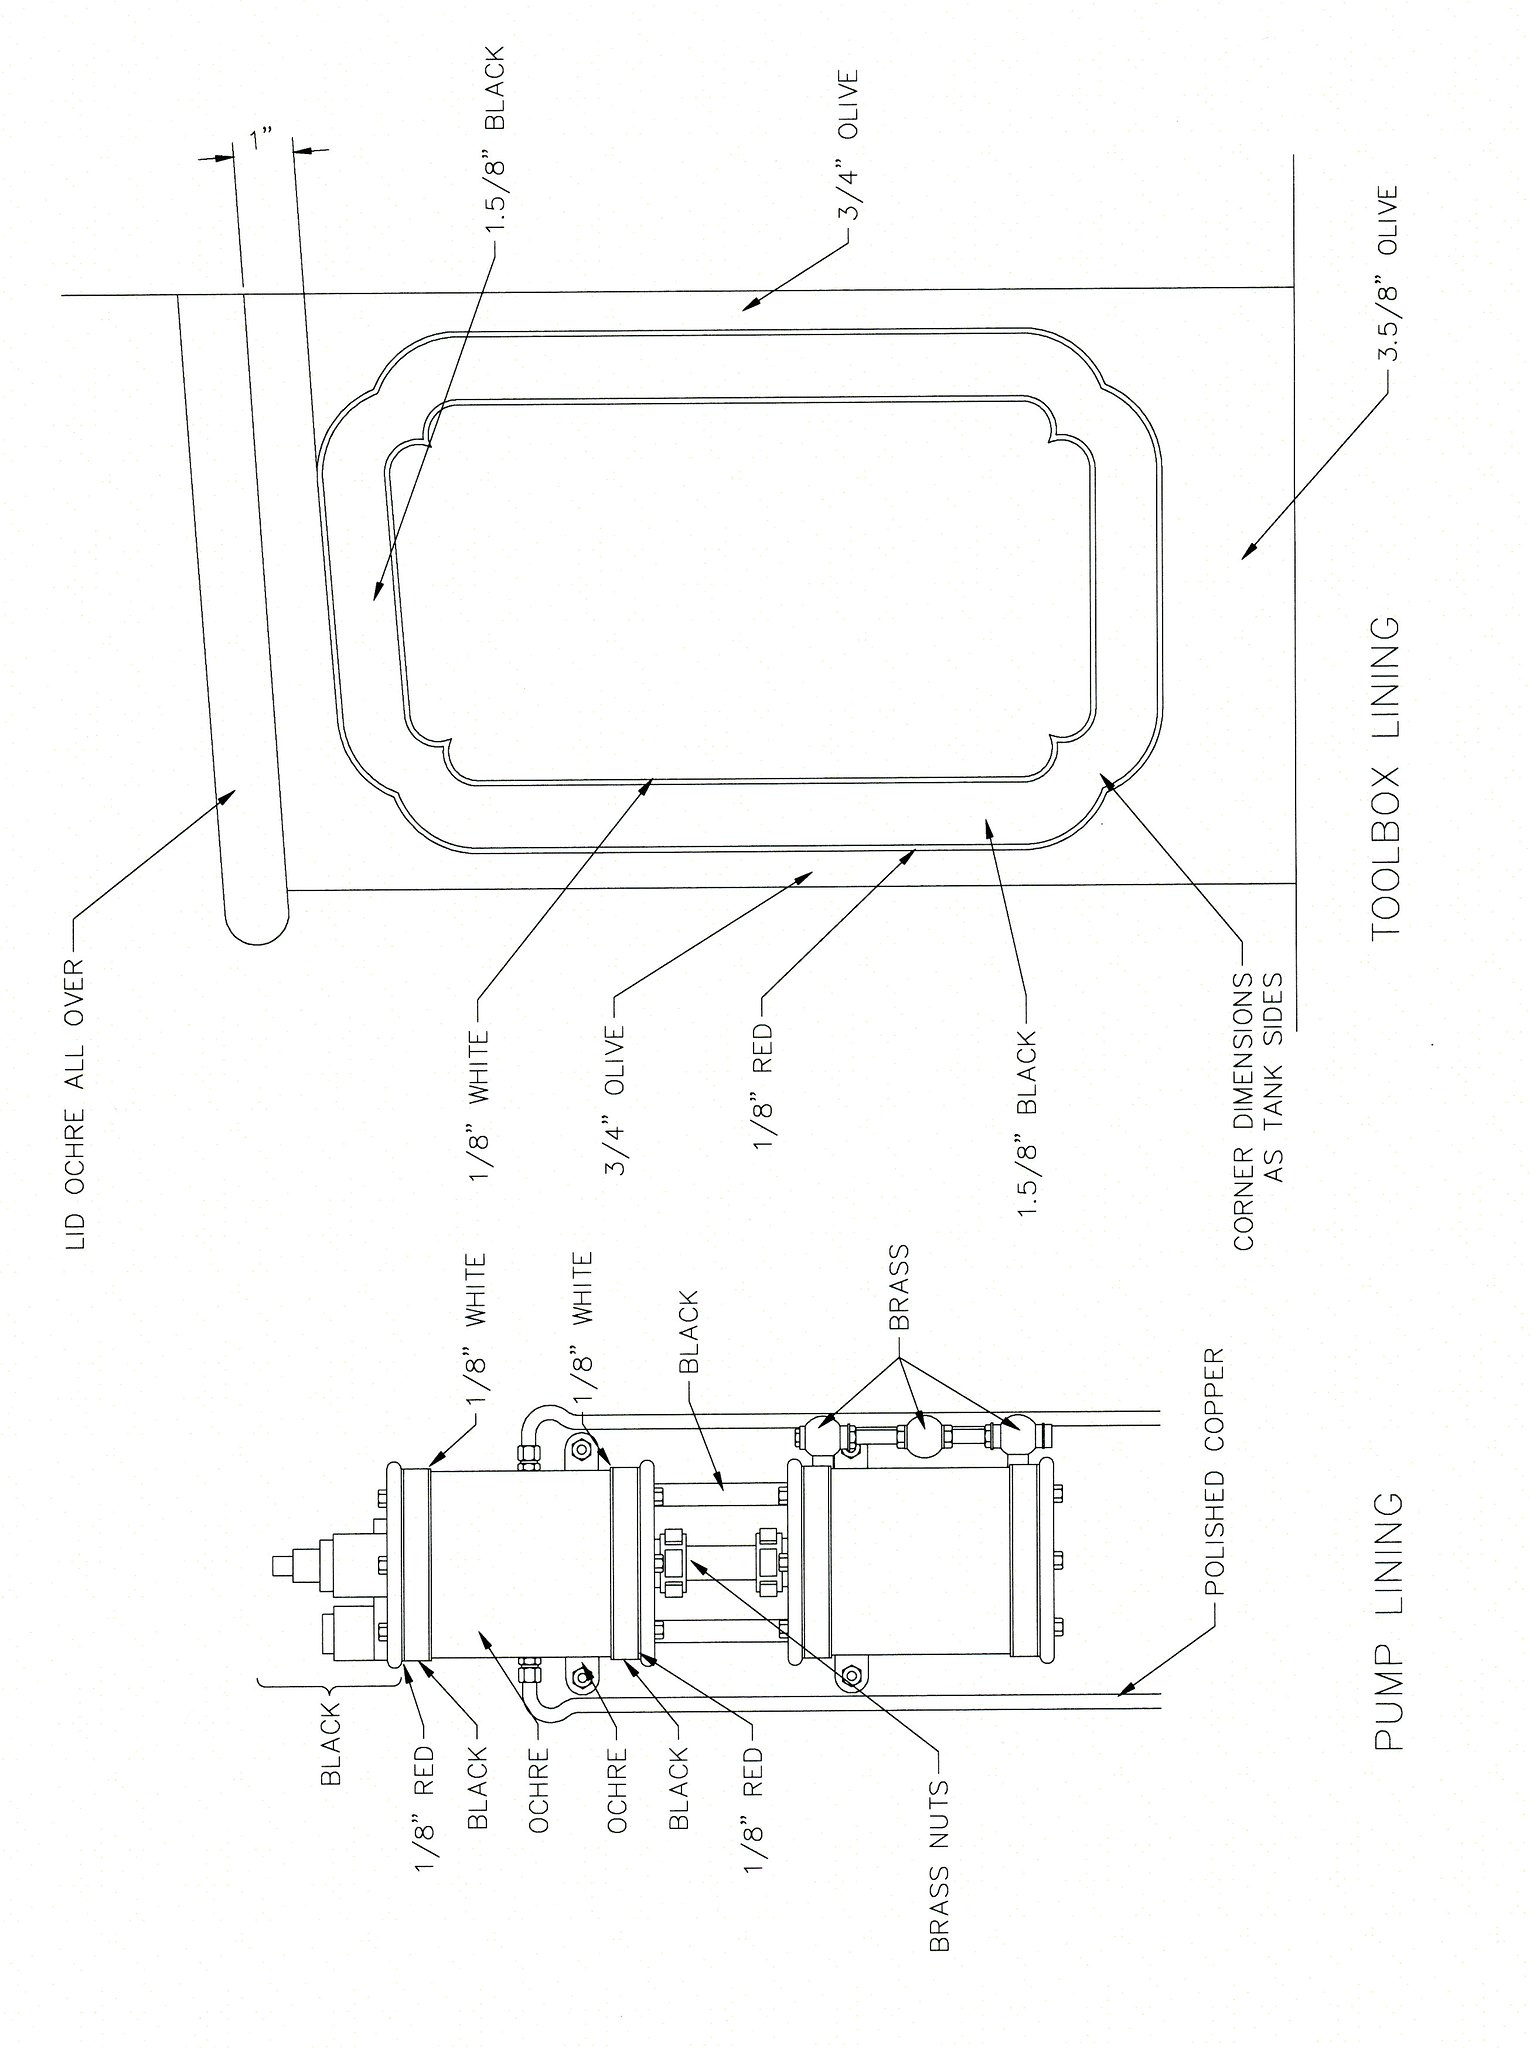 Image7 by Robert Shephard, on Flickr Image7 by Robert Shephard, on Flickr
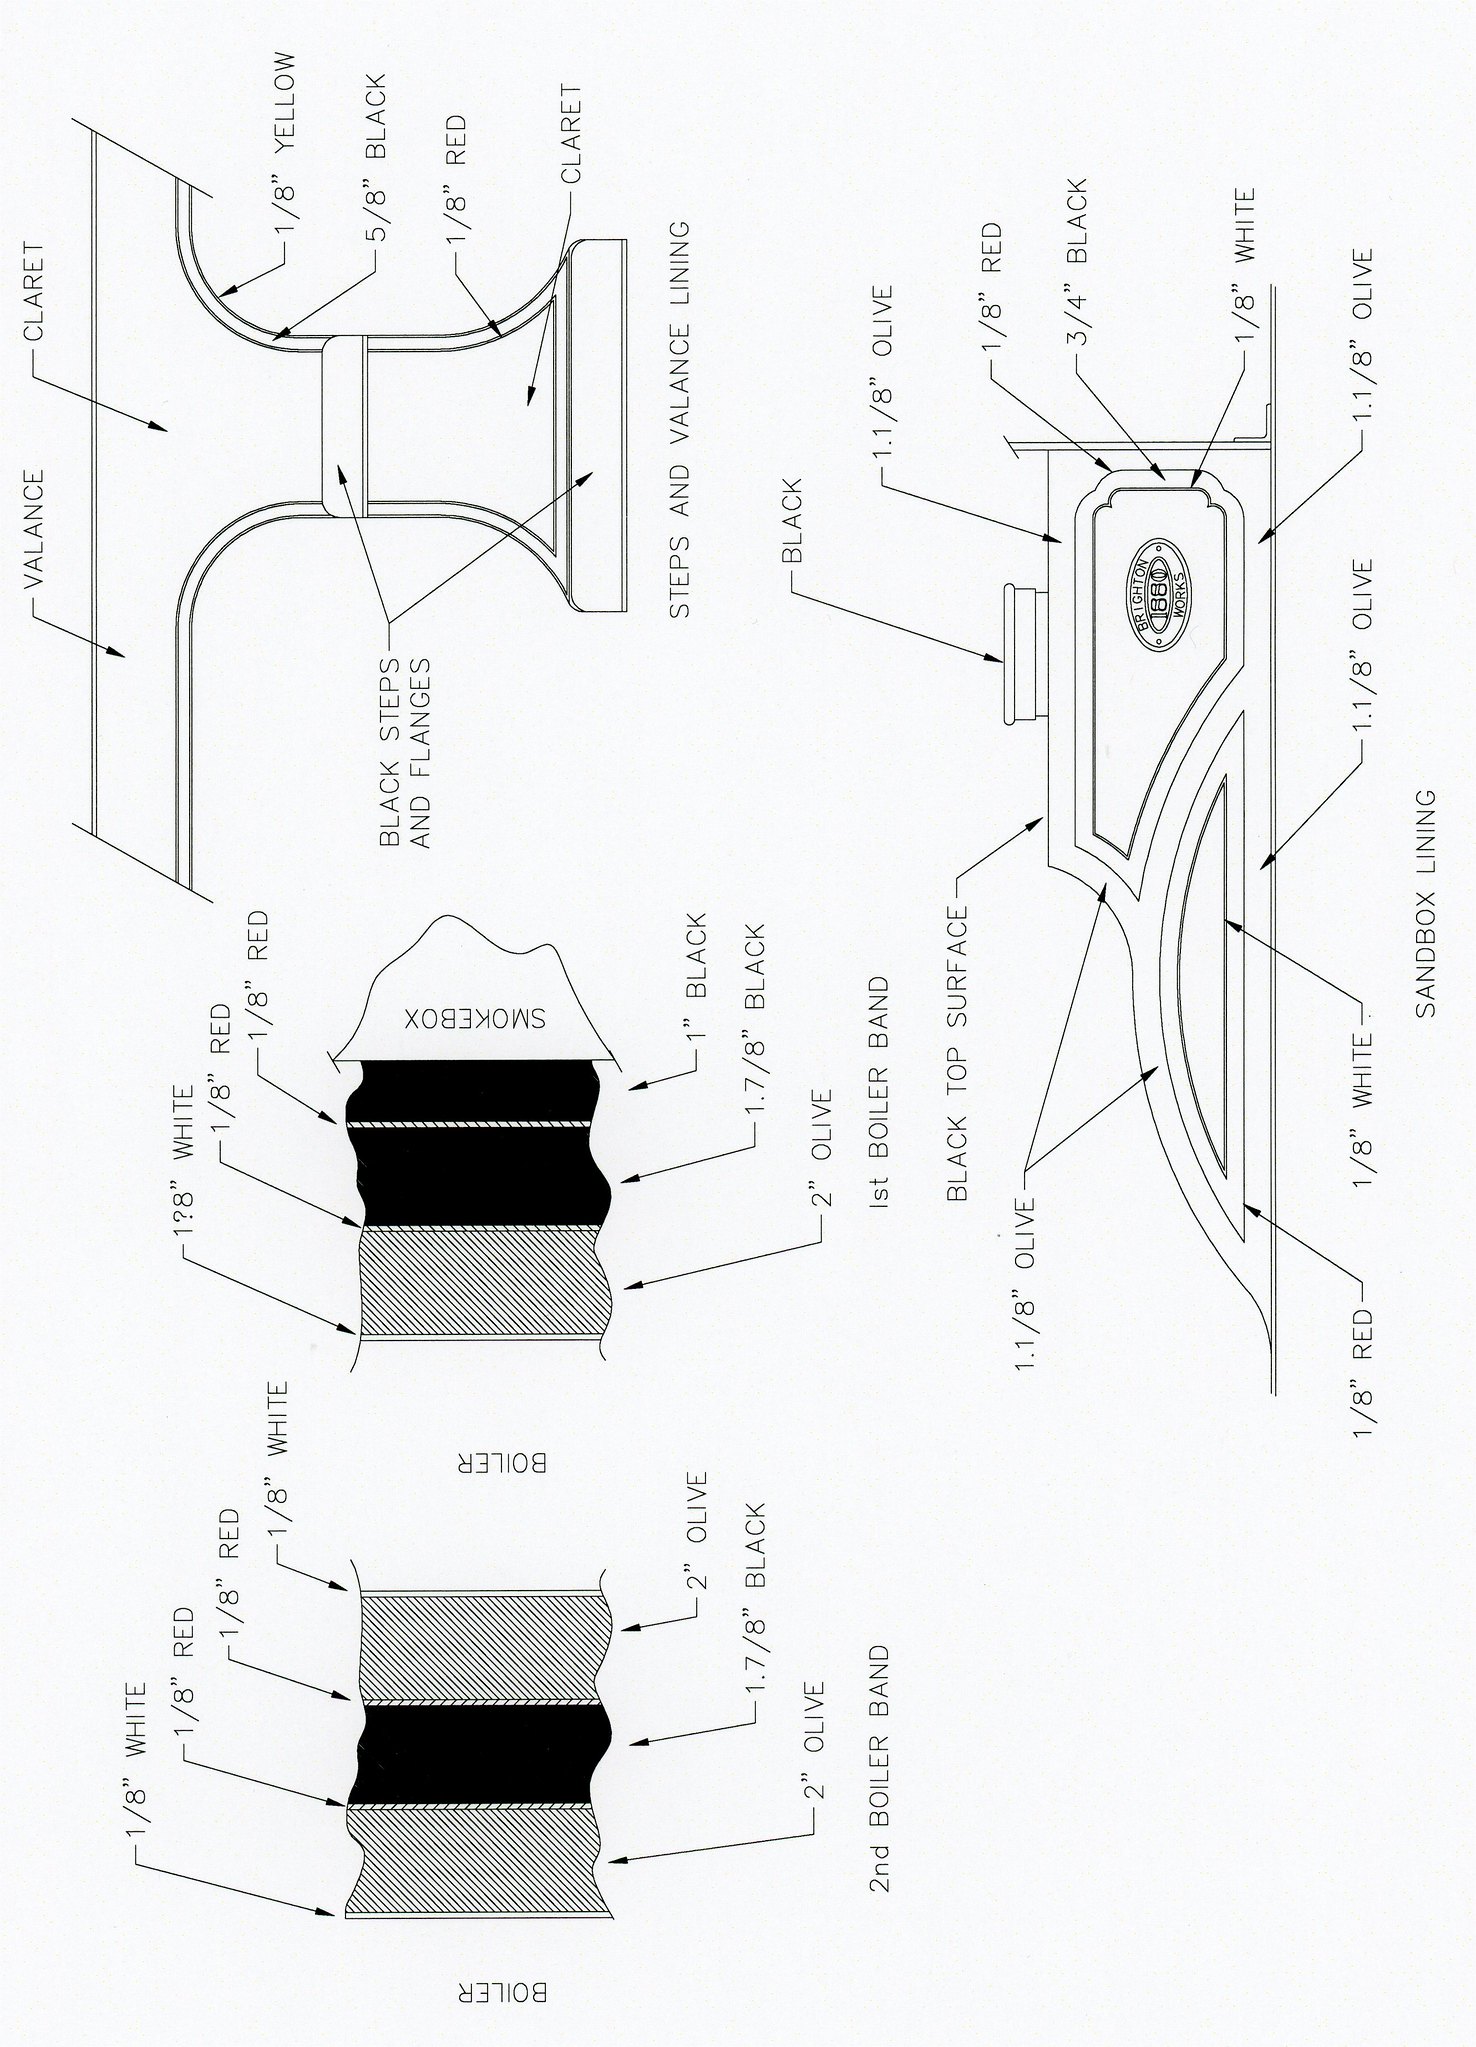 Image8 by Robert Shephard, on Flickr Image8 by Robert Shephard, on Flickr
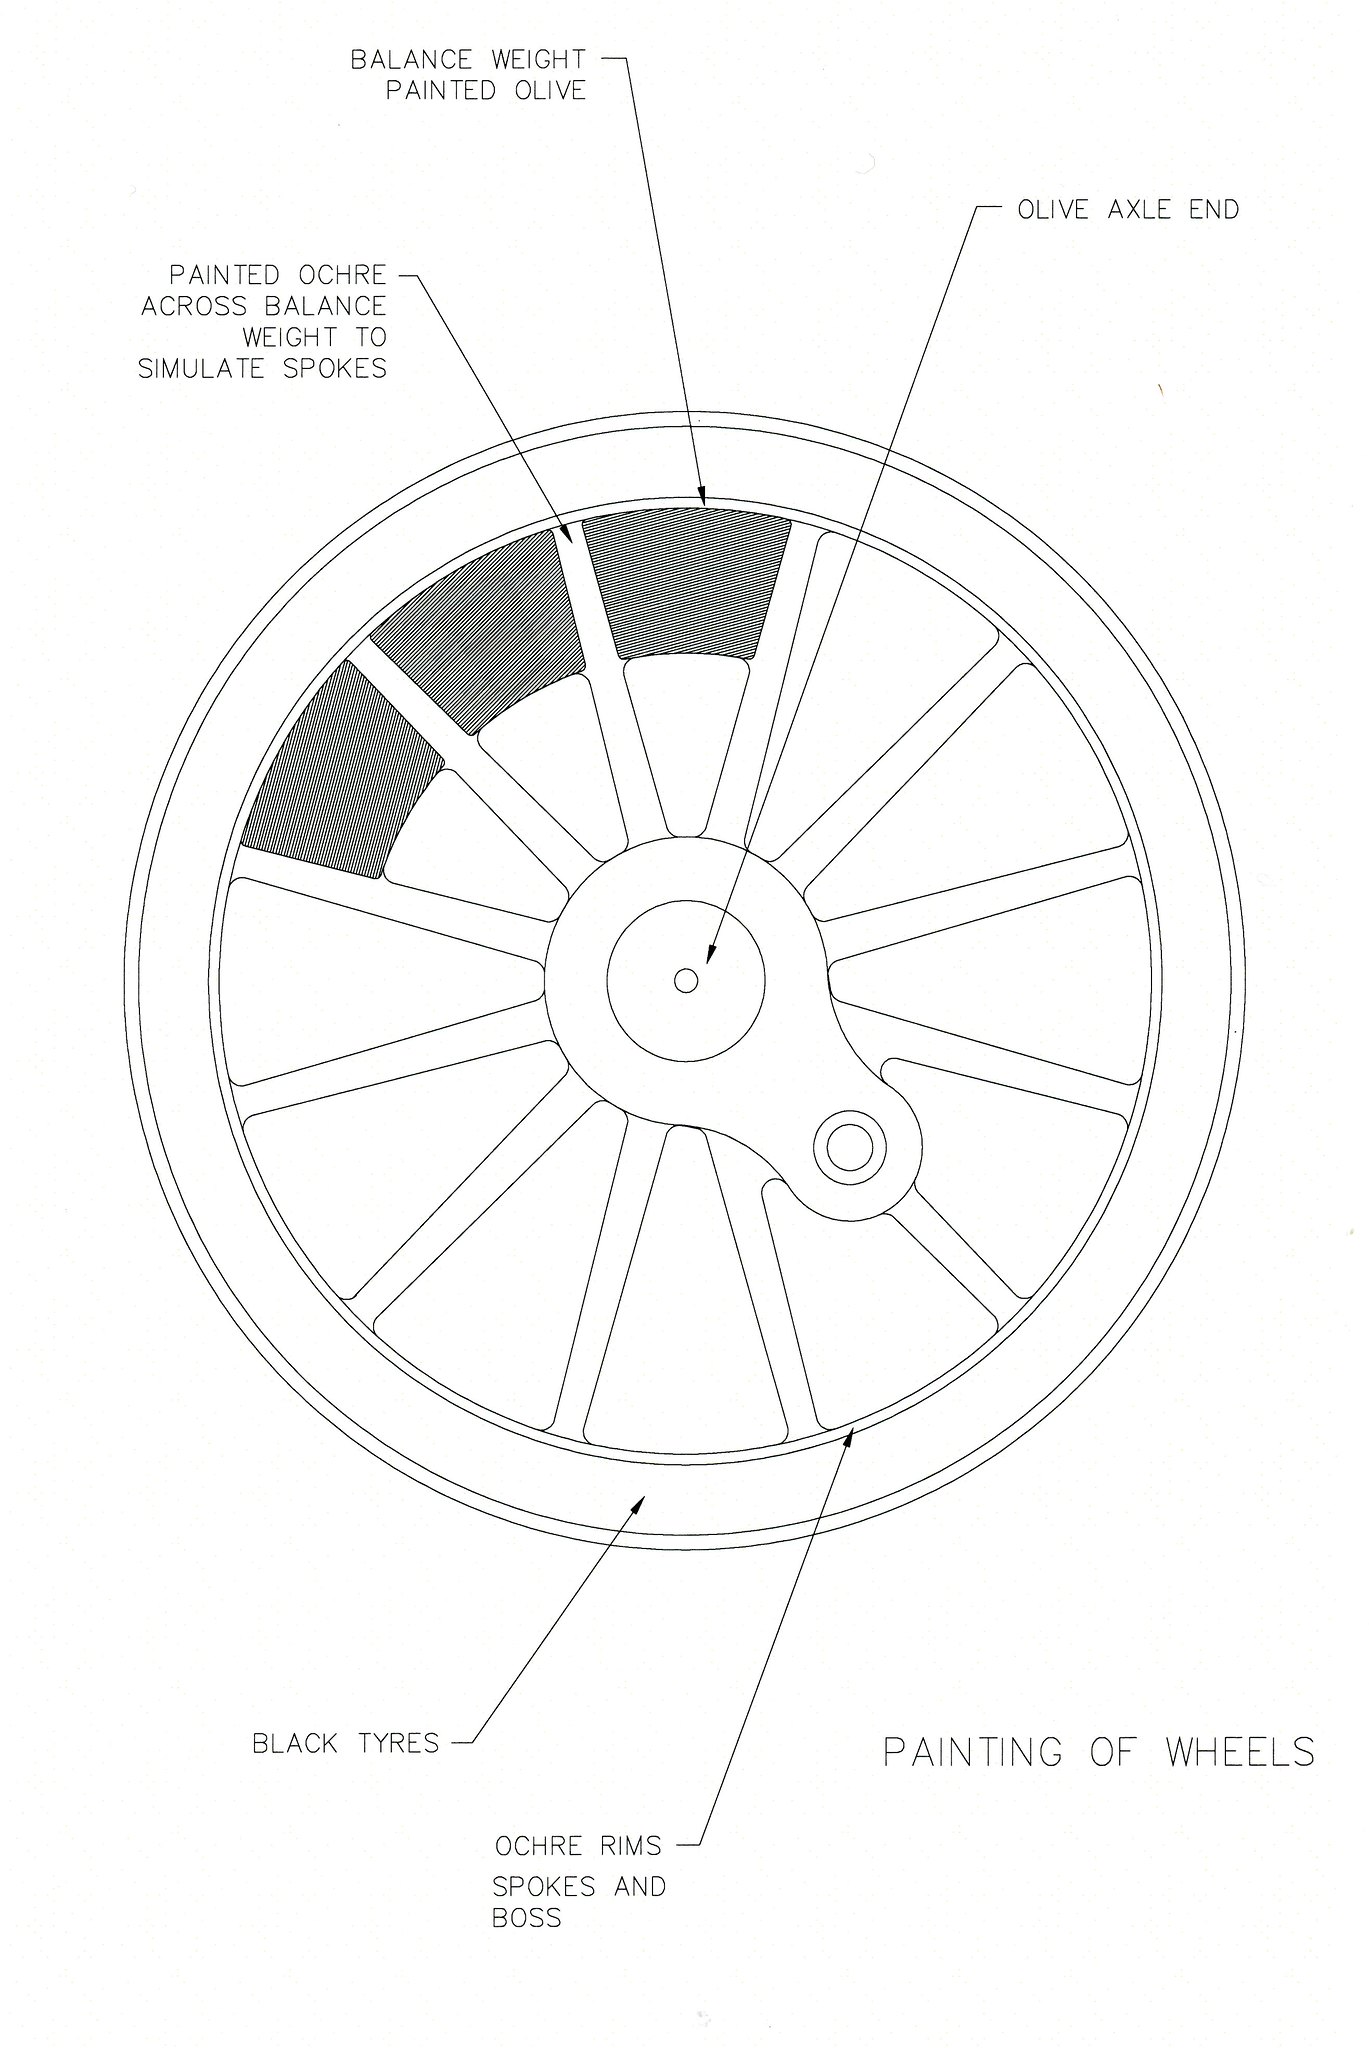 Image10 by Robert Shephard, on Flickr Image10 by Robert Shephard, on Flickr
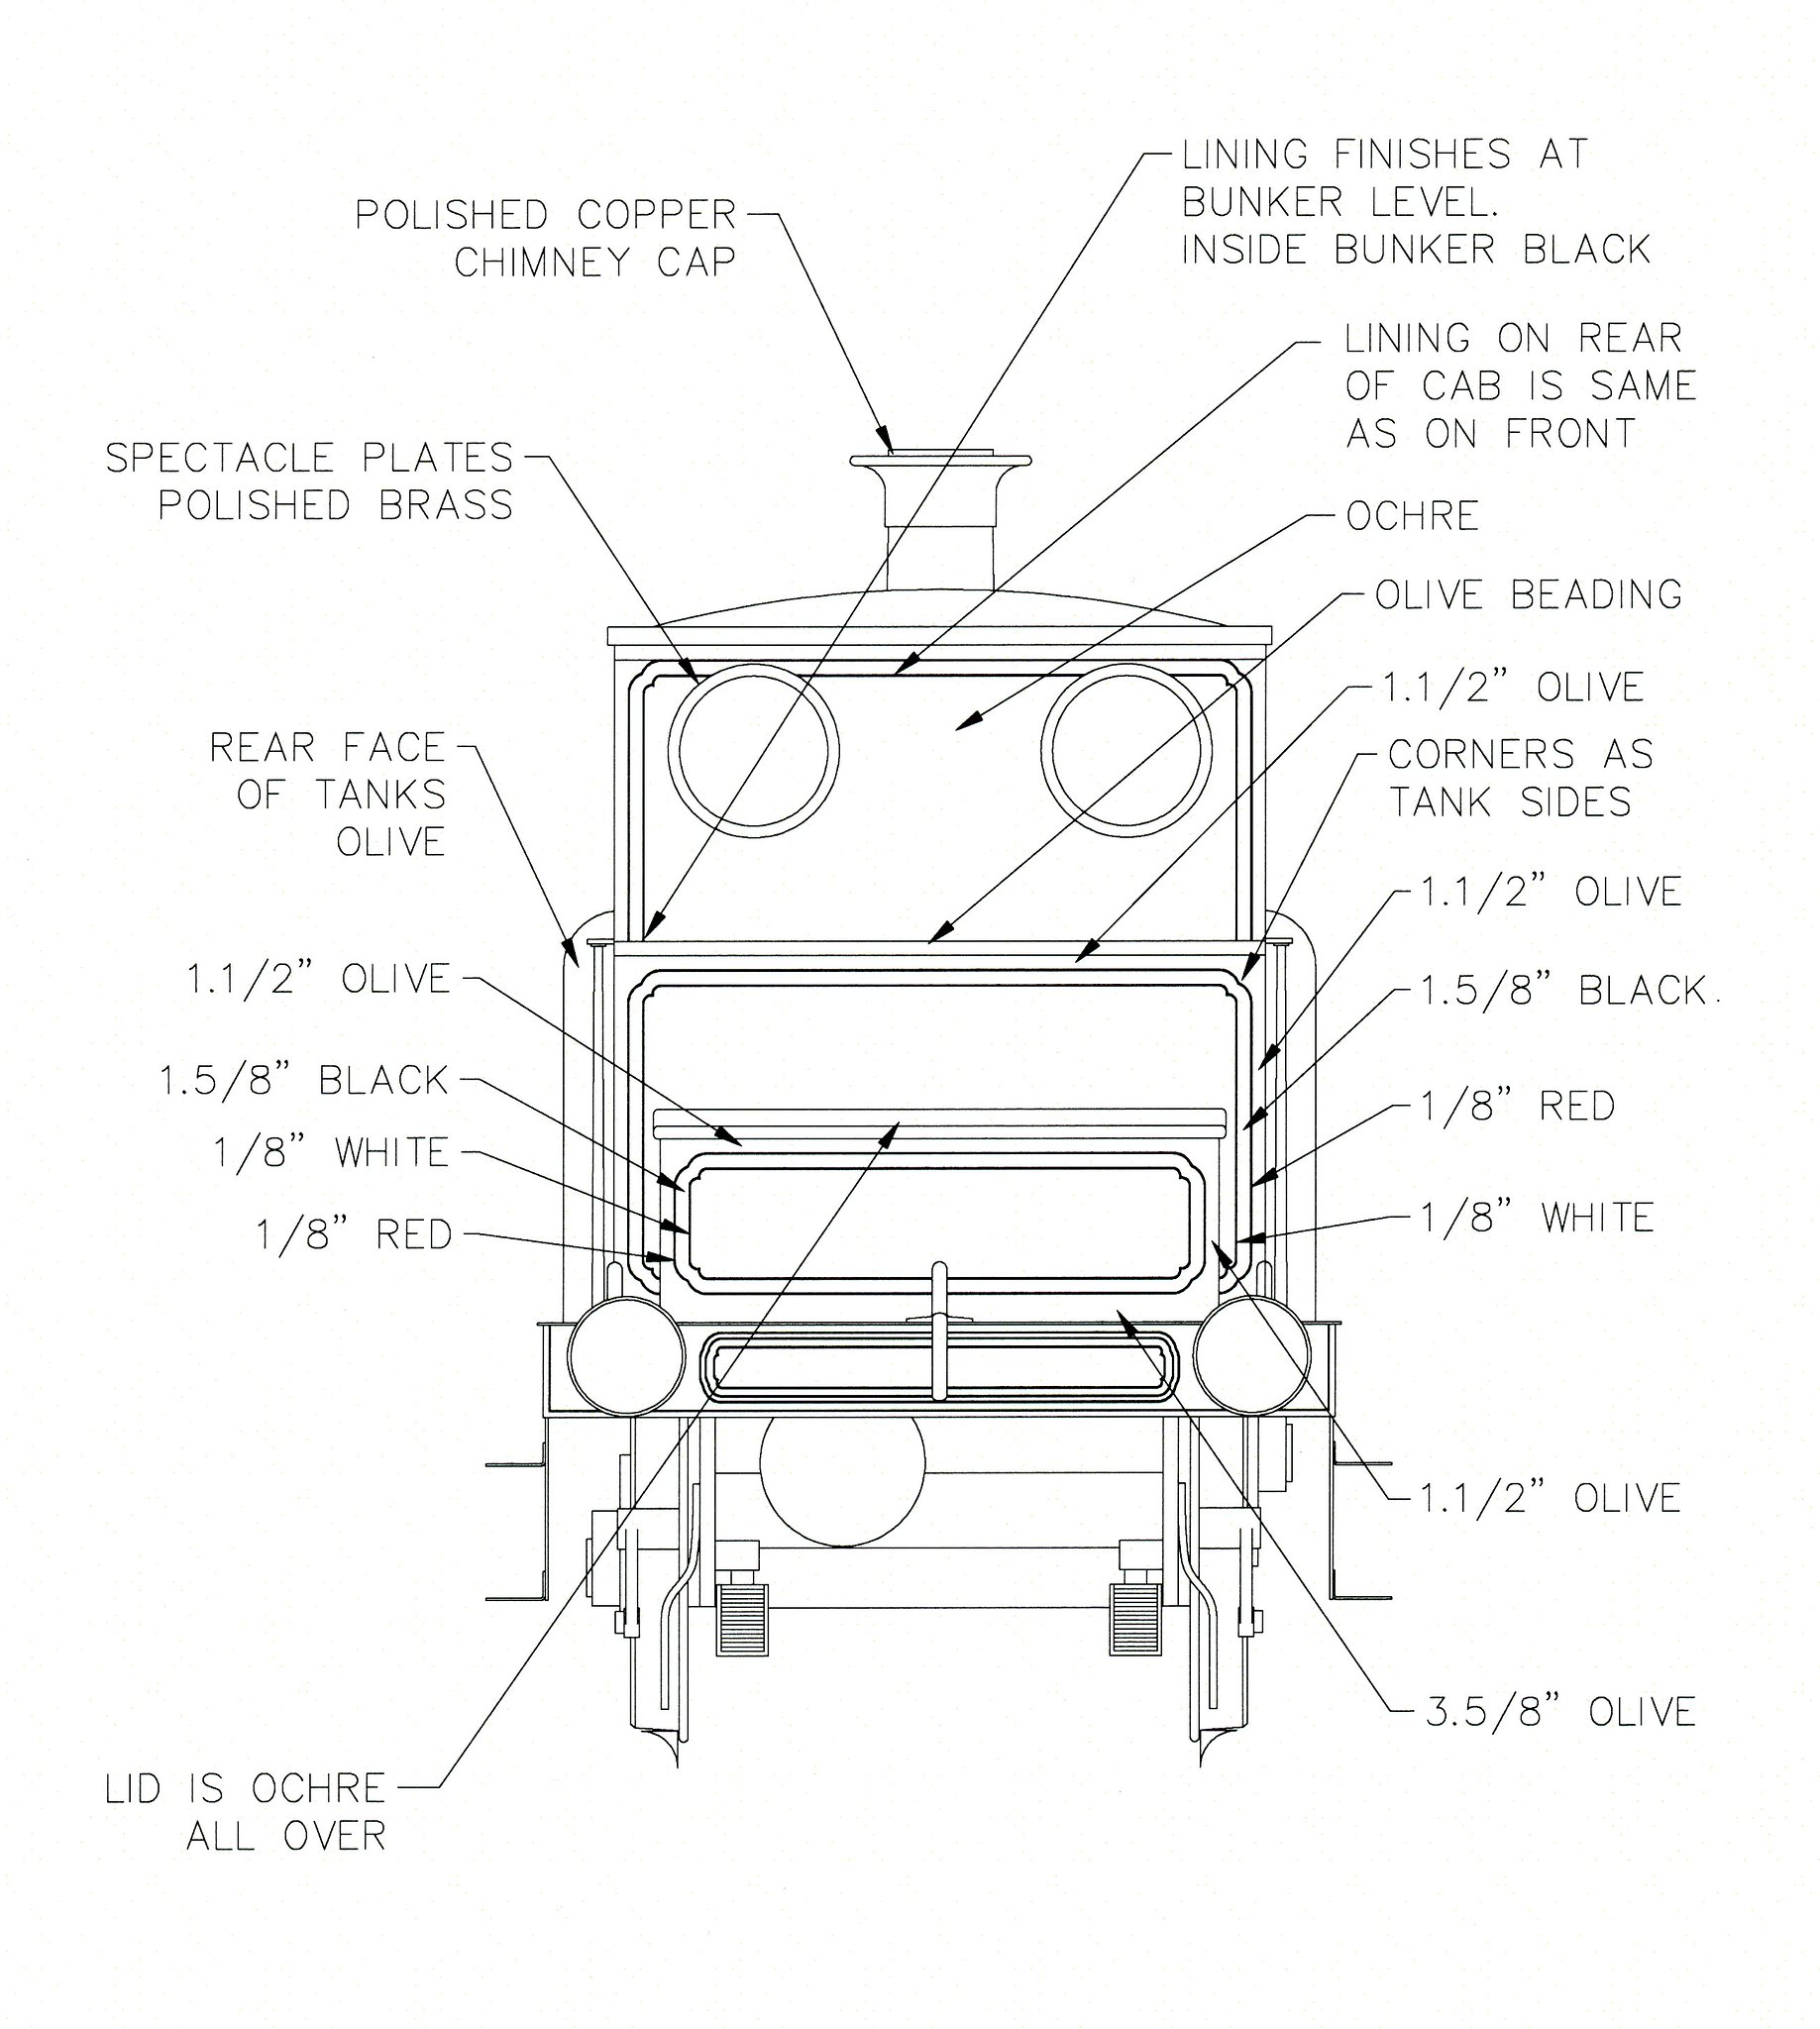 Image11 by Robert Shephard, on Flickr Image11 by Robert Shephard, on Flickr
There has always been a certain amount of controversy in the modelling world, regarding the true colour of LBSCR 'Improved Engine Green' or Yellow Ochre as often called. I was lucky that when I had Phoenix Paints Ltd. I used to supply British Rail with some special colours for locos. One loco that I supplied paint for was the Western diesel that was painted BR Golden Ochre. I was sent the sample panel to match by the Derby Surface Coatings Lab, and was told that it was original LBSCR paint from a tin found in Eastleigh works. While colour matching the paint, I formulated the colour for inclusion in the Precision range, because up until then, nobody was sure what the true colour was. When I compared the BR panel against Como, the shades were identical. As the colour was based on natural Yellow Ochre, which is colour stable, the model hadn't faded with age and the BR panel was a match.
The Stroudley colours, from the Precision range, are:
P476 Improved Engine Green (Yellow Ochre)
P477 Lining Olive
P480 Claret
P481 Cab Interior Tan
P994 Vermillion
By the way, I should stress that I no longer have any connection with the company, and haven't for some 13 years.
Bob
(edit) I shall know, next time, to reduce the file size of pics!!
|
|
|
|
Post by 92220 on Nov 5, 2017 11:50:14 GMT
Como was built by Dr Bradbury Winter. I am sure he got the livery exactly correct though! Chris.
That's interesting Chris. I posted the data sheet details, above, before I saw your post. I had never thought to question what I had been told by the museum staff, back in the 1980s when I was doing my research. Just goes to show that museum staff don't always know what they have got!!
Bob.
|
|
|
|
Post by Deleted on Nov 5, 2017 11:53:31 GMT
Wow...now that's what I call an in depth report on the Terrier Livery...fantastic work Bob...a fabulous piece of info for builders of this pretty little loco.....well done sir..
Pete
|
|
pugsy
Active Member

Posts: 31 
|
Post by pugsy on Nov 5, 2017 13:43:22 GMT
Very useful stuff, but it says the salter calve arms were plain steel, the ones on no.55 Stepney are blue 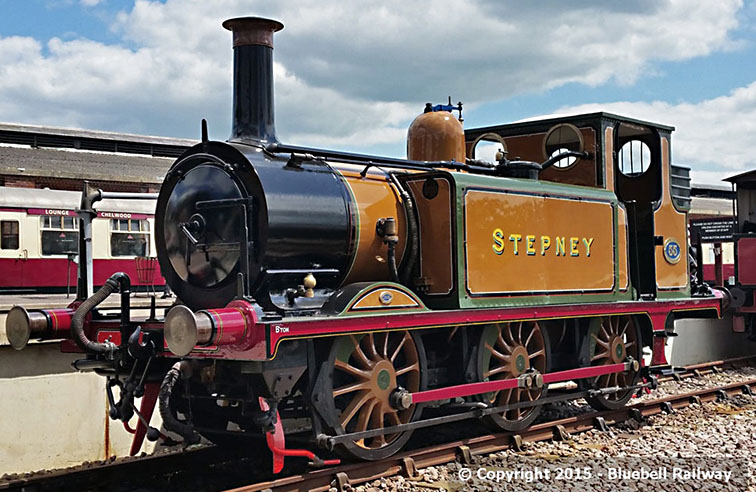 |
|
foote
Active Member
Posts: 16
|
Post by foote on Nov 5, 2017 13:55:19 GMT
M Machine sell 5/32" stainless tube of various thicknesses
|
|
|
|
Post by 92220 on Nov 5, 2017 19:16:35 GMT
Hi Pugsy.
Yes. There were small variations on some locos. Drivers often made small changes, to make the loco 'their own', but never anything major that would have got them in trouble for breaching company livery policy. Also, Stepney has been repainted in preservation days so differences from original can creep in, though looking at the photo, they do seem to have got the livery right. The only question I would level is the shade of red of the guard irons. They look Vermillion but they should be Claret the same as the valances and coupling rods. Colour photos are notorious liars(!), so it may just be the photo at fault.
Bob.
|
|
jma1009
Elder Statesman
Posts: 5,900
|
Post by jma1009 on Nov 5, 2017 19:18:27 GMT
Hi Bob,
Many thanks for posting the livery sheets here for all to see. You very kindly sent them to me last year.
Ed asked about the handrails along the side of the boiler - which are hollow.
The lefthand hand rail contains the operating rod from the cab for the external blower valve on the outside of the smokebox.
The righthand hand rail contains the operating rod for the external cylinder lubricator on the outside of the smokebox - which was removed in the 1920s/1930s on most Terriers that remained and then a pipe usually was run inside the handrail from the hydrostatic lubricator in the cab.
I have done a quick perusal of LBSCR Stroudley livery era Terrier pics and some show burnished boiler handrails and some show them painted. As a result one can only assume they were painted (black) ex-works or re-paint, and crews and cleaners removed the paint and burnished the rails. The stanchions usually always remained black.
Hi Pugsy, I think the reason Stepney's salter safety valve arms are currently painted black is because the loco is out of use on display. This is a recent repaint.
'Como' in Brighton Museum was indeed built by Dr J Bradbury Winter, and it is well worth popping in to the free museum to say 'hello' to Como. It was painted by the foreman painter at Brighton Works and the Stroudley livery was still the LBSCR livery until Marsh changed it to 'umber' in 1905.
Cheers,
Julian
|
|
|
|
Post by terrier060 on Nov 5, 2017 20:17:45 GMT
Firstly let me thank you all for your very thorough replies. It has been most helpful. I am ashamed to say that I started these Terriers in about 1989, before even Don Young got going with 'Newport', and am still struggling on with them! I have based the models on copious photos of Fenchurch (on which the models are based), Stepney and Knowle which was then in pieces so I got some good info of the insides. One of the engines is Fenchurch as A1 and the other A1X in BR black. I have based the livery and some of the early A1 details on 'Boxhill' and have many photos of the engine which I took in the NRM many years ago. The drawings I have done in AutoCAD, based on the originals published in 'The Engineer' and 'Engineering' in the late 1800s. If one follows the original drawings it appears that even 'Boxhill' is incorrect in some details, but I suspect it has not got its original boiler so that would not surprise me. In fact the original A1 version of Fenchurch, as shown on the drawings, had only one water gauge and two test cocks! Regarding the handrails, they are shown bright on 'Boxhill', hence the need for stainless tube. They have to be hollow as the blower and oil handles run through the middle of them to the smokebox. I may be able to get 3/16" tube, but this is a bit over scale. The firms that produce this sort of small tubing seem to be the ones that make hypodermic needles, but I shudder to think what a 5/32 one is used for!!!  Many thanks for the M Machine tip - I will try them. Otherwise I will trawl the net again for 4mm tubing - I might even beg one of these big suppliers to help an eccentric model engineer! They do sometimes put themselves out. I needed some very large ball bearings for the Stuart Major Beam engine and the firm sent two lots over from the USA (by mistake) - no charge! If all fails I will research how the gunsmiths bored very long holes through small pieces of metal! I tried to send some pics, but was told the thread was full up! If anyone can advise me I will post some - not very good at forums as I do not often use them - more fool me - this is such a good site. Thanks all of you Ed |
|
|
|
Post by terrier060 on Nov 5, 2017 20:22:31 GMT
PS. Those livery diagrams are fantastic - which reminds me Bob, I still have some of your original Improved Engine Green paint which I bought about twenty years ago - I wonder if it is still useable?
Ed
|
|
|
|
Post by steamer5 on Nov 6, 2017 5:39:27 GMT
Hi Ed,
On the stainless tube front, have you tried Hewson models ( of Doug Hewson fame) they use 5/32 for there superheaters, pretty sure they sell straight length, still no harm in asking.
Cheers Kerrin
|
|
|
|
Post by terrier060 on Nov 6, 2017 10:02:47 GMT
Many thanks Kerrin - I have tried them and they are undergoing new management at the moment, but are going to have a look.
Ed
|
|
|
|
Post by GeorgeRay on Nov 6, 2017 10:39:34 GMT
Ed
Just a thought since you say you are building from photographs. I hope that you have made the crank axles right hand lead and not as Boxhill in the NRM which is left hand lead. If you’ve used Fenchurch or Knowle then all is OK.
George Ray
|
|
|
|
Post by 92220 on Nov 6, 2017 12:02:33 GMT
Hi Ed.
As long as your paint is still fully liquid in the tin, it will be OK to use. However, you will have to mix the paint VERY thoroughly, as the pigments will have settled and packed down, on the bottom. The only way to get them back into suspension is with a power mixer. Break up the 'cake' in the bottom, with a screwdriver, then make a wire mixer with 16 or 18 swg if a 50mls tin. If your tin is a 250mls tin, make the mixer out of 14 or12 swg (2 or 3mm) steel wire. I use steel welding rod. This is a page from my book on painting, if it helps:
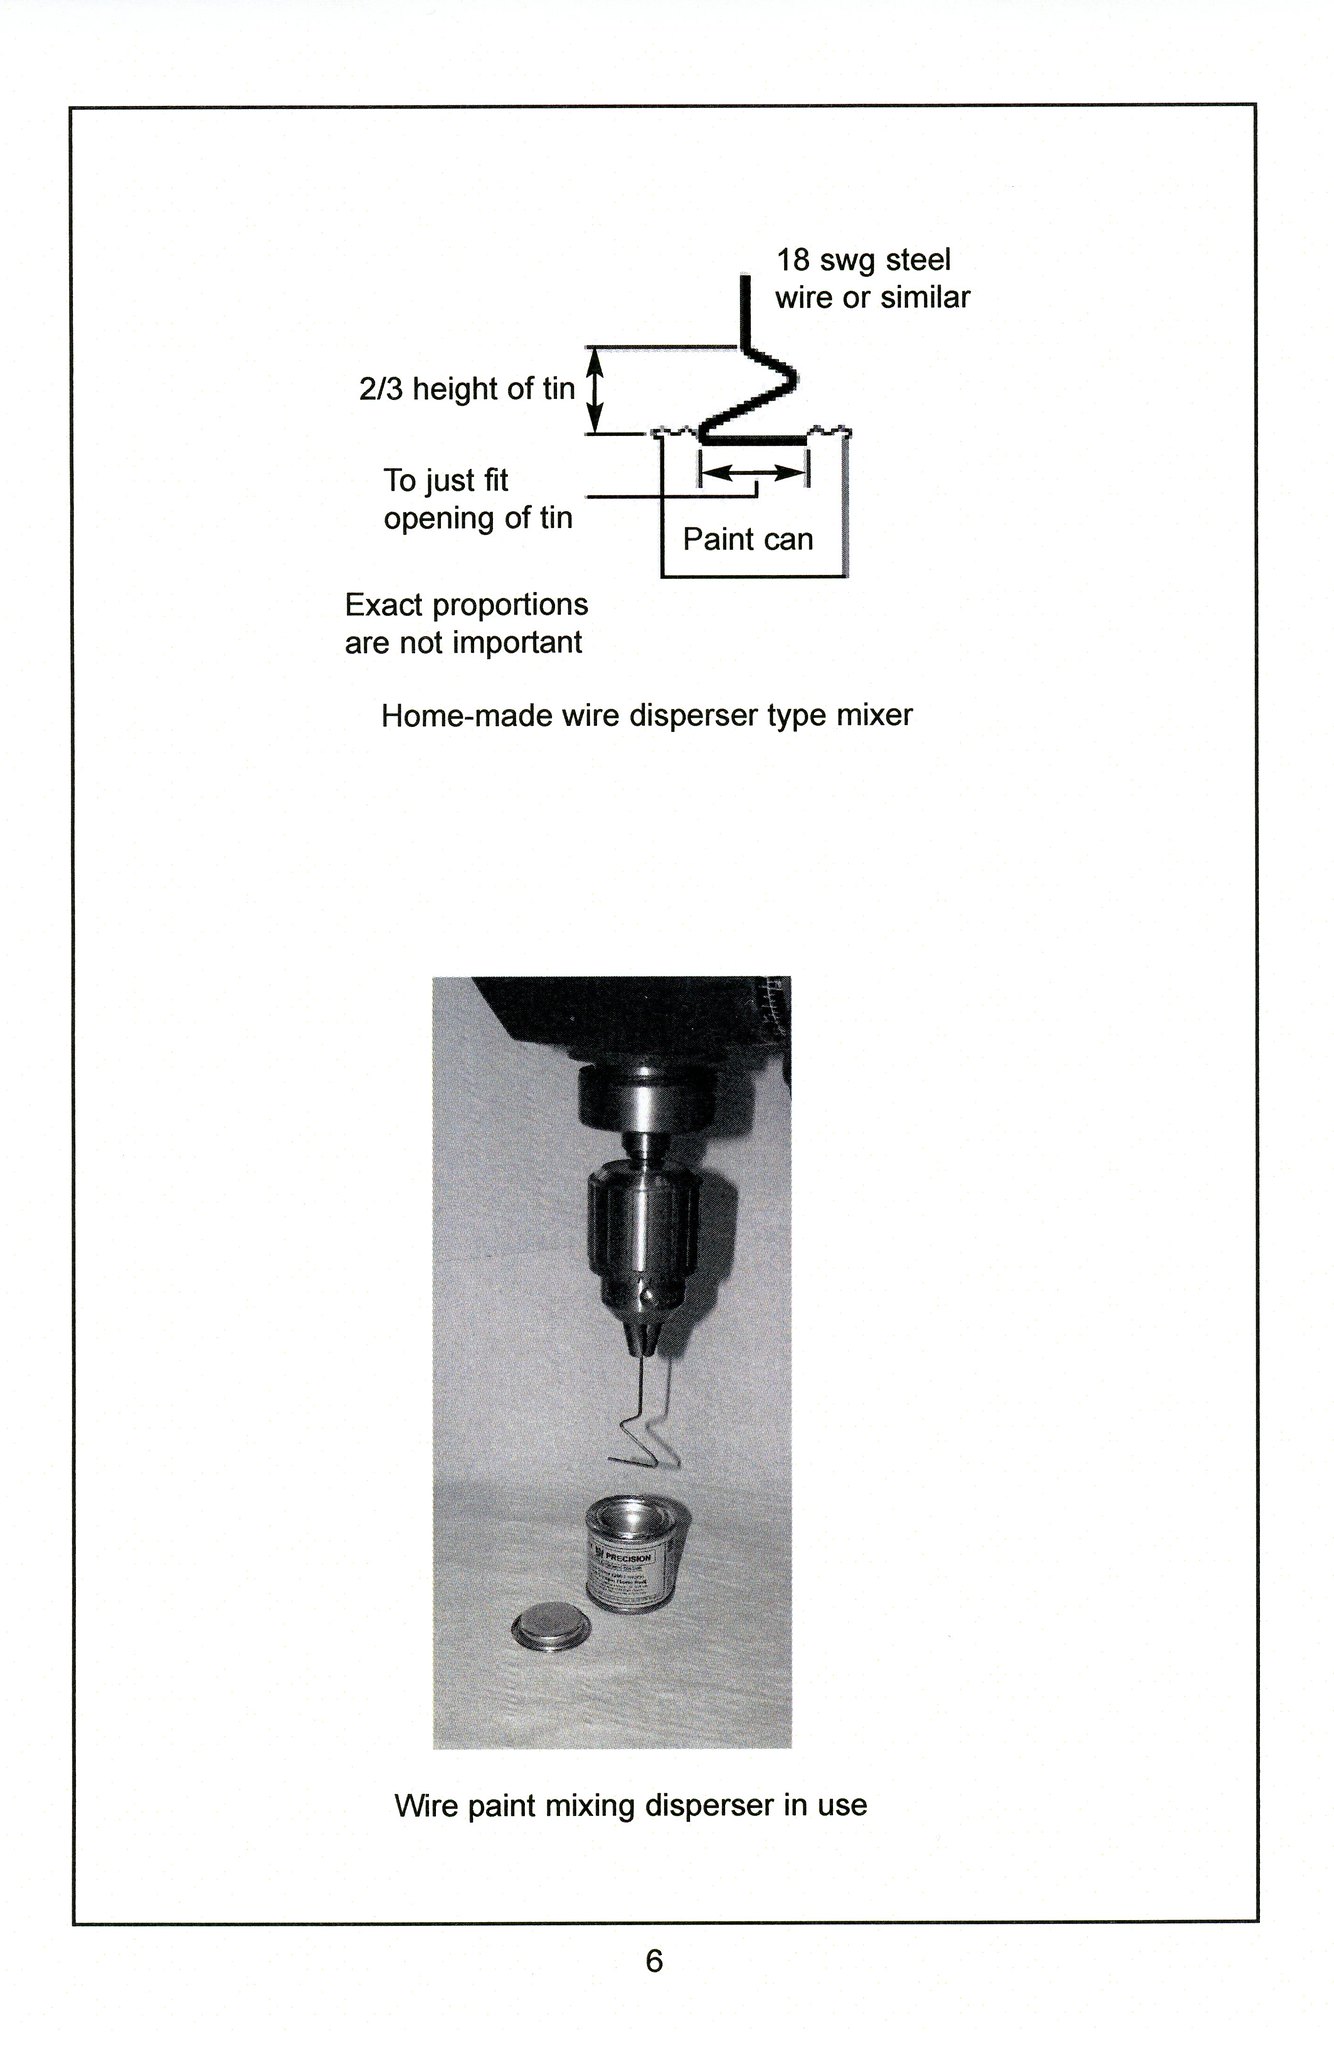 wire paint mixer by Robert Shephard, on Flickr wire paint mixer by Robert Shephard, on Flickr
Bob.
Edit: I forgot to add - run the mixer at around 1000 rpm to start, then work up to around 2000 rpm. Make sure the mixer is in the paint before switching on and keep in the tin until switched off, otherwise you will have a very nice 'Improved Engine Green' shirt!! (or not so nice!!) The vortex should bring the rotating paint just up to the rim of the tin. |
|
|
|
Post by terrier060 on Nov 6, 2017 23:38:55 GMT
Thanks Bob - I will do as you say. They are 250ml tins. Love the colour - Stroudley was a genius as an engineer and a manager of men. The idea of putting the driver's name in the cab would have ensured the engines were cared for better than wielding a stick!
Bye-the-bye, is your book on painting still available?
|
|
|
|
Post by terrier060 on Nov 6, 2017 23:48:29 GMT
To reply to George - on my locos, when the left hand crank is back, the right hand is vertical in the up position as per Stroudley's drawings. I tried to post a photo but it says the thread is full?!
Ed
|
|
|
|
Post by GeorgeRay on Nov 7, 2017 9:58:41 GMT
Ed
You’re Ok then because that is right hand lead just as it should be. Boxhill has a SE&CR left hand lead crank axle ex Waddon.
George
|
|


 Many thanks for the M Machine tip - I will try them. Otherwise I will trawl the net again for 4mm tubing - I might even beg one of these big suppliers to help an eccentric model engineer! They do sometimes put themselves out. I needed some very large ball bearings for the Stuart Major Beam engine and the firm sent two lots over from the USA (by mistake) - no charge! If all fails I will research how the gunsmiths bored very long holes through small pieces of metal!
