|
|
Post by simplyloco on Jan 8, 2019 17:10:07 GMT
Pete Unless things have improved over the years, you might need deep pockets to buy a tiny reamer. Tap-Die do one for about £35! If you look closely at my Brit, all the 'taper pins' are straight silver steel, loctited in, and they look fine. Somehow I don't think that you will adopt that approach...  John |
|
|
|
Post by Deleted on Jan 8, 2019 17:20:51 GMT
Somehow I don't think that you will adopt that approach... John What do you mean sir???... Actually, I have a drawer full of odd reamers, some may be taper, I'll have a rummage around tomorrow to see what I have, can anyone tell me the size of the taper, I'm assuming that a 1/16th reamer is 1/16 at it's widest part but what is it at the bottom and is it this size hole that you drill or do you go a little larger? Pete |
|
|
|
Post by Roger on Jan 8, 2019 17:26:19 GMT
Hi Pete,
Please try this on a piece of scrap before you do it for real. It's amazing how a tiny error results in the pin going in miles further than you intended!
|
|
|
|
Post by simplyloco on Jan 8, 2019 17:30:52 GMT
Somehow I don't think that you will adopt that approach... John What do you mean sir???... Actually, I have a drawer full of odd reamers, some may be taper, I'll have a rummage around tomorrow to see what I have, can anyone tell me the size of the taper, I'm assuming that a 1/16th reamer is 1/16 at it's widest part but what is it at the bottom and is it this size hole that you drill or do you go a little larger? Pete 0.0432 little end one inch long. Tap- Die website |
|
stevep
Elder Statesman

Posts: 1,070
|
Post by stevep on Jan 8, 2019 17:33:27 GMT
At the risk of trying to teach grandma how to suck eggs, you know that you should ream the hole with the large end towards the centre of the axle? Then centrifugal force makes the taper pin go further into the hole, rather than throwing it out.
|
|
|
|
Post by Deleted on Jan 8, 2019 17:54:09 GMT
At the risk of trying to teach grandma how to suck eggs, you know that you should ream the hole with the large end towards the centre of the axle? Then centrifugal force makes the taper pin go further into the hole, rather than throwing it out. Not sure I get what you mean Steve?...in this situation the large end is always going to be on the outside, no matter which side you start at? or am I missing something here? Pete |
|
|
|
Post by Roger on Jan 8, 2019 19:53:40 GMT
At the risk of trying to teach grandma how to suck eggs, you know that you should ream the hole with the large end towards the centre of the axle? Then centrifugal force makes the taper pin go further into the hole, rather than throwing it out. Not sure I get what you mean Steve?...in this situation the large end is always going to be on the outside, no matter which side you start at? or am I missing something here? Pete I think Steve is meaning that since you're fixing a crank pin that's at a radius, anything attached to the pin is going to be thrown outwards. If you drill the hole from the centre line of the axle, heading in the direction of the wheel rim, the pin will try to continue in that direction when installed, making it wedge further into the taper. |
|
pault
Elder Statesman
Posts: 1,496
|
Post by pault on Jan 8, 2019 20:03:42 GMT
One thing to note is that metric and imperial taper pins have different angles so only use a metric pin with a metric reamer, same with imperial.
As some have said reaming a hole just a tiny bit more can mean the pin going a lot further into the hole. I would get pins longer than you need ream, tap the pin in and trim to length.
|
|
|
|
Post by Deleted on Jan 8, 2019 20:39:38 GMT
Not sure I get what you mean Steve?...in this situation the large end is always going to be on the outside, no matter which side you start at? or am I missing something here? Pete I think Steve is meaning that since you're fixing a crank pin that's at a radius, anything attached to the pin is going to be thrown outwards. If you drill the hole from the centre line of the axle, heading in the direction of the wheel rim, the pin will try to continue in that direction when installed, making it wedge further into the taper. I understood the physics Roger, what a had forgotten was that the crank pin is offset, so yes I now see what Steve was saying, thanks for the heads up Steve, sorry for my confusion...I just need to remember this... Pete |
|
|
|
Post by Deleted on Jan 8, 2019 20:42:03 GMT
One thing to note is that metric and imperial taper pins have different angles so only use a metric pin with a metric reamer, same with imperial. As some have said reaming a hole just a tiny bit more can mean the pin going a lot further into the hole. I would get pins longer than you need ream, tap the pin in and trim to length. Thanks, Paul, the Pins that I have found are 1/2" long which I think is long enough, I'll measure across the flats tomorrow to check. Cheers Pete |
|
mbrown
Elder Statesman
Posts: 1,720
|
Post by mbrown on Jan 8, 2019 21:26:33 GMT
Lots of the usual ME suppliers do 1/16" taper pins. I last got some from Western Steam's stand at the Midlands Exhibition. I think they also do 5/64" ones - which are useful to have in hand in case you go too deep with the 1/16" taper reamer....
I measure the small end of the taper pin and do the initial drilling at a size a tiny bit bigger - but like most of my work, it's rule of thumb rather than precision engineering!
A big advantage of taper pins over roll pins etc is that it only takes a light tap at the small end to free them - other kinds of pins have to be driven out for their whole length. In many situations, it is really useful to be able to remove a pin that easily.
I think the big difficulty you face is drilling the nut and crankpin with the wheel itself in the way.... I suspect you'll need a long extension shank for the drill and something similar to hold the taper reamer. I have a 1/16" drill Loctited into a length of 1/4" silver steel (about 10" long) which I find is invaluable for all kinds of tricky drilling jobs. If the protrusion of the drill is kept fairly small, it is not too wobbly. For the reamer, maybe a small collet chuck with an extension handle is the answer. Whatever you do, go gently!
Hope this helps.
Malcolm
|
|
|
|
Post by builder01 on Jan 8, 2019 22:03:00 GMT
Taper pins are a good way to secure nuts to shafts and really anything to a shaft that you may want to later easily remove. Most people don't want to go through the trouble of installing them because the hole for them must be carefully reamed by hand. Once installed, they are more secure than a straight pin, or tension pin, and are easier to remove and install. Imperial size taper pins all have the same taper and a longer taper pin of a larger size can be used to fit in a hole reamed for a smaller size, if you happen to ream it a little over size. Attached are a few photos of my return crank on my Super Simplex. It is secured with a taper pin. The pin is about .085" on the small end. This is a #0000 taper pin 5/8" long. The hole drilled for it is just large enough for the reamer to start into the hole, or, just a little larger than the small end of the pin. The reamer shown has a high helix with a left hand twist. This pushes the chips ahead of the reamer. A right hand twist tends to "suck" the reamer into the tapered hole and can cause it to jam. Never turn a tapered reamer backwards to unjam it, you will break something. Use cutting fluid and clear the chips frequently. Also, clear the hole when you get close to size and frequently check with the pin to be used, for fit. As you can see, all of the rods are still in place as I did not want to pin my return crank until it was exactly in the perfect spot where I knew the loco would run correctly. Removing the rods would have disturbed the setting of the return crank. Now that it is pinned, the return crank can be removed and put back exactly in the same position every time. I got all of my pins and reamers for a fraction of full price off of Ebay, all new old stock. 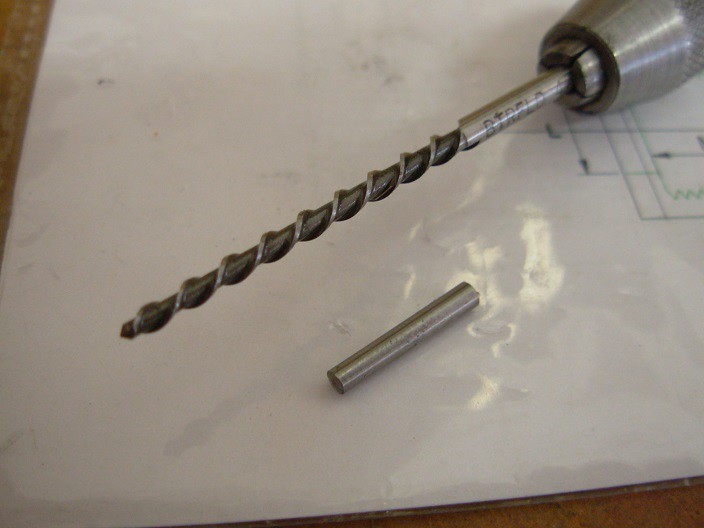 DSCN1766 - resized 3 DSCN1766 - resized 3 by Builder16, on Flickr 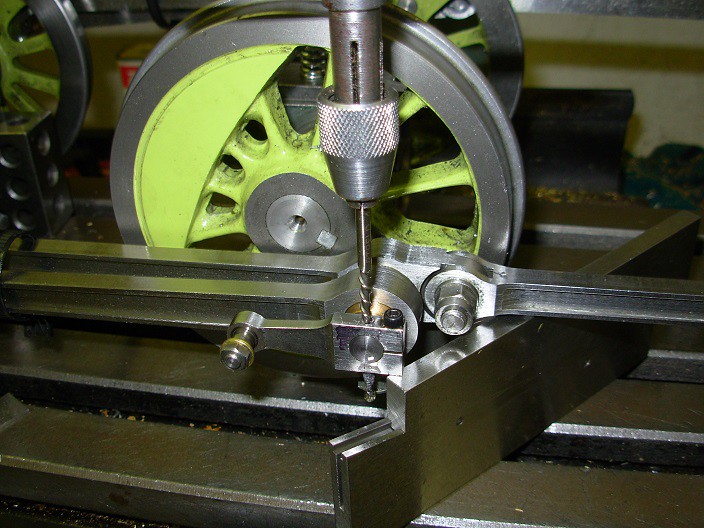 DSCN1768 - resized 4 DSCN1768 - resized 4 by Builder16, on Flickr |
|
mbrown
Elder Statesman
Posts: 1,720
|
Post by mbrown on Jan 8, 2019 22:13:37 GMT
I have never seen a taper reamer with a helix on it before. All mine - and all the ones I have seen used on the TR at Pendre - have parallel flutes. I must investigate the ones like yours - they look handy.
Malcolm
|
|
|
|
Post by builder01 on Jan 8, 2019 22:17:08 GMT
I have used both straight and twisted flute types of reamers. Having used both types, I really prefer the twisted flutes, the left hand twist is even better. I was lucky to get this high helix, most twisted flutes are slow helix.
David.
|
|
|
|
Post by Deleted on Jan 8, 2019 22:24:24 GMT
you know, I think that I've seen a reamer like that in my drawer, most of it's contents came with 4470 when I bought it 'part finished' some years ago, I seem to recall something like that, no idea what size it is though? Hopefully, tomorrow's search will answer this...
Pete
|
|
|
|
Post by Deleted on Jan 9, 2019 12:46:52 GMT
Morning all Well, it was a good idea to check what I had before spending any cash, I found that I have both 1/16th tapered reamers and 1/16th taper pins... happy days. the two top reamers are a fraction larger at the shank, so perhaps too big. The lower reamers and the pins are all 1/16 at the top of the taper, I have taken another look at the caps following Steve's comment regarding the direction of taper and was pleased to see that by some luck the flats after a slight tightening can be positioned at 90 degrees to the axle, so again happy days. In fact, you can see this in the picture I posted yesterday, I just needed to tighten it a very small amount to get it in position, the other side is the same.  I'll probably do this job once the wheelset has been removed for the other work required to finish it. Pete |
|
|
|
Post by 92220 on Jan 9, 2019 17:36:55 GMT
Hi Pete.
If there is no heavy load on the nut and pin as you indicate, why not just make the pin 3/16" x 40, and use that size nut? Because the thread pitches are the same, it should be easy to do, and have no visual impact, if strength is not a problem?
Bob.
|
|
|
|
Post by Deleted on Jan 9, 2019 18:35:00 GMT
Hi Bob Thank's for the suggestion, it had been suggested before but the crank pins are already loctited into the wheels thus not really an option without removing them. All is sorted now, I made new caps and only threaded partly using a taper tap as suggested by some. This worked well, today I cross drilled the caps using a PCB drill of just a slightly larger size than the smaller end of the taper pin. The PCB drills where the only drills I have of that size and they are crap Chinese cheapies which are useless for metal. Anyway, I persevered (broke 4, luckily they are so crap that the tips just shattered and weren't stuck in the hole) and managed to drill the holes starting with a 0.8 mm and stepping up to 1.2 mm. I won't try to cross-drill the crank pins themselves until I have some decent drill bits, I ordered those this afternoon. I have a picture to show how they are coming along...  Pete |
|
|
|
Post by 92220 on Jan 9, 2019 18:43:46 GMT
Hi Pete.
I'm pleased to hear it's sorted, and relatively easily. That looks a nice job!
bob.
|
|
|
|
Post by Deleted on Jan 9, 2019 20:08:01 GMT
Thanks, Bob It was relatively easy, with the flat sides I could easily set the cap so it's square to the drill bit, place a small piece of wood under it to protect the vice and just drill after first clocking it to be central. It would have been much easier with decent drill bits but hey ho...  Pete |
|


