|
|
Lisa
Statesman

Posts: 806 
|
Post by Lisa on Jan 18, 2019 22:32:40 GMT
Speaking of changes to the pump stretcher, I was reminded of the setup of Oily Rag 's 'axle bush holders' on his 32mm gauge loco, and it occurred to me that something similar could work for dropping the pump in/out and would also alleviate my concerns about weakening the stretcher. 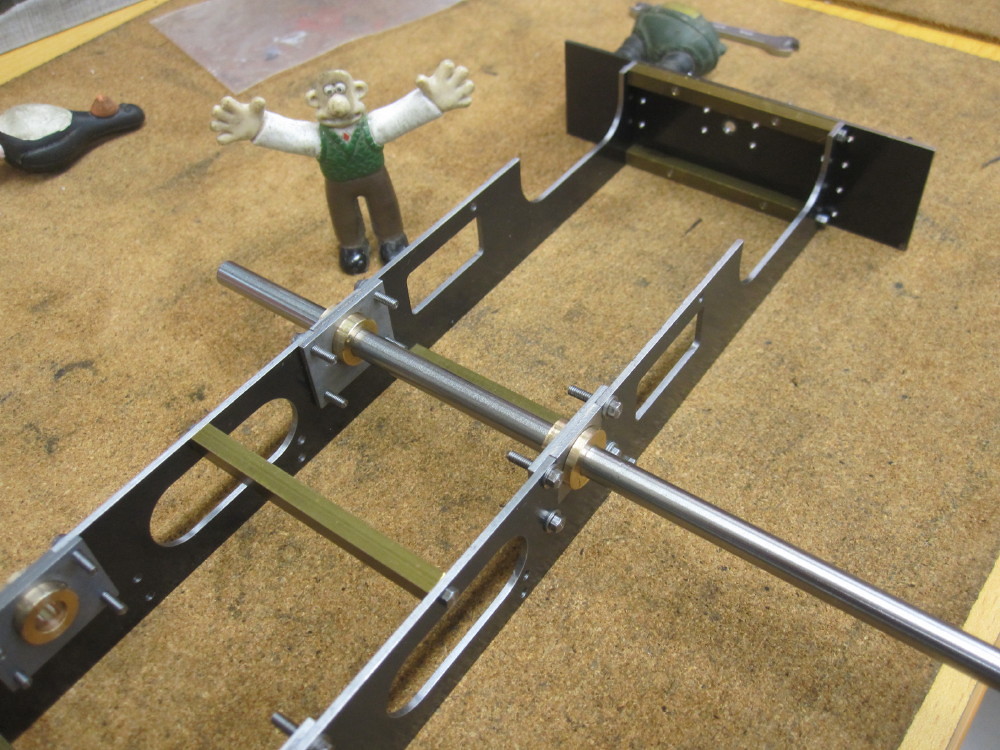 Image pinched from Daz's thread. Ultimately though, I'll probably just stick with 'as designed' and go with a tapped hole for the pump; as I could always just unscrew the whole stretcher and drop it out if needed. |
|
Lisa
Statesman
Posts: 806
|
Post by Lisa on Jan 19, 2019 19:06:37 GMT
|
|
|
|
Post by Roger on Jan 19, 2019 20:05:54 GMT
Pump stretcher silvered together, a good solid joint. Now ready to be milled to final length and the various holes drilled.    Nice and solid, a very good joint by the look of it. You can save a lot of time cleaning up that dreaded Black oxide if you paint everything with flux, not just the joint. I cover absolutely everything (both sides too) with it when joining Steel, it doesn't have to be a thick mix, it still works. There are usually a few spots that go black, but most of it needs no cleaning other than warm water and a brush. |
|
Lisa
Statesman
Posts: 806
|
Post by Lisa on Jan 19, 2019 20:21:43 GMT
Nice and solid, a very good joint by the look of it. You can save a lot of time cleaning up that dreaded Black oxide if you paint everything with flux, not just the joint. I cover absolutely everything (both sides too) with it when joining Steel, it doesn't have to be a thick mix, it still works. There are usually a few spots that go black, but most of it needs no cleaning other than warm water and a brush. Thanks Roger, I'll give that a go next time. I noticed that the worst of the black was right on the edge of where the flux was, so not having an edge would help! |
|
|
|
Post by Roger on Jan 19, 2019 20:34:13 GMT
Nice and solid, a very good joint by the look of it. You can save a lot of time cleaning up that dreaded Black oxide if you paint everything with flux, not just the joint. I cover absolutely everything (both sides too) with it when joining Steel, it doesn't have to be a thick mix, it still works. There are usually a few spots that go black, but most of it needs no cleaning other than warm water and a brush. Thanks Roger, I'll give that a go next time. I noticed that the worst of the black was right on the edge of where the flux was, so not having an edge would help! Hi Lisa, The black was possibly worse at the edge because you had to concentrate the heat at the joint so it was hotter there for longer. Getting cracking with the job helps so that the flux doesn't get used up before the job is done. Another thing that helps is to form the Silver Solder into a shape that fits the joint. If you put lots of flux over it, the flux melts and thermally connects the Silver Solder wire with the metal so it doesn't melt into little balls, it's sitting in a pool of clear flux. This means you don't have to get the parent metal anywhere near as hot before the Silver Solder melts. You can join something like this with the metal barely glowing noticeably red hot. If you're adding the wire to the pre-heated joint, the joint needs to be significantly above the melting point of the Silver Solder before it conducts enough heat to melt it. You also have to keep the joint hot for longer while you mess about adding more Silver Solder and it's easy to end up with more than you need and it not being evenly applied. The result is likely to have much more black oxide because of this. |
|
|
|
Post by mr swarf on Jan 19, 2019 20:48:38 GMT
I like the way you have used the nails to keep everything in place for soldering, I'll remember that for the future.
Paul
|
|
Lisa
Statesman
Posts: 806
|
Post by Lisa on Jan 19, 2019 21:21:25 GMT
Hi Lisa, The black was possibly worse at the edge because you had to concentrate the heat at the joint so it was hotter there for longer. Getting cracking with the job helps so that the flux doesn't get used up before the job is done. Another thing that helps is to form the Silver Solder into a shape that fits the joint. If you put lots of flux over it, the flux melts and thermally connects the Silver Solder wire with the metal so it doesn't melt into little balls, it's sitting in a pool of clear flux. This means you don't have to get the parent metal anywhere near as hot before the Silver Solder melts. You can join something like this with the metal barely glowing noticeably red hot. If you're adding the wire to the pre-heated joint, the joint needs to be significantly above the melting point of the Silver Solder before it conducts enough heat to melt it. You also have to keep the joint hot for longer while you mess about adding more Silver Solder and it's easy to end up with more than you need and it not being evenly applied. The result is likely to have much more black oxide because of this. That's pretty much how I did it; cut some straight lengths of solder, placed them tight into the corner of the joint with plenty of flux, then heated the lot in one go with a fairly large flame, rather than adding solder to a hot job. The steel was barely red, if at all, as you mention. I think, if anything the issue was that the flux was a bit too watery, as it dried out long before the job was up to heat. I do find it much easier with the solder already on the joint, once it's all hot it essentially just flashes in and it's done; rather than poking about trying to get it all even. |
|
Lisa
Statesman
Posts: 806
|
Post by Lisa on Jan 19, 2019 21:23:45 GMT
I like the way you have used the nails to keep everything in place for soldering, I'll remember that for the future. Paul Thanks, the fire bricks I have are quite soft, it makes poking nails and screws in to keep everything aligned nice and easy. |
|
Lisa
Statesman
Posts: 806
|
Post by Lisa on Jan 20, 2019 19:18:55 GMT
Other than tapping the pump hole (which I don't have the M12F tap for yet), the pump stretcher is now done. It could still do with a bit more cleaning up though; I might leave it in vinegar overnight or something.  This then meant I could bolt bits together for a look for the first time.  Yes, the back of my bench is a mess. |
|
JonL
Elder Statesman
 WWSME (Wiltshire)
Posts: 2,909
|
Post by JonL on Jan 20, 2019 20:23:49 GMT
Looks like my bench! Satisfying to see it starting to look like something tangible I should imagine.
|
|
Lisa
Statesman
Posts: 806
|
Post by Lisa on Jan 25, 2019 21:24:02 GMT
Working on the angles for joining the bufferbeams to the sideframes, I've still got some holes to tap, then it's on with the rivetting. I've got a stock of 3/32 rivets, so this is the one thing I won't be using metric for; not that there's a big difference between 3/32" (2.38mm) and 2.5mm anyway.    Poking about with things in an awkward position earlier, I decided it'd be easier if I turned the chassis over; then I realised it was Tich, and just flipped the chassis over with one hand! |
|
JonL
Elder Statesman
WWSME (Wiltshire)
Posts: 2,909
|
Post by JonL on Jan 25, 2019 21:39:26 GMT
Looking forward to seeing the riveting, I've not done it since my apprenticeship so I suspect my skill has drifted.
|
|
timb
Statesman
Posts: 512 
|
Post by timb on Jan 26, 2019 13:07:48 GMT
Ahhh riveting, whacking things hard with a hammer and a lot of swearing I seem to remember! I don't know about anyone else but I always seem to get the angles moving out of square as I am riveting, there does not seem to be enough surface area to get a good clamp on them, then its the 'I wish I had three hands' scenario. This is why I am looking at using a press for the job rather than a hammer.
Looking good Lisa, hope it goes well for you!!
Tim
|
|
|
|
Post by Roger on Jan 26, 2019 14:26:20 GMT
Ahhh riveting, whacking things hard with a hammer and a lot of swearing I seem to remember! I don't know about anyone else but I always seem to get the angles moving out of square as I am riveting, there does not seem to be enough surface area to get a good clamp on them, then its the 'I wish I had three hands' scenario. This is why I am looking at using a press for the job rather than a hammer. Looking good Lisa, hope it goes well for you!! Tim In my experience, riveting is much easier when the rivet is a really snug fit in the hole. Then it all wants to stay together when all of the rivets are inserted, and they don't tend to bend over quite as easily |
|
JonL
Elder Statesman
WWSME (Wiltshire)
Posts: 2,909
|
Post by JonL on Jan 26, 2019 16:03:22 GMT
I have the use of skin pins which will probably help.
|
|
Lisa
Statesman
Posts: 806
|
Post by Lisa on Feb 2, 2019 8:07:20 GMT
I spent the afternoon discovering how out of practice I am at rivetting. Though I think the trickiest part, in summer at least, is getting good weather (so as not to melt into a puddle) at a reasonable time (neighbours don't appreciate rivetting at 2am, oddly enough) and when dad's happily occupied but not trying to nap. Anyway, one angle rivetted to a bufferbeam; not too bad after a quick cleanup with a file, but there's a couple of spots where I've clearly hit the bufferbeam rather than the rivet!  Still, I'm satisfied with that, and hopefully it'll improve with practice. |
|
timb
Statesman
Posts: 512
|
Post by timb on Feb 2, 2019 8:23:02 GMT
I think 'dings' are inevitable Lisa, it looks like you have a lot fewer than I usually have at this stage! Draw filing usually helps and a few thick coats of brush on primer smoothed prior to painting will make them all go away! Fine job! If you use ear defenders, you wont notice the noise effecting anyone else  .
Tim |
|
|
|
Post by richard2018 on Feb 2, 2019 9:04:50 GMT
Hi Lisa (and all),
May I join the gang watching your build?
Throughout my career, in many places, I have always known someone building a Tich, but having retired (and moved) I now do not know anyone either building or running one so your build will be interesting to watch!
Currently I'm seriously refurbishing my Conway (which I did not build) so will be machining and reading rather than running for a while. New valvegear just completed.
You've made a tidy job of that rivetting considering how deep those countersinks were! Have you tried the side frame in the slot though? It's usually about this time I find I picked up the wrong piece of angle and because of the hole tolerances......!!
Anyway I look forward to watching your progress.
Best wishes from Lincoln (UK),
Richard.
|
|
Lisa
Statesman
Posts: 806
|
Post by Lisa on Feb 3, 2019 9:54:55 GMT
Hi Richard, the more the merrier! I know of at least a half dozen Tiches under construction, who's builders I'm in touch with; she's certainly a popular little design.
In my metric redraw the holes for the angles are positioned such that it's not possible to fit the wrong angle... though maybe I shouldn't tempt fate by saying that.
|
|


 .
.
