uuu
Elder Statesman
 your message here...
Posts: 2,808
|
Post by uuu on May 25, 2020 10:09:36 GMT
Ailsa is my locomotive project. She’s a Geordie lass: Ken Swan’s “Jessie”, with a few cosmetic changes. She was conceived in 1997, but hasn’t been born yet, and it will be quite a while yet before she belches her first exhaust. I’ll post updates to this thread as they happen. I’ll also add a few posts for parts already made. And ask for help for things coming up. I did start a thread on this in 2012 (Another Jessie), but abandoned it in 2015, when Dropbox screwed up many of the pictures. Wilf |
|
uuu
Elder Statesman
your message here...
Posts: 2,808
|
Post by uuu on May 25, 2020 10:12:38 GMT
Today I fitted the axleboxes, a job I had been putting off - since 2013, when I had bored four blocks of cast iron and prepared bronze bushes. Someone did comment that the bushes were superfluous, and I suppose the cast iron on its own would have been fine. I was frightened off all-bronze by the cost, and couldn’t see the advantage. Here is the machining:  Axlebox machining Axlebox machining by Wilf, on Flickr The reamer stuck in the hole (resting on parallels) is to ensure that the bore is the determinant of height. The rod on the moving jaw is not to guard against jaw lifting (of which, although this vice is claimed to be immune, suffers), but to make sure the fixed jaw is the datum. The first one needed a lot of fitting. I changed the machining for the remaining three. Instead of flipping top to bottom, I turned from side to side, so the same face of the block was against the fixed jaw. The CNC mill is brilliantly repeatable, but only if you can get the workholding right. And here they are in place:  Axleboxes in frames Axleboxes in frames by Wilf, on Flickr Those who know the design will see I’ve not done split boxes. I’m assuming they’ll not wear out in my time and, if I wanted to replace them, I can saw these ones off (or take a wheel off). I still have to fit the post on top for the suspension – and to arrange the lubrication (Ken Swan has a trough on top that feeds to the axles and out to the horns. I may have a pocket for felts under the axle, and feed through the axle centres). Wilf |
|
dscott
Elder Statesman
Posts: 2,438
|
Post by dscott on May 25, 2020 23:21:58 GMT
Dear Wilf,
What a lovely model!
I see you have also gone for square or in fact Rectangular blocks on your drag plate. They are not seen and add a bit of weight to counteract the cylinders. On the axleboxes... If you add up all the milage we will do it does not add up to much. Plus most Clubs have something rough and heavy to bash round passenger hauling.
If all cast iron axle boxes were used once worn out beyond, a quick Thump from a Cold Chisel would split and new ones split this time replaced.
I continued with the pump mounting Today and got it in the Myford centered just before Dinner in the Garden. Tempted, but I didn't resort to self act via rope through the window of the Workshop!!!
More work on the Motion Brackets and the bottoms done and a look into the extension pieces. These again will be a bit thicker and a ledge included for sticking and bolting onto the bracket.
I bit the bullet and took the 4 bronze brackets off and re machined them. Now they are all even inside. And bolt on.
PLUS put into the right places? Yes the front fitted perfectly in the back and the Back to front one as well. Both sides?
Number and letter stamps are a lifeline to getting things to go back where you made them fit last week prior to painting!
Again I can't believe just how SHARP all the edges were.
Here's to Top Coat when things have warmed up in the morning.
David and Lily.
|
|
uuu
Elder Statesman
your message here...
Posts: 2,808
|
Post by uuu on May 26, 2020 6:17:25 GMT
Ken Swan wore out a set of axleboxes on Bridget - I think he used it a lot! So Jessie's are bigger, for more bearing area.
Wilf
|
|
millman
Part of the e-furniture

Posts: 297 
|
Post by millman on May 26, 2020 8:22:47 GMT
Too late for you Wilf but I always machine axleboxes on the dividing head using a mandrel. This method ensures that the axle will always be in the middle of the axlebox.
|
|
uuu
Elder Statesman
your message here...
Posts: 2,808
|
Post by uuu on May 26, 2020 9:54:30 GMT
Good plan, but alas I have no dividing head. There are a number of things that must wait until I can make use of the Pumphouse facilities - this could have been one, but it's quite nice to do things with my own resources.
I keep in touch with John by phone - he comes onto this forum less often at the moment.
I'm thinking now about the push-rods that go up to a beam for the suspension. These are shown as screwed in 1/4" x 40. That sounds a bit fine for cast iron - I may go 0BA and have a little skirt on them.
Wilf
|
|
|
|
Post by Deleted on May 26, 2020 10:55:29 GMT
It's nice to see you working on Jessie again Wilf, I for one will be following with interest, keep up the good work sir...
Pete
|
|
stevep
Elder Statesman
Posts: 1,070
|
Post by stevep on May 26, 2020 11:08:42 GMT
Wilf,
When I made the axleboxes for my Stanier, I turned a stepped plug, the smallest diameter of which fitted in the axle hole. The larger diameter was that of the horn openings.
I coated the larger diameter with marker pen and placed the plug in the axlebox, and then put it in the machine vice. I then milled the sides of the axlebox down to the larger diameter. I was able to advance the cut gingerly, so I just kissed the plug and took off the marker pen without taking metal off the plug. I was then able to do the same thing from the other side, ensuring the two faces were equidistant from the axle hole.
|
|
uuu
Elder Statesman
your message here...
Posts: 2,808
|
Post by uuu on May 26, 2020 16:42:08 GMT
A question on the fettling of wheels. Here's one of mine:  JessieWheel JessieWheel by Wilf, on Flickr The outline of the teardrop has been cut by CNC and this has also cleaned the "spoke" right at the bottom. But what to do to improve the rim - it's a bit messy where the lathe-turned area meets the rough-cast parts. Do I put it back in the lathe - where I doubt I can get a complete circuit without clouting the teardrop. Or try a ball-end mill in the CNC. Or on a rotary table. And what else could I do to improve things? Wilf |
|
|
|
Post by Deleted on May 26, 2020 17:40:14 GMT
Hi Wilf
I think if it was me I'd ground up a small profile tool, make the curve of the tool something that fits betwwen rim (leaving tge traditional lip) and the crankpin boss and also gently curve in to meet the spokes. If planned carefully I think this would work fine on the lathe...if there are any small raised edges left where the tool meets spoke just blend this in with a small sanding drum using a dremel.
Hope that makes sense
Pete
|
|
uuu
Elder Statesman
your message here...
Posts: 2,808
|
Post by uuu on May 26, 2020 17:58:31 GMT
That sounds like a good starter plan, thank you. I suspect that, on one or more wheels, the required cut depth will vary around the circuit, but I may be able to get a clean circle without it looking odd.
I'll have to practice with the dremel, it's a tool I've not used enough.
Wilf
|
|
|
|
Post by Deleted on May 26, 2020 18:41:03 GMT
You may not need the dremel Wilf, just an option if there are any areas that need tidying.
|
|
dscott
Elder Statesman
Posts: 2,438
|
Post by dscott on May 27, 2020 0:42:14 GMT
To me the wheel is fine. If you look on the later Wheels like the Class 2 for instance they have this pattern by the spokes.
I also model the older locomotives and they due the time they were built. Demand perfection on spokes and finish.
I never looked at my wheels apart from sorting out the why they did not go round bit!!
Did some painting today as there was no wind and the paint could be baked on nicely.
Just the middle stay and Drag beam.
Two more bits of Motion Bracket and we are almost there. The top and The sticking out piece. The 4 jaw is on the Myford
so we will be able to make the outer link bracket as well.
David and Lily.
|
|
|
|
Post by springcrocus on May 27, 2020 7:08:47 GMT
I think they stand out because of the colours of the machined and unmachined sections. Why don't you spray one with primer and see if it is still noticeable? I suspect painting will soften the look of them.
Regards, Steve
|
|
|
|
Post by runner42 on May 27, 2020 7:26:39 GMT
Put it back in the lathe and under hand power only operate the lathe from just after the tear drop through almost 360 degs until it reaches the other side. Continue with a rocking motion taking a little bit off at a time until you are happy with the results. But you probably considered this method already.
Brian
|
|
uuu
Elder Statesman
your message here...
Posts: 2,808
|
Post by uuu on May 27, 2020 10:16:33 GMT
Thank you for your suggestions. It may be a little while before I get stuck in - I have just had a quick half-hour with some small files and have softened the pointy bits on the ends of some spokes. I need to restrain any enthusiasm for drastic treatment, as I could so easily turn a handle the wrong way and ruin things.
The wheels were originally turned in 1998. One was defective and sent back to Reeves. Two short years later a replacement arrived and I was back to four. Although some later operations were done after 2010, when I got my current mill.
Wilf
|
|
|
|
Post by ettingtonliam on May 27, 2020 10:56:56 GMT
Not being a toolroom sort of guy, I'd just soften the edges with a fine file (suggest 3/16" dia which will get into the corners) and let them go at that. Just run the file over the spokes while you are at it to knock off any high spots, though they look pretty good already from the photo. A bit tedious, but, hey, you've only got 4 to do, not like its 'Evening Star' or Great Bear!
|
|
dscott
Elder Statesman
Posts: 2,438
|
Post by dscott on May 27, 2020 23:10:34 GMT
ibb.co/TMW4GcJThis is my penance in case I can't find, or have not Organised any Jessie bits to make for the Day. It happened over the weekend after I cleaned up the frames having taken everything off. They are for 5 inch gauge and were a cheap set I saw advertised years ago for six twelve turned up and hung around. A fresh look and 2 days filing work each!!! Doug Hewsons Pannier wheels will do but not at £20 for the 2 sets!!! David and Lily.
|
|
dscott
Elder Statesman
Posts: 2,438
|
Post by dscott on May 27, 2020 23:17:55 GMT
ibb.co/nf0ZWxXFrom the front. The black lines on the previous photo are so I can keep the spokes central. The cast iron outer skin is the thing to break first. On the backs it is just a messy turning job. David and Lily.
|
|
uuu
Elder Statesman
your message here...
Posts: 2,808
|
Post by uuu on May 28, 2020 14:58:18 GMT
Although I'd intended to carry on with the axleboxes I thought, having asked the question, I'd play with the wheels and see how things went. Starting with Pete (greenglade)'s suggestion, I ground a lathe tool and, turning the lathe by hand, got some way towards the objective. I carried on a bit with Brian (runner42)'s approach of doing part turns, to get a but more of a blend at the edge of the counterwieght. 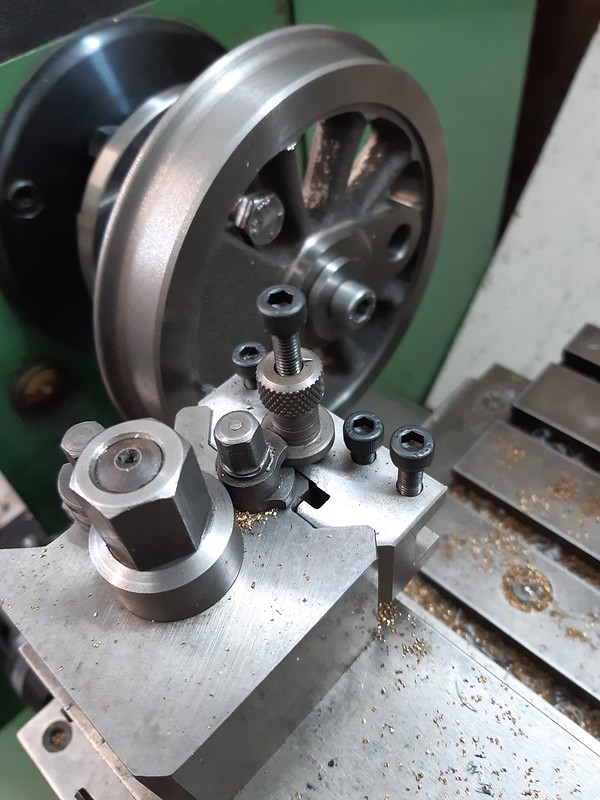 JessieWheelLathe JessieWheelLathe by Wilf, on Flickr I then played with the dremel - using a little pink grinding stone, which seemed to be able to cope with the abrasion of the as-cast parts without wearing too quickly. Anyway - here's how far I've got - all the wheels are similar:  JessieWheel2 JessieWheel2 by Wilf, on Flickr It looks better in real like than in the photo - nicer I think than it did and, as Steve (springcrocus) notes, it will all look softer under a coat of paint. Wilf |
|


