|
|
Post by steamer5 on Apr 14, 2021 21:43:06 GMT
Hi John,
Nice work! Really looks the part ticking over!
On the whining front, with the plinth being wooden it’s probably acting as a sounding board.....my Toby tram has a wooden cab & that’s what happens with him
Cheers Kerrin
|
|
|
|
Post by simplyloco on Apr 14, 2021 22:12:38 GMT
Hi Steve and Kerrin. It looks like any low speed motor will protest under load,so I'll live with it. Looking on the net it is a lot quieterthan many out there!
|
|
|
|
Post by ettingtonliam on Apr 15, 2021 11:07:30 GMT
Why are you worrying? It doesn't sound any louder than any other engine with an electric drive that I've seen.
If its really an issue for you, try glueing thick felt to the inside of the box.
|
|
|
|
Post by simplyloco on Apr 15, 2021 17:13:42 GMT
Given up on the fake quarried stone!I couldn't get the effect I wanted so I've covered the plinth in some very thin maple veneer to give myself a nice virgin surface to work with.  I lightly sanded and oiled the rear panel and it doesn't look half bad! If I put some nice edging on it I might just run with it as it is...  John 
|
|
jasonb
Elder Statesman

Posts: 1,209
|
Post by jasonb on Apr 15, 2021 17:38:47 GMT
If you want to try another method for the stone, this is one I did last week. 1. paint the surface a colour of choice and then lay a grid of fine masking tape, cut out alternate bits and peel off to get a brick pattern 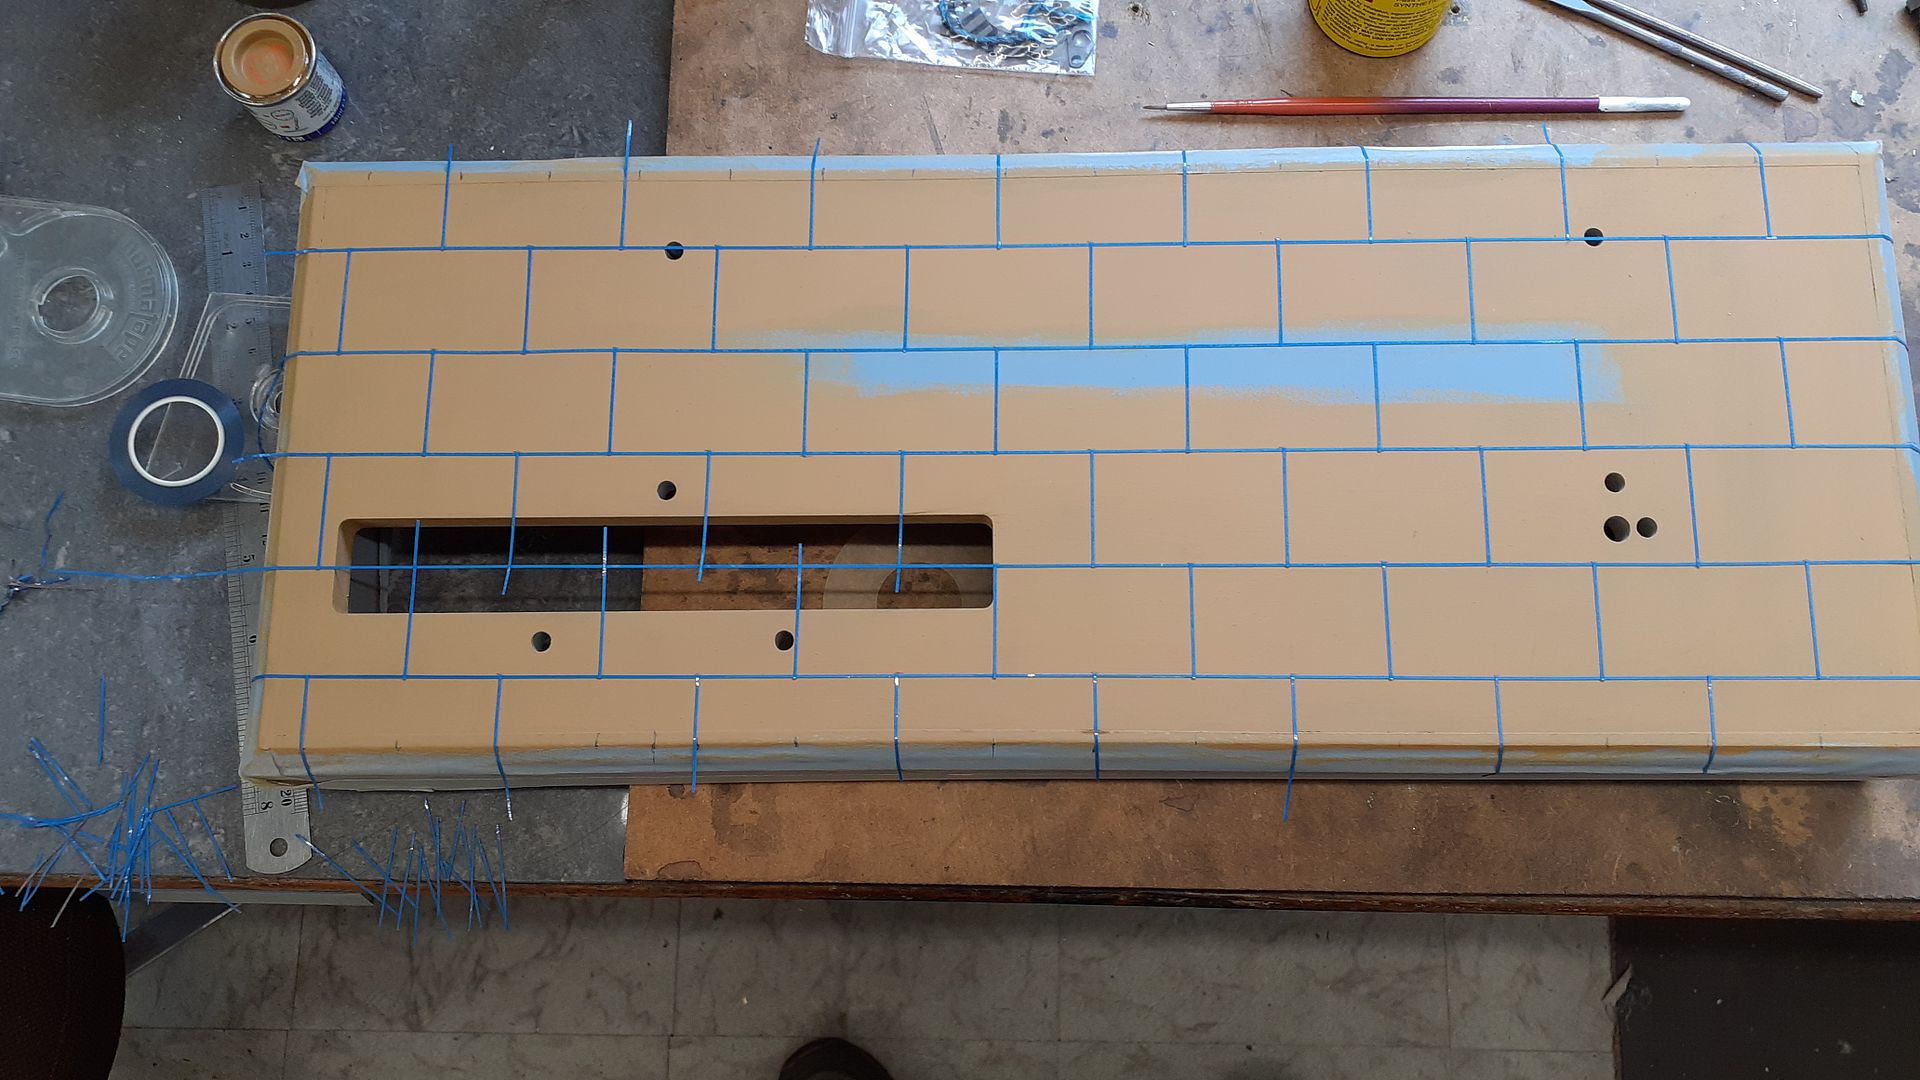 Then mix your colour with varied amounts of white and apply almost dry with a sponge using a dabbing motion 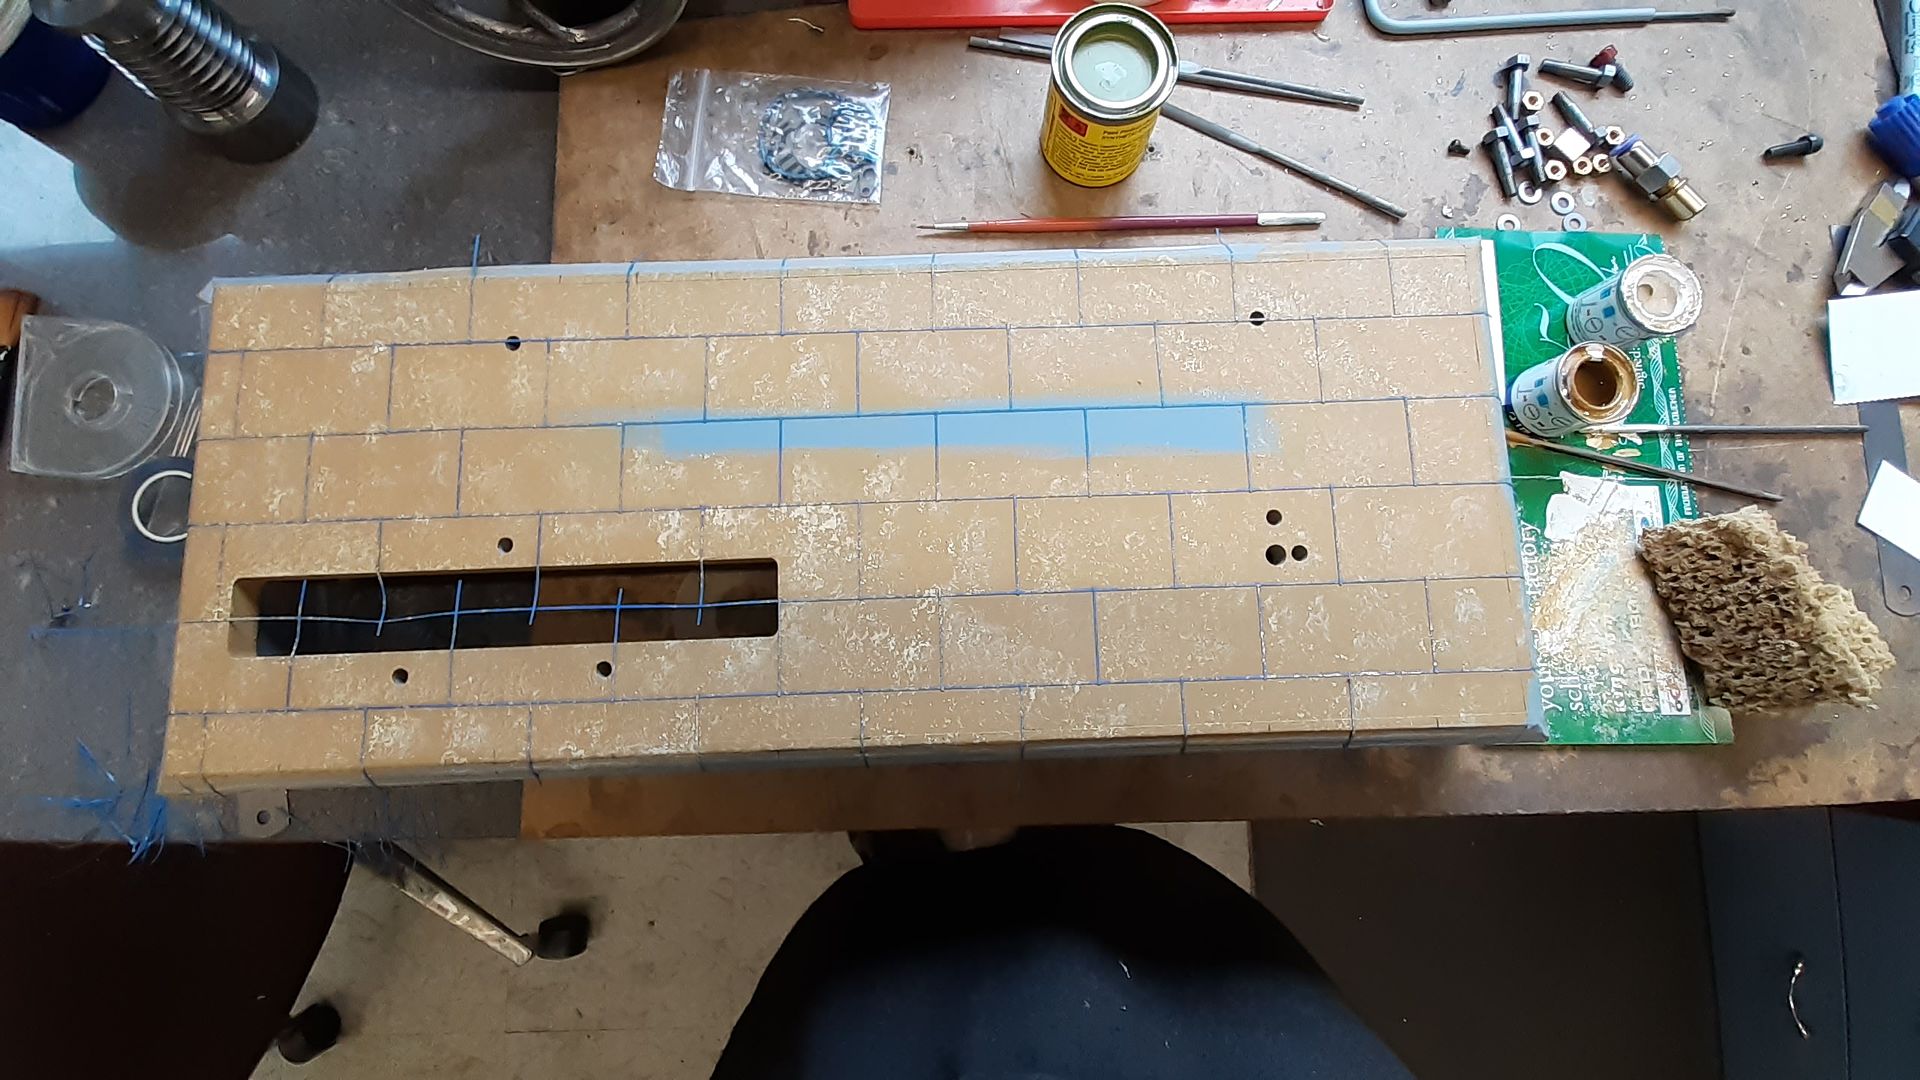 Gives a very subtle joint pattern, if more of teh light colour is applied then the joints will show more when the tape is removed youtu.be/DpSbv_mdNCU |
|
|
|
Post by simplyloco on Apr 15, 2021 19:21:09 GMT
If you want to try another method for the stone, this is one I did last week. SNIP Thanks Jason, very helpful. John |
|
|
|
Post by simplyloco on Apr 17, 2021 17:00:15 GMT
I tried, without success, to emulate Jason's method, but failed miserably. However, I got myself some textured paint spray, and gave that a go, using Jason's method with a coloured base coat and thin masking tape. I'm quite impressed with the results.  Ivory emulsion base coat with three very thin coats of the stuff otherwise it goes 'gloopy' and joins together! I have to say that it looks better from a distance...  Here are the test cards. My white 0.7mm POSCA pen is a bit thin for this job, but you get the idea! I prefer the ivory with white grouting to the white base coat with black grout (which is Mr. Taylor's original colour scheme).   |
|
uuu
Elder Statesman
your message here...
Posts: 2,808
Member is Online
|
Post by uuu on Apr 17, 2021 17:21:25 GMT
Could you use real stone? I have a salesman's sample of portland stone, which is way too coarse, pockmarked with fossils, but there may be something smoother that's appropriate. A cheeky approach to a monumental mason, or quarry might supply something.
Wilf
|
|
barlowworks
Statesman
 Now finished my other projects, Britannia here I come
Posts: 874 
|
Post by barlowworks on Apr 17, 2021 18:37:01 GMT
Hi John, here are a couple of shots of our O gauge layout Yeomans Quay. I hope they give you an idea of what can be achieved and are not scale specific.
Heres how....The stone effects and the cobbles are all created using DAS white modelling clay. Firstly cover the area with PVA glue then thumb on a layer of DAS on top of this. The texture of the stone can be determined by how smooth you thumb out the wet DAS. Leave to dry thoroughly then using a broken hacksaw blade you can scribe out the courses as you require them. You can even use the broken edge of the blade to carve away the top if you require more of a pitched face to the stone. When you are happy with the stone surface it is time to paint it. I use a sample pot of acrylic emulsion from B&Q as the base and paint it all over, then using the same base colour add various artists acrylic colour tints to the base colour to highlight individual stones (acrylic paints from Poundland if they have them in, also you will need water colours for the next step). Once you are happy with the stone colours mix up a wash of watercolour for the mortar colour you require, this will also weather the stone a bit, and liberally apply it to all of the stone.As the acrylic emulsion should be waterproof you are ok to add the washes over the top. Once it is dry (I use a hair drier) use moistened cotton buds to remove the mortar wash from the fronts of the stones to leave the mortar colour in the courses. A quick spray over with a matt varnish will lock all the colours in place.
I know it sounds a bit long winded but to me produces the best stone effects I have seen. If you require more info drop me a PM.
Hope this helps
Mike
|
|
|
|
Post by simplyloco on Apr 18, 2021 19:39:02 GMT
Hi Mike, and thanks for the info. I managed to get what I wanted with the spray paint, as can be seen below. I'm quite pleased with it! Better Fake Stone Blocks!
Two coats of white ceiling emulsion, three hours spent with masking tape, followed by a heart in the mouth spray session. I let the stuff dry in the sun for four hours, and gave it a coat of clear laquer to 'fix' it and give the stone a bit of a 'glisten'! Methinks It will do 🤩...   |
|
|
|
Post by simplyloco on Apr 19, 2021 18:45:50 GMT
Display Base and Plinth Completed I can now get on with the rest of the fiddly bits! Base edges planed and sanded. Four 'Hockey Sticks' produced on the Proxxon FET saw from a piece of Mahogany and mitred on my new bench sander.  Where would we be without LIDL's cheapy tools!  Sanded and oiled. Well pleased with the result. 
|
|
|
|
Post by mikessme on Apr 19, 2021 22:25:53 GMT
Nice job well done, now it looks the part.
|
|
terryhowlett
Active Member
 Actually retired (almost as planned) in late 2019.
Posts: 47
|
Post by terryhowlett on Apr 23, 2021 18:46:06 GMT
Hi John,
Just had a catch up on the last few weeks of activity on this one. What can I say except wow! Very impressive stuff, although I shouldn't be surprised really should I!
Hope Karen and I will be able to see you and Jan in the summer!
Terry
|
|
|
|
Post by simplyloco on Apr 28, 2021 15:59:35 GMT
Governor Assembled
Well, I stopped looking for the lost stirrup and made another one! I also went for pivot pins instead of the more often seen 10BA screws: I just have to make the fixture for drilling the 1/32" holes in the right place... Progress! John    
|
|
|
|
Post by simplyloco on Apr 29, 2021 18:47:30 GMT
Governor Valve Links
Our caravan comes out of storage tomorrow so I had to finish the governor! The links are straightforward, but like many model engines, are well over scale and need to be reduced somewhat. For example, the butterfly valve link rods are specified 3/16", so in full size that would make them nearly 2" in diameter, so they are now only 1/8" diameter and to me they look much better!! The same applies to the adjuster, both in thickness and in length. Some progress pics. Using a 'Frog' to hold the boss onto the arm  You can see that the solder paste leaves very little residues to clean up. Damned expensive but worth every cent!  A self centreing four jaw chuck is dead handy for these jobs.  My home made bending machine makes light and accurate work of the link rods.  Looking quite a picture now!   
|
|
|
|
Post by simplyloco on May 7, 2021 20:22:20 GMT
While waiting for my caravan floor refurb to dry out I had a look at the crank case. It's a solder or rivet job, but if you have a 3D printer then... Printing the prototype cage in PETG. I have some black on order so I won't have to paint it.  Shaping the stainless steel insert.  Quite a nice fit!  That's what I call BLING!   |
|
|
|
Post by simplyloco on May 18, 2021 16:48:18 GMT
Help please in choosing the right bits! I want to run the Bosch windscreen wiper motor from a battery or PSU. I need a discreet 12v connector on the floor of the base unit, tucked around the side somewhere, the power lead running under the 'stonework' into the box. I don't need a switch. It will need to take up to five amps. There is a myriad of plugs and sockets out there to choose from, and I haven't a clue...  John |
|
|
|
Post by coniston on May 18, 2021 20:57:29 GMT
Help please in choosing the right bits! I want to run the Bosch windscreen wiper motor from a battery or PSU. I need a discreet 12v connector on the floor of the base unit, tucked around the side somewhere, the power lead running under the 'stonework' into the box. I don't need a switch. It will need to take up to five amps. There is a myriad of plugs and sockets out there to choose from, and I haven't a clue... John Personally John, I'd use one of the types I use on RC planes for main power batteries. The XC30 type are lovely and small, gold plated contacts and carry 30A. I probably have some spare ones, I'll look tomorrow. There are many other similar types used for RC and easily available, probably much smaller and neater than more industrial types. Chris D |
|
|
|
Post by simplyloco on May 18, 2021 21:10:14 GMT
Help please in choosing the right bits! I want to run the Bosch windscreen wiper motor from a battery or PSU. I need a discreet 12v connector on the floor of the base unit, tucked around the side somewhere, the power lead running under the 'stonework' into the box. I don't need a switch. It will need to take up to five amps. There is a myriad of plugs and sockets out there to choose from, and I haven't a clue... John Personally John, I'd use one of the types I use on RC planes for main power batteries. The XC30 type are lovely and small, gold plated contacts and carry 30A. I probably have some spare ones, I'll look tomorrow. There are many other similar types used for RC and easily available, probably much smaller and neater than more industrial types. Chris D That's great Chris. See you soon! John |
|
|
|
Post by simplyloco on May 19, 2021 16:05:03 GMT
|
|


