darrene
Part of the e-furniture

Posts: 440 
|
Post by darrene on Jul 20, 2021 14:34:00 GMT
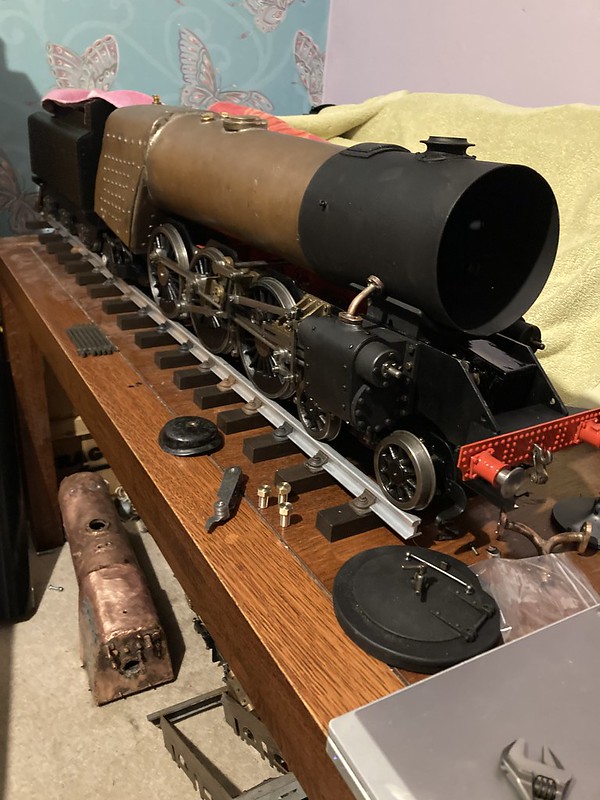
I wasn't looking for a loco but somehow this found me - an old and very nearly (bar the backhead and tender) completed 3 1/2" gauge Britannia. Number 7000 in pre-livery black.
I thought it would make a nice stablemate for 70049 Solway Firth and althought it's suffered a slight ravaging of time and neglect it has some nice design touches, by a builder who had so nearly got it over the finish line 
here are some examples of the details - bearing caps on the eccentric rods and squared off driver pin
castellated nuts
The cab and tender though, being steel had a fine dusting of surface rust and will require more energetic attention. Here it is as it arrived:
Regulator is the smokebox type and it sports a Bassett Lowke PG 
The first job was to strip it down and bag everything up, labelling the bags and taking multiple pictures during the disassembly. The loco itself is in fairly fine fettle as you might expect for something that has done nothing but sit. I've panel wiped and wirebrushed everything ready for primer and eventually some satin black.
Getting the cladding off the boiler was an interesting exercise. Each feed clack had a flanged plate sitting against the boiler with 4 small BA screws in the flange. Five screws came out of them fine but I couldn't remove the fitting. The sixth head sheared and I still had two to go. Re-reading Curlys assembly notes my heart sank somewhat as I read his suggestion of sweating the flange to the boiler if there was a tendancy to leak as 'they'll stay on for the life of the boiler anyway'
After more head-scratching I realised the BA screws I was attempting to remove were dummies. The builder had threaded 5/16x22 bushes into the boiler and cut a thread on the clacks to screw into that. Finally the clacks were off, the cladding too and the boiler was exposed.
The boiler doesnt owe me anything and isnt likely to win any beauty contests. Construction seems to have been faithful to the original LBSC design. I've taken a tour of its insides and to my untrained eye it looks as though it's had water in it at some point
The water chamber through the regulator bush:
The water chamber through the steam dome bush:
Journey through the main flues
Journey through the smaller flues
I plan to hydraulically test the boiler to 110PSI for interest, to see if and how it holds up. My expectations aren't high but if it does hold up there may be a possibility of giving it an easy life and running at a nice and low 50psi WP, given it'll be pootling up and down the garden track. If it's definitely scrap, I have an option to fit a new one.
|
|
johnd
Part of the e-furniture
Posts: 281
|
Post by johnd on Jul 20, 2021 14:56:51 GMT
Nice honest looking loco, just the way you like find them.
Have fun on the rebuild, keep us posted, will watch with interest.
John
|
|
darrene
Part of the e-furniture
Posts: 440
|
Post by darrene on Jul 20, 2021 20:08:44 GMT
Cheers John,
Definitely. I'll post some follow-ups as I make some progress.
The frames are going back together slowly so I'll get another report posted soon
Kind regards
Darren
|
|
darrene
Part of the e-furniture
Posts: 440
|
Post by darrene on Jul 26, 2021 16:48:51 GMT
There’s been progress a-plenty on the project Britannia. It’s in its component parts now and everything has been degreased with panel wipe and wire brushed. It’s now going through primer and paint.
I decided to tackle surface rust on the bare steel of tender and cab with my first electrolysis tank: hot water and washing soda, a piece of rebar as a sacrificial anode and a bench supply connected with the negative on the part for de-rusting, positive on the rebar.
It worked fantastically; just leave it for a few hours than remove part and wipe, I plan to use electrolysis more in my life.
Using a bench supply rather than a battery charger let me keep track of the process based on the current reading - as soon as it dropped too low it was time to take the part out.
The tender frames give an idea of how effective it was. As a belt-and-braces approach I opted to give everything I'd de-rusted this way, a spray with Jenolite's rust convertor aerosol before the primer.
Interestingly (I thought), parts such as the safety valves are hand made and the builder opted to make functional leaf springs for the front and trailing bogies. He also modified the front bogie pivot to include a lubrication delivery. I find it fascinating to see how another mind has approached something!
The boiler has been stripped and pickled. I need to figure out what’s needed in terms of blanking plugs, then shell test it.
I have tracked down a second, much more decent boiler to use but am interested to see how the current one tests. Whilst the new one has passed a hydraulic test, the blower pipework has not been installed which struck me as odd because I'd assumed it would be done during construction. I suppose rather than insert bushes, a blower pipe could be run externally?
|
|
timb
Statesman
Posts: 512
|
Post by timb on Jul 26, 2021 18:21:26 GMT
Yes, electrolysis works great. I use an old mobile phone charger as the power source, works a treat! Looks like the boiler has the backhead and tubeplate tapped for the blower pipework, I don't think that is allowed now but if you were going to use this and run the blower along the outside then you will have to blank the holes anyway, I think only a silver soldered joint will be allowed, no doubt someone will correct me if I am wrong. It could be done with OXY-Acetylene, I think, localising the heat with a hot flame - but why not solder in threaded bushes to suit the blower anyway?
Good luck
Tim
|
|
|
|
Post by Deleted on Jul 26, 2021 19:30:31 GMT
Hi Darren and Tim, re blower, this is what's known as a 'live' blower and is standard practice in full size. Some boilermakers only use this method as it means the blower pipe can be changed if it fails, this can't be done when silver soldered and thus risks scrapping the boiler if this small pipe gets damaged. The pipe will need to be swagged like a brake fitting to get a proper seal.... my own boiler built by Paul Tompkins (Southern Boiler Works Ltd )has a live blower feed. Paul did scribble a drawing for me on how to make the pipe and fit it, I'll try to dig it out to share, give me a nudge if I haven't done this in the next day or two...
Regards
Pete
|
|
darrene
Part of the e-furniture
Posts: 440
|
Post by darrene on Jul 26, 2021 20:54:45 GMT
Thanks Tim, Thanks Pete.
Ah-ha. A live blower... That's really interesting. Thanks for the education Pete, I'm not familiar with it but that certainly sounds like a clever approach. It makes sense - the maker of the boiler certainly knows his way around them by all accounts.
I don't want to put you to any inconvenience and there's no rush but I'd certainly be interested to see Paul T's info on it when you get a chance!
Regards
Darren
|
|
|
|
Post by Cro on Jul 26, 2021 21:03:50 GMT
I don’t know what LBSC did on his boiler drawing but the blower on the standards is run down the outside of the boiler and in the side of the Smokebox on the LHS. It would normally run in the trunking. I’ve seen a lot of 3 1/2” brits with the push pull regulator through the missing bush your newer boiler appears to have in the backhead but again on the brits it’s linkage down the LHS and into the Smokebox with the valve mounted directly onto the bush on the tube plate.
Adam
|
|
|
|
Post by philh1aa on Jul 28, 2021 18:02:40 GMT
I am no expert but if the boiler is stamped and past a test years ago (is that evidence of it from 1992?) - surely you don't need to go anywhere near it again with silver solder - unless t has developed a very unlikely leak of some sort. is that right?
Phil H
|
|
darrene
Part of the e-furniture
Posts: 440
|
Post by darrene on Jul 28, 2021 19:29:10 GMT
I am no expert but if the boiler is stamped and past a test years ago (is that evidence of it from 1992?) - surely you don't need to go anywhere near it again with silver solder - unless t has developed a very unlikely leak of some sort. is that right? Phil H Thanks Phil, I'd thought the same but not being well versed in boilers eithe, couldn't understand why there was no blower fitting on the front and how you'd test it without any holes.tapped on the dome ring. Now I've come to understand the live blower aspect and the approach of testing with a bar/bolt/plate or temporarily soldered plate on the dome ring, which explains things Darren |
|
|
|
Post by philh1aa on Jul 28, 2021 19:46:17 GMT
Boiler stuff gets a bit confused I think. For example, I took my Rob Roy boiler to two different inspectors at 2 different clubs. All sorts of characters surrounded my boiler and each of the inspectors. Some were saying 'oooh dear' because I didn't have a top fitting for the water gauge - plus all sorts of other features that were on the 1965ish design. Both inspectors independently dismissed the onlookers and just said 'lets test it and see'. I haven't done it yet but I suspect there are people who know what they are looking for and why and others that are being conservative for no real reason.
|
|
darrene
Part of the e-furniture
Posts: 440
|
Post by darrene on Aug 2, 2021 10:41:03 GMT
Reassembly is slowly commencing and the're some crosshead shenanigans..
During reassembly of the project Brit, I noted the RH piston seemed much tighter than the left. I initially thought it was from 20 years of standing , but on inspection it seems the tolerances on the crosshead slide are a bit too close.
The support bracket was forcing the top guide down onto the crosshead, generating a fair amount of friction. I've skimmed the bracket bottom face very slightly which improved matters. Of course that meant all of the bolts retaining the top crosshead slide were ever so slightly too long, so they were filed down.
The next issue is that the spacers for the top/bottom crosshead slides are a thou or so too thin. Nipping up the bolts binds the crosshead a li - something that will only get worse when everything expands with heat. Backing them off a little keeps everything buttery smooth. I ended up skimming the top of the crosshead which is what I should have done initially in order to kill two birds with one stone.
Life's never straightforward but at least i know it's going back together slightly better!
|
|
darrene
Part of the e-furniture
Posts: 440
|
Post by darrene on Aug 17, 2021 11:48:57 GMT
Slow progress but it's getting there. A replacement drain cock control mechanism will be needed. The old one has far too much friction, being rusty cable in a copper tube. Teflon coated bike cable might be a low-maintenance alternative...
The tender is also coming together but requires a fair bit of work.
A nice number plate for the smokebox door is being made, courtesy of the excellent MDC Plates.
I'm scratching my head over the boiler now and have posted a thread about that here |
|
darrene
Part of the e-furniture
Posts: 440
|
Post by darrene on Sept 6, 2021 16:27:43 GMT
The chassis has joined her fully-built sister having her own run on air. It's not as free-running but she does run, which is a start.
The odd whistling on the video is at a guess, a small leak from somewhere. I think it's coming from both steam chests, which makes me wonder if the piston rings are getting blown past. I think I should really pull the pistons, check and repack them. I haven't done this before though so need to work out how best to approach it.
I also took a cursory look at the valve timing and whilst it seems perfect at forward/top dead centre, at back/bottom dead centre I am definitely getting some valve travel as the expansion link moves across it's range of movement.
|
|
JonL
Elder Statesman
 WWSME (Wiltshire)
Posts: 2,907
|
Post by JonL on Sept 7, 2021 11:34:07 GMT
Blimey, if you find any more boilers under the sink let me know, I'm furiously saving for the Britannia boiler and never seem to get any closer!
It's coming together very well, congratulations.
|
|
darrene
Part of the e-furniture
Posts: 440
|
Post by darrene on Sept 9, 2021 17:19:00 GMT
 Cheers Jon.
I strategically placed oil at a few parts to check for leaks and noticed this which doesn't look ideal  It's on the exhaust side admittedly but clearly isn't going to heal itself. I guess it was a mistake made by over-enthusiastic drilling of the cover holes.
I'm wondering how best to address it. Current thinking is perhaps putting some JB-Weld on the bolt that goes into it? or perhaps some of the grey Loctite 5660 which I use for sealing steam manifolds?
|
|
|
|
Post by John Baguley on Sept 9, 2021 17:38:40 GMT
Just use some ordinary threadlocker when you finally fit the bolt. I use that for sealing boiler fittings with no problems.
John
|
|
darrene
Part of the e-furniture
Posts: 440
|
Post by darrene on Sept 9, 2021 18:27:01 GMT
Brill. Thanks ever so much John
|
|
darrene
Part of the e-furniture
Posts: 440
|
Post by darrene on Sept 11, 2021 21:26:33 GMT
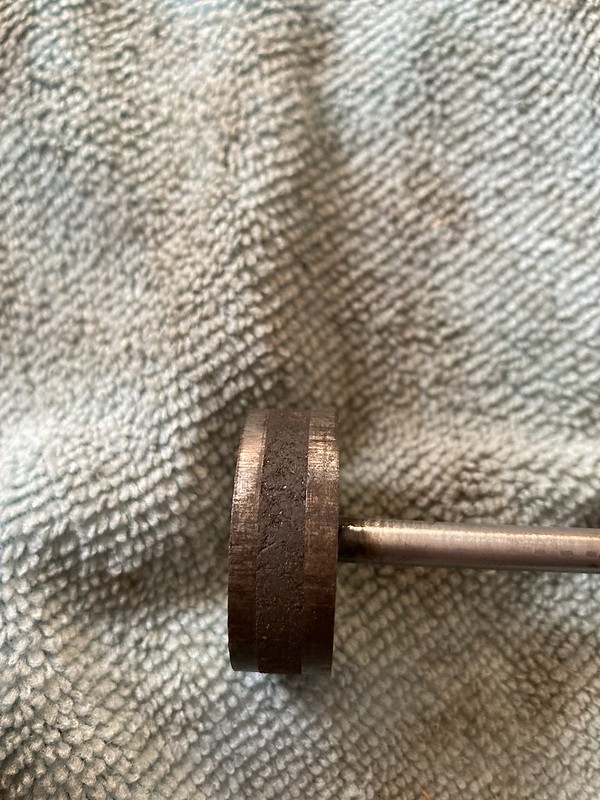
I needed to take one of the steam chests off in order to work on the drain cock mechanism, so I took the opportunity to pull and check one of the pistons. The cylinder bore is totally unmarked and the old school cylinder packing looks to be in good condition. The pistons aren't gunmetal so I've opted to leave everything as is and just put it back together, which I hope is a sensible choice.
|
|
darrene
Part of the e-furniture
Posts: 440
|
Post by darrene on Sept 17, 2021 17:37:02 GMT
‘Ol Squeaky as I’m calling her for the moment, gets a second run on air after stripping down and check the LH cylinder - a job worth doing as I discovered the combination iink for the valve was rubbing against the crosshead slides. Now she runs without complaint at 14psi and a small leak on the exhaust side has been eliminated.
Running her up helped track down the squeak which Sod’s law dictated was in the other cylinder so it’s time to pull that one apart too.
Here is the piston from that side. The cylinder bore is unmarked - it's not been run so that's not a surprise. As for the packing, I've no experience of what it usually looks like so I'm not quite sure of the best approach - does it look okay as-is or should I just replace anyway as a matter of course?
|
|


 Cheers Jon.
 It's on the exhaust side admittedly but clearly isn't going to heal itself. I guess it was a mistake made by over-enthusiastic drilling of the cover holes.