|
|
Post by jcsteam on Oct 13, 2021 9:29:20 GMT
Hello again, so after my weekend away to collect my Doris from Newport model engineers, and take in some sights of South Wales. Plus a night off to recover from the 700miles I'd driven over the weekend. I set about Josh's loco again last night. Window openings and front grill cut out, and the side panels cut out for the metal lourve panels to be fitted. This should all help with cooling batteries and other electronics. As well as been aesthetically pleasing.  20211006_195538 20211006_195538 by Jon Cameron, on Flickr The chassis is now at a point it could be painted. The horn keeps have been made up, they were to be out of thicker material but I messed up the holes to start with so started again in some new stock, with smaller holes, they only have to stop the wheels falling out so should be fine.  20211012_202715 20211012_202715 by Jon Cameron, on Flickr  20211012_214510 20211012_214510 by Jon Cameron, on Flickr  20211012_214536 20211012_214536 by Jon Cameron, on Flickr  20211013_021148 20211013_021148 by Jon Cameron, on Flickr The thickening pieces of the horn openings have all been trimmed to 8mm and filed over to remove the burrs after drilling the holes. I made a start on assembling the bodywork, bonnet panels been routered over by my friend at work to give a radiused edge to the top of the bonnet. Wood was stacked up underneath to give a solid surface to hammer some nails in each side to hold it while the glue set. The radiator front which is raised from the bonnet has been cut out from 6x30mm pine strip, and glued and clamped overnight. This will be to tidy up then glue to the bodywork after edges are cleaned up with a sander.  20211013_005009 20211013_005009 by Jon Cameron, on Flickr  20211013_011704 20211013_011704 by Jon Cameron, on Flickr  20211013_021055 20211013_021055 by Jon Cameron, on Flickr  20211013_021107 20211013_021107 by Jon Cameron, on Flickr The shiny metal vents for the bonnet sides have been given a going over with 80grit emery to roughen the surface for paint. Finally the radiator grill has been cut out ready to be glued to the inside of the bodywork.  20211013_022551 20211013_022551 by Jon Cameron, on Flickr Jon |
|
JonL
Elder Statesman
 WWSME (Wiltshire)
Posts: 2,907
|
Post by JonL on Oct 14, 2021 17:50:04 GMT
Just as a suggestion; if you make the grill clamped between two pieces of wood rather than glued it makes replacement and damage repair a lot easier, and can be painted before installation instead of after. Obviously you know what you are doing and I am sure your way will work equally well.
|
|
dscott
Elder Statesman
Posts: 2,438
|
Post by dscott on Oct 14, 2021 22:51:09 GMT
While I tackle some Home INSULATION the right way BY doing it myself!!!
A new quick project can be thought through.
B.S. 450 based around a mowing machine motor that turned up from a friend. Hardly used and the owner just got a small electric one.
Well I couldn't bring myself to bung away an old cover to a gas boiler so this is making the bonnet and a method of holding some sound deadening material. A sound card and system the locomotive will not need.
Your mesh has just given me an idea for the grass collecting box cut up and stuck to the sides. It will make a nice mesh and is self coloured in dusty black.
David and Lily.
|
|
dscott
Elder Statesman
Posts: 2,438
|
Post by dscott on Oct 14, 2021 23:01:00 GMT
I found with self aligning bearings that they needed some wearing in to move with the ease needed for an axle box.
They come out in one direction and once positioned sideways I held the bearing part in a knocked up clamp and spun it with the usual power drill driver turning it round occasionally. Perfect.
Bearing Boys seem to have an All year sale on 3/4" plummer blocks so these I tend to use.
David and Lily.
|
|
|
|
Post by jcsteam on Oct 15, 2021 11:47:53 GMT
Just as a suggestion; if you make the grill clamped between two pieces of wood rather than glued it makes replacement and damage repair a lot easier, and can be painted before installation instead of after. Obviously you know what you are doing and I am sure your way will work equally well. Damit wish I'd have done this now. It is fixed in place with two steps of wood now, both glued in place. Oh well hope it doesn't get damaged. Jon |
|
|
|
Post by jcsteam on Oct 15, 2021 11:52:08 GMT
David I'll see how they go for now, they may need bedding in as you say. But there moving on I think.
Jon
|
|
|
|
Post by jcsteam on Oct 15, 2021 12:03:44 GMT
Been a bit slack on the updates, but here's some photo progress. I realised that painting the frame with all the nooks and crannies of angle iron and bolts was going to be a pain, how to flip it around without spoiling the paint. This was my solution 6 bits of 4x2, some large 4" screws, and two long M6 bolts. It worked rather well!! 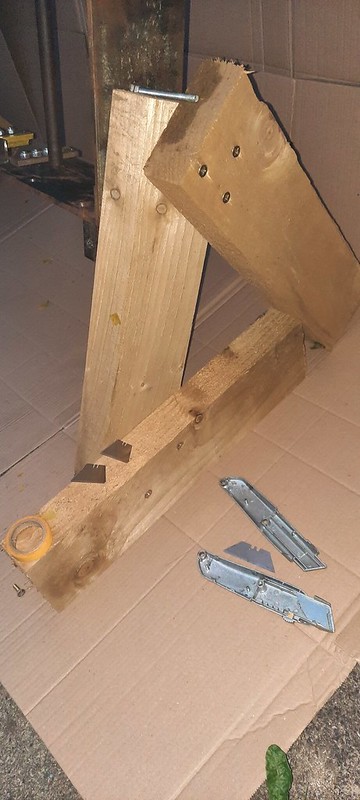 20211013_182610 20211013_182610 by Jon Cameron, on Flickr 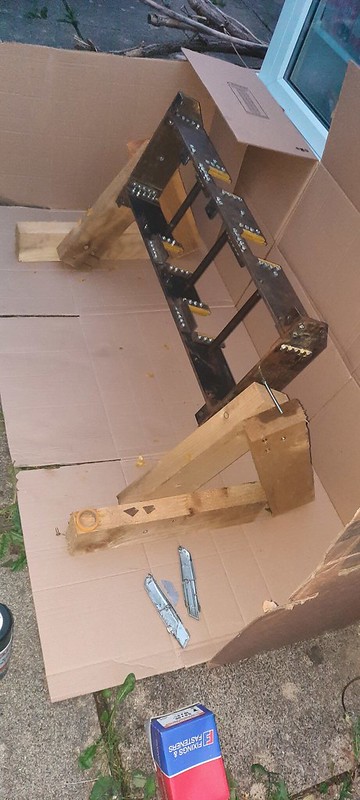 20211013_182600 20211013_182600 by Jon Cameron, on Flickr 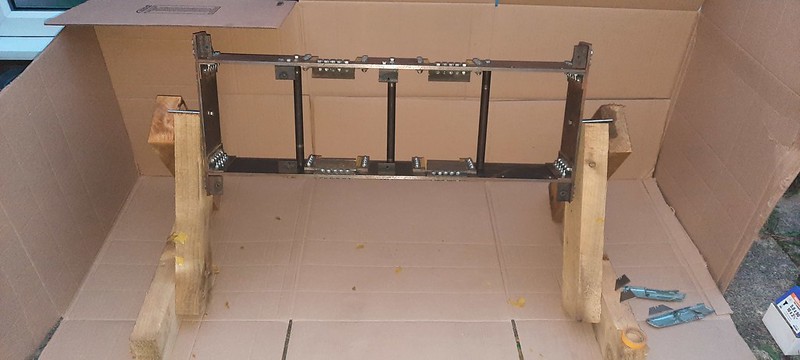 20211013_182634 20211013_182634 by Jon Cameron, on Flickr  20211013_185127 20211013_185127 by Jon Cameron, on Flickr After the black had been left to set overnight, the buffers were painted red. Masking off the now painted black frame was an absolute nightmare. However the buffers have come up nice and its beginning to look like a loco instead of bits of metal bolted together.  20211014_181110 20211014_181110 by Jon Cameron, on Flickr Footplate hung up through the bolt holes with 2.5mm copper wire from twin and earth cable.  20211014_210744 20211014_210744 by Jon Cameron, on Flickr Bodywork progress, the bonnet was sanded all over to line everything up perfect and remove some of the blemishes.  20211013_204409 20211013_204409 by Jon Cameron, on Flickr I didn't have large enough clamps to clamp the wood on for the radiator at the front, so instead opted for elastic bands which would apply a small amount of pressure while the woodglue set. When I put the side pieces in the elastic bands put pressure on the bottom of the side pieces (being slightly over size. So I put a piece of angle and plate at the bottom and sat the hood on that with the bands wrapped around them. Then I noticed the tops of the side pieces weren't against the panel for gluing, again the top been slightly over length. So two more strips of metal were placed under the elastic bands to put pressure where needed. This worked well and it's all nice and dry and relatively strong.  20211013_212207 20211013_212207 by Jon Cameron, on Flickr The front portion of the radiator could now be sanded flush, and the corners were rounded over at the top.  20211014_190232 20211014_190232 by Jon Cameron, on Flickr Mesh panel been glued into place  20211014_221555 20211014_221555 by Jon Cameron, on Flickr To fit the louved vent panels on the sides and limited room under the bonnet between the inside and the batteries, the bolts were shortened down with a hacksaw placing the nut on before cutting, so the nut corrected the threadform.  20211014_225800 20211014_225800 by Jon Cameron, on Flickr Front face of the bonnet and sides showing all finished work on them. Ready for paint now.  20211014_231438 20211014_231438 by Jon Cameron, on Flickr The last bit of the chassis to be completed, some small round bungs that the springs sit over. Nothing complicated but effective at retaining the springs. 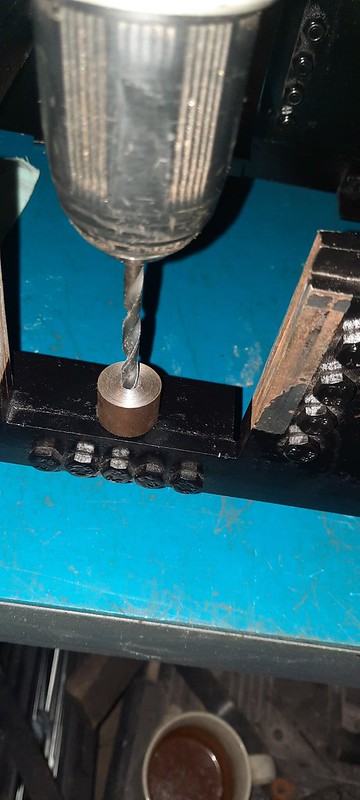 20211014_234257 20211014_234257 by Jon Cameron, on Flickr  20211015_011514 20211015_011514 by Jon Cameron, on Flickr The brass hex was used as a mandrel as the across corners was almost spot on what I needed the final size to be, start cutting the brass the noise changes and I'm there. Sped the process of four of them to dimension up.  20211015_012047 20211015_012047 by Jon Cameron, on Flickr The springs were also painted in a burgundy colour, I want to paint the take up bearings too, but worried that paint will get where it's not wanted if I do.  20211015_020942 20211015_020942 by Jon Cameron, on Flickr Cab Glued together ready for sanding tonight, and hopefully painting since weather is good.  20211015_031622 20211015_031622 by Jon Cameron, on Flickr Jon |
|
JonL
Elder Statesman
WWSME (Wiltshire)
Posts: 2,907
|
Post by JonL on Oct 15, 2021 12:42:16 GMT
I can't believe the speed of progress, good work
|
|
|
|
Post by jcsteam on Oct 15, 2021 13:08:17 GMT
I can't believe the speed of progress, good work I can with the hours I'm putting into it. Finishing work at 5pm, home start on the loco around 5:30pm last night was my latest finish yet 3:40am, then up again at 7am. I will be glad to see it finished. Im also trying to think three steps ahead for each night. Planning work for one night such as gluing bodywork, so I can fix metal pieces onto the bodywork, so I'm not wasting a night waiting for glue to dry. Two last machining jobs and I'm on the home striaght. As wiring I simply plug in four leads. Jon |
|
|
|
Post by jcsteam on Oct 15, 2021 19:21:25 GMT
On the way home tonight my boy Josh drew a picture of his first driving experience behind a loco. This was at Newport model engineering club, at the Glebelands track last weekend.  20211015_164042 20211015_164042 by Jon Cameron, on Flickr This was Josh receiving instruction from a few of the members, (such a lovely group of people that made me and my whole family very welcome), before Josh took to the track under instruction. He loved it, and I had a proud dad moment.  IMG-20211011-WA0000 IMG-20211011-WA0000 by Jon Cameron, on Flickr Also been waiting all day to get home and set this up, the body glued together and looking awesome. Very pleased with how it's looking, though not sure how much will be done on it tonight. Maybe fit the angle to the footplate so the bodywork can attach to the footplate with some self tapping screws. Get a good rest tonight and go for broke tomorrow all day getting the axles turned, wheels pressed on the axles, sprockets and chains connected up and wiring done ready for a test on the track Sunday.  20211015_181813 20211015_181813 by Jon Cameron, on Flickr  20211015_181535 20211015_181535 by Jon Cameron, on Flickr |
|
|
|
Post by jcsteam on Oct 17, 2021 14:35:32 GMT
So after finishing last night a 6am and off to bed, up again at 9:30am, to a welcome sight of bacon sandwich and cuppa.  20211017_100212 20211017_100212 by Jon Cameron, on Flickr Took the kids for a day with their Uncle. Time to update you all on Josh's loco. Bright angle cut to size aligned on the footplate, and drilled, countersunk, and bolted up with nylock nuts and countersunk screws. So bodywork can now continue to completion, since holes are now drilled.  20211016_142133 20211016_142133 by Jon Cameron, on Flickr  20211016_143127 20211016_143127 by Jon Cameron, on Flickr Axles have been made up, quite difficult without a catchplate/faceplate, and only one dead centre to turn between centres. But photos show how this was overcome.  20211016_163705 20211016_163705 by Jon Cameron, on Flickr End faced off and drilled with a slowcomb drill for the dead centre  20211016_163720 20211016_163720 by Jon Cameron, on Flickr Having only one dead centre, a piece of steel was placed in the 4jaw, roughly centred, and the compound set over to 45° and a point turned onto it to make a dead centre.  20211016_172339 20211016_172339 by Jon Cameron, on Flickr One of the bolts was removed from the face of the chuck and a piece of threaded bare screwed in with two nuts locked together so the chuck remained secure  20211016_173033 20211016_173033 by Jon Cameron, on Flickr Drive dog made from more threaded bar, and two bits of steel drilled 8mm  20211016_204220 20211016_204220 by Jon Cameron, on Flickr Back to back measurement of the wheels, these dimensions were obtained from the Internet, so no shouts if there not right. It seemed about right. So went with them.  20211016_232737 20211016_232737 by Jon Cameron, on Flickr I'll never hit this level of accuracy again so a photo for prosperity, the other three were slightly under lol. This is for the axle ends that fit into the 12mm bearings.  20211017_002321 20211017_002321 by Jon Cameron, on Flickr Cleaning up the OD of the axle, to make fitting the taperlock sprockets easier.  20211017_030202 20211017_030202 by Jon Cameron, on Flickr A quick trip into work at 4am this morning saw the wheels mated to the axles for the first time.  20211017_005836 20211017_005836 by Jon Cameron, on Flickr Finally a test run of the track this morning. Sent the missus out on it first as a guinea pig haha.  20211017_113149 20211017_113149 by Jon Cameron, on Flickr Then added more weight. The suspension worked well underneath, though was quite overloaded.  IMG-20211017-WA0000 IMG-20211017-WA0000 by Jon Cameron, on Flickr Vikki took a video of me playing ahem, testing the chassis.  VID-20211017-WA0001 VID-20211017-WA0001 by Jon Cameron, on Flickr Have bought some Rustins MDF wood sealer for the bodywork. Got some body filler, and paint so will be getting on with the bodywork and hope the paint dries in time. I tried to link up the chains but they didn't fit so have bought two outy to inny connector links for the chain. Not sure of the correct name of them but they'll help the chain from been so slack. Jon |
|
|
|
Post by steamer5 on Oct 17, 2021 14:54:18 GMT
Hi Jon,
Great progress!
Nothing like a guinea pig! I stood on Tobys frame in the garage & used the battery drill....very slowly pulled on the trigger!!
I set Toby up so in forward gear the chain was pulled up on the bottom, in reverse the chain drops down...i figured that more time is spent in forward & the extra clearance helped keep the chain up a bit more from the gravel etc on ground level tracks.
The outy inny things are joiner links...you can get full or 1/2 ones.
Cheers Kerrin
|
|
|
|
Post by jcsteam on Oct 17, 2021 15:10:05 GMT
That's the way this one will run, pulling the chain up in running position. The half links are needed as the chain linked up as it is now would drag on the sleepers
Jon
|
|
|
|
Post by jcsteam on Oct 20, 2021 12:14:46 GMT
Not many updates on the loco recently as I've been frantically trying to get it built up and together. So forgot to take some pics but here's some I did take and the finished pic (well almost) A horn for mounting on top of the cab, Aluminium bracket milled out. Filed to shape, and fixed in place to the top of the cab after been sprayed black. 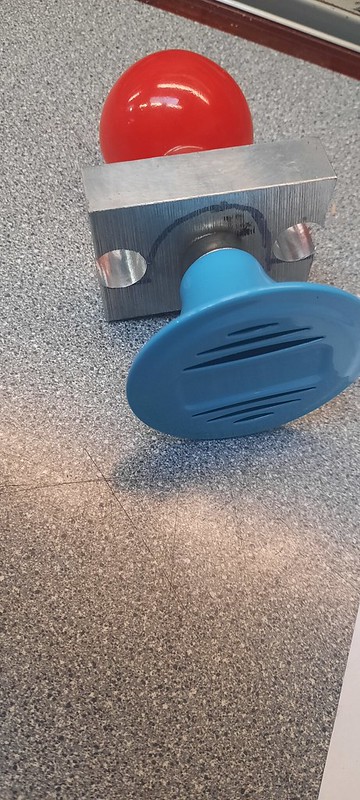 20211019_163500 20211019_163500 by Jon Cameron, on Flickr Vikki said one of his drawings showed an exhaust funnel at the front of the bonnet so a hunt around the garage produced some waste pipe for under sinks which 100mm was cut off and squared up, an aluminium disc was drilled tapped M8 and then mounted onto some threaded bar for machining. The end been made a push fit for the plastic pipe. This was then sprayed and bolted to the top of the bonnet. 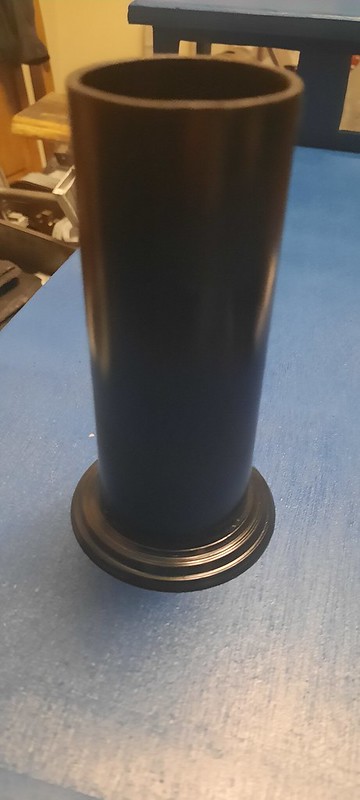 20211019_220702 20211019_220702 by Jon Cameron, on Flickr Bodywork all finished.  20211019_174127 20211019_174127 by Jon Cameron, on Flickr Couplings were made up from some 20mm square bar, and a 4mm x 25mm piece of bar was cut down drilled for the bolt, and a large washer used as a template to form the rounded end clamped up in the vise.  20211019_231124 20211019_231124 by Jon Cameron, on Flickr  20211019_231155 20211019_231155 by Jon Cameron, on Flickr Ready for birthday boy!  20211020_000653 20211020_000653 by Jon Cameron, on Flickr With his drivers hi viz he looks the part even if he's wearing PJ'S lol.  IMG-20211020-WA0003 IMG-20211020-WA0003 by Jon Cameron, on Flickr It sadly wasnt completed to running state in time. Need to buy a sprocket and chain as my idea to use the gears ultimately was a bad one. Speed would have been around 20mph with the gears I needed to use. Also a little bit of wiring should see him on the track for half term next week. A member of the club has stepped forward and said they'll bring along their 08 loco for him to play on and learn the track Sunday. So he'll be getting some driving experience in anyway. Really gutted I couldn't get it completed and running for him in time, but his smile says it all! Jon |
|
|
|
Post by Deleted on Oct 20, 2021 12:22:18 GMT
well done Jon, such a lovely present, and the smile on your son's face must be worth all the hard work...top marks sir...  Pete |
|
lesstoneuk
Part of the e-furniture
 Retired Omnibus navigation & velocity adjustment technician
Posts: 373
|
Post by lesstoneuk on Oct 20, 2021 12:49:19 GMT
Absolutely fantastic job, puts a lot of us to shame on your commitment and dedication to your goal. A child's smile is always worth it and is more than adequate as payment. Well done both for recording your progress so detailed and your actual achievement.
|
|
JonL
Elder Statesman
WWSME (Wiltshire)
Posts: 2,907
|
Post by JonL on Oct 20, 2021 12:58:23 GMT
I don't think you should feel anything other than very proud for what you have achieved. I think even at his age he will understand it needs a few things to finish it off.
|
|
oldnorton
Statesman
5" gauge LMS enthusiast
Posts: 692
Member is Online
|
Post by oldnorton on Oct 20, 2021 13:10:03 GMT
Yes very impressive to see what you have achieved, and so quickly. I am not sure many of us could manage the night shifts that you put in! Well done.
|
|
|
|
Post by jcsteam on Oct 20, 2021 17:24:00 GMT
Thank you for the compliments gentleman. Much abliged, as is your kindness to me not achieving the deadline. I have today heard back from Andrew Charman, the editor of Engineering in Miniature, that I contacted the other day. I'm pleased to say that he would be interested in running an article on the build. Which I'm very pleased about, searching around in previous years there is only Charlatan that I found as a battery operated loco. Hopefully it's ease of build, and not necessarily requiring a lathe, or milling machine. It should help get some more young ones started into the hobby. So when the loco is finished to running state, it looks as though I'll be typing on my laptop Jon |
|
don9f
Statesman
Les Warnett 9F, Martin Evans “Jinty”, a part built “Austin 7” and now a part built Springbok B1.
Posts: 960 
|
Post by don9f on Oct 20, 2021 17:24:27 GMT
Great job and agree with everything that’s been said....also it’s been a fascinating “mini project” to follow for a few weeks!
Cheers Don
|
|


