|
|
Post by modeng2000 on Jan 27, 2008 21:49:26 GMT
Bob I have in stock some pieces of plumbing copper pipe in various diameters that I got from a local plumbing outlet. They kindly cut short pieces off for me for another project, a Shay type T boiler. The shay loco is a long term project so I wanted something that would be easier to make hence the De Winton.
As Havoc said cross tubes might be subject to scaling and bubbles and I think the porcupine quills would be easier to use than tubes. The firebox would be quite congested with tubes and that might interfere with the burner operation.
John
|
|
steam4ian
Elder Statesman
 One good turn deserves another
Posts: 2,069
|
Post by steam4ian on Jan 27, 2008 22:19:13 GMT
G'day all. Me again. I don't know about elsewhere but in Oz copper plumbing tube is marked along the length with the Australian Standard number indicating compliance. I discussed materials with the club boiler inspector who told me that one thing they looked for was indication that materials complied with a Standard; not just some rubbish picked up from  ?? He told me to keep my receipts. We had a hardware chain that came to grief selling copper pipe from, yes! China, which was untested and non complying. Look up the catalogues and handbooks produced by the pipe/tubing manufacturers, they are a wealth of information, you can never know too much. One other thing, avoid soldering/brazing alloys containing phosphorus, these are commonly used for plumbing. They are a "No No" although if this is justified for gas or spirit fired boilers is questionable, apparently the problem is the sulphur in coal fire fumes. Regards, Ian |
|
|
|
Post by modeng2000 on Jan 28, 2008 7:17:16 GMT
The copper plumbing pipe I have is marked along its length although I have seen some, mainly in the smaller sizes like 15mm, that have no markings.
John
|
|
abby
Statesman

Posts: 925
|
Post by abby on Jan 28, 2008 8:36:54 GMT
Them danged Chinese again , is there no end to their evil LOL!
|
|
steam4ian
Elder Statesman
One good turn deserves another
Posts: 2,069
|
Post by steam4ian on Jan 28, 2008 9:17:28 GMT
G'day abby
Trust you to take that slant ;D
|
|
|
|
Post by havoc on Jan 28, 2008 11:09:45 GMT
Ian, thanks for clearing this up. It seems that definition of terms can be/are different in different codes. This is something to consider when discussing on a board like this as people can be using the same words to describe different things.
Our code on talks about "silver soldering" only meaning high silver content hard solders. (sidenote: Bronze solders are not considered. I know about phosphorous solders and their problems. But would this be a problem for frames?)
Regarding the "butt/end" joints: I don't see a difference between them from a mechanical/stress point. One has the solder in tension, the other in shear. But as the solder is stronger than the copper this is rather theoretical. You cannot use a press fit as this would hinder solder penetration. And even that isn't a garantee that it won't move when you heat the lot.
I don't think the staying would be a problem for a G1 boiler. The working pressure is lower than what is used for the larger gauges.
Copper plumbing pipe is also marked here. The small diameters that you can get for model making are not marked. But I never heard they looked at that in order to inspect a boiler. They do check wall thickness and relation to diameter (I hope...). And after you soldered and pickled your boiler I doubt there would anything legible on it. (there wasn't on mine)
John, I don't think scale would be a problem in our boilers. G1 is mostly run on distilled water over here. But water and gas flow could be.
|
|
|
|
Post by modeng2000 on Feb 8, 2008 20:18:38 GMT
Progress report.
I have at last got round to making the boiler for my De Winton type loco. Sorting out the various copper tubes and flanging the end plates went fairly well but forming what is I think called a 'mud ring' was something else.
This ring forms the base of the vertical boiler between the two tubes of the fire box. It is started as a 1/4" square bar and after annealing it about 5 times I managed to get it into a circle and then silver soldered the ends together. I have a Warco Formit and the bending rolls were just right for this job. The ring was then sized on the lathe, not without problems on account of the copper now being quite soft. I suppose I could have made some sort of a jig to hold the ring for machining but in the end I just took it easy and managed with the 3 jaw chuck.
I'll try to post a picture of the boiler components before assembly so you will be able to see how the boiler question was solved.
|
|
|
|
Post by havoc on Feb 8, 2008 21:30:37 GMT
Good work done I suppose. When forming copper I was very surprised how easy it was to flange a boiler end. Please post pictures it is always informative.
|
|
|
|
Post by dewintondave on Feb 21, 2008 1:45:54 GMT
Hi folks,
I'm sorry for not checking back into this forum for a while, de Winton's are right up my street. I have experience with Dave Watkins' design. I have made two 16mm size boilers. If anyone has any questions please feel free to contact me.
All the best,
Dave.
|
|
paul
Member

Posts: 8
|
Post by paul on Feb 21, 2008 10:09:09 GMT
If anyone has any questions please feel free to contact me. Dave. Can we have some pictures? ;D |
|
|
|
Post by modeng2000 on Feb 21, 2008 12:16:17 GMT
Hi Dave,
Thanks for the offer. As you can see from my posted pictures, I am using a different boiler from the one Dave Watkins' designed.
Pressure test any day now!
John
|
|
|
|
Post by dewintondave on Feb 22, 2008 20:24:07 GMT
If anyone has any questions please feel free to contact me. Dave. Can we have some pictures? ;D Hi Paul, Certainly. Here's a shot of loco # 1. Built almost to the plans, until I added some "improvements". 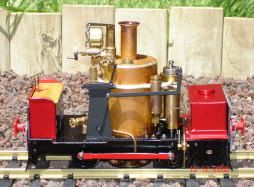 Here's a shot of the "backhead" 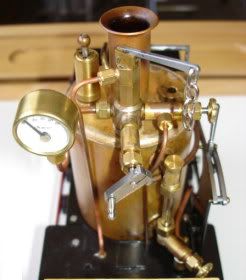 I have had much improvement in steaming with low mounted exhaust nozzle for these meths fired boilers. 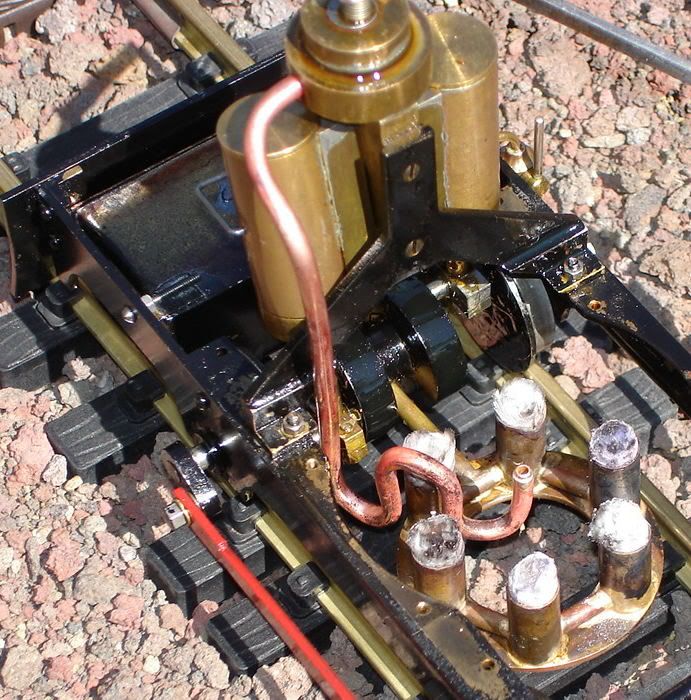 Here's a shot of loco # 2 waiting in the yards. Built with high mount cylinders, with the port block directly connected to boiler shell. That isn't steam but smoke coming from the chimney; burning steam oil - almost smells like coal. 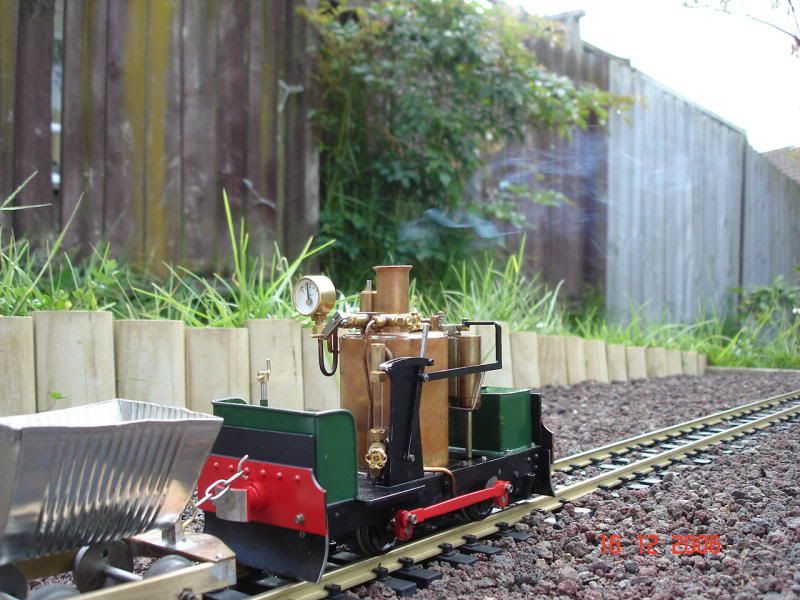 Here's a shot of loco # 3. Built to a larger scale. With different reversing method.  I have other pictures, text, and videos of them on my website. www.geocities.com/bdmrailway/index.htmlAll the best, Dave. |
|
|
|
Post by havoc on Feb 23, 2008 10:24:40 GMT
Very nice pics. Keep them coming! I love the wagon behind # as well.
Question: does attaching the cilinder block to the boilershell improve starting? I would think that preheating the block would lessen condense but how big is it an improvement.
|
|
|
|
Post by dewintondave on Feb 24, 2008 2:26:46 GMT
Question: does attaching the cilinder block to the boilershell improve starting? I would think that preheating the block would lessen condense but how big is it an improvement. Hi Havoc, It makes a great improvement. The engine will self-start everytime. There is no condensation with #2, and the loco is also very economical with water usage, running on half the throttle of #1. Before the "improvements", #1 was really bad on condensation, requiring much pushing and shoving to get underway. But, with the port block drain valve, I can pre-heat the motor with steam before the run, and #1 will now self start with no pushing required too. #1 loco uses more than twice the amount of water that #2 uses. Here's a photo of #1's port block drain; it's like cylinder drain cocks for an oscilator. 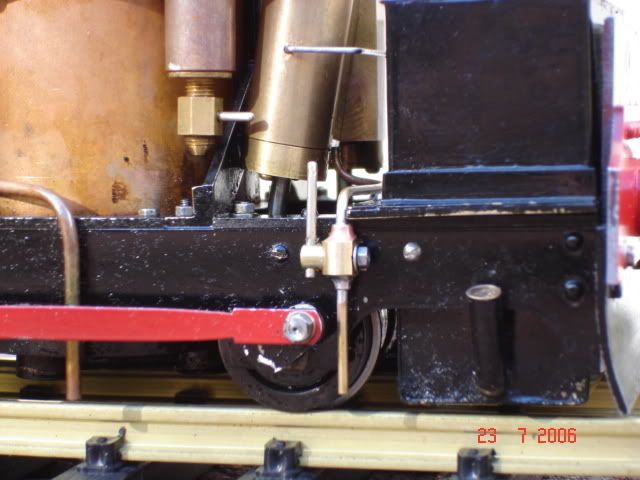 Loco #2's high mounted, long piston rods motor is better. There is less waggle and more torque. There is good low down torque for slow running. All the best, Dave. |
|
|
|
Post by havoc on Feb 24, 2008 10:53:03 GMT
Thanks for the info. I'm thinking of providing the motor of my next project with a separate "preheat". Running a small steam tube through the port block.
Have you tried on #1 to isolate the port block from the carrier? From your photo it looks as if it is bolted directly to the inverted 'Y'.
|
|
|
|
Post by dewintondave on Feb 24, 2008 23:26:30 GMT
I'm thinking of providing the motor of my next project with a separate "preheat". Running a small steam tube through the port block. Have you tried on #1 to isolate the port block from the carrier? From your photo it looks as if it is bolted directly to the inverted 'Y'. It's well worth pre-heating. If you put a drain on the port block you can also remove some of the condensate when running. #1 only has the one drain, and it's set-up to operate in forward; the cock needs shutting off in reverse. No, I haven't. The motor is is bolted directly to the inverted 'Y'. All the best, Dave. |
|
paul
Member
Posts: 8
|
Post by paul on Feb 25, 2008 23:06:46 GMT
Dave sorry I haven't commented on your pics - need time to digest them and formulate the questions!
|
|
|
|
Post by modeng2000 on Mar 30, 2008 15:49:04 GMT
Here is a picture of my boiler with the engine attached. I decided to use a flat spring to seat the reversing valve. I had not realized that not much pressure is required. The piece of copper wire supporting the cylinder seating spring is just temporary 'till I can think of something better and there are two screws missing from the cylinder block. John  |
|
paul
Member
Posts: 8
|
Post by paul on Mar 30, 2008 20:54:52 GMT
Looks really great John - you've been busy!! Now, the questions!
Did you make the gear wheel (the toothed wheel on the crank)?
Is the column made from solid?
Is the piano wire (if that's what it is) likely to need replacement at some point? I take it the cylinders rotate on a plain 'peg' for a pivot?
It looks like the engine is mounted on to a copper 'plinth' soldered to the boiler, is that right?
Any idea how long it will run for when complete?
I think your engine is brilliant, can't wait to see more progress.
|
|
|
|
Post by modeng2000 on Mar 30, 2008 21:34:51 GMT
Hi Paul,
The answers:-
Yes and 3 others for the rest of the gear train.
Yes, now like a piece of Gruyere cheese.
Don't think so. There is a 3mm pin that engages both cylinders.
Yes, silver soldered so as to conduct boiler heat to the engine.
Not yet, time will tell.
John
|
|


 ?? He told me to keep my receipts.
