ace
Statesman

Posts: 528
|
Post by ace on Jun 22, 2008 22:52:33 GMT
Hi maybe someone can help with this one. I am building the G1 loco 'Project' and have stumbled on a little problem with the smoke box and saddle. My instruction booklet gives me the length and sizes at which to bend the material for the saddle but does not give the height for this piece. I have made and constructed both the saddle and steam chest but when offered up to the chassis with boiler it sits rather high. Does anyone know the height this should be, I can reduce the height but I am not sure how low the smoke box should be in relation to the steam chest. I know that the boiler firebox should sit down in the chassis abit more than this.  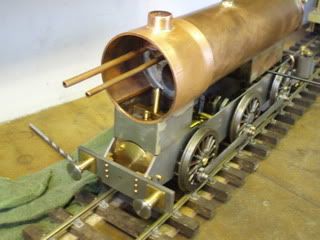 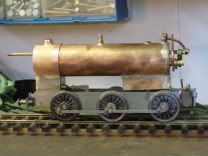 Oops a bit to small, sorry. 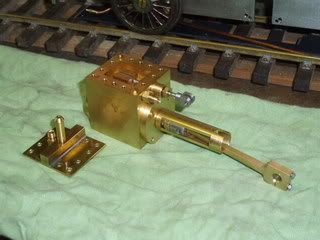 The steam chest now fully completed. ![]() i193.photobucket.com/albums/z284/spwok/P6210218.jpg[/IMG] i193.photobucket.com/albums/z284/spwok/P6210218.jpg[/IMG]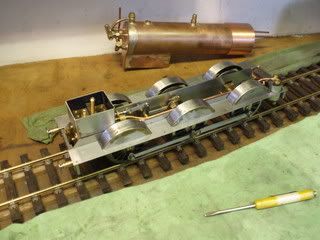 Some of the body work done over the winter tried on for size. Had a great day today managed to get quite a bit done on it and I am pleased with it so far, even managed to run it on air, still needs a bit of tweaking though there are a couple of bits that need adjustment such as the steam valve needs a bit filing off one side as it doesn't quite open on the ports fully.  ace |
|
ianmac
Part of the e-furniture
Posts: 308
|
Post by ianmac on Jun 24, 2008 4:28:23 GMT
I am sorry i cant be of assistance but i would just like to congratulate you on the work that has been completed.
What loco is the model based on, who published the plans etc
Those splashers look great too!
Cheers
Ian
|
|
|
|
Post by dewintondave on Jun 24, 2008 7:19:40 GMT
Hi Ace,
That's a very nice looking loco.
I like your BeePee avatar! Very timely.
Dave.
|
|
|
|
Post by spamcanman on Jun 24, 2008 15:43:00 GMT
|
|
ace
Statesman
Posts: 528
|
Post by ace on Jun 24, 2008 16:47:47 GMT
Everything except the above required dimensions. ;D ;D ;D
Steve
|
|
|
|
Post by spamcanman on Jun 24, 2008 21:25:08 GMT
Hi Steve,
Your right, I have just looked in the book and nothing I have left a message with a friend that has just completed building two at the same time as soon as he replies I'll post it here.
|
|
abby
Statesman
Posts: 925
|
Post by abby on Jun 25, 2008 16:11:16 GMT
Looks really good Ace , but some bigger pictures would make it look even better , I usually go for 600x480 ( I think lol). I haven't looked at the "project" , but it does look a bit odd. The drawings for "DOT" are full of mistakes and ambiguities even double dimensions for the same part, and I find the lack of tolerances most annoying , particularly for a first time builder. I am preparing a full set of dimensioned and toleranced drawings for my version with explanations too , not as readable ? as "curley's" ME write-up but should be useful to anyone who wants to build one. I have made many changes since starting and am currently working on a walschaerts gear mod , and the boiler , and loads of detail bits in between producing 5" gauge castings for a German Loco and drawings for my next project -a G1 spinner. It's great to see more members posting in G1 forum , I was beginning to think only me Tel and Havoc were interested in small steamers. Keep up the good work !  . |
|
ace
Statesman
Posts: 528
|
Post by ace on Jun 25, 2008 21:50:26 GMT
Abby I'm hooked on G1, I thought stationary engines and customizing Mamod traction engines where the thing for me and then 'pow' I started this project and can't get enough of it. The only little snag is its my first loco and I'm not that clued up on G1 loco's or any trains come to think of it. I can't wait to see this little thing running round my garden (hopefully I won't have run with it). I never realised how easy it can be given that there are suppliers for parts should you not have the skills or equipment to make the parts yourself. I will try to post some better pics when I have made more progress. Steve |
|
|
|
Post by spamcanman on Jun 25, 2008 21:59:01 GMT
Ace, A friend has told me in his book it says 9/16 does that help! I am going to speak to the guys on Saturday that produced the book and get the size 'from the horses mouth'  |
|
ace
Statesman
Posts: 528
|
Post by ace on Jun 25, 2008 22:26:39 GMT
Spamcanman
Many thanks for that, sounds more like it. Now just got to cut and file it down I guess to what looks right, so long as the boiler doesn't touch the valve knuckle.
Cheers
Steve
|
|
ace
Statesman
Posts: 528
|
Post by ace on Jun 29, 2008 20:31:46 GMT
Hi all Disaster struck today, whilst checking all the adjustments I have made to loco and ensuring that the timing was now right I ran the engine on low air pressure but the trunk guide snapped off  and after looking closely it appears to have stripped the threads inside securing the piston rod. Whilst that its self is not much of a problem to rectify, its the fact that I will now have to strip off all the work that I spent this week putting on, splashers, boiler, boiler pipe work and front wheels and coupling rods. 'O' well suppose thats engineering for you.  ace |
|
ianmac
Part of the e-furniture
Posts: 308
|
Post by ianmac on Jun 29, 2008 23:13:43 GMT
|
|
ace
Statesman
Posts: 528
|
Post by ace on Jun 30, 2008 17:49:46 GMT
No problem with the home made cylinder. I'll put it down to the lack of thread on the piston rod but it was made as per instructions. (well almost)  Live and learn, trial and error. ace ;D |
|
ace
Statesman
Posts: 528
|
Post by ace on Jun 30, 2008 22:57:26 GMT
Well I finished the new piston rod and trunk guide tonight, applied a little stud lock for added security and hey 'presto' she's up and running again ;D. Just needs a little TLC on the timing as stripping it down seems to have altered the smooth running that I had before.
Now back to work on the boiler fittings, or at least tomorrow anyway.
ace
|
|
ianmac
Part of the e-furniture
Posts: 308
|
Post by ianmac on Jul 1, 2008 2:49:28 GMT
I know the timing on my G1 is just off a little bit.
I need to fix the return crank in place properly it must be moving ever so slightly.
Good fun aint it! the loco looks very nice indeed cant wait to see some more pics
|
|
ianmac
Part of the e-furniture
Posts: 308
|
Post by ianmac on Jul 1, 2008 2:50:37 GMT
Would you mind posting up a larger pic of the back end of the boiler just wanted to see how you laid out your fittings
Ta
|
|
ace
Statesman
Posts: 528
|
Post by ace on Jul 1, 2008 21:56:46 GMT
ianmac
I will post some better pics this week and see if I can get a good one of the rear end of the boiler. (I didn't solder the boiler)
I spent ages last night trying to get it to run. Set up the timing as described in the book but when I tried it on air it did one full rotation and stopped dead, but I did notice it would run in reverse better. So after a little bit of fiddling with the stop collar
(by the way my collar has 2 fine adjustment screws plus the main fixing screw) and the adjustment to the valve rod it now runs OK, took about 2 hrs to sort that out.
Spent a couple of hours tonight fiddling with the pipe work and unions plus the banjo's, yep it great fun and then to sit back with a coffee and admire ones work. (for another hour). ;D ;D
Do you have any track laid out yet? I was looking at my garden the other day and decided to put out 3 pieces of track that I have just to see what kind of scale I could do in the garden. Well I think it will be a fairly small one but I don't know how sharp a curve I can have. Any ideas on the smallest size of bend.
steve
|
|
ace
Statesman
Posts: 528
|
Post by ace on Jul 2, 2008 21:36:09 GMT
Clack valve. I have finished off the clack valve this evening and found that it won't seal properly. I have tried two new bronze balls but it still leaks. I have tried lightly tapping the balls to secure a better seat but it made little difference. any suggestions would be great. ace |
|
|
|
Post by baggo on Jul 2, 2008 23:11:24 GMT
Try using a steel ball to 'form' the valve seat - the bronze ones may be too soft.
Have you reamed the inlet bore to make sure it is truly round and formed the valve seat with a D bit to make sure it is perfectly flat? At a pinch you can use an endmill instead of a D bit.
John
|
|
ianmac
Part of the e-furniture
Posts: 308
|
Post by ianmac on Jul 3, 2008 1:24:09 GMT
I spoke to a few people who have said dont worry too much about the clack vavle leaking if you just using lung pressure to see if its working.
Wait until its under steam and see how it peforms.
Also the other advise was if its possible try rotating the ball in the seat with some light pressure.
So place the ball on some news paper and the clack over the top and make some figure 8's. see how that goes.
Yeah i have 100ft of track in the yard over a pond . the track was put in for LGB trains but i got sick of those in about half an hour.
I got plans for the 36 class then....
Some of the radi are way to tight for a live steamer so once were looking like its time to play i will correct the curvs
Track laying is a PITA! good feelign once something can run around though
Ian
|
|


 and after looking closely it appears to have stripped the threads inside securing the piston rod. Whilst that its self is not much of a problem to rectify, its the fact that I will now have to strip off all the work that I spent this week putting on, splashers, boiler, boiler pipe work and front wheels and coupling rods.

