redmog
Part of the e-furniture
 Not Morgan weather
Posts: 461 
|
Post by redmog on Oct 22, 2009 18:10:28 GMT
Ploughing On - whilst JB's off the scene. Throatplate in the fitting. Chris. 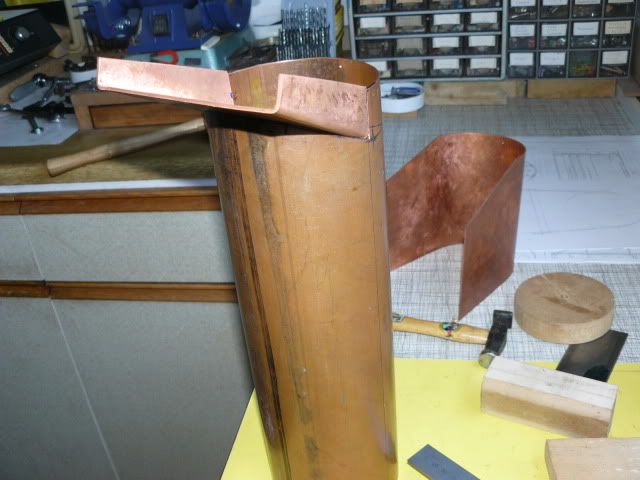
|
|
redmog
Part of the e-furniture
Not Morgan weather
Posts: 461
|
Post by redmog on Oct 22, 2009 19:27:13 GMT
Ready to Rivet. And now assembled with 10 BA screws nuts and washers ready for reassembly with copper rivets. To flux or not to flux. I can't remember whether I fluxed my Simplex boiler during riveting, but I think it might be messy. If I rivet up without flux the flux will still penetrate - won't it? 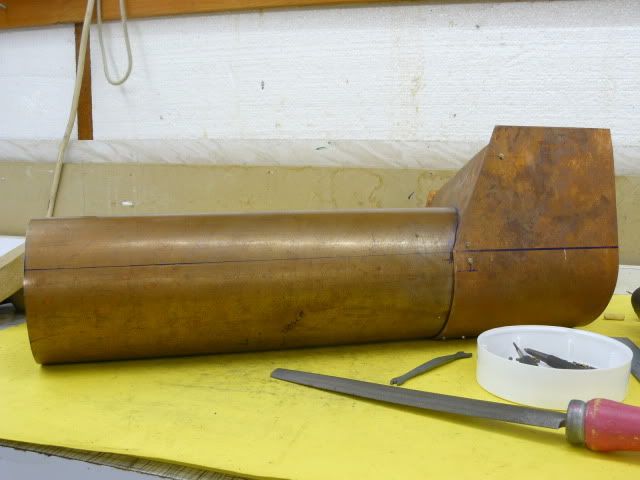
|
|
|
|
Post by Deleted on Oct 22, 2009 20:08:07 GMT
Ploughing On - whilst JB's off the scene. I'm still lurking........ JB |
|
redmog
Part of the e-furniture
Not Morgan weather
Posts: 461
|
Post by redmog on Oct 23, 2009 12:42:00 GMT
To Flux or Not to Flux. Ready to Rivet. And now assembled with 10 BA screws nuts and washers ready for reassembly with copper rivets. To flux or not to flux. I can't remember whether I fluxed my Simplex boiler during riveting, but I think it might be messy. If I rivet up without flux the flux will still penetrate - won't it? Andy - This is why I ask this question. Flux before or after assembly. Chris
|
|
|
|
Post by baggo on Oct 23, 2009 13:00:01 GMT
I've never bothered to preflux bits before soldering but that doesn't mean it won't help. I just scrub everything up spotlessly clean, fasten together, and flux just before soldering. If you have to leave the joint for a time before fluxing/soldering, dunk the lot in the pickle bath and rinse before you do actually flux/solder to remove any oxide that may have formed.
If you make the flux fairly 'runny' and add a bit of washing up liquid to it, it will seep into the joints to a certain extent by capillary action anyway.
John
|
|
redmog
Part of the e-furniture
Not Morgan weather
Posts: 461
|
Post by redmog on Oct 23, 2009 13:06:31 GMT
Washing up liquid. I've never bothered to preflux bits before soldering but that doesn't mean it won't help. I just scrub everything up spotlessly clean, fasten together, and flux just before soldering. If you have to leave the joint for a time before fluxing/soldering, dunk the lot in the pickle bath and rinse before you do actually flux/solder to remove any oxide that may have formed. If you make the flux fairly 'runny' and add a bit of washing up liquid to it, it will seep into the joints to a certain extent by capillary action anyway. John Thanks John. - I'll have a read of the Alex Farmer book tonight. He uses the washing up liquid trick. Chris
|
|
redmog
Part of the e-furniture
Not Morgan weather
Posts: 461
|
Post by redmog on Oct 25, 2009 13:26:22 GMT
Quote 'This little distraction might let Chris off the hook......' JB. What Hook? I'm swimming free this week. Boiler inspectors well pleased. Looked very impressed when they inspected throatplate workmanship quality and my quoting CFS's to 6 decimal places. I didn't let on about the software download recommended by Baggo. So full steam ahead with the silver solder this week whilst others have the arc welding gear out fabricating traversers. Chris 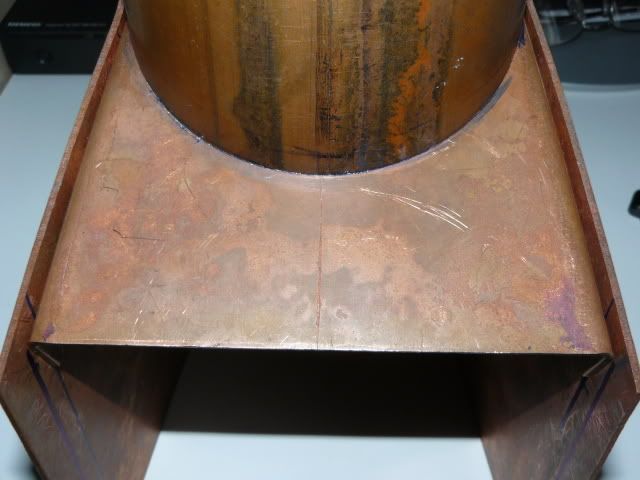 |
|
|
|
Post by Deleted on Oct 26, 2009 8:41:35 GMT
Sorry Chris, I put this reply in the wrong thread! Getting old......
Chris. Delighted your boiler inspector is happy, and so he/she should be given the quality of your workmanship!
I've got another good reason to delay finishing the boiler: the weather forecast for Montpellier is brilliant for the next seven days, so I'm back to the boat on Wednesday for 10 days to do some painting and electrical work, and perhaps restore my jaded suntan!
JB
|
|
redmog
Part of the e-furniture
Not Morgan weather
Posts: 461
|
Post by redmog on Oct 26, 2009 13:34:58 GMT
Slight Disappointment. Thanks JB. But I'm not completely happy with this mornings silver soldering. Seem to have a couple of dry spots. Throatplate to barrel fillet - OK. Throatplate flange to wrapper - good penetration. Barrel to wrapper - slight dry spot. It'll have to wait until I solder the dome bush in now though. Got some copper tube for the smokebox. Couldn't resist lining it up. Big Kid Syndrome again. Chris 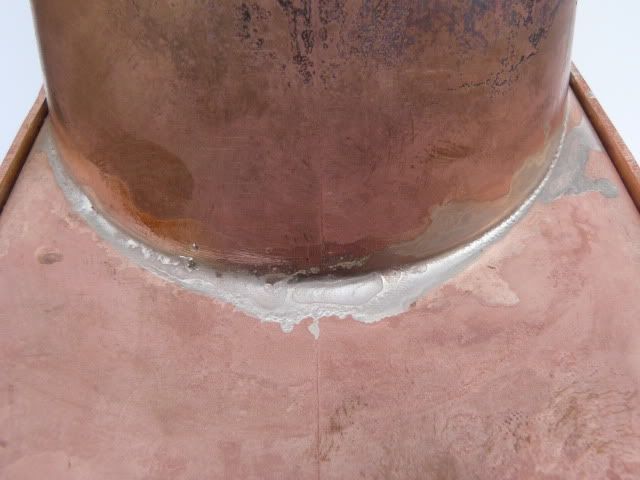 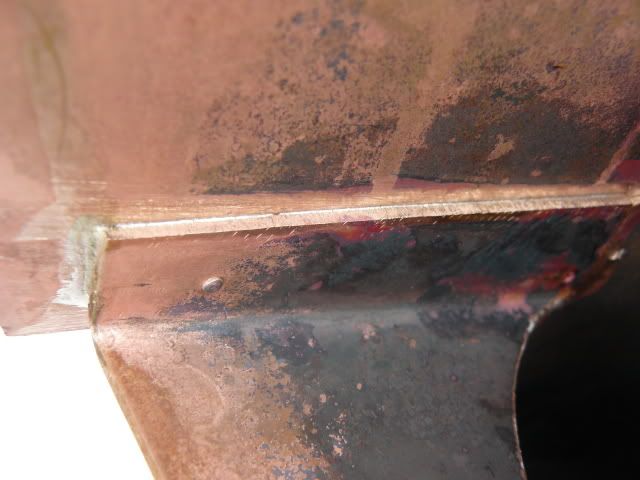 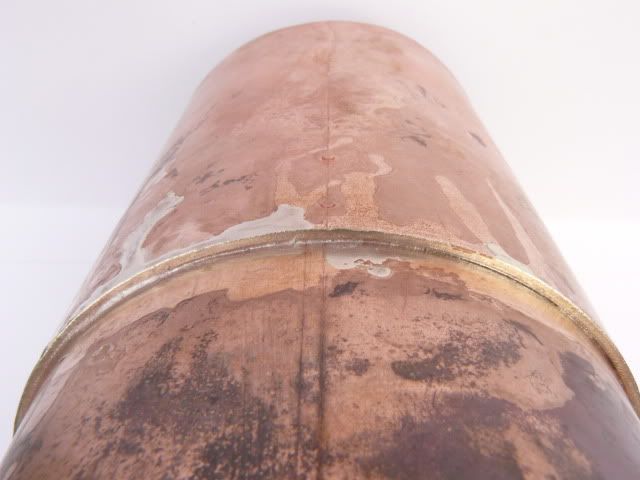 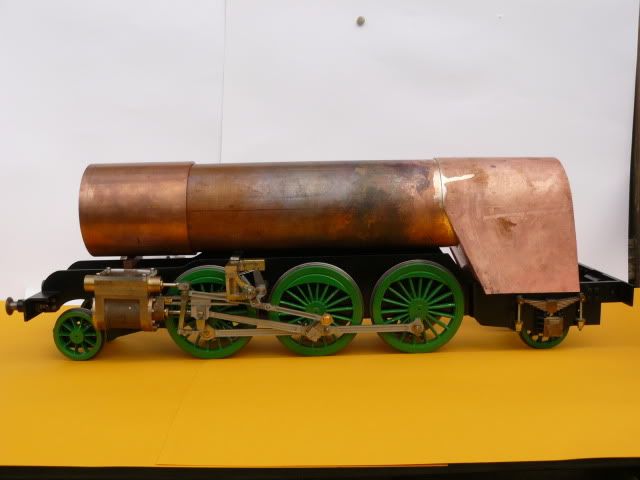
|
|
redmog
Part of the e-furniture
Not Morgan weather
Posts: 461
|
Post by redmog on Oct 27, 2009 20:20:19 GMT
Smokebox Detail. I've been doing a bit on the smokebox today, therefore I have been looking at smokebox detail. Can anyone please tell me what the large raised rectangular plate is just behind the chimney. Green Arrow has them. Bantam Cock did not. Thanks Chris 
|
|
|
|
Post by Deleted on Oct 27, 2009 21:09:33 GMT
Hi
The raised plate is to cover the superheater header, the A1 pacifics didn't have it but the A3's did because they had a different superheater. The V2 had a very similiar boiler to the A3 except it was a little shorter.
hope this helps
regards
Trevor
|
|
redmog
Part of the e-furniture
Not Morgan weather
Posts: 461
|
Post by redmog on Oct 27, 2009 22:20:25 GMT
Thank You.
Thanks Trevor.
Now it make sense.
Just as well I don't need to make one.
There's more work in one of those than first realised.
Chris
|
|
redmog
Part of the e-furniture
Not Morgan weather
Posts: 461
|
Post by redmog on Oct 29, 2009 19:54:11 GMT
Spigot Location. This is the first time I have used a smokebox door casting. On my previous 5" locos I used a steel blank. When I made those I'm sure I machined a spigot on the inner side of the door. It makes more sense to me, - 1. Machine the spigot. 2. Machine inner face. 3. Hold by spigot. 4. Machine outer curve, drill, then cut off spigot. It's a shame the spigot isn't cast onto the other side of this casting. How will I hold this - or have I missed something? The inner diameter of the door ring is far too small. How can I plumb inside there? I will enlarge it when I have the size from the door. Still enjoying it though.  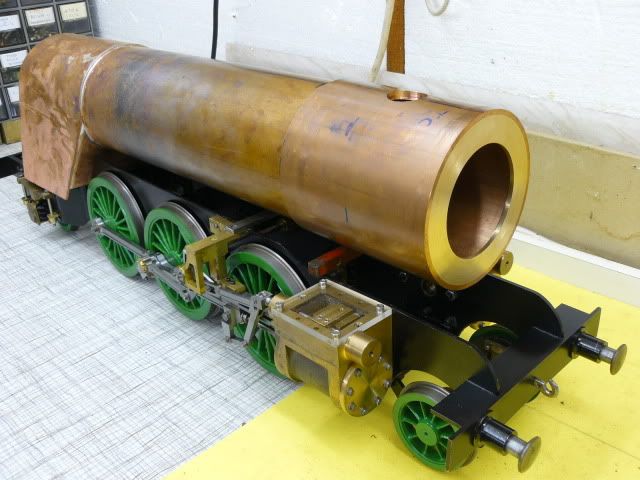
|
|
steam4ian
Elder Statesman
 One good turn deserves another
Posts: 2,069
|
Post by steam4ian on Oct 29, 2009 20:20:43 GMT
G'day
Your skills are way ahead of mine but I'll throw in 2 cents worth.
Plan A. Silver solver a new spigot on the back side of the door. Hold on the front spigot to true up the back spigot and the sealing face. Then rechuck on the back spigot to finish the front, use a 4 jaw if you are really fussy.
Plan B. If there will be a boss on the door front for the dart bar then drill out the present spigot to a thread size under the diameter of the boss. Tap the hole and true up the face around the hole. Make a spigot with a threaded end and shoulder to screw into the back of the door. screw it in and true it up as before, use Loctite to hold, it can be released by heat later.
You will ultimately have to make a boss to be silver soldered into the hole that the inside spigot screwed into. The dart will pass through a smaller hole in the boss as per prototype.
Regards
Ian
|
|
|
|
Post by baggo on Oct 29, 2009 21:41:04 GMT
Chris,
I did virtually what Ian has suggested in his plan B i.e. drilled through the boss where the will dart go and then put a bolt through into a length of bar to hold the door for machining the outer face. I used soft solder to secure the door to the bit of bar but Loctite would do just as well.
John
|
|
redmog
Part of the e-furniture
Not Morgan weather
Posts: 461
|
Post by redmog on Oct 30, 2009 8:02:33 GMT
Spigot Both Sides.
Ian - John. Thanks for your thoughts.
As I say it's a shame the spigot isn't on the other side.
Or better still all the way through - both sides.
I'm going to drill, counterbore, re centerdrill the spigot
and put a socket cap screw through into a back spigot.
It'll be held by the back and the front will by pushed by
a running centre for the seal face to sit on reverse chuck jaws.
Cut front spigot off after machining and clean up face.
I Hope.
Chris
|
|
redmog
Part of the e-furniture
Not Morgan weather
Posts: 461
|
Post by redmog on Oct 30, 2009 8:09:58 GMT
G'day Your skills are way ahead of mine but I'll throw in 2 cents worth. Regards Ian I don't know about that Ian. I just plough on carefully. My problem is that I don't give things the finishing touch. My B1's a nice loco I just can't bring myself to finish the platework. I don't have much interest in sheet metalwork. Shame really. Chris |
|
redmog
Part of the e-furniture
Not Morgan weather
Posts: 461
|
Post by redmog on Oct 30, 2009 21:52:11 GMT
Smokebox Door. G'day Plan B. Tap the hole and true up the face around the hole. Make a spigot with a threaded end and shoulder to screw into the back of the door. screw it in and true it up as before, Ian I've gone for a variation of your Plan B Ian. There's a 3mm socket cap screw in there. I tapped a piece of hex brass 3mm thread. Drilled a clearance hole through the spigot. Counterbored it for the head. Then centre drilled it for the running centre. Now the freelance bit - shape it! Chris 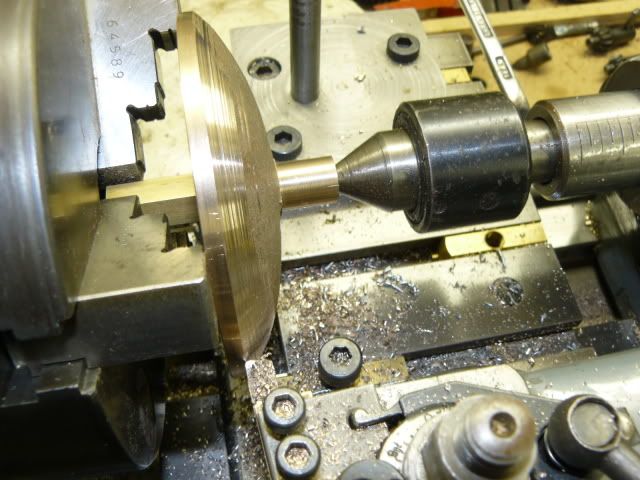
|
|
redmog
Part of the e-furniture
Not Morgan weather
Posts: 461
|
Post by redmog on Oct 30, 2009 22:05:31 GMT
Convex Front.
Like my last post said - freelance, with difficulty.
I'm afraid I haven't worked that one out yet.
But I do have an idea, which I might put into practice tomorrow.
Any suggestions welcome.
Chris
|
|
redmog
Part of the e-furniture
Not Morgan weather
Posts: 461
|
Post by redmog on Oct 30, 2009 22:16:41 GMT
Lacking Confidence. Sounds interesting - I'm looking forward to tomorrow's update. I'm interested in this as I received some more castings for my loco yesterday.....including the smokebox door, which is the same form as yours. Wish I could give advice but I am currently on a steep, highly-polished and well-oiled, learning curve. Good luck tomorrow. Mike. I might be slipping down the oily curve tomorrow.
|
|


