abby
Statesman

Posts: 925
|
Post by abby on Feb 28, 2008 0:42:30 GMT
fraid your wrong there Havoc , in the US most G1 stuff is RC , where is the fun in running along side your loco , especially at ground level , trying to adjust the regulator or alter the cut-off. more a test of agility than driving !
Far from detracting RC adds an extra dimension to driving , allowing control that could not easily if possibly be accomplished by hand. As for water and fuel levels whats the difference , they still need to be maintained .
Anyone serious enough to want to sit behind their loco to drive it would not be building G1. Whats your problem with batteries ? this is the 21 st century and batteries are small,powerful and re-chargeable. There is also the challenge of designing and fitting the servos and linkages required in such a small space.
I have an image of you chasing your loco through a nicely planted and scenic railway trying to get your fingers into the cab to shut down the regulator LOL !
Yet again there is this question of "the main issue" and it should be obvious by now that your main issue is not everyone elses.
Just like scratch building versus kit , or simply buying we all have different requirements from our hobby , mine is model construction, which is model engineering to me. My ultimate goal is a system where every aspect of loco driving can be controlled via a laptop , including a full colour live view from the cab with stereo sound , this may not be everyone elses cup of tea but it is mine and achieving this goal is all that matters to me.
|
|
|
|
Post by mutley on Feb 28, 2008 9:47:38 GMT
Am I missing something here. Where the video of Mallard?
Looking good Abby, often thought about using a wireless camera in the cab of a 5" gauge engine to help keep the passengers amused whilst waiting at the station.
|
|
|
|
Post by havoc on Feb 28, 2008 11:51:37 GMT
Well, I'm not into scenic landscape gardening ;D G1 running here is always at table height. Maybe because most live steamers are 60+... Just because I want more hands-on I'm more and more wanting to go coal fired.
Batteries are a pita. Always flat when you need them, wether it is in a gsm, laptop, watch, camera or something else. And it's just another thing to forget taking with you to a steamup.
|
|
abby
Statesman
Posts: 925
|
Post by abby on Feb 28, 2008 13:08:31 GMT
Ah, Havoc I am sure steam-ups are fun but I prefer piss-ups  My own project includes a railroad in my own garden which will be at ground level , this is the reason that I have chosen G1 , although I make castings for any gauge and have a couple of 5" loco's in the workshop at present for new boilers and overhaul. My early experiments with cab-cam have been encouraging although suitable bandwidth camera transmitters are a tad expensive at present , but prices are coming down  |
|
|
|
Post by havoc on Feb 28, 2008 16:47:08 GMT
I have seen such cams advertised in magazines up to Z scale. Not for putting in a loc cabin then, but it fitted on top of a flat wagon. About $100 IIRC. No idea about quality.
|
|
|
|
Post by ausdan on Mar 2, 2008 0:08:08 GMT
|
|
paul
Member

Posts: 8
|
Post by paul on Mar 2, 2008 17:31:39 GMT
Awwww, that's not fair, I want one of those!  |
|
Smifffy
Statesman
Rock'n'Roll!
Posts: 943
|
Post by Smifffy on Mar 19, 2008 20:10:37 GMT
wow Abby, my turn to check out this post - inspirational work!
I started on the Gauge 1 project as my re introduction to Engineering. I got as far as running the chasis on air, but that was enough to get me into doing something bigger. Hence my Royal Scot.
Cracking stuff, please do keep us updaed with more pictures.
Smifffy
|
|
abby
Statesman
Posts: 925
|
Post by abby on Mar 24, 2008 1:41:20 GMT
Doing some major re-design at moment after getting Turbocad 3D , lots of little faults - no disrespect to LBSC - and mistakes on the drawings, should have everything put back together in a couple of days. Thanks to Baggo I will have something that looks a bit more like a Black 5 and what I hope will be a new concept for small boiler construction.
|
|
brozier
Part of the e-furniture
Posts: 335
|
Post by brozier on Mar 29, 2008 15:26:25 GMT
Hiya Abby,
Just caught up with this thread. Really like the casting you have been doing.
How are you getting on with TurboCAD? I noticed in this months ME they are offering v14 deluxe for £40 as a sepcial offer for ME readers.
I've be using the evaluation copy the last few days and I think I'll be buying it seems a lot more intuitive than QCAD...
Do you have a website? I'd be interested in how you do your casting - I hope to get some use out of my Kasenit furnace this summer starting with some green sand casting of Aluminium.
I've made some wooden patterns for Dave Gingery's Atkinson Differential engine design, though building Spencer in 3.5" gauge is distracting me at the moment.
Cheers
Bryan
|
|
abby
Statesman
Posts: 925
|
Post by abby on Mar 29, 2008 21:17:58 GMT
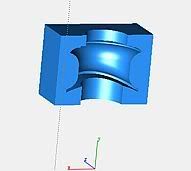
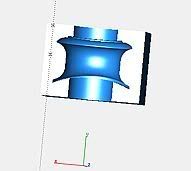
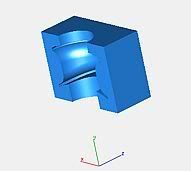
Hi Bryan, I am getting on well with Turbocad 3D and I am now able to draw things I can't posssibly make, you have probably noticed that you need Turbocad 2D to produce conventional drawings. I also have the trial version but it keeps on working ,well past the 14 days. My web-site is unionsteam.co.uk/ and the gallery should show how we produce castings, I am based in Nuneaton , not far from you so if you want to visit drop me a line. Here is the design for half the die to produce chimney castings. |
|
abby
Statesman
Posts: 925
|
Post by abby on Apr 12, 2008 16:55:54 GMT
I have done a few mods to DOT which may be of interest , the springs have been moved above the axles , making a neater job and allowing the keeper to be replaced with dummy leaf springs. The axle boxes have been given a radius on the inner side, this allows the axles to float without locking. The wheels have been altered to G1MRA specification , which in turn has allowed the cylinder centre distance to be cut down to something approaching scale for a black5. The motion brackets have been re-designed to allow more accurate positioning and the guide bars are now fixed with 1 mm socket head screws. The stretcher bar riveted between the frames has been replaced with a casting screwed in place. 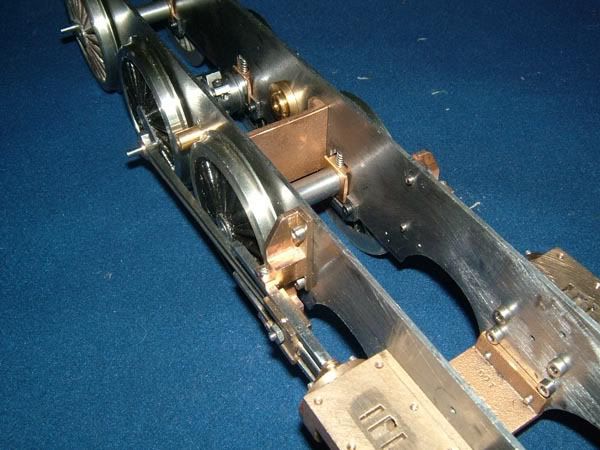 the axles boxes were turned on this jig to 1 5/16" radius and work very well. 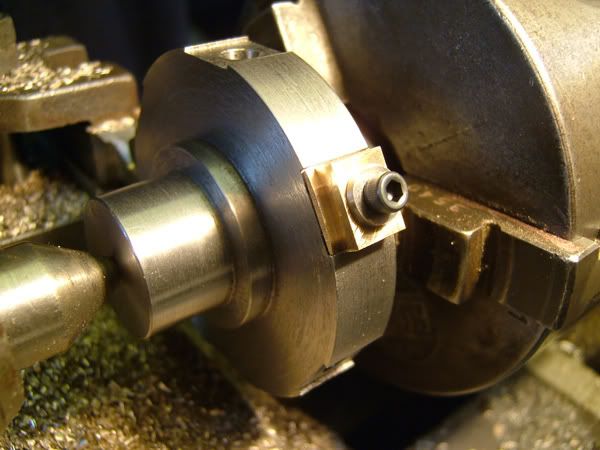 just waiting for the boiler parts that I am having rapid prototyped, more soon. |
|
|
|
Post by havoc on Apr 12, 2008 19:38:47 GMT
I appreciate the view of your jig for the axleboxes. I have been wondering how to do this for my coming job and could't see it. Filed the picture for reference. Very nice job.
|
|
abby
Statesman
Posts: 925
|
Post by abby on Apr 12, 2008 20:11:23 GMT
Glad to be of help Havoc , I couldn't decide whether the curve should run inside the frames or outside so I settled for inside , which then means fitting a spacer to prevent the boxes moving inwards. I was thinking that as the spacer is a tube it could be used for oiling the axles. Give me your axle box size and I will cast you a stick of gun-metal.
|
|
|
|
Post by havoc on Apr 12, 2008 21:33:02 GMT
Actually from full size, there is a "radius" on both sides. I'll see if I can find back the drawing. Don't know how useful it is in our sizes. I have mostly seen the edges broken so that there isn't a sharp edge to seize.
I don't get your reference to the spacer. Might be because it is already late and it's been a busy day. I'll think again about it tomorrow.
Thanks for the offer Abby. However I already have a piece at hand.
|
|
|
|
Post by baggo on Apr 12, 2008 22:54:23 GMT
Like the jig Abby  Looks a lot easier method than using the rotary table in the mill like I normally do ! |
|
abby
Statesman
Posts: 925
|
Post by abby on Apr 13, 2008 0:23:49 GMT
Haven't got a mill at present John , so I tend to think turning lol !
I have had several but had to part with my Henry Milne when I moved to a workshop at home. my mate up the road has a Dore-westbury home build and does any milling, we have just bought the Elliot mini-mill that was on ebay, and it really is a cracker , it weighs about 1/2 ton , fetched it from Southampton on a trailer , 310 miles round trip on 25 quids worth of diesel , I was well chuffed. Be even more chuffed if I can change the 100 gallons of dirty lard and fried animal bits that I have collected into biodiesel.
|
|
|
|
Post by havoc on Apr 28, 2008 9:59:27 GMT
Abby, something I forgot to ask concerning the radius you put on the axleboxes. How did you determined the radius to be used?
|
|
abby
Statesman
Posts: 925
|
Post by abby on Apr 29, 2008 17:18:33 GMT
Simple Havoc the frames are 1 5/16" apart so that's the radius , actually I have been thinking about the axle boxes and if the radius cut was done from the front instead of the side it would be a radiused slot, if the boxes were then removed from the jig and reversed , they could be cut again to produce a second radius. Thus the axle box will fit snugly in the frame slot and will be retained by the inner and outer radiused lips , yet still be free to move without locking the axles. Hope that makes sense without a drawing.
|
|
|
|
Post by havoc on Apr 29, 2008 18:09:17 GMT
Yes, it makes sense. For the radius on the inner side...but I have been wondering about the radius on the outer side. OTOH if you used the same radius both sides and it works fine I accept that as an answer.
|
|