barlowworks
Statesman
  Now finished my other projects, Britannia here I come
Posts: 878 
|
Post by barlowworks on May 7, 2017 15:01:48 GMT
It appears that most water treatment is tannin based, more likely to taste like tea than beer. 😊
|
|
stan
Seasoned Member

Posts: 110 
|
Post by stan on May 7, 2017 21:09:34 GMT
I think you are all wrong that pipe and funnel were for the driver to empty his tea can down so it would not go all over the front carriage window if he threw it out of the cab window, Ha Ha . Must make a start in the workshop now things are settling down your tender looks ok to me Jim and will look even better when painted. I have just ordered the water scoop castings from Mike.
Stan
|
|
Lisa
Statesman
 
Posts: 806 
|
Post by Lisa on May 8, 2017 1:00:29 GMT
It appears that most water treatment is tannin based, more likely to taste like tea than beer. 😊 This reminds me of when running steam commercially, filling the tender with water, and every now and then you'd hear some nit telling their kids something along the lines of "see they're filling it with petrol." So whoever was in charge of the loco would pull the hose out of the tender, take a drink, and put the pipe back. Could always tell who'd made the petrol comment by the wide-eyed stare. |
|
|
|
Post by Jim on May 8, 2017 7:04:50 GMT
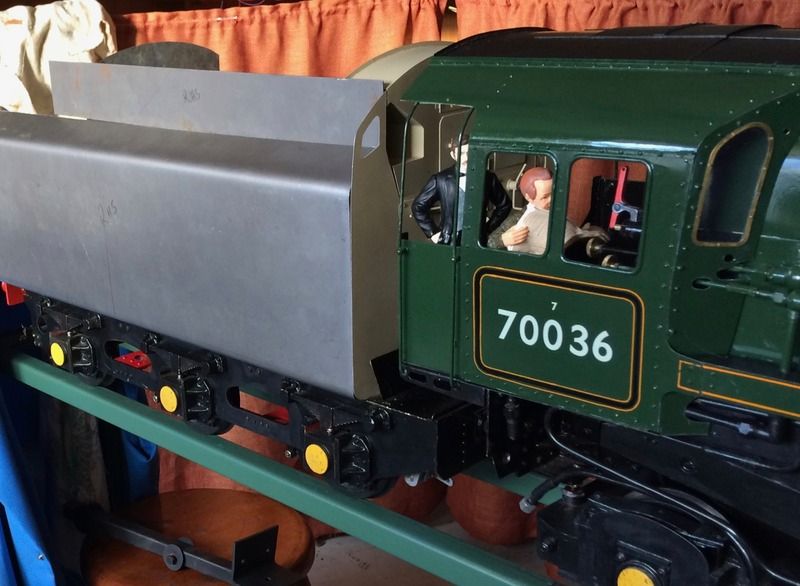
Today I rechecked my measurements for sorting out the LH side of the tender that was pulling the front of the tender in such a way as to skew one side of the bunker. The excess was removed with the hand shears I have, then to give a nice true edge I set the plate up in the mill and lightly milled the edge. A test assembly to check the problem was no more, all was sorted. With the help of magnetic clamps and some blu tac I managed to get the tender assembled on its chassis and behind the loco. There is obviously a lot of trimming and fitting to go but at least the main components are now right.  Off tomorrow to baby sit the grandchildren for 5 days. I know where I'd rather be.  |
|
|
|
Post by steamer5 on May 8, 2017 7:12:53 GMT
Hi Jim,
Still following along. The tender is looking great! Have you got any hints & tips for us poor sheet metal benders to make sure we get the bends in the right place would be great fully accepted!
Oh looking after the grandkids is fun! Espeacally if you have aToby Tram that you can take visiting!
Cheers Kerrin
|
|
|
|
Post by simplyloco on May 8, 2017 7:57:47 GMT
Today I rechecked my measurements for sorting out the LH side of the tender that was pulling the front of the tender in such a way as to skew one side of the bunker. The excess was removed with the hand shears I Have then to give a nice true edge I set the plate up in the mill and lightly milled the edge. A test assembly to check the problem was no more, all was sorted. With the help of magnetic clamps and some blu tac I managed to get the tender assembled on its chassis and behind the loco. There is obviously a lot of trimming and fitting to go but at least the main components are now right. Off tomorrow to baby sit the grandchildren for 5 days. I know where I'd rather be.  Looks great Jim. I'm scratching my head as to how to join the bunker to the tender side as I haven't got a welder that small! Do I use a piece of angle joined internally to the bunker and the canted bit? I smell some araldite... John |
|
|
|
Post by Jim on May 8, 2017 7:59:11 GMT
Hi Kerrin, I found making a former to the shape of the tender sides was invaluable in being able to reproduce the two sides. There's a photo of the former on the previous page. One thing I forgot when making the former for BR1 tender was to deduct 2x the thickness of the metal sheet from the width of the former. As a result the sheets fitted round the ends rather than butting up to them. To correct this I had to run the former through the table saw to take of the 2.5mm needed  . then I had to tap the top curve over a bit more to bring it down to the new position. The other thing I'd suggest is that when tapping the bends in over the former you use a block of wood against the metal and tap onto the wood and not directly on the metal. That way you don't put dents in the metal and you bring the bend down flat. I'd suggest you have a look at Steve's (Springcrocus) site here: modeleng.proboards.com/thread/10476/5-gauge-britannia-build-diary?page=19 Steve is doing a superb job building a BR1 tender and he has more ideas for forming and shaping the sides. Jim. |
|
|
|
Post by Jim on May 8, 2017 8:11:45 GMT
Looks great Jim. I'm scratching my head as to how to join the bunker to the tender side as I haven't got a welder that small! Do I use a piece of angle joined internally to the bunker and the canted bit? I smell some araldite... John Thanks John, I'm doing as Steve and others have done John and using a length of suitable angle set in the thickness of the sheet and soldered to the front plate to create a surface to screw the side sheet to using counter sunk screws. Once all is ok I'll fill the screw heads and file/sand the tops smooth. Steve has some nice photos on his site. modeleng.proboards.com/thread/10476/5-gauge-britannia-build-diary?page=19I'm not sure what others have done but I think some form a gasket goo would be needed between the angle and the side to keep things water tight. Jim |
|
|
|
Post by steamer5 on May 8, 2017 9:09:17 GMT
Hi Jim,
Thanks for the link, I'll go have a read!
Cheers Kerrin
|
|
|
|
Post by 92220 on May 9, 2017 17:45:49 GMT
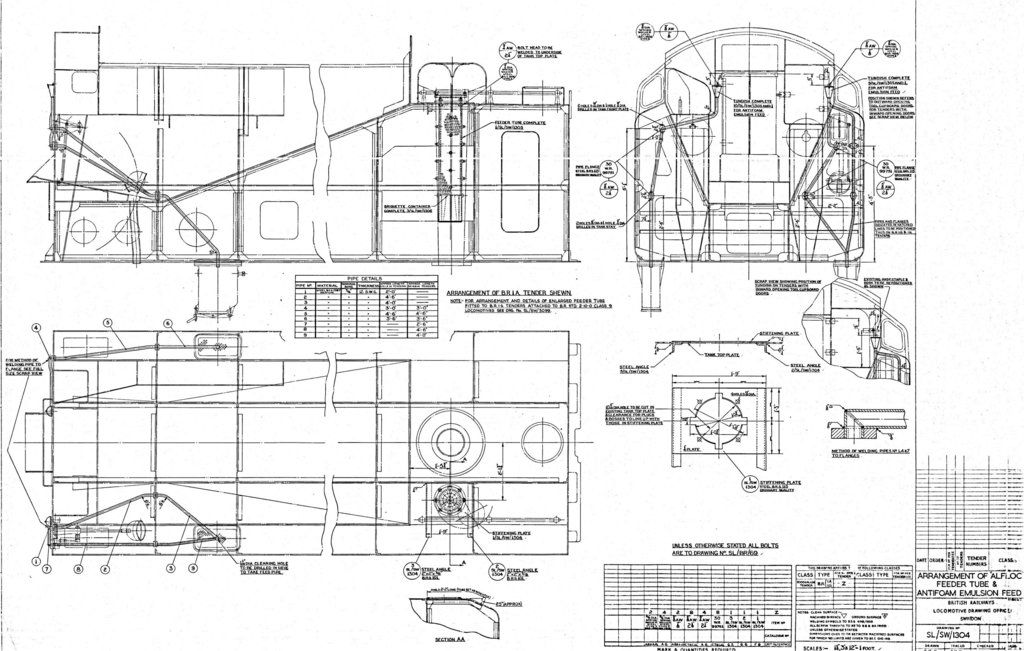
Jim. You were asking about the ale dispenser on the front of the B1G tender. Here is a copy of the drawing:  Bob |
|
|
|
Post by 92220 on May 9, 2017 17:50:16 GMT
Now the drawing has come up, the dimensions are not readable. I will re-draw and re-post. It will take a bit of time, but I am also drawing up the access cover. I'll post that when I've finished it.
Bob
|
|
|
|
Post by Jim on May 10, 2017 1:06:49 GMT
The drawing looks fantastic Bob and I'm sure it will be of much interest too to the others working on the BR1 tender and its variations. Thank you very much indeed.
I've also sent you a PM.
Jim.
|
|
|
|
Post by Jim on Jun 3, 2017 6:55:17 GMT
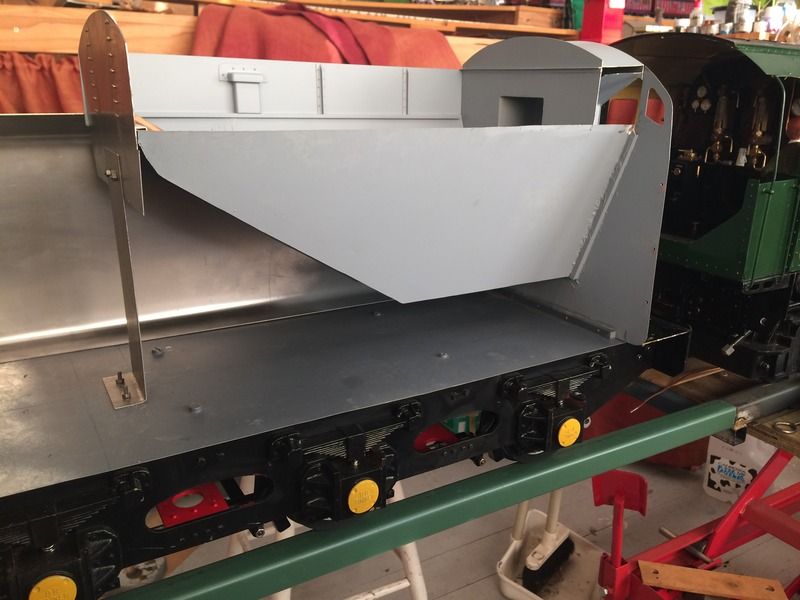
At last I've got back to the work shop to start the task of fitting and securing the sides and bunker tops in position while checking that all is square. The photo shows the tender sides in place with the inside brass ledges that will eventually support the dummy load of coal when the engine is in display mode.  Jim |
|
|
|
Post by springcrocus on Jun 3, 2017 7:12:59 GMT
And you were having so much fun looking after the grandchildren.  Nice to see you back in the workshop, Jim. Regards, Steve |
|
|
|
Post by Jim on Jun 3, 2017 22:18:16 GMT
Thanks Steve for the kind thoughts and much as I love the little darlings, especially when they are asleep, it is nice to be back working on the tender. Today's task will be to make up the tee section bracing for the bunker upper sides and the rear bulkhead. Then with them in place along with the two air vents I can start fixing the two plates to the front and rear bulkheads. At this stage I'm keeping the main side walls as separate removable components. Did I hear you mention the word 'Leaks'?   JIm |
|
|
|
Post by Jim on Jun 6, 2017 4:57:22 GMT
Waiting for a load of firewood so decided to fit the tee section bracing to the side and end walls of the tender. It's worth noting there is no bracing on the fireman's side due to the presence of the fire iron tunnel. That turned out to be a lucky fact as I'd run out of tee section bracing. 😜  Now to drill the holes for the rivets.😒 Jim |
|
|
|
Post by Jim on Jun 6, 2017 5:19:09 GMT
I should have mentioned another job and that will be to make the two air vents, one for each side which are fitted with a distinctive semi circular row of rivets seen from the outside. All this drilling is just a warm up for the zillions of rivet holes to be drilled in the tender sides. Oh dear I can feel the need for a soothing ale or three. No I must be strong, make it a couple of boxes of soothing ale.  Jim |
|
|
|
Post by Jim on Jun 9, 2017 2:45:57 GMT
This morning I've managed to complete the two air vents that sit opposite each other on the side walls of the coal bunker. Luckily I had some square section tube of just the right width that I could cut to size for the body of the vents. The cowls were made from an off cut of brass bar. After lunch I'll mark and drill the rivet holes ready for riveting in place. The photo also shows some sanding is needed to clean up the joints and walls in the bunker. Can't let that pass even if it will be covered bu coal.   Jim |
|
|
|
Post by Jim on Jun 10, 2017 8:01:45 GMT
Thanks to the magical qualities of a soothing ale the tee sections and air vents have now been riveted to the side walls of the bunker. Looking at Paul Orrel's detailed photos the air vents were secured with hexhead bolts on 70000 'Britannia' while earlier photos of other Brits appear to show them riveted in place which is the option I've taken, besides I didn't have any scale bolts but I did have lots of rivets.😀  Satisfied with the set up for drilling the holes and setting the rivets I've since done the rear wall of the bunker. Hopefully tomorrow I may get the half round beading for the edges of the side and end walls. Jim |
|
|
|
Post by Jim on Jun 15, 2017 0:45:52 GMT
I thought I'd add this photo of the tender's innards while I had the side off for a final trim of the end while waiting for the half round beading to arrive to complete the upper sides and end wall of the bunker. I've also marked out the drain hole and location for the water feeds to the high and low pressure injectors. I must admit the visit last week to the Hot Pot Run has fired me up to get the Britannia completed and running for next year's event. Well we can but hope.   I've used this arrangement to ensure water isn't trapped behind any internal walls. Jim |
|