|
|
Post by steamer5 on Jun 15, 2017 2:59:50 GMT
Hi Jim,
Nice work! There's nothing like a visit to a track to get you wound up with enthusiasm for your own project!
Hope you marked the tank from below for the drain & injector point? The drain on my tender needed to be about 1/2" to the right to be able to get the spanner, had to be home built, on the drain plug easily
Cheers Kerrin
|
|
|
|
Post by Jim on Jun 15, 2017 5:55:20 GMT
You're dead right about a visit to an inter club run to fire up a bit of enthusiasm Kerrin and you raise a very valid point too about marking out the various outlets to avoid the obstructions under the floor.
I intend making the flat deck at the rear of the tender removable to give easy access to the two water taps and it also means I can put my hand in to undo the drain plug, it's an idea I've copied from others in the club. That way I can avoid the problem of getting a spanner up between the frames to undo the drain.
Jim.
|
|
|
|
Post by steamer5 on Jun 15, 2017 8:30:49 GMT
Hi Jim,
Sounds like you have a cunning plan! My plug is underneath so made up a long handler tee wrench with the appropriate sized hex on the end. Make access reasonably easy with the loco on the steaming bay.
Cheers Kerrin
|
|
Lisa
Statesman
 
Posts: 806 
|
Post by Lisa on Jun 15, 2017 8:41:38 GMT
Personally, I've always just used a standard ¼"BSP quarter-turn tap from the hardware shop, instead of a drain plug; can be hidden behind the frames, and at the end of a run the tender can be drained with a flick of the wrist, rather than messing with spanners and plugs. |
|
nonort
Part of the e-furniture
 If all the worlds a Stage someone's nicked the Horses
Posts: 279 
|
Post by nonort on Jun 15, 2017 11:09:56 GMT
Taps quarter turn valves. Sounds a bit technical to me why not a plug hole directly under the filler, the plug has along handle. At the end of a run pull out the plug using the extension one empty tender in super quick time. Just a thought.
|
|
Lisa
Statesman
 
Posts: 806 
|
Post by Lisa on Jun 15, 2017 11:42:21 GMT
One of these ball valves:  |
|
|
|
Post by 92220 on Jun 15, 2017 12:28:27 GMT
Hi Jim.
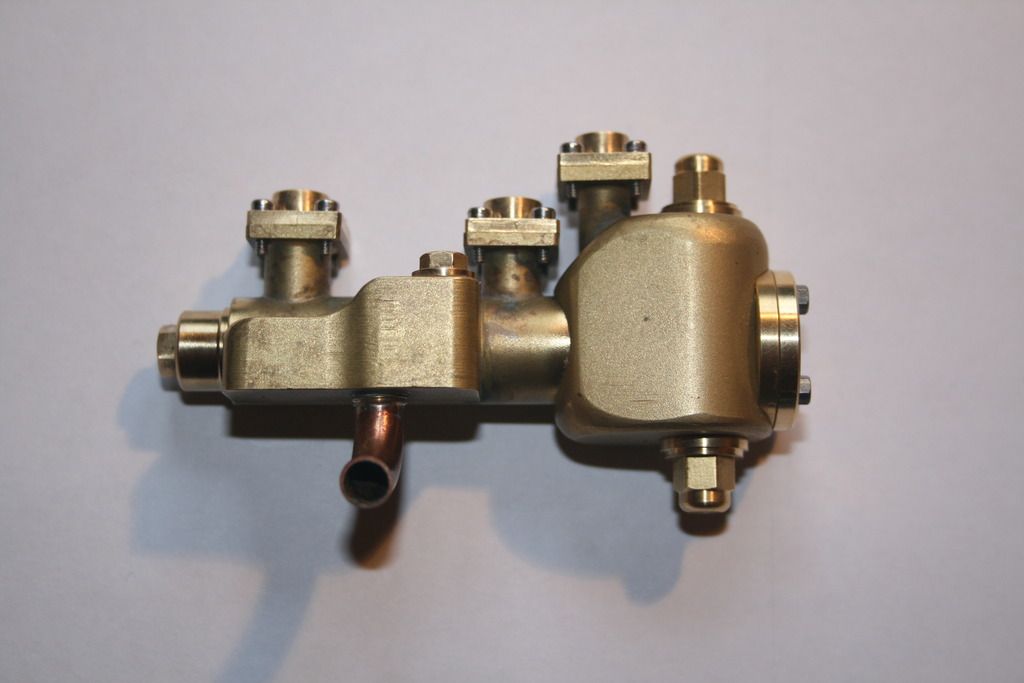
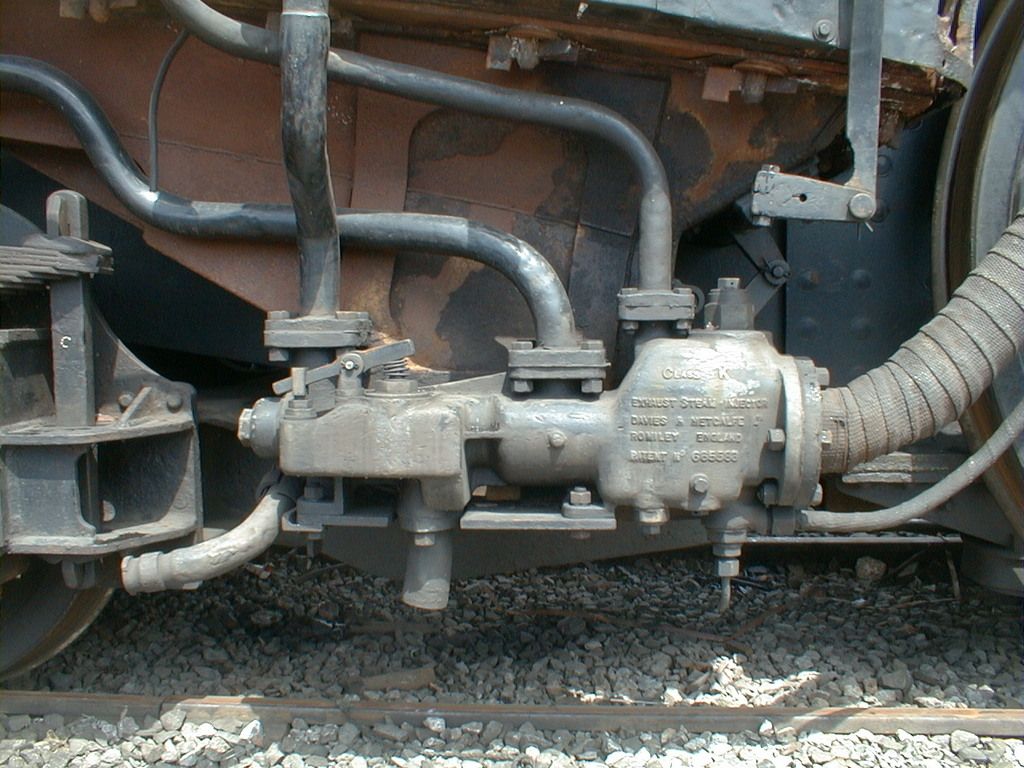
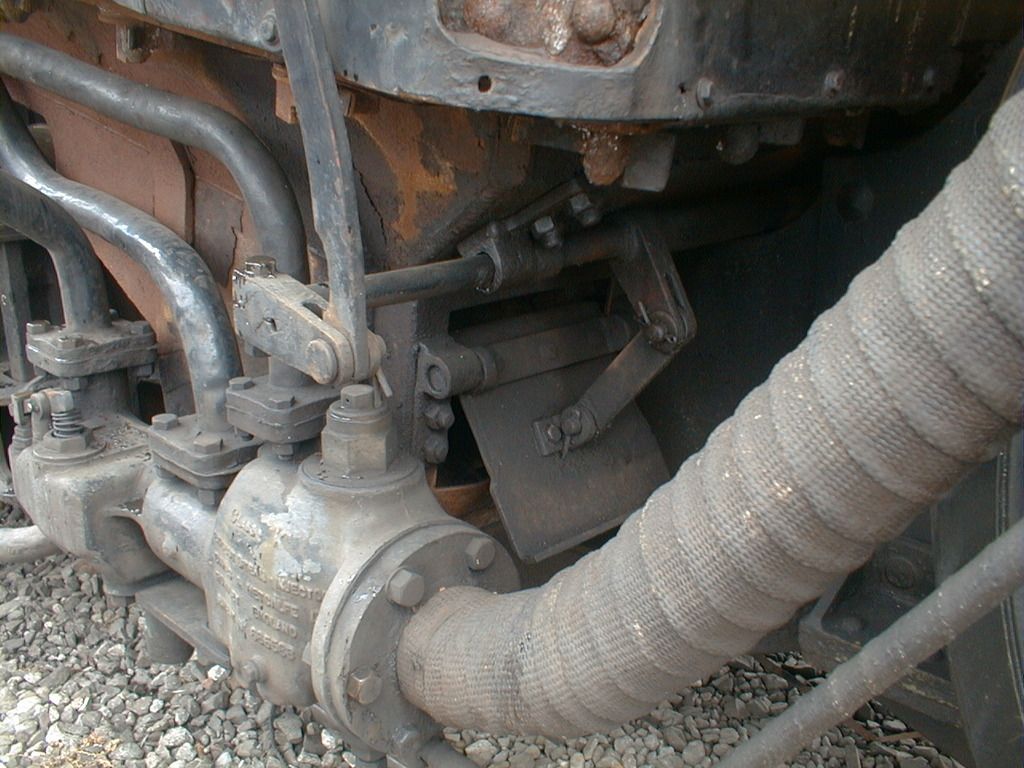
The Brit has a large Davies & Metcalfe Type K exhaust steam injector, very prominent on the right hand side, below the cab. Have you managed to source a scale version of this? If not, does anyone know of a source of these as WORKING scale injectors? I've been trying to get hold of the drawings but despite being promised them, no works drawings have materialised. I know a white metal dummy injector is available for The Steam Workshop, but I, and probably others, would like to see a scale shape working version available.
Bob
|
|
|
|
Post by Deleted on Jun 15, 2017 12:34:06 GMT
Hi Jim. The Brit has a large Davies & Metcalfe Type K exhaust steam injector, very prominent on the right hand side, below the cab. Have you managed to source a scale version of this? If not, does anyone know of a source of these as WORKING scale injectors? I've been trying to get hold of the drawings but despite being promised them, no works drawings have materialised. I know a white metal dummy injector is available for The Steam Workshop, but I, and probably others, would like to see a scale shape working version available. Bob Hi Bob I could be wrong but isn't Adam currently working on one of these? Pete Edit: just checked Adam's thread, seems he's doing a type G, not sure what the differences are but if similar perhaps Adam may do a type K too? |
|
|
|
Post by Cro on Jun 15, 2017 16:18:36 GMT
Hi Jim. The Brit has a large Davies & Metcalfe Type K exhaust steam injector, very prominent on the right hand side, below the cab. Have you managed to source a scale version of this? If not, does anyone know of a source of these as WORKING scale injectors? I've been trying to get hold of the drawings but despite being promised them, no works drawings have materialised. I know a white metal dummy injector is available for The Steam Workshop, but I, and probably others, would like to see a scale shape working version available. Bob Hi Bob I could be wrong but isn't Adam currently working on one of these? Pete Edit: just checked Adam's thread, seems he's doing a type G, not sure what the differences are but if similar perhaps Adam may do a type K too? Pete the type G is a Gresham & Craven Ejector rather than injector, I am working on the injector from a drawing I have found but sadly not a fully detailed one but we can try. If possible we will try and fit a working injector into it but will wait and see on the size when done. I know there are overscale ones available but not dead scale. One thing you might want to consider Jim is an overflow pipe, we have one on the black 5 that is about 3/8" below the filler plate and is just an open tube all the way down to the sole plate and when you are filling the tender it will 'overflow' when you get to the right height letting you know when to stop filling. Just made from some basic water copper pipe but any large bore pipe will do. Adam |
|
|
|
Post by trainman on Jun 15, 2017 16:56:10 GMT
Bob, Do you mean like this? Paul  |
|
|
|
Post by Cro on Jun 15, 2017 17:09:31 GMT
That's essentially the one Paul but it's a crude shape compared to the real thing.
Adam
|
|
|
|
Post by 92220 on Jun 15, 2017 18:27:46 GMT
Hi Paul. That's the one, but as Adam says, it's a very simplified shape. Here are a couple of photos of it:   I have a BR drawing but it's not dimensioned except for the inlet and outlet flange positions. With the help of these photos I hope to be able to draw it up but it may still not be possible. Will have to see. Bob. |
|
|
|
Post by Jim on Jun 15, 2017 21:59:29 GMT
Hi Bob,
That's an interesting pair of photos. Apart from the main subject there's a heap of added detail such as the way the ash pan is secured to the foundation ring and the damper operating arm with the partly opened damper flap.
Jim
|
|
|
|
Post by Jim on Jun 15, 2017 22:07:28 GMT
One thing you might want to consider Jim is an overflow pipe, we have one on the black 5 that is about 3/8" below the filler plate and is just an open tube all the way down to the sole plate and when you are filling the tender it will 'overflow' when you get to the right height letting you know when to stop filling. Just made from some basic water copper pipe but any large bore pipe will do. Adam An overflow pipe? That's a good idea Adam for not over filling the tender, easily done if distracted, don't ask how I know.  Have pipe and will include it in list of things yet to do.  Jim. |
|
|
|
Post by steamer5 on Jun 15, 2017 22:11:10 GMT
Hi Lisa,
Yes looked at putting a valve in, the tender stretcher won't allow a valve to be screwed in! The new loco will be sorted!
Cheers Kerrin
|
|
|
|
Post by Cro on Jun 16, 2017 6:13:03 GMT
One thing you might want to consider Jim is an overflow pipe, we have one on the black 5 that is about 3/8" below the filler plate and is just an open tube all the way down to the sole plate and when you are filling the tender it will 'overflow' when you get to the right height letting you know when to stop filling. Just made from some basic water copper pipe but any large bore pipe will do. Adam An overflow pipe? That's a good idea Adam for not over filling the tender, easily done if distracted, don't ask how I know.  Have pipe and will include it in list of things yet to do.  Jim. Good decision, on another thought for draining your tender, the water filter boxes would open easily to drain the tank pretty quick.....just throwing that out there  Adam |
|
|
|
Post by 92220 on Jun 16, 2017 7:29:58 GMT
Or a plug and socket in the bottom of the tank, using an o-ring as a seal.
Bob.
|
|
|
|
Post by Jim on Jun 16, 2017 7:47:54 GMT
Thanks Bob, I must admit I prefer something simple and low tech (like me) which is why the idea of a screw plug that I can access at the rear of the tender by just putting my hand in the water to undo it is appealing. I've already marked out an off cut of copper tube to become the overflow pipe. On another matter, I trimmed to exact length the fireman's side of the tender. My plan to do it on the band saw came to nought when I realised the task was too big so had to resort to the trusty hack saw. It took a bit longer but worked well with all square and to size. I used the former as a guide and support to ensure a straight square cut. I'll do the driver's side tomorrow and then move onto marking and cutting out the tender end to get me another step closer to completion.  Jim |
|
|
|
Post by 92220 on Jun 16, 2017 12:12:28 GMT
Hi Jim.
Your idea should work fine. As a slight expansion on theidea, how about making the screw plug with a long, thin,rod handle and cross tommy bar, so that you don't have to get your little pinkies wet?!
Bob
|
|
|
|
Post by Jim on Jun 16, 2017 13:00:48 GMT
Excellent Bob! I hate having to put my hands into cold water and given a few of our runs occur in winter with icy water.  It shall be done. Jim. |
|