|
|
Post by Jim on Jul 1, 2012 1:25:19 GMT
Geoff, I think regardless of how you achieved it the tender looks just right and as I've said before if mine turns out as well I shall be a very happy lad, well a rather senior sort of happy lad.  By the way is that a secret supply of soothing ales I see tucked under the lounge Geoff? ;D ;D ;D Jim |
|
|
|
Post by Geoff (Carlisle) on Jul 2, 2012 21:58:13 GMT
Hi all, especially Jim and Reg, It was'nt soothing ale under the seat but Coke, I'm drinking Australian Yellow Tail Shiraz wine as i write this. While I've decided to work on the loco, as you will see the fore end is getting a few add ons. when i go back to the tender i think i will do what Reg has said .I will pull back the side sheet 1/16" and bend up to about 100Deg. then straighten the edge of the bend back to 90 Deg. in the vice by working it along. Your drawings Jim may be faded but mine are all celotaped up, and keep up the good work. Geoff (Carlisle). I Attachments:
|
|
|
|
Post by Jim on Jul 3, 2012 11:13:29 GMT
I can see Geoff that you're not only producing a lovely model of a Clan but you're doing it in style with a glass of Yellow Tail to boot, a very nice drop I must say.  The photo of the front end of your loco is very impressive Geoff and I particularly like the footplate support brackets. My plans are rather vague or faded on that issue. I must see if I can do something similar. Keep up the good work. Jim. |
|
|
|
Post by Geoff (Carlisle) on Jul 6, 2012 18:43:52 GMT
Hi all, the add-ons that i've been putting on are the regulator valve cover made in brass. The base being 22G. and the top piece is 1/8" thick brass, rolled, and then warmed up to red heat and laid on the top of the base plate ,on the top of the smokebox and tapped with a mallet, just to make it a perfect fit. Now the next job was to tap an 8 BA hole in the bottom of the plate to hold the two to-gether during the soft soldering operation, capillary attraction drew the solder between the two, cleaned up and painted. The next job was making the dummy whistle which will be a full dummy, only i will have to go back to the drawing board as the 1/8" copper tube sticking out like that is not right. I may be wrong here but i can't see how an 1/8" copper tube could supply enough steam for a chime whistle. To-night Jim its Australian Yellow Tail Merlot. Geoff (Carlisle). Attachments:
|
|
|
|
Post by Geoff (Carlisle) on Jul 6, 2012 18:47:44 GMT
And here's another view . Geoff (Carlisle). Attachments:
|
|
|
|
Post by Jim on Jul 7, 2012 0:34:43 GMT
If it's any help Geoff I used 2mm copper wire to represent the steam feed line to the whistle. In a moment of madness I had toyed with the idea of having steam to the dummy whistle so it would look like it was working when the real whistle was blown. A soothing ale restored my sanity and I realised that all I would get would be dribbles of hot water. I have seen it done out here with models of NSW locos where the whistles were mounted directly to the top of the firebox or the steam dome eliminating the condensation problem. The effect was to create a very realistic 'working' dummy whistle. Your method of making the poppet valve cover is one I wish I'd thought of instead of laboriously making a silver soldered hollow box filed to shape!  Maybe I should ditch the soothing ales for Yellow Tail. ;D ;D You're doing a great job there Geoff and giving me all sorts of handy ideas. Jim |
|
|
|
Post by Geoff (Carlisle) on Jul 14, 2012 20:58:06 GMT
Hi all. I've been quiet for the past week while making a start on the loco front steps. The method i use will be strange to a lot of people. Firstly whenever the likes of a washing or a tumble drier goes to heaven ,i always strip the 20 SWG. steel sheet top and sides as this is very handy material to have. Well this is what i use to make the front steps.These are cut to size then laid on a fire brick, the two side pieces are shaped and laid on,held on each side by two pieces of steel with a piece of brass rod to hold it all in place while i silver solder it.This jig is a bit Heath Robinson but it works. There are several methods to make steps but this is better than the hammer. By the way Jim i'm on my second Yellow Tail shiraz. Geoff (Carlisle). Attachments:
|
|
|
|
Post by Geoff (Carlisle) on Jul 14, 2012 21:03:48 GMT
And this is the jig. Geoff (Carlisle). Attachments:
|
|
|
|
Post by Jim on Jul 14, 2012 22:45:27 GMT
Your method of making steps works Geoff and that's what counts and we gain from seeing a new method for doing a job. The steps look great. It's not just washing machines that are reborn as model loco steps either. Wire coat hangers mysteriously disappear from wardrobes here to reappear as handrails and lubricator rods on Boadicea. I haven't caught the person responsible for the theft yet but I'm working on it Jim |
|
|
|
Post by Geoff (Carlisle) on Jul 23, 2012 19:59:16 GMT
Hi all, well here's the first footstep on the tender, with more steps partially made to be made up. With 12 steps to make it becomes a bit of a pain.  Geoff (Carlisle). Attachments:
|
|
|
|
Post by Geoff (Carlisle) on Jul 23, 2012 20:05:51 GMT
Hi again, here's another view. Geoff (Carlisle). Attachments:
|
|
|
|
Post by Jim on Jul 25, 2012 22:03:03 GMT
Your photos of the tender are really stirring me up to do the Britannia's tender. It really looks superb Geoff, you should be very happy with the progress. I spotted your two tube spanners that are identical to my set. That means I can't even blame my tools now when things go pear shaped.  Jim |
|
|
|
Post by Geoff (Carlisle) on Aug 6, 2012 20:58:11 GMT
Hi all, here's something that will interest some people, inserted behind the tender buffer beam is a section of mild steel 1"X1/2", no machining required except to square the ends off. Using 4BA allen cap screws which are tapped in the ends. There's a hole in the centre to take the coupling. Remember if there is a snag when pulling a train it could pull the buffer beam out, so let the steel section take the strain.  Attachments:
|
|
|
|
Post by Geoff (Carlisle) on Aug 6, 2012 21:02:12 GMT
And more Attachments:
|
|
|
|
Post by Geoff (Carlisle) on Aug 6, 2012 21:05:16 GMT
A bit more Attachments:
|
|
|
|
Post by Geoff (Carlisle) on Aug 6, 2012 21:09:37 GMT
And finally Attachments:
|
|
|
|
Post by Jim on Aug 8, 2012 11:33:16 GMT
Well Geoff apart from coming up with a very good idea in having a solid backing for the draw bar I see that yet again you have been borrowing my tools. First the tube spanners and now in the final photo of your tender I see one of my 'extended' drills. Of course it could be that Clans and Britannias being what they are need the same kit to build them, says I with a nice Yellow Tail Shiraz in hand to drive away the winter chill. ;D ;D ;D ;D Well done Geoff. 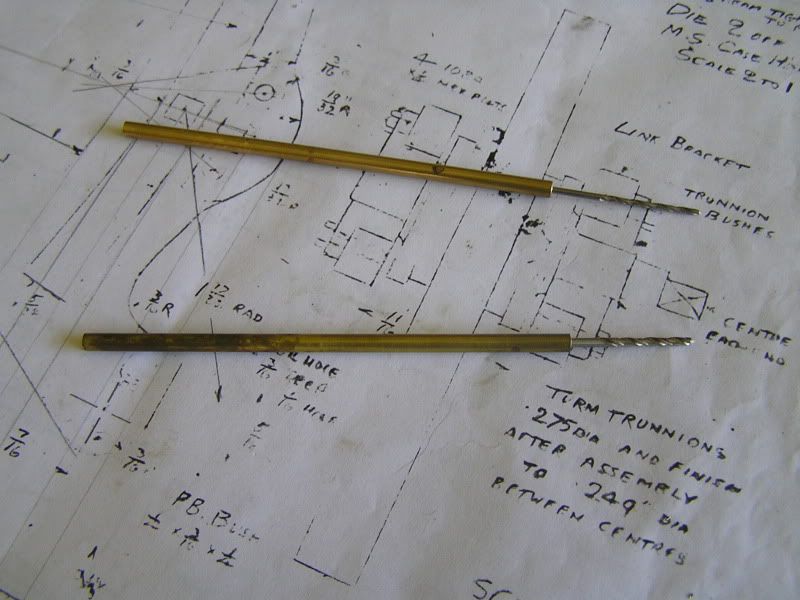 |
|
|
|
Post by Geoff (Carlisle) on Aug 8, 2012 19:13:58 GMT
Hi all and Jim,as you all can see the Enterprise boiler on the bench and as a lot of people believe that superheaters are a waste of time. They were the greatest invention on full size loco's ,but i think i will away with them so ,back to the drawing as the saying goes. As for the tube spanners and the drill extensions you could be right as you need these for a B.R. loco. So i will be giving the Clan the elbow for a while until the V3 is a runner. Geoff (Carlisle) Attachments:
|
|
|
|
Post by Geoff (Carlisle) on Aug 17, 2012 14:47:37 GMT
|
|
|
|
Post by Geoff (Carlisle) on Aug 20, 2012 21:40:29 GMT
Hi all & Reg from Co. Durham, today i was fed- up looking at the tender side sheet,and the one which was 1/16" higher on one side. So using Reg's method of taking the bend off the straight piece, it worked but even using 3 clamps it still moved. This must have taken about 6 times,and each time i had to lift the bender in then out of the vice jaws, because i needed the vice jaws to straighten the brass out after each time. However Reg i'm a much happier man now that the jobs done and i'm celebrating with a glass of McGuigan cabernet shiraz from South Eastern Australia. Many thanks. Geoff (Carlisle). Attachments:
|
|


 Maybe I should ditch the soothing ales for Yellow Tail. ;D ;D


