|
|
Post by David on Mar 24, 2019 10:16:50 GMT
I like that idea for use as a soft solder flux------ god knows commercially that stuff is expensive enough.....Is phosphoric acid openly available or by special order only ?? I buy it in 1 litre bottles at a hardware store, although there is only 1 in my town that has it. |
|
|
|
Post by Jim on Mar 24, 2019 16:47:11 GMT
I like that idea for use as a soft solder flux------ god knows commercially that stuff is expensive enough.....Is phosphoric acid openly available or by special order only ?? I buy it in 1 litre bottles at a hardware store, although there is only 1 in my town that has it. Does it have a trade name David or is it sold just as Phosphoric Acid?
Jim.
|
|
|
|
Post by Roger on Mar 24, 2019 19:52:35 GMT
Here's the test of the cardboard template being prepared for the back of the tank next to the tapered boiler barrel. The two layers of black foam simulate the 4mm thick insulation I've ordered from eBay today. In the end I opted for the Graphite infused Polystyrene which is supposed to be 20% better than just Polystyrene. There's actually a little more room than that, but I didn't want it to be tightly pressed against the boiler cladding. I'll probably put either some card against the boiler first, or perhaps a 1mm thick layer of Ceramic Fibre sheet if there's room. 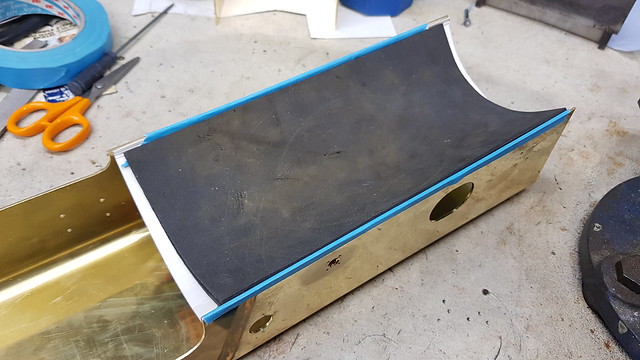 20190324_111509 20190324_111509 by Anne Froud, on Flickr It took a few attempts to get the curve looking about right at both ends. If you look near the LH end of the template, there's a hole on the wrapper nearest the camera that's where the tube goes right through the tank carrying the water to the top feed. When you insert that tube, it's perilously close to the inside of the curved plate. I actually moved it 1mm further away from the scale position to give just a little more room.  20190324_111627 20190324_111627 by Anne Froud, on Flickr The flattened template was then transferred to the 1.5mm Brass sheet which was sawn to size. It's a bit too thick for the guillotine... 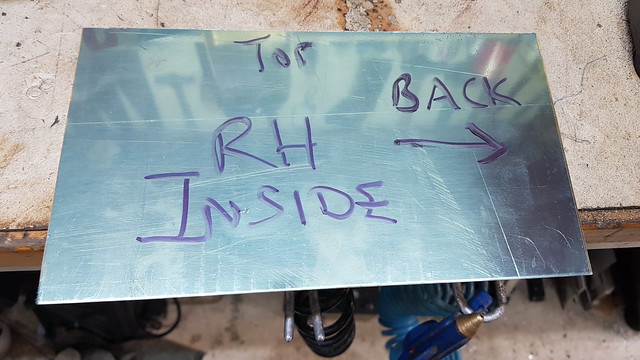 20190324_120534 20190324_120534 by Anne Froud, on Flickr ... but the rollers worked just fine until it work hardened. 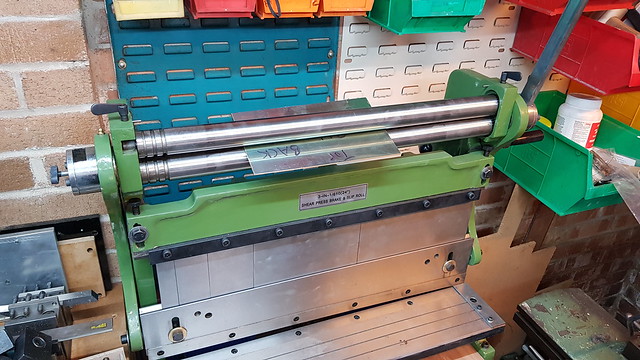 20190324_120730 20190324_120730 by Anne Froud, on Flickr I could probably have bullied it round the last bit, but I also need two sharp bends on the edges, so it needed annealing anyway. 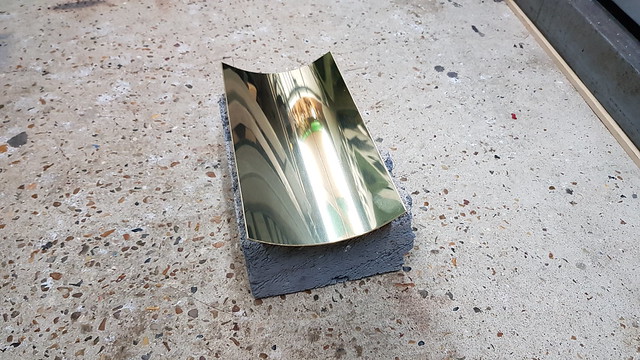 20190324_122518 20190324_122518 by Anne Froud, on Flickr The folder isn't man enough to form that sharp bend either, so here's a setup jig which is getting a slot at the right depth that will set the material the right distance from the vice jaws... 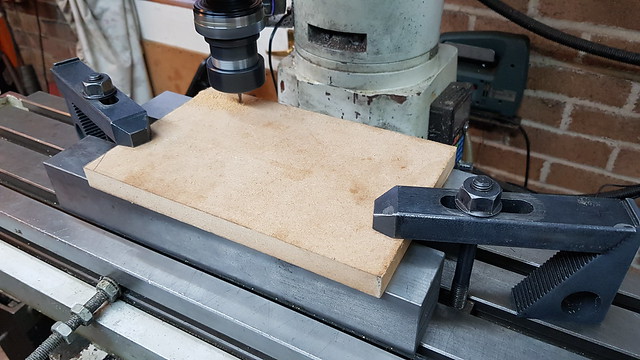 20190324_163125 20190324_163125 by Anne Froud, on Flickr ... like this. I machined a piece of the rusty Steel bar I showed before, this time getting one end true and adding a couple of reliefs where the existing bend is. I don't want to flatten out that, just grip it close to the edge. The Steel bar is thick so that it will resist rolling over when I make the fold... 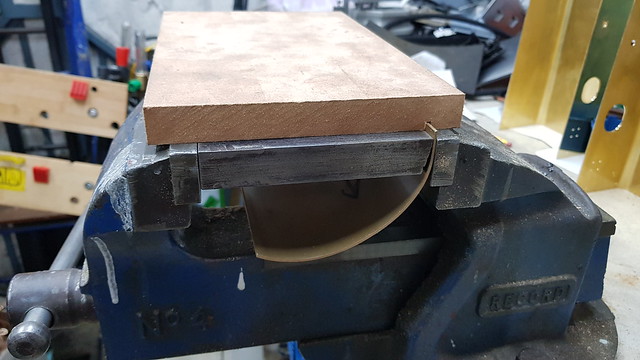 20190324_163749 20190324_163749 by Anne Froud, on Flickr ... which was done in sections using a piece of Delrin and a mallet. 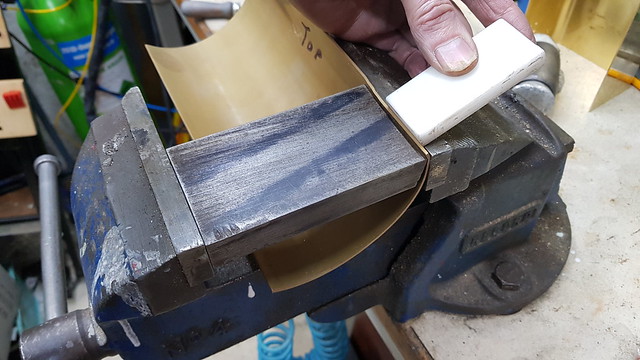 20190324_164423 20190324_164423 by Anne Froud, on Flickr 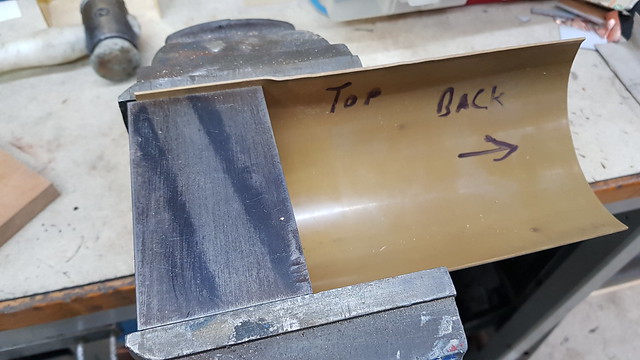 20190324_164940 20190324_164940 by Anne Froud, on Flickr The bend was a little too tight in the middle and not tight enough near the outside. That meant that the tube inside the tank would touch the back of it. Here I'm using the bender with the largest radius to bend the sheet a little tighter near the edge. 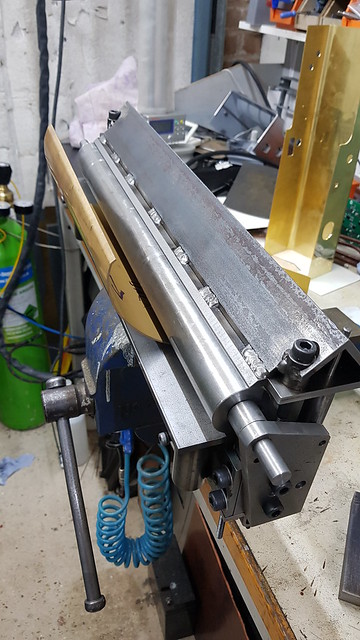 20190324_192438 20190324_192438 by Anne Froud, on Flickr The piece was then put on the bench and the sides forced outwards to reduce the bend in the middle. This looks about right now. So the idea is that there are now two nice flat areas on the edge which can be riveted and then Soft Soldered. The ends will have angles either bent to the radius or cut in many places and bent. It's going to be massively strong, and you won't see that anyway so it doesn't have to be elegant. The LH end of the inner wrapper will have a bulkhead to butt up against, and that will have a cutout near the top and bottom for water and air to reach the outlets to the injectors.  20190324_190319 20190324_190319 by Anne Froud, on Flickr One down, one to go. |
|
JonL
Elder Statesman
 WWSME (Wiltshire)
Posts: 2,908
Member is Online
|
Post by JonL on Mar 25, 2019 6:40:18 GMT
Elegantly achieved. For the annealing is that just heating to red then a cold water plunge? I know this is basic stuff but I get confused on the different metal types and techniques.
|
|
|
|
Post by Roger on Mar 25, 2019 8:48:21 GMT
Elegantly achieved. For the annealing is that just heating to red then a cold water plunge? I know this is basic stuff but I get confused on the different metal types and techniques. The bend isn't perfect, there are marks on the inside of the bend, but it's good enough. The main thing is to get a clearance for the insulation, keep the shape of the outer wrapped and get a seal. You don't need to quench the Brass, just let it cool naturally. The only reason you quench Copper is to remove the black Oxide layer which is horrible stuff to breathe in if you try to clean it off mechanically. You can get it off with an acid, but it's easier to just quench it. The other thing to watch is not to get the Brass too hot, a dull red all over is good. The melting point of Brass is quite low, so you don't want to have it droop and then melt. Brass just gets a yellowy/green patina that doesn't need removing until you come to solder the joints. |
|
|
|
Post by 92220 on Mar 25, 2019 8:49:11 GMT
Hi Nobby.
Just heating to red heat and allowing to cool, will partially anneal it. The cold water plunge takes it all the way and makes it very soft.
Bob.
|
|
JonL
Elder Statesman
WWSME (Wiltshire)
Posts: 2,908
Member is Online
|
Post by JonL on Mar 25, 2019 8:50:06 GMT
Brilliant, thank you for explaining. Working brass sheet is something I have a feeling I'm going to struggle to do neatly.
|
|
|
|
Post by Roger on Mar 25, 2019 9:05:30 GMT
Brilliant, thank you for explaining. Working brass sheet is something I have a feeling I'm going to struggle to do neatly. Brass is very soft and easily marked, so I'd suggest only using it where you really have to. For things like Tenders and Side Tanks it's the obvious choice, but I'd use at least 1.5mm thick material personally. I've used it on the backhead cladding because it's likely to end up getting wet, but there's more scope for using Steel for boiler cladding and the cab plating. I've also used it for the throatplate cladding though because it's more robust than copper but easier to form than Steel which would probably have to be done Red hot. If you do any forming of Brass, I'd err on the side of thicker material, it's easier to form without ripples. You will probably need Steel formers though. |
|
JonL
Elder Statesman
WWSME (Wiltshire)
Posts: 2,908
Member is Online
|
Post by JonL on Mar 25, 2019 10:24:23 GMT
Thats a good idea. Also thicker material might net me some extra tractive adhesion!
|
|
|
|
Post by Roger on Mar 25, 2019 16:31:04 GMT
Thats a good idea. Also thicker material might net me some extra tractive adhesion! My thoughts exactly, I've tended on the thicker side for quite a few items, starting with the frames. OK some of it, like the buffers, might look a little chunky, but some things need to be really strong. It will be very interesting to see what the all up weight turns out to be. I reckon it will be the heaviest 'SPEEDY' on the tracks by the time it's finished. |
|
|
|
Post by 92220 on Mar 25, 2019 17:13:02 GMT
I an currently looking as an alternative to brass sheet for my tender tank and the cab plates. It might also be useful for the boiler cladding. It's Monel 400 and it can be bought in all the standard sheet thicknesses. I am just waiting for a quote to see how it compares with brass. It is an easy material to work with, looks like steel and is corrosion proof.
Bob.
|
|
|
|
Post by Roger on Mar 25, 2019 17:58:39 GMT
I an currently looking as an alternative to brass sheet for my tender tank and the cab plates. It might also be useful for the boiler cladding. It's Monel 400 and it can be bought in all the standard sheet thicknesses. I am just waiting for a quote to see how it compares with brass. It is an easy material to work with, looks like steel and is corrosion proof. Bob. Hi Bob, I'd be interested to know how hardness compares with Brass and Steel and how easy it is to paint. Googling it reveals that it work hardens very quickly and is difficult to machine, so personally I probably wouldn't use it since I machine most of the sheet metal panels. It does look like you can weld it though, so tack welding with TIG looks feasible. It's certainly an interesting alternative. To be honest, I don't see any problems using Steel sheet, it's only drawback is it will rust. It is easy to treat and paint though. |
|
|
|
Post by 92220 on Mar 25, 2019 19:03:33 GMT
Hi Roger.
Yes. The rust is the problem otherwise I would use steel. The company I worked at, before getting back into paint, used a lot of cupro nickel sheet....both 90/10 and 70/30. The 70/30 is the same as monel 400, and that was easily machinable and formable. We had larghe dishes spun in 1.5mm 90/10 and 70/30. My other option, I suppose, is to use steel and use one of those home plating kits to plate the steel parts with dull finish electroless nickel plate. Something to investigate. It's the inside of the tender I'm concerned about rusting. tenders were not treated in any way, inside, from new, so I want the interior to be scale as it is seen through the filler and manhole covers.
Bob.
|
|
|
|
Post by Roger on Mar 25, 2019 19:49:56 GMT
Hi Roger. Yes. The rust is the problem otherwise I would use steel. The company I worked at, before getting back into paint, used a lot of cupro nickel sheet....both 90/10 and 70/30. The 70/30 is the same as monel 400, and that was easily machinable and formable. We had larghe dishes spun in 1.5mm 90/10 and 70/30. My other option, I suppose, is to use steel and use one of those home plating kits to plate the steel parts with dull finish electroless nickel plate. Something to investigate. It's the inside of the tender I'm concerned about rusting. tenders were not treated in any way, inside, from new, so I want the interior to be scale as it is seen through the filler and manhole covers. Bob. Hi Bob, Ah, I see, the inside of a water tank isn't a good place for Steel unless it's Stainless. It looks like you can Soft Solder Monel with high lead content ie 60/40 Solder, so that's ok. I suppose the other alternative is to make the tender from thicker Brass and thin the edges so it looks like it's scale thickness. |
|
|
|
Post by Roger on Mar 29, 2019 22:30:08 GMT
This is the inside of the RH Pannier tank front, with the holes for the hand rail and twelve 0.5mm slots of the tags on the foot steps. I opted to use a 1mm deep rebait on the 1.5mm outer edge to act as a register for the outer wrapper to ease assembly. The edge is slightly over size so that it can all be filed true when it's been soldered.  20190329_222114 20190329_222114 by Anne Froud, on Flickr The steps will just be soldered from the inside, the tags go all of the way through. 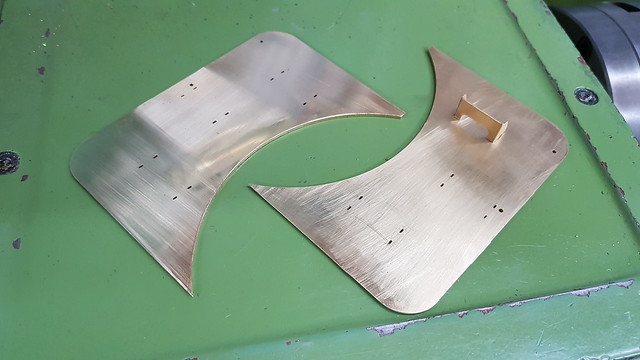 20190329_221716 20190329_221716 by Anne Froud, on Flickr The slots were machined with 0.5mm PCB burrs which are totally the wrong geometry for this sort of thing, but if you take it very slowly then it can be done. The idea is to get spot on locations for the steps, and to make the attachment strong enough to resist the odd knock. The tank will be closer to the boiler when it's bolted on, it's just resting there at the moment.  20190329_221902 20190329_221902 by Anne Froud, on Flickr |
|
|
|
Post by Roger on Mar 31, 2019 10:07:03 GMT
This is the first of the dividers that join the front and rear sections of the Pannier tanks where the inner wrapper changes section. 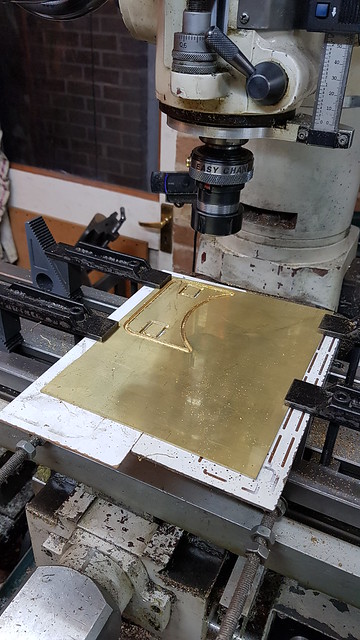 20190330_195329 20190330_195329 by Anne Froud, on Flickr The holes will be covered with fine Brass mesh to filter all of the water that reaches the injector outlets. 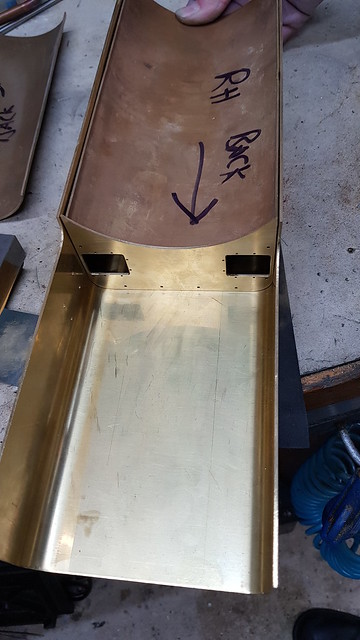 20190330_204433 20190330_204433 by Anne Froud, on Flickr |
|
JonL
Elder Statesman
WWSME (Wiltshire)
Posts: 2,908
Member is Online
|
Post by JonL on Mar 31, 2019 14:03:11 GMT
Will you be abled to access the filters to clean them if required or is this all going to be buried in the depths?
|
|
|
|
Post by Roger on Mar 31, 2019 14:24:08 GMT
Will you be abled to access the filters to clean them if required or is this all going to be buried in the depths? They will be buried, but I suppose you could clean them if you took the tank off and flushed it out in both directions. The idea is to have more filters to stop dross getting in there in the first place, but better to have too many than not enough. |
|
|
|
Post by steamer5 on Mar 31, 2019 14:59:53 GMT
Hi Roger,
Looking good.
As a thought would it be possible / have been possible to have hatch under the tank at the bottom of the wall that the filters are attached to with guides to keep them against the wall? Undo say 4 bolts pull the hatch / filters down clean & replace.
Cheers Kerrin
|
|
|
|
Post by Roger on Mar 31, 2019 15:40:09 GMT
Hi Roger, Looking good. As a thought would it be possible / have been possible to have hatch under the tank at the bottom of the wall that the filters are attached to with guides to keep them against the wall? Undo say 4 bolts pull the hatch / filters down clean & replace. Cheers Kerrin Hi Kerrin, I'm sure it would be possible to make a way to access them, but I doubt if it will need much, if any, attention. It shouldn't be a huge job to remove the tank if it ever does become necessary. The idea is to filter the water before it even gets to these, so hopefully they will remain unblocked. |
|


