|
|
Post by Roger on May 27, 2019 8:55:12 GMT
Hi Roger. My camera resolution is 52M so is just a bit high for Photobucket!! I've just bought a high temperature soldering station that ranges from 180C to 420C. What is the high temp solder you bought? Those fillets are neat! What flux did your use? I assume it's a special high temp flux, or is the Comsol? Bob. Hi Bob, Is there a way to downsize the resolution in the camera itself? I have some pictures taken at 4MP and they are absolutely stunning. For most things you don't need more than that. I bought some Carrs 243 solder which seems to work ok with Comsol flux. I've got some more aggressive flux for Stainless Steel that might be better though. It doesn't flow that easily, it's definitely more viscous and less keen to wet than 60/40 solder. The solder definitely feels stiffer though, so for anything that might benefit from a little more strength it makes sense to use it. I'll probably use it for the injector water valve bushes too. |
|
barlowworks
Statesman
 Now finished my other projects, Britannia here I come
Posts: 874 
|
Post by barlowworks on May 27, 2019 10:30:24 GMT
The ISO value is the one you need to change in an SLR camera, the equivalent of the old film speed. I usually use 800 in the workshop, 100 at the top of a mountain ( not that I get to the top of a mountain that often these days. 😕)
Mike
|
|
|
|
Post by 92220 on May 27, 2019 10:46:49 GMT
Hi Mike. The ISO change doesn't effect the resolution on my camera. Whatever the setting, the res is still 52M. I can reduce this but nothing under 32M so it stays at maximum so that I can take small pieces of a photo and it is still perfectly readable. Generally I do use manual settings in the workshop rather than auto unless I'm feeling lazy! Having the high res available means that photos of the fullsize loco can have details taken off and blown up to large size and still see all the fine detail cleanly.
Bob.
|
|
|
|
Post by 92220 on May 27, 2019 11:00:35 GMT
Hi Roger.
The res can't be reduced anywhere near as low as needed for Photobucket or Ebay, so I'm looking at getting a cheapy camera just for use in the workshop, that has a low res, but good enough to read detail. I've always used the Canon 7D but a Canon PowerShot would probably be much better.
Thanks for the info about the solder and flux. I'll have to get some as I am starting work on the cab soon. I've got my sheets of nickel silver. They arrived next day after ordering at about 3pm. Excellent service from Columbia Metals, and cheaper than anyone else!
Bob.
|
|
|
|
Post by Roger on May 27, 2019 20:27:19 GMT
This is the RH rear end plate cleaned up and riveted...  20190527_121839 20190527_121839 by Anne Froud, on Flickr ... there's no need to fully form the heads since they are only compressed enough to fill the shallow countersinks. 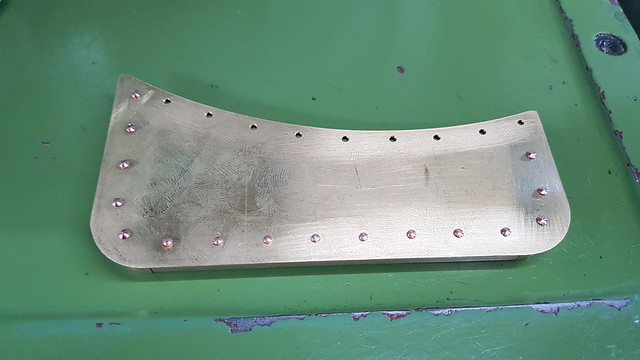 20190527_121846 20190527_121846 by Anne Froud, on Flickr The high temperature solder is being used again so it won't melt when I finally attach it to the end. I'm just laying pieces of it with flux so it just needs heating. I'm resting it on Titanium welding rod so it lets the heat get underneath.  20190527_125158 20190527_125158 by Anne Froud, on Flickr I've used the Comsol flux on a brush along the joint to make sure it's wetted it all along.  20190527_125856 20190527_125856 by Anne Froud, on Flickr  20190527_152246 20190527_152246 by Anne Froud, on Flickr The joint looks like it's penetrated fairly well.  20190527_163744 20190527_163744 by Anne Froud, on Flickr The front tank support bracket is riveted on and the rivets are soldered to prevent leaks.  20190527_155914 20190527_155914 by Anne Froud, on Flickr 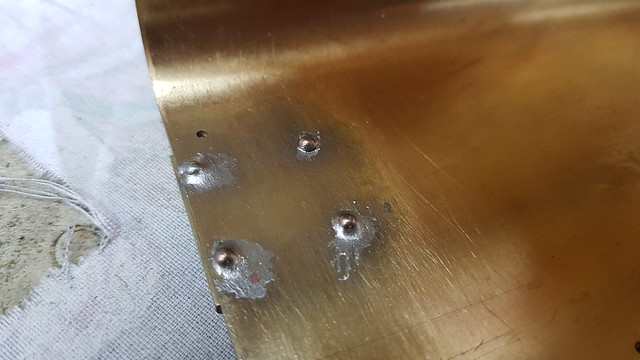 20190527_163305 20190527_163305 by Anne Froud, on Flickr The is the front end plate getting the same treatment. You can see where I had to add a wafer thickness of angle at the front RH corner where I inadvertently made the inner wrapper too short while using the belt sander. Oops! 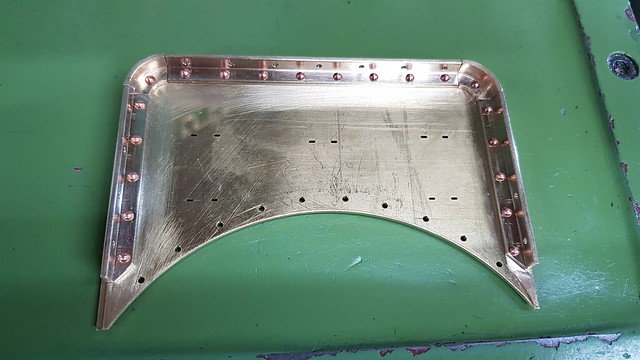 20190527_200502 20190527_200502 by Anne Froud, on Flickr  20190527_201702 20190527_201702 by Anne Froud, on Flickr 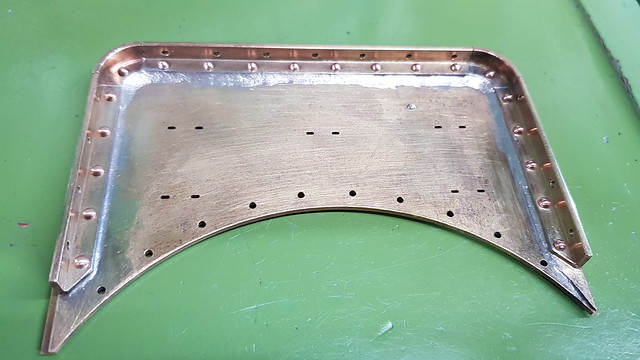 20190527_210229 20190527_210229 by Anne Froud, on Flickr |
|
|
|
Post by Roger on May 28, 2019 22:14:46 GMT
I needed to cut down 16 pieces of M2 Brass screws to an exact length to attach the top tank bridge supports, so rather than struggle I decided to make another batch of adaptors for the Rivet Cutting tool with M2, M2.5 and M3 threads in them and a spare one. Here they are being machined from 2mm thick Gauge plate with a 2mm Carbide 2-flute.  20190527_211116 20190527_211116 by Anne Froud, on Flickr The screws need to be 2.7mm long, so that's not easy to do accurately by hand. 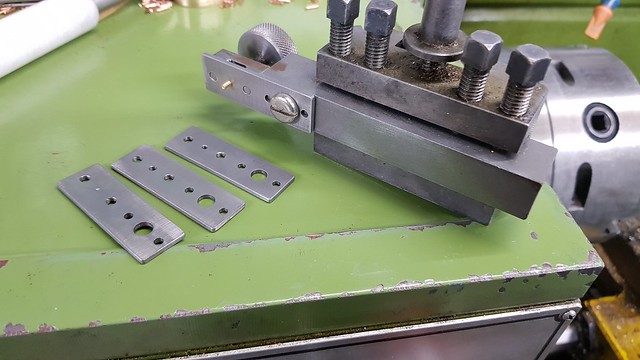 20190528_101820 20190528_101820 by Anne Froud, on Flickr You can see that there's a rivet hole that is on the edge between two of the screws, and that needs to go...  20190528_103007 20190528_103007 by Anne Froud, on Flickr ... like this. I just lightly countersunk both sides, used one of the offcuts of 1/16" rivets and squeezed it in the vice then filed it flat on both sides. The same treatment was done for the inner wrapper.  20190528_103820 20190528_103820 by Anne Froud, on Flickr Here it's all cleaned up and ready for soldering, again with the high temperature solder. I thought I'd try applying the giant rod of solder directly to the joint to see how that would work...  20190528_113334 20190528_113334 by Anne Froud, on Flickr ... and the result was a lot messier and wasteful than laying scraps on the joint. It also had to be made quite a lot hotter to get the initial melt going, just like when Silver Soldering. I probably won't do it that way again. This is the top, so It probably doesn't need to be soldered as well as riveted.  20190528_114023 20190528_114023 by Anne Froud, on Flickr 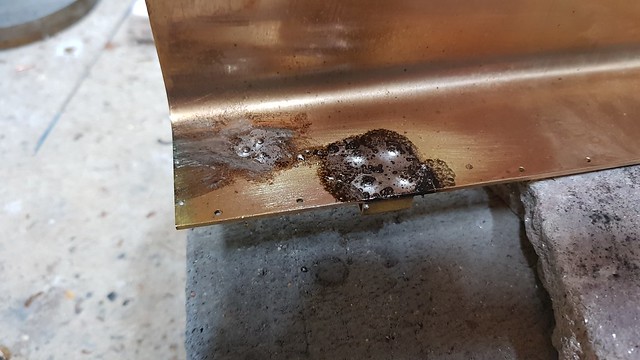 20190528_114028 20190528_114028 by Anne Froud, on Flickr Anyway, it cleaned up well enough and it all looks sealed.  20190528_132833 20190528_132833 by Anne Froud, on Flickr  20190528_132844 20190528_132844 by Anne Froud, on Flickr The rear end plate hadn't had its rivet holes done to attach it to the outer wrapper, so the inner wrapper was secured with loose rivets and the end held in place by hand to do this, dropping rivets into the holes as I went.  20190528_175047 20190528_175047 by Anne Froud, on Flickr The same thing was done on the other sides.  20190528_184312 20190528_184312 by Anne Froud, on Flickr This end is riveted ready for soldering...  20190528_222845 20190528_222845 by Anne Froud, on Flickr ... while this end still needs some done with a rivet snap the old way since the rivet press won't reach the ones on the bottom of the picture.  20190528_222902 20190528_222902 by Anne Froud, on Flickr  20190528_222915 20190528_222915 by Anne Froud, on Flickr Once that's done, I can solder both ends in place. All of the fits look pretty good, so it ought to be easy enough to get a seal. I've not decided whether to use high temperature solder or not for this. It's easier to get a nice fillet and fill any gaps with the high temperature solder, so I might go with that. We'll see.  20190528_222925 20190528_222925 by Anne Froud, on Flickr |
|
jma1009
Elder Statesman

Posts: 5,901
|
Post by jma1009 on May 28, 2019 22:40:23 GMT
Hi Roger,
I don't know why you are adopting this singular approach to soft soldering. I've used ARAX 96 with Bakers Fluid on Stepney's side tanks, then followed up with large sticks of old fashioned plumbers' lead solder again using Bakers Fluid.
I've used Comsol flux as sold by Reeves years ago for use with Comsol solder, but found the Comsol flux difficult to use, and you didn't get an awful lot, whereas for side tanks and tenders Bakers Fluid I find much easier to use with ordinary soft solder, and ARAX 96.
Basically, I heat it up gently then with generous amounts of old fashioned soft solder and Bakers Fluid flush everything around wearing foundry gloves, and slosh around. Sub assemblies that are critical such as threaded bushes under shear stress are silver soldered beforehand or wedged if soft soldered as ordinary soft solder has poor sheer strength.
Cheers,
Julian
|
|
|
|
Post by Roger on May 28, 2019 22:54:47 GMT
Hi Roger, I don't know why you are adopting this singular approach to soft soldering. I've used ARAX 96 with Bakers Fluid on Stepney's side tanks, then followed up with large sticks of old fashioned plumbers' lead solder again using Bakers Fluid. I've used Comsol flux as sold by Reeves years ago for use with Comsol solder, but found the Comsol flux difficult to use, and you didn't get an awful lot, whereas for side tanks and tenders Bakers Fluid I find much easier to use with ordinary soft solder, and ARAX 96. Basically, I heat it up gently then with generous amounts of old fashioned soft solder and Bakers Fluid flush everything around wearing foundry gloves, and slosh around. Sub assemblies that are critical such as threaded bushes under shear stress are silver soldered beforehand or wedged if soft soldered as ordinary soft solder has poor sheer strength. Cheers, Julian Hi Julian, I'm just feeling my way cautiously, step by step trying not to mess it up. The Comsol flux works ok if you paint it on before the solder melts and again to brush the solder to make sure it's where it's needed. I do have some Baker's fluid, but I'm not convinced that it's significantly better than the Comsol flux. For the 60/40 solder, the Plumbers waxy kind of flux works really well because it stays put rather than gassing off and vanishing like Baker's fluid or Comsol flux. It's a pity there isn't a version of that for higher temperatures. I don't really fancy adding loads of solder when the joints are close enough to seal with a small amount because it's likely to drip out everywhere and need a lot of cleaning up. It would also clog up the internal filters permanently. I also need to keep it from getting all over the 'O' ring fitting for the balance pipe. I think I can get it sealed without resorting to flooding it with solder. I'm planning on riveting over the threaded bushes to give a mechanical joint and then solder them with high temperature solder. I'm a bit concerned that Silver Soldering them will distort the tank and it will certainly make it softer then the Cold Rolled state it's currently in. |
|
|
|
Post by 92220 on May 29, 2019 8:10:09 GMT
Hi Roger.
You'll soon be doing a water test!!
I have to shorten screws for almost every application on my loco. I now buy all sizes in either 3/4" long or the longest available (usually 1/2" for the smaller sizes,) and to cut them to size. I use a 1/16" parting tool set very close to the chuck jaws, and hold the screw by the thread in the chuck jaws and use a spacer between the parting tool and underside of the head of the screw, to part it off to length. When I set the length I then move the tool up the length for 0.01" and the produce an angular cut for the first 10 thou or so to make a lead on the end of the thread, then continue to cut it to length. That way I can get all my screws to length within a thou or two. Generally I use slip gauges to set the parting tool, as there are easy to hold between fingers. This works for me for all screws right down to 14BA. Your idea of a cutter, similar to a rivet shortener sounds good though, but won't that give a sharp end to the screw which would possibly make it more difficult to screw into place? I shall watch how your screw shortener works with great interest!! It would be easy for me to make up a couple of tapped blades to go in my rivet shortener.
Bob.
|
|
|
|
Post by Roger on May 29, 2019 8:22:27 GMT
Hi Roger. You'll soon be doing a water test!! I have to shorten screws for almost every application on my loco. I now buy all sizes in either 3/4" long or the longest available (usually 1/2" for the smaller sizes,) and to cut them to size. I use a 1/16" parting tool set very close to the chuck jaws, and hold the screw by the thread in the chuck jaws and use a spacer between the parting tool and underside of the head of the screw, to part it off to length. When I set the length I then move the tool up the length for 0.01" and the produce an angular cut for the first 10 thou or so to make a lead on the end of the thread, then continue to cut it to length. That way I can get all my screws to length within a thou or two. Generally I use slip gauges to set the parting tool, as there are easy to hold between fingers. This works for me for all screws right down to 14BA. Your idea of a cutter, similar to a rivet shortener sounds good though, but won't that give a sharp end to the screw which would possibly make it more difficult to screw into place? I shall watch how your screw shortener works with great interest!! It would be easy for me to make up a couple of tapped blades to go in my rivet shortener. Bob. Hi Bob, I do a similar thing to what you describe for the bigger sizes. The tool I've made works pretty well because it's mounted in the quick tool change holder so I can put the screws or rivets in the holder at the bench. When the cut is finished, I take it back to the bench and use a few strokes with the needle file to take the sharp edges off the end while it's still in the holder. In the case of the screw, you have to wind it backwards through the thread, so that makes sure it's cleaned up the thread. I used a pair of fine electrical angled cutters to take rivets in and out of the cutting tool, but you can't do that with threads unfortunately. It works down to a thread length of 2mm and of course you can always put it back in to change the length if required. I always buy the longest screws too, it's easier to handle them and I only have to stock one size. |
|
|
|
Post by simplyloco on May 29, 2019 8:34:21 GMT
I made 2 & 3 mm nut plates for all the sizes I use. Simple and effective.
John
|
|
|
|
Post by Roger on May 29, 2019 20:58:39 GMT
Here are a succession of the incremental steps heading towards getting every part of both ends completely wetted with high temperature solder, including the rivet heads. Here I've formed a piece of solder to lay where the fillet is required.  20190529_153936 20190529_153936 by Anne Froud, on Flickr  20190529_154935 20190529_154935 by Anne Froud, on Flickr I've just laid short fragments of solder on top of the areas where it's needed. Once melted, I use a brush dipped in Comsol flux to brush it in place. 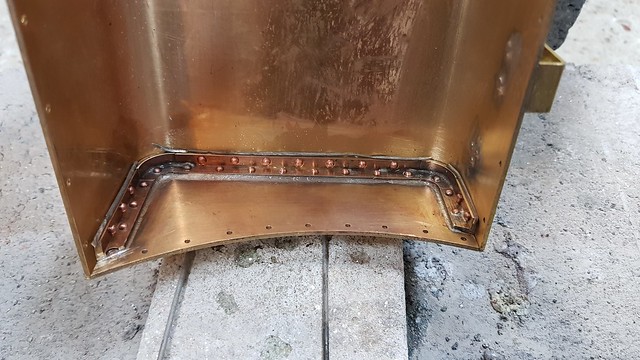 20190529_155332 20190529_155332 by Anne Froud, on Flickr It can get a bit black and horrible, so it's best to stop at that stage and see what it's like when it's cleaned up.  20190529_155622 20190529_155622 by Anne Froud, on Flickr The fillets are good, but the rivets still need covering.  20190529_161157 20190529_161157 by Anne Froud, on Flickr There are a few rivet heads that haven't quite been covered properly 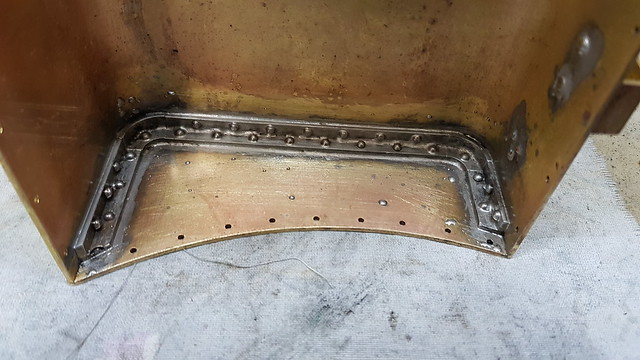 20190529_163045 20190529_163045 by Anne Froud, on Flickr I think it's good enough now...  20190529_201350 20190529_201350 by Anne Froud, on Flickr ... at both ends. 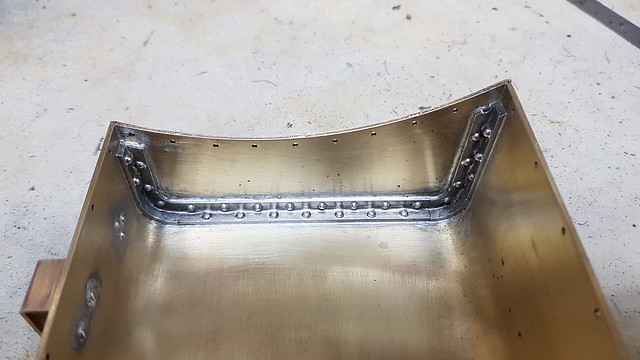 20190529_201403 20190529_201403 by Anne Froud, on Flickr It's hard to see in this photo, but the high temperature solder has certainly penetrated deep into the joints. It needs topping up with 60/40 solder around the edges and then the slightly overlapping edge can then be filed level at the same time as the rivets. I don't think I'm going to solder over the rivets on the outside, it shouldn't be necessary. 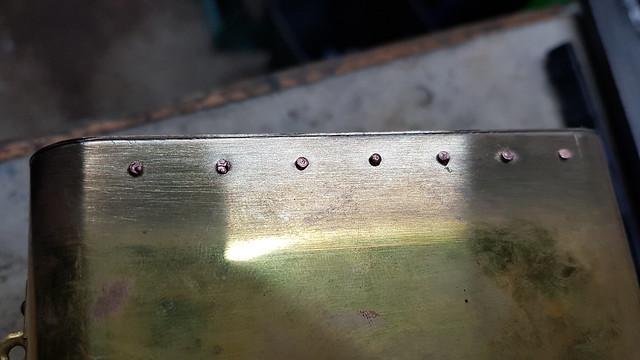 20190529_201438 20190529_201438 by Anne Froud, on Flickr All cleaned up and ready for the final assembly...  20190529_210217 20190529_210217 by Anne Froud, on Flickr ... like this. I've run out of rivets but I've found enough to see that it looks like I can line up the holes well enough without the need to drill any of them out. That's a minor miracle to be honest since there are so many parts and it's such a snug fit. More luck than judgement I reckon. 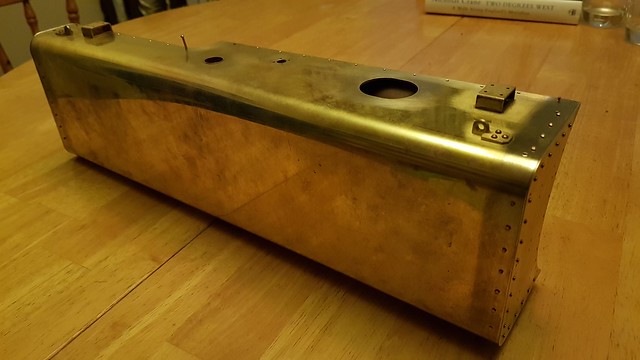 20190529_213309 20190529_213309 by Anne Froud, on Flickr  20190529_213335 20190529_213335 by Anne Froud, on Flickr |
|
|
|
Post by Oily Rag on May 29, 2019 21:08:44 GMT
Hi Roger. You'll soon be doing a water test!! I have to shorten screws for almost every application on my loco. I now buy all sizes in either 3/4" long or the longest available (usually 1/2" for the smaller sizes,) and to cut them to size. I use a 1/16" parting tool set very close to the chuck jaws, and hold the screw by the thread in the chuck jaws and use a spacer between the parting tool and underside of the head of the screw, to part it off to length. When I set the length I then move the tool up the length for 0.01" and the produce an angular cut for the first 10 thou or so to make a lead on the end of the thread, then continue to cut it to length. That way I can get all my screws to length within a thou or two. Generally I use slip gauges to set the parting tool, as there are easy to hold between fingers. This works for me for all screws right down to 14BA. Your idea of a cutter, similar to a rivet shortener sounds good though, but won't that give a sharp end to the screw which would possibly make it more difficult to screw into place? I shall watch how your screw shortener works with great interest!! It would be easy for me to make up a couple of tapped blades to go in my rivet shortener. Bob. I ground up a funky parting tool that cut and put the domed chamfer on the end. Made up little holders for each size screw/bolt to go under the nut. I was inspired by a clock making article in a ME mag. Maybe this may be of use for an onlooker.   |
|
|
|
Post by Roger on May 29, 2019 22:01:46 GMT
|
|
|
|
Post by Roger on May 30, 2019 21:57:51 GMT
The rivets arrived today, so here it is with the inner wrapper completely riveted in position. With a little persuasion all of the rivets fitted the original holes without any easing.  20190530_154130 20190530_154130 by Anne Froud, on Flickr 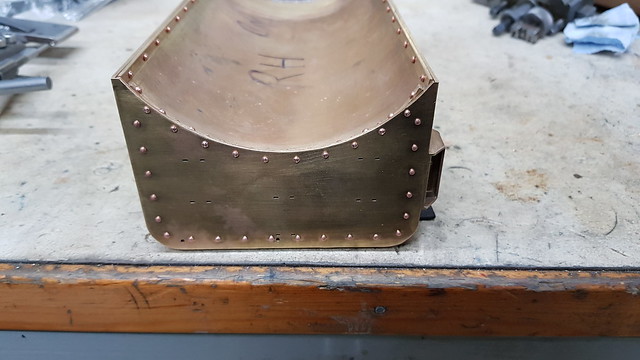 20190530_154143 20190530_154143 by Anne Froud, on Flickr  20190530_154148 20190530_154148 by Anne Froud, on Flickr I've raised this up for soldering so it's not so back breaking. There's Tippex around the the boundaries to contain any stray drips to a small area.  20190530_160254 20190530_160254 by Anne Froud, on Flickr All of the joints are really close, so I decided to use 60/40 cored solder for this. I've used plumbers greasy type of flux applied all over with a brush first so it doesn't oxidise at one end while I'm working on the other.  20190530_163304 20190530_163304 by Anne Froud, on Flickr Filing the rivets flush on the ends is awkward if it can't be held firmly, so I lashed up this arrangement with pieces of wood and a few clamps to steady it. Simple but effective. Tippex comes off easily with Acetone by the way.  20190530_194929 20190530_194929 by Anne Froud, on Flickr I'll tidy this up a bit more before adding the steps. 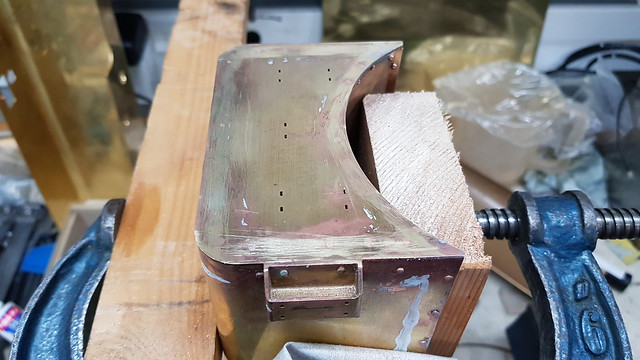 20190530_200704 20190530_200704 by Anne Froud, on Flickr  20190530_201949 20190530_201949 by Anne Froud, on Flickr So after over three hours of finger numbing filing with needle files, this is the result. I still have to solder the top of the through tube and add the filler.  20190530_221020 20190530_221020 by Anne Froud, on Flickr I'm 3D printing a bung to use with an 'O' ring so I can seal the outlet for the balance pipe and be able to test it all for leaks. I still need to make the handles on the top and side which will also need to be soldered in place. Even so, this is starting to feel finished.  20190530_221056 20190530_221056 by Anne Froud, on Flickr |
|
|
|
Post by delaplume on May 30, 2019 23:55:23 GMT
Hi Roger,
No wonder I can't find any Tippex in my local shops,---------- you've cornered the market it would seem LoL !!!
This is truly gripping stuff and I for one eagerly await your next listing....
Quote}--"Even so, this is starting to feel finished."......careful now, don't drop your guard at the last hurdle old son.......
Best regards...
|
|
|
|
Post by Roger on May 31, 2019 22:20:07 GMT
The front of the pannier tanks have two hand rails welded onto them which scale to 2mm diameter. On the bunker there are similar ones, and I've made those from Silver Steel to make them strong. However, that's not possible here because they need to be soft soldered into the tank and they will be in contact with water on the inside. I have some 2mm Brass rod/wire that I was going to use, but it's way too soft for my liking. I couldn't find anything suitable for this, so I decided to use some of the 5mm diameter Phosphor Bronze rod that I had left over from making the boiler stays. Here I'm holding one end in a collet and the other end being supported by a small countersink in the tailstock. There's still a lot of unsupported length in the middle that is either going to deflect away and be too large diameter or it's going to climb over the top of the tool. I've used an insert suitable for Aluminium because that's razor sharp.  20190531_173216 20190531_173216 by Anne Froud, on Flickr I left about 0.2mm over size on the end and the middle was a further 0.3mm oversize. I could have tried to get that better, but it was far easier to just grind them down to size. 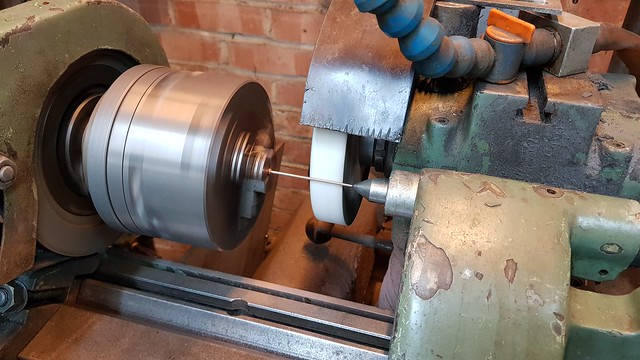 20190531_163846 20190531_163846 by Anne Froud, on Flickr I machined a former for the two sizes to make sure that the centres are right.  20190531_172006 20190531_172006 by Anne Froud, on Flickr 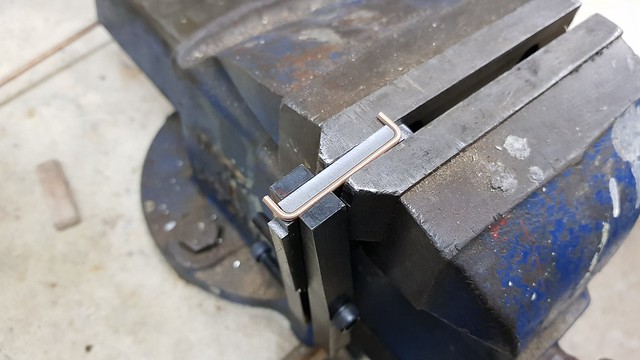 20190531_172305 20190531_172305 by Anne Froud, on Flickr Originally the ends of the handles were going to be 1.6mm diameter so they had a shoulder to locate on. However, I decided that it would be stronger to have the full 2mm diameter for the attachment. The holes go through the angles too, so making the handles a little longer to go through those too makes sense.  20190531_205318 20190531_205318 by Anne Froud, on Flickr The steps go through holes in the front plate, so obviously those need to be sealed or it will leak water. I've done it like this because soldering straight onto the surface isn't going to be that strong and it's not easy to get them aligned. I could have Silver Soldered them, but if they were damaged at any point, it would be almost impossible to do anything about it.  20190531_214718 20190531_214718 by Anne Froud, on Flickr So here it all is with the last few joints ready to be made. I've added little rings and shapes of solder round each of the joints. I could heat it all up and add the solder by hand, but I'm sure it would go everywhere. As it is, there's a bit of a problem that the front needs to be heated in one orientation and the top needs to be done in another. So the plan is to stand it up and solder the steps and handles and then drop it onto its bottom and then finish the top. Hopefully I can avoid melting the parts that are in the opposite orientation. I could do it in two setups, but getting it hot is only going to oxidise the parts I'm not soldering, so I may as well flux it to protect it and try to do them in one session. We'll see how that works out.  20190531_223449 20190531_223449 by Anne Froud, on Flickr |
|
|
|
Post by terrier060 on May 31, 2019 22:45:49 GMT
Just lovely work as always Roger, and here am I stuck in Bermuda in the sweltering 80s repairing clocks! Very impressed with how neat your soldering is, and I agree with you that it is much easier to control the flow using small snippets of solder well placed and leaves you a free hand to use a pricker to help guide it to the right places.
|
|
|
|
Post by Roger on Jun 1, 2019 6:43:08 GMT
Just lovely work as always Roger, and here am I stuck in Bermuda in the sweltering 80s repairing clocks! Very impressed with how neat your soldering is, and I agree with you that it is much easier to control the flow using small snippets of solder well placed and leaves you a free hand to use a pricker to help guide it to the right places. Hi Ed, Poor you, I'm sure you'd rather be at home in the workshop. I have to be prised out of there to go on holiday! To my way of thinking you have to spend time either putting the solder on in the right place or getting it off from the wrong place. However careful you are, some of it will go walkabout, but at least you can keep it to a minimum this way. |
|
barlowworks
Statesman
Now finished my other projects, Britannia here I come
Posts: 874
|
Post by barlowworks on Jun 1, 2019 14:00:22 GMT
A handy tip for removing excess soft solder is to find a set of cheep jewellers screwdrivers and grind them up to a chisel profile. You can then " carefully" pare away the soft solder to the finished level and then clean up with wet and dry or a fibreglass brush. A quick turn of tape of a contrasting colour round the top helps to stop them being mixed up with proper jewellers screwdrivers.
Mike
|
|


