uuu
Elder Statesman
 your message here...
Posts: 2,808
|
Post by uuu on Jun 26, 2020 14:04:34 GMT
It is a bit like ironing socks, though!
Wilf
|
|
jem
Elder Statesman
Posts: 1,064
|
Post by jem on Jun 26, 2020 16:34:18 GMT
What about a tent in the garden Roger, for your painting, they are not expensive, and it would protect against dust etc. spray in the evening cool, and collect in the morning, just a thought.
best wishes
Jem.
|
|
|
|
Post by Roger on Jun 26, 2020 18:00:08 GMT
What about a tent in the garden Roger, for your painting, they are not expensive, and it would protect against dust etc. spray in the evening cool, and collect in the morning, just a thought. best wishes Jem. Hi Jem, Although a great idea, I'll never get away with it. I'm already held guilty of requisitioning a bedroom for the office, the garage, the garden office, the shed and the space next to the house. One more piece of infrastructure would be the last straw! |
|
|
|
Post by Roger on Jun 26, 2020 20:22:06 GMT
More preparatory work prior to painting today. I've made two of these frames that attach to the M1.4 bush that secures the band around the firebox middle. The outside of this has that 90 degree bend at the top, so the idea is to be able to rotate this around the axis of the M8 studding so those surfaces can be made horizontal and turned to avoid sagging.  20200626_144025 20200626_144025 by The train Man, on Flickr These are for the buffer stocks...  20200626_163150 20200626_163150 by The train Man, on Flickr ... they're M12 x 1 which is actually just size for size with the tap run down it to make sure it will fit. The other was printed at 7.5mm and tapped through M8. The idea is to mask the inside of the business end with masking tape.  20200626_201740 20200626_201740 by The train Man, on Flickr The massive stretcher under the cab is going to be removable, so that needs painting separately.  20200626_184448 20200626_184448 by The train Man, on Flickr I the sides don't need painting, so I can use the fixing screws to support it. 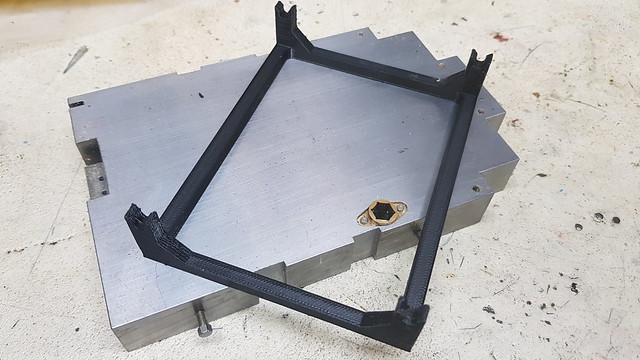 20200626_203257 20200626_203257 by The train Man, on Flickr This allows it to be turned over to spray both sides. 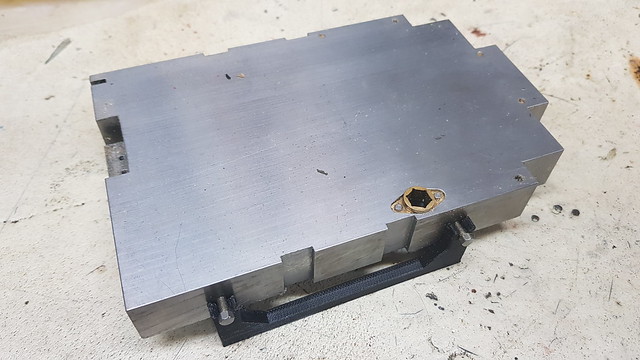 20200626_203230 20200626_203230 by The train Man, on Flickr This stand is for the plate that sits on the front buffer beam, hiding the lubricator. The stringers are because the print is jumping between distant points on the same layer and it's not pulling back quite enough on the filament. A heat gun will sort those out.  20200626_195258 20200626_195258 by The train Man, on Flickr The bolts are dummies, but they need to be fitted before painting.  20200626_201247 20200626_201247 by The train Man, on Flickr The nuts on the bottoms sit in small pockets on the pillars. The idea is to be able to use the handle to move it out of the way when it's been sprayed.  20200626_201237 20200626_201237 by The train Man, on Flickr The same idea here, but this time it's for the flat top sheet of the firebox cladding.  20200626_210147 20200626_210147 by The train Man, on Flickr Again, the side holes on this are going to have dummy M1 nuts and bolts added before painting, and those will engage with the pockets.  20200626_210212 20200626_210212 by The train Man, on Flickr So although you might imagine that this has been a lot of work, in reality they are trivial to design. I don't suppose I spent more than ten minutes on any of them. The longest print time was just over an hour and it used very little material. All of these have been designed and printed today, with another one on the printer right now. I've not spent all day on it, it's been far too nice to be indoors! Anyway, to my mind it's time well spent because it's going to be so much easier to handle these parts. However you paint them you're going to need wires or rods and some holes drilled in a support board, so there are no zero time alternatives. Besides, you know what I'm like by now... |
|
dscott
Elder Statesman
Posts: 2,438
|
Post by dscott on Jun 26, 2020 23:25:45 GMT
I so love the solid stay and have drawn one into Asia and boosted the weight of Jessie round the drag beam.
I was just counting back to 44 years ago when Keith Wilson suggested I cast a Block of Concrete under my Homemade Lathe.
It still gives one of the best finishes and hardly ever vibrates. The block is about the size of a curbstone.
I will try and bung a photo in my Jessie section.
A MUST for the Autumn is to assemble my Rapid Prototype machine. Being me, gets a part built one that needs work.
Yes to all the attachments as it makes life so much easier and just think of the problems a dropped just final coated part would give!!
OUCH.
Such a shame that when setting out to produce drawings for our models. VERY LITTLE time was put into what way or how does it get painted. 32 bolts into the underside of a Black Five smokebox still amuses me.
Four M6 stainless Allen ones from underneath and the fiddly ones are dummies!
David, and Lily our current expert on rattle cans and a degree in Electronics (THEORY)
|
|
|
|
Post by Roger on Jun 27, 2020 20:43:07 GMT
Not much to show for a pretty busy day, but here is some progress. I realised that I'd only made a mount for three of the four barrel straps, so I've rectified that now. While thinking about that, I was mulling over how to hold the bands so I could spray the inside with primer. I thought I'd make some stands what would be handy for holding those and also things like the smokebox or anything that just needs supporting off the bench. So I quickly designed these spider supports which are nice and robust but also tall and thin at the top where they will touch the part.  20200627_155835 20200627_155835 by The train Man, on Flickr I've made four so that several parts can be set up at once.  20200627_212053 20200627_212053 by The train Man, on Flickr They're 8mm wide at the bottom of the triangle and 20mm high. The arms span 160mm  20200627_212121 20200627_212121 by The train Man, on Flickr With the compressor running again, I've spend an hour cleaning these up and also the smokebox which still needs a little more work. I don't think the shot blaster is picking up enough media, so I've got a smaller feed tube to try and an adaptor printed for that. The idea is to increase the velocity in the media feed pipe. I'll try the original gun again too, and see if I can find a combination that works better. The compressor seems to have plenty of capacity even at 30Hz so I don't think that's an issue. I may have to put a gauge up near the cabinet for a quick check to see what pressure that's actually getting when it's running.  20200627_212711 20200627_212711 by The train Man, on Flickr I spend a good hour or so cleaning the Garden Office using packing tape in the way they pick up fibres in crime scenes. I've gone over the bench, the lights and anywhere I can see that dust can rest. The chair got a lot of attention, and I don't think I dare sit on that while painting is going on for fear of sending up a cloud of dust. I've left the filter box running for about four hours to give it a chance to capture as much of the dust I've disturbed as possible. I'll probably blow that off with an air line in the garden and then repeat the process again before painting anything. |
|
|
|
Post by 92220 on Jun 28, 2020 8:08:23 GMT
Hi Roger.
These blast cabinets are quite critical on air pressure. You need to be up to at least 80 psi to blast easily. Below that and there just isn't enough pressure to lift the media and clean the surface.
Those are very handy supports for your painting!!
Bob.
|
|
|
|
Post by jon38r80 on Jun 28, 2020 13:16:34 GMT
I like the 5 legged star supports you have made they would be helpfull on something larger. I have some three sided pyramid supports for odd shapes and bigger tings like furniture or boxes as they only have one small point of contact. I got them long before 3D printiong was available to the masses, Ive got about a dozen, they are 60mm on a side ( before anyone says anything I know they are not true pyramids but made up of four isoscelese triangles( had to look that spelling up to make sure I got it right)) there is no base so they stack nicely and dont take up so much room.
|
|
uuu
Elder Statesman
your message here...
Posts: 2,808
|
Post by uuu on Jun 28, 2020 13:37:15 GMT
A tetrahedron, then
Wilf
|
|
stevep
Elder Statesman
Posts: 1,070
|
Post by stevep on Jun 28, 2020 13:50:45 GMT
Well, they would be if they had a base.
|
|
|
|
Post by jon38r80 on Jun 28, 2020 14:41:53 GMT
Just found this definition of a tetrahedron so mabe both Wilf and I are right  , In geometry, a tetrahedron (plural: tetrahedra or tetrahedrons), also known as a triangular pyramid, is a polyhedron composed of four triangular faces, six straight edges, and four vertex corners. |
|
|
|
Post by Roger on Jun 28, 2020 20:32:17 GMT
Ok, finally it's time to have a go and do some priming. First I made a stirrer for the large tin of the two part primer, stirred it, got a bit ambitious with the speed and split a bit. With that stirred, I used a couple of syringes and put equal parts into the Badger AirBrush jar. I didn't want to mix up a lot in case it went pear shaped. I made a tiny stirrer for that, and used the Pillar Drill to stir the parts together. I had absolutely no idea how it was going to work out, but I adjusted the spray pattern to cover a reasonable area, set the pressure to 30PSI and tried it on a piece of paper. Anyway, you know me, I just decided to have a go since there's not much to lose. I've got the Shot Blaster, so starting again is no big deal. Being able to manipulate this with the handle is a huge help, as is letting it turn itself when it's done. To be honest, it was way too hot in there. I'd not been out in the Garden Office for ages, just in the Workshop which was nice and cool. However, when the paint was mixed up and I went back, the Sun had been out and the temperature was reading 26C!  20200628_170547 20200628_170547 by The train Man, on Flickr Anyway, I got in close enough to see it form a wet coat so hopefully it will be fine. It certainly dried quickly. These are the buffer beam to frame gussets. I just wanted to flash some primer on the back, that's all they will get on this face. Next they're get mounted on this surface for priming the other side and finishing.  20200628_170554 20200628_170554 by The train Man, on Flickr I turned the spray booth fans on first thing this morning and left the door shut. So by the time I started spraying, it had been running for about 8 hours. That certainly seems to have done the trick, there's next to no dust on the sprayed parts so I'll do the same each time. The idea is that given enough time, the entire volume of air in the room will pass through the filter. The fans are pretty powerful, so that probably doesn't take more than an hour or so to happen.  20200628_170600 20200628_170600 by The train Man, on Flickr This is the steam brake mount, it's going to get attached permanently to the frame before applying to top coat.  20200628_171029 20200628_171029 by The train Man, on Flickr Click on the video to watch paint dry!  20200628_171042 20200628_171042 by The train Man, on Flickr I should have mounted this on a shorter bar, it's too heavy really to be cantelevered like that. I also should have chamfered the end of the M8 rod, I manager to cross thread it and mangle the end of the mount in the process. Still, it was good enough to do what was needed.  20200628_172651 20200628_172651 by The train Man, on Flickr Again, click to watch more paint drying!  20200628_172705 20200628_172705 by The train Man, on Flickr Here are some more mounts, a bit of a scruffy print but they clean up and fit. And today's competition is... to fit what?  20200628_184406 20200628_184406 by The train Man, on Flickr I need to make a better way to support these part, like Chris Vine said. Mine will have 8mm clearance holes too.  20200628_200409 20200628_200409 by The train Man, on Flickr I spent rather too long getting this mounted, by with time the AirBrush way playing up. On stripping it down, there was a lump of something in one of the four nozzles, so that rather messed up doing this. I'll let it harden and then see if it's going to need shot blasting again to make a fresh start.  20200628_200418 20200628_200418 by The train Man, on Flickr I've been printing out more supports and making more M8 attachments, so you haven't seen everything yet. So, what have I learned? 1) Running the spray booth for hours really does reduce the amount of dust in the air. 2) I look daft in a mask and painter's hat. 3) I need to check the temperature before mixing up the paint. 4) Don't stir the paint too fast. 5) Mix up at least two jars of paint, it doesn't go very far. 6) I could use a larger jar on the spray gun for things like the Gear Frame so I don't have to worry about it running out before it's finished. I've ordered a load of M8 x 60 grub screws to support more parts by means of an M8 coupler. Those will be transfered to a drying plate. I've also tracked down the 3/16" tube required for making a larger paint bottle. It turns out it's the same as used in some Beer delivery systems. I've also tried all of the different nozzles in the shot blasting gun supplied with the cabinet. It turns out that the middle sized one seems to work the best, picking up a decent amount of media while still ejecting it with enough force to do the job. The compressor copes with that with ease and I can leave it running happily for hours while it's going that or supplying the AirBrush. Yeah, I know, it's a bit overkill for the AirBrush but I don't have a receiver. |
|
|
|
Post by Roger on Jun 28, 2020 20:34:41 GMT
I like the 5 legged star supports you have made they would be helpfull on something larger. I have some three sided pyramid supports for odd shapes and bigger tings like furniture or boxes as they only have one small point of contact. I got them long before 3D printiong was available to the masses, Ive got about a dozen, they are 60mm on a side ( before anyone says anything I know they are not true pyramids but made up of four isoscelese triangles( had to look that spelling up to make sure I got it right)) there is no base so they stack nicely and dont take up so much room.
Hi Jon, Those look really handy. I might print some smaller ones for things like the cab base. |
|
|
|
Post by Roger on Jun 30, 2020 7:09:25 GMT
Oops, I posted this in the wrong place, so here it is again... This is my take on the pyramid supports that Jon, showed yesterday. These are 30mm long and have indented sides to make them easier to get hold of while still being simple to print.  20200629_092622 20200629_092622 by The train Man, on Flickr The hot air gun made short work of the whiskers.  20200629_122142 20200629_122142 by The train Man, on Flickr I also printed adaptors for this larger mixing jar...  20200629_161725 20200629_161725 by The train Man, on Flickr ... and the smaller ones that came with the AirBrush.  20200629_162035 20200629_162035 by The train Man, on Flickr And this is what those mystery prints were for the other day. I'd already painted the brake pull rods with a spray can, but I wasn't happy with them. The shot blaster soon stripped the paint off those. The three pairs are different lengths but all have 5mm holes with the exception of the three 4mm adjusting holes.  20200629_162512 20200629_162512 by The train Man, on Flickr It's a bit blurry, but you can see the idea. There's a step on the supports that's 0.1mm deep and they fit with a nice easy push fit.  20200629_162523 20200629_162523 by The train Man, on Flickr This is the first use of the spider supports. I just wanted to flash some primer around the inside and end of the Smokebox so I can then use the inside spider support for the rest of the spraying.  20200629_164113 20200629_164113 by The train Man, on Flickr I blasted this and started again. It's not the easiest thing to spray, but turning it over and keeping it on the move seems to work.  20200629_165409 20200629_165409 by The train Man, on Flickr Another 'watching paint dry' movie...  20200629_165427 20200629_165427 by The train Man, on Flickr The support is as Chris Vine suggested, with 8mm clearance holes and some 3 and 4mm ones too. I blew it off with compressed air to remove as much debris as possible and also sprayed it with clear lacquer to keep the dust down.  20200629_172845 20200629_172845 by The train Man, on Flickr And this is my 'Daft Vader' get up with Painters Cap and a fresh dust coat that was given a vigorous shake in the garden in an attempt to get rid of any loose material. Thankfully, the face mask is very comfortable and doesn't cause my glasses to steam up.  20200629_170551 20200629_170551 by The train Man, on Flickr |
|
|
|
Post by ettingtonliam on Jun 30, 2020 9:54:21 GMT
Well thats one way to scare off any unwanted callers if you answer the door dressed like that.
An excellent car body repairer.paint sprayer I once knew didn't wear a mask when spraying, and smoked Woodbines when not spraying. What his lungs were like I shudder to think.
|
|
|
|
Post by Roger on Jun 30, 2020 21:14:16 GMT
The first solid mounts for the Buffer to Frame Gussets didn't really grip as well as I needed, so here's a modified version that works like an expanding mandrel. The inside M8 hole ends in a 45 degree chamfer and they are now spit to within 2mm of the end.  20200629_172935 20200629_172935 by The train Man, on Flickr That worked a treat, it's really got a good grip on the hole and the recess. So as suggested by Bob, I reduced the air pressure on the AirBrush and wound the needle down until it was creating a very small spray pattern. I tried it at 15PSI but it wouldn't pick up the paint. 20PSI seemed to work pretty well. This was the first one and I managed to stray onto the face a little too often which pooled there. I decided to stop at that point and do the rest to the same stage, trying to be more careful. The others came out much better, but I spotted a few holes that need filling where the Silver Soldering wasn't perfect, so I've been filling those tonight.  20200630_152946 20200630_152946 by The train Man, on Flickr I also shot blasted the back plate and the bodies then added the M1.6 studs and bolted the two parts together. I'm using 0.8mm Steel Rivets to simulate round headed screws. They are a really snug fit in the holes, so I've just squeezed them in are far as they will go and then shot blasted the whole assembly. At this stage I've run a little permanent Loctite 601 around the base of the rivet and then used the air line to carefully direct the overspill so it flowed under the step. The step was machined from a Brass ring, so there's a flat surface under there which is now bonded to the buffer stock. The excess Loctite was later removed with Acetone. The 3D printed supports protect the thread and firmly hold it for blasting and spraying.  20200630_113646 20200630_113646 by The train Man, on Flickr  20200630_150415 20200630_150415 by The train Man, on Flickr I sprayed them from left to right, turning the handle the whole time and then gave a short spray onto the open end. I'm pleased that the paint is thin enough to retain the detail on the threads, rivets and tread pattern and not fill in the gap between the plate and the back of the flange.  20200630_153558 20200630_153558 by The train Man, on Flickr I've also had another session shot blasting the frame assembly. That's not too difficult until it comes to the ends. However, by placing it diagonally on edge, it's just possible to train the gun on the ends, even though I can't see what I'm doing. That's given a reasonable finish on the ends, good enough for painting. It has exposed quite a lot of imperfections on the outside, mainly where holes have had to be filled in and where the horns are flush riveted. I've filled those with Devcon Aluminium Putty which I'll sand off tomorrow.  20200630_221232 20200630_221232 by The train Man, on Flickr |
|
|
|
Post by Roger on Jul 1, 2020 22:08:16 GMT
It's taken all day to get to this point, so here's a summary of what I've done. 1) Sanded off the filler on the various nicks and marks 2) Masked off the horn blocks, cylinder bolting faces and where the large stretcher under the cab goes. I was originally going to use the stretcher as the mask, but there are cutouts for the rivets that get in the way and I want to paint those areas too. 3) Fitted the Steam Brake stay with the correct length bolts with the heads turned down to a more sensible thickness. 4) Fitted the Smokebox Saddle which will also be a permanent fixture. Again, the bolt heads were turned down. 5) Masked the attachment point for the Gear Frame. That would be really hard to paint while on the Frame, and it would also make painting the frame there difficult. 6) Fitted the fame to the chassis, altering the White Delrin pieces which had too long sleeves. Once attached, the whole thing was inverted to the position shown. 7) Wiped it all over with Methylated Spirits to remove any traces of blasting media after blowind it off with an air line. I'll give it another wipe in the morning when I get round to spraying it.  20200701_225156 20200701_225156 by The train Man, on Flickr I've had some business things to attend to today, so I've not got as far as I would have liked. Tomorrow should be interesting.  20200701_225218 20200701_225218 by The train Man, on Flickr |
|
|
|
Post by Roger on Jul 2, 2020 11:18:34 GMT
I'd forgotten to fit the front hand rails to the sloping edge of the frame, so I fitted those with Loctite 601 retainer this morning. It's a good job I mixed up a decent amount of paint because this took two and a bit of the small bottles. In reality you can't draw paint from the very bottom, so it's probably only two bottles. I sprayed most of it at 25PSI with a fairly small, say 25mm spray pattern at 50mm because there is a mix of tricky inside corners and gussets with rivet and bolt heads, as well as the larger areas. Trying to reach every part of it isn't that easy, some had to be done from further away than I'd have liked. Still, it seems to have come out alright. At least it's cool today so hopefully all of the paint was still wet when it reached the surface. Some of it was more shiny than others, it's hard as a newbie to know how it should look when it's being applied. It goes to a Matt finish very quickly as it dries. Anyway, I'm pretty happy with it, it's certainly a lot easier than spraying with a Can.  20200702_112727 20200702_112727 by The train Man, on Flickr  20200702_112737 20200702_112737 by The train Man, on Flickr 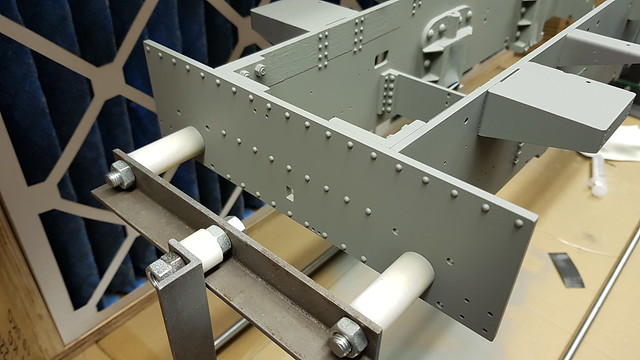 20200702_112743 20200702_112743 by The train Man, on Flickr 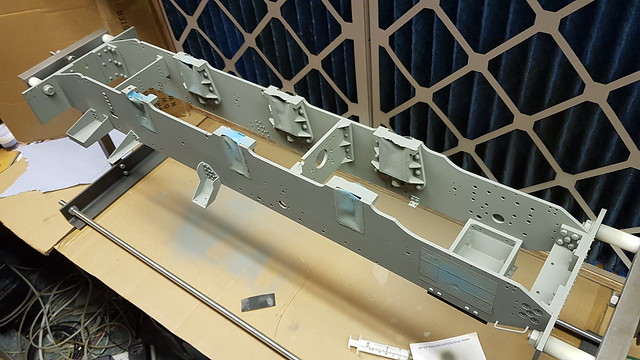 20200702_112756 20200702_112756 by The train Man, on Flickr  20200702_112807 20200702_112807 by The train Man, on Flickr  20200702_112813 20200702_112813 by The train Man, on Flickr |
|
|
|
Post by mr swarf on Jul 2, 2020 11:19:44 GMT
Is there an advantage to using aluminium putty over something like car body filler?
Paul
|
|
|
|
Post by Roger on Jul 2, 2020 12:16:15 GMT
Is there an advantage to using aluminium putty over something like car body filler? Paul I think it's pretty similar, it's a two part Aluminium filled epoxy that sticks well and can be filed and sanded easily. I just happen to have some that I use for other repairs. |
|


 ,
, 
