|
|
Post by Roger on Jul 2, 2020 14:19:07 GMT
So I have a few more questions about painting...
1) Do I paint the mating faces of the Smokebox door?
2) Can I spray the outside of the Smokebox with the handrail stanchions and hand rails in place?
3) Can I spray a gloss finish onto a vertical face if I can rotate that plane? The buffers are one such situation where I can turn the frame on the spit.
|
|
stevep
Elder Statesman

Posts: 1,070
|
Post by stevep on Jul 2, 2020 15:29:30 GMT
Roger,
I painted the mating faces of my smokebox door on Rob Roy, but continual opening and closing (over 30+ years) has worn most of it away.
|
|
|
|
Post by Roger on Jul 2, 2020 16:01:27 GMT
Roger, I painted the mating faces of my smokebox door on Rob Roy, but continual opening and closing (over 30+ years) has worn most of it away. Thanks for that. I've been told an anecdote of a door becoming stuck on the first steaming, so I wondered if that was just due to the paint not being fully cured. |
|
JonL
Elder Statesman
WWSME (Wiltshire)
Posts: 2,906
|
Post by JonL on Jul 2, 2020 19:27:14 GMT
I've been wondering the same thing lately, following with interest!
|
|
mbrown
Elder Statesman
Posts: 1,718
|
Post by mbrown on Jul 2, 2020 19:49:28 GMT
I have always painted the whole front of the smokebox, although not the rear face of the door.
Never had any trouble with it sticking, or paint lifting, except on my very first model when (age 17) I couldn't resist steaming it a day or two after painting. Quite a bit of paint came off that day, but once it had baked on I had no more trouble.
In every case, I used Humbrol enamels and the smoke boxes gave been made variously of steel, brass and aluminium tube. I used Precision single pack primer on them all.
Malcolm
|
|
oldnorton
Statesman
 5" gauge LMS enthusiast
Posts: 692
|
Post by oldnorton on Jul 2, 2020 19:58:35 GMT
Hi Roger
Good to see you enjoying painting. I have only just caught up with the last couple of pages of your thread so apologies if you have answered this before, but are you using an acid etch two component primer or have you chosen something else? Secondly, have you got some conventional paint thinner like cellulose, 2K or synthetic to use for wiping down the bare metal rather than Methylated Spirits? Meths is deliberately adulterated to stop people drinking it, i.e. it contains stuff.
Norm.
|
|
|
|
Post by Roger on Jul 2, 2020 22:15:41 GMT
Hi Roger Good to see you enjoying painting. I have only just caught up with the last couple of pages of your thread so apologies if you have answered this before, but are you using an acid etch two component primer or have you chosen something else? Secondly, have you got some conventional paint thinner like cellulose, 2K or synthetic to use for wiping down the bare metal rather than Methylated Spirits? Meths is deliberately adulterated to stop people drinking it, i.e. it contains stuff. Norm. Hi Norm, The priming seems easy enough, but whether I'm going to enjoy the Enamel spraying remains to be seen. We'll find out soon. I've got some thinners, so I ought to use that really. I tried the Acetone I've got, but that turns out to be a solvent for the filler! Yes, it's a two part Etch primer with an activator that's as thin as water. |
|
|
|
Post by Roger on Jul 3, 2020 14:48:10 GMT
This is my solution to presenting the bunker and cab at any angle for spraying. The 'U' shape is supported on the spit arrangement shown previously. I've assembled this to check the balance which turns out to be bottom heavy because of the large handle on the bottom. The handle is one I had in stock as a spare for one of the CNC routers I support. It's never going to get used, so I drilled and tapped the plain boss M8. The bunker is held to the Aluminium base plate with three M3 countersunk screws from the top. I've tried to judge the centre of mass so it doesn't tend to pivot when it's on its side.  20200703_150803 20200703_150803 by The train Man, on Flickr The rectangular Aluminium extrusion came with the shower I put into the bathroom recently. That proved to be way too flexible in the configuration I ended up using it, so that got replaced by a piece of solid Stainless Steel bar of the same section. The bar isn't that strong, so I 3D printed a piece to go inside to support the bar where I'm squeezing it at the pivot to get some friction. The 3mm Aluminium plate is attached to the M8 studding with a 4mm thick Steel tapped washer which has 4 x M3 tapped holes for the countersunk fixing screws. The M8 studding is held to the plate with Locitite 601 retainer. I've tensioned the 2.5mm thick Delrin washers with an M8 nut to get some friction and then wound the handle tight onto it. These are the first 3D printed supports arms which have a 13mm AF hex for the M8 nuts so they can be locked to the studding on the spit. Having found the balance isn't great, I'm just printing out some arms that are 20mm shorter.  20200703_151145 20200703_151145 by The train Man, on Flickr It's taken a few hours to figure this out and make the various bits and pieces, but it ought to make it so much easier to spray. I don't know how anyone else would hold this for spraying. Maybe they would just attach a handle to the bottom of it and manipulate it somehow with one hand while spraying with the other. Who knows, it's a nightmare shape to get all around and prevent runs from happening. |
|
|
|
Post by Roger on Jul 4, 2020 6:38:32 GMT
Here are the old and the new support arms for the Bunker and Cab spray mounts. I don't know how well balanced this will be with the Cab, but as long as it's not too far out then it will be fine. I can always make another pair of a different length if necessary, it takes seconds to change one dimension and a couple of hours to print them out.  20200703_215758 20200703_215758 by The train Man, on Flickr |
|
|
|
Post by Roger on Jul 4, 2020 17:25:24 GMT
I tried shot blasting the Steel Boiler Bands, and that nearly ended in tears. The force of the compressed air wants to thrash them around and bend them every which way, so that's not going to work. My solution is to 3D print a little support that holds the band down either side of a clear zone where I can blast the full width. You can see a couple of rectangular holes in the side of the print. Those go right through and are for a cable ties to attach it to the grid on the bottom of the blasting cabinet so I can have enough hands free to do the job.  20200704_181734 20200704_181734 by The train Man, on Flickr |
|
|
|
Post by steamer5 on Jul 4, 2020 23:04:45 GMT
Hi Roger,
Now that's a great trick!
I guess the waving about is a Tacoma Narrows bridge effect & that did end in disaster!
I'm going to have to see if I can sneak a 3D printer under the radar!
Cheers Kerrin
|
|
|
|
Post by Roger on Jul 5, 2020 0:07:55 GMT
I started this a bit too late really, it was almost 10PM. However, I'm out walking tomorrow, so I thought I'd crack on and have a go at painting the Red parts of the chassis. 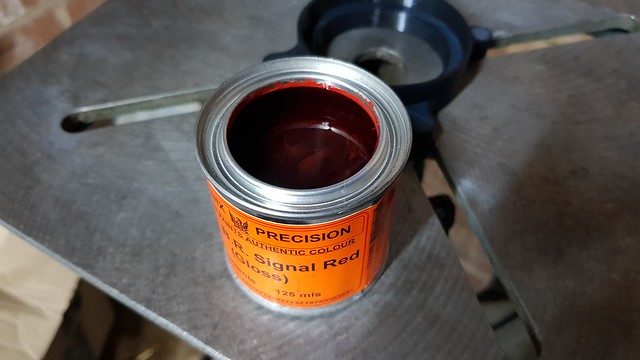 20200704_210724 20200704_210724 by Roger Froud, on Flickr  20200704_211909 20200704_211909 by Roger Froud, on Flickr I used a pair of specially bought tights to strain the stirred paint to make absolutely certain there were no lumps. I used the syringes to measure 25% thinners which I then mixed in a jar.  20200704_212628 20200704_212628 by Roger Froud, on Flickr Masking this up was very time consuming, I think it took the best part of an hour in total. I bought the low tack tape from Precision Paints and some brown paper, and that seems to work really well.  20200704_231321 20200704_231321 by Roger Froud, on Flickr I used 30 PSI and a smallish spray pattern so that I could target the tricky webs and rivet heads as well as the larger surfaces. It's a compromise between what I understand to be best for each feature. I turned the spit over many times to get a decent angle on the AirBrush, trying to make sure there was enough paint to wet the surface but not so much that it ran. That's a tricky juggling act, one I'm not sure I've mastered yet.  20200704_232518 20200704_232518 by Roger Froud, on Flickr  20200704_232527 20200704_232527 by Roger Froud, on Flickr It may well be that I haven't really got enough paint on the buffer beams, but until it's dry and I can get up close and personal in the daylight I won't know. To be honest, at the moment my gut feeling is that it's good enough, even if it's not pulled out to a full gloss.  20200704_232536 20200704_232536 by Roger Froud, on Flickr  20200704_232542 20200704_232542 by Roger Froud, on Flickr The masking came off easily enough without ruining the edges.  20200704_233428 20200704_233428 by Roger Froud, on Flickr  20200704_233445 20200704_233445 by Roger Froud, on Flickr At least the rivets came out better than when I painted these years ago with a spray can. That time I ended up with a horrible ring around each of the rivets, but that doesn't seem to have happened this time.  20200704_233455 20200704_233455 by Roger Froud, on Flickr  20200704_233500 20200704_233500 by Roger Froud, on Flickr Anyway, it's far from perfect, but it does look free from dust and such like. This morning I went over the light fittings, the bench and many other surfaces with packing tape (like they do in CSI to recover fibres) to take away as much dust as possible then ran the spray booth filter fans for an hour before painting. That seems to have paid off. |
|
|
|
Post by Roger on Jul 5, 2020 21:49:32 GMT
I made a second stand today so I could leave the frame on the first one while I do some of the smaller items. The buffer stocks were sprayed at 30PSI with a cone of about 30mm diameter at 50mm distance so I could progress from right to left in a spiral motion, turning the handle as I went. I thought that would allow me to control where and how much paint was being applied rather than blanketing the whole piece in one revolution. Maybe that's not the right way to go about it, but it seemed to work very well. Turning it like that means that it was easy to cover all round the small nuts and studs on the flange. 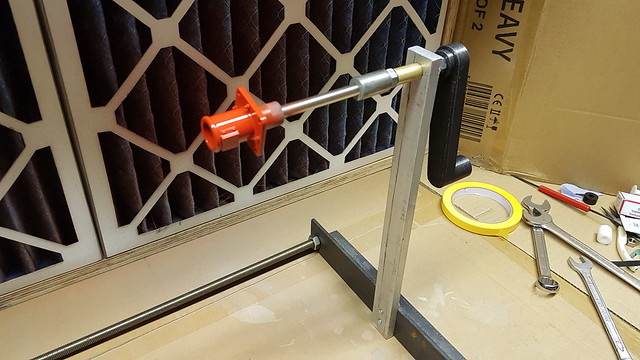 20200705_205407 20200705_205407 by The train Man, on Flickr Once painted, I kept turning them by hand for another five minutes. I probably won't bother motorising this one since it's only a temporary measure while the frame is tying up the main spit. We'll see, I might change my mind.  20200705_214002 20200705_214002 by The train Man, on Flickr |
|
|
|
Post by delaplume on Jul 6, 2020 2:02:24 GMT
I made a second stand today so I could leave the frame on the first one while I do some of the smaller items. The buffer stocks were sprayed at 30PSI with a cone of about 30mm diameter at 50mm distance so I could progress from right to left in a spiral motion, turning the handle as I went. I thought that would allow me to control where and how much paint was being applied rather than blanketing the whole piece in one revolution. Maybe that's not the right way to go about it, but it seemed to work very well. Turning it like that means that it was easy to cover all round the small nuts and studs on the flange. 20200705_205407 by The train Man, on Flickr Once painted, I kept turning them by hand for another five minutes. I probably won't bother motorising this one since it's only a temporary measure while the frame is tying up the main spit. We'll see, I might change my mind. 20200705_214002 by The train Man, on Flickr Hi Roger, Excellent !!..........these and the previous photos show just what can be achieved when you combine traditional and modern technology /thinking.......hoo-ray especially for the 3D printer Now then young chap, I'm intrigued to know just how you asked for those "specially bought tights" ??.......... LoL . |
|
barlowworks
Statesman
Now finished my other projects, Britannia here I come
Posts: 874 
|
Post by barlowworks on Jul 6, 2020 5:27:13 GMT
Why not just buy some paint filter papers, a lot like coffee filters but for paint. A lot less embarrassing then having to buy ladies tights. 😉
Mike
|
|
|
|
Post by Roger on Jul 6, 2020 7:24:11 GMT
Why not just buy some paint filter papers, a lot like coffee filters but for paint. A lot less embarrassing then having to buy ladies tights. 😉 Mike Hi Mike, Had I known they existed, I may well have done just that! |
|
|
|
Post by Roger on Jul 6, 2020 7:26:26 GMT
Hi Roger, Excellent !!..........these and the previous photos show just what can be achieved when you combine traditional and modern technology /thinking.......hoo-ray especially for the 3D printer Now then young chap, I'm intrigued to know just how you asked for those "specially bought tights" ??.......... LoL . Hi Alan, Good old eBay to the rescue as always! I was asked by my Son if I was going to be on 'Drag race' though. He's never one to miss a comedic opportunity. |
|
|
|
Post by 92220 on Jul 6, 2020 9:54:14 GMT
Why not just buy some paint filter papers, a lot like coffee filters but for paint. A lot less embarrassing then having to buy ladies tights. 😉 Mike Hi Mike. When I was investigating paint filters for Precision Paints, I couldn't find a commercial paint strainer that was anywhere near as fine as the top part of ladies/stockings tights. Doubling up the lower, thinner part of the tights, also produces a fine filtration, so there is no waste. For airbrushing you do need something finer than a commercial paint strainer (unless they have started making finer strainers since I looked into what was available). Bob. |
|
|
|
Post by 92220 on Jul 6, 2020 9:58:00 GMT
Why not just buy some paint filter papers, a lot like coffee filters but for paint. A lot less embarrassing then having to buy ladies tights. 😉 Mike Hi Mike. When I was investigating paint filters for Precision Paints, I couldn't find a commercial paint strainer that was anywhere near as fine as the top part of ladies/stockings tights. Doubling up the lower, thinner part of the tights, also produces a fine filtration, so there is no waste. For airbrushing you do need something finer than a commercial paint strainer (unless they have started making finer strainers since I looked into what was available). Bob. Edit: I forgot to add.....the fact that they are made from nylon, also helps the filtration, because the nylon attracts any fine dust and bits, rather than let it pass through. That has always been a problem with nylon clothing, but for our use as a filter, it is an advantage. |
|
|
|
Post by andyhigham on Jul 6, 2020 9:58:25 GMT
Hi Roger, Excellent !!..........these and the previous photos show just what can be achieved when you combine traditional and modern technology /thinking.......hoo-ray especially for the 3D printer Now then young chap, I'm intrigued to know just how you asked for those "specially bought tights" ??.......... LoL . Hi Alan, Good old eBay to the rescue as always! I was asked by my Son if I was going to be on 'Drag race' though. He's never one to miss a comedic opportunity. I do the proper Drag Racing  68378438_2851412321538956_1317529390401191936_n 68378438_2851412321538956_1317529390401191936_n by Sigma Projects, on Flickr |
|


