|
|
Post by rogsteam1959 on Jul 27, 2020 14:01:12 GMT
Roger,
do your thing. You did it all the time and the result so far is fabulous.
I like the way you tackle the things.👍
|
|
|
|
Post by Jock McFarlane on Jul 27, 2020 14:07:54 GMT
Yep, it's easy to ruin a job with a moment's inattention. We've all done it, and we take note not to make the same mistake again. Mistakes will happen, regardless of what measures you take. You bolt a spray gun down, and now you go over like a skittle because the hose doesn't move when you trip over it! In the workshop, I do my own risk assessment for myself and for the job, then work with a level that I'm prepared to live with. Some are happy to hold sheet metal on the pillar drill by hand. I'm not. Some use sketchy setups that can potentially damage the work or allow it to fly out and hit you. I'm not. I think I've got a pretty good track record in these matters, and calamities with a spray gun don't feature high on my list of potential dangers. Now, can we please stop fretting about things that are probably never going to happen, and are hardly a disaster if they do? Roger, That is an epitome of common sense and of perspective. JM |
|
|
|
Post by Roger on Jul 28, 2020 21:21:46 GMT
I mixed up a decent amount of semi-gloss Black to have a go at a few pieces with the big spray gun. I practiced on some card and a Steel panel and then gave the back of the backhead cladding a coat around the outside...  20200728_210905 20200728_210905 by Roger Froud, on Flickr ... before biting the bullet and having a go on the front. To my surprise and delight, it came out remarkably well! 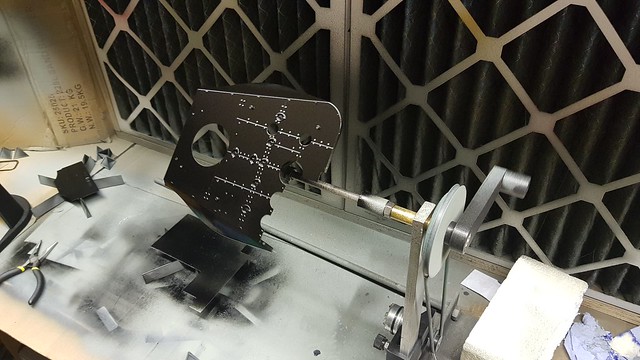 20200728_210856 20200728_210856 by Roger Froud, on Flickr This wobbly video shows it drying on the spit which I left running for five minutes.  20200728_210916 20200728_210916 by Roger Froud, on Flickr Flushed with that success, I thought I'd have another go at the smokebox. The inside isn't marvellous, but that's not that important. However, the outside seems to have come out really well on first inspection. I didn't want to push my luck, so I carefully exited, trying not to raise any dust and left these to dry. I've turned this upside down, so that any dust settles on the bottom. Spraying over the hand rails left a shadow, so I approached them from both directions while tilting the gun slightly so the paint would reach everywhere. Hopefully this will look ok when it's dry. I wouldn't be surprised if the underside of the handrails aren't covered, but that's the least of my worried. I can paint those with a brush if necessary, or mask them off and spray them. After the disaster with the last effort, I'm heartened that this is actually going to work.  20200728_212616 20200728_212616 by Roger Froud, on Flickr |
|
|
|
Post by 92220 on Jul 29, 2020 8:17:38 GMT
Hi Roger.
That paint coat looks really good! You may be concerned that it looks a bit gloss, but don't worry, that is not a problem. The finish will dull down the first time you fire up the loco, due to the higher temperature the smokebox reaches during running, just like on a fullsize loco, and will for a couple of times more. One big advantage of using coach enamel (like Phoenix Paints), is that even though the paint can go extremely hard with heat and time, like on a car, it retains it's flexibility, so doesn't crack easily, like cellulose and other hard paints can.
Bob.
|
|
|
|
Post by Roger on Jul 29, 2020 8:32:12 GMT
Hi Roger. That paint coat looks really good! You may be concerned that it looks a bit gloss, but don't worry, that is not a problem. The finish will dull down the first time you fire up the loco, due to the higher temperature the smokebox reaches during running, just like on a fullsize loco, and will for a couple of times more. One big advantage of using coach enamel (like Phoenix Paints), is that even though the paint can go extremely hard with heat and time, like on a car, it retains it's flexibility, so doesn't crack easily, like cellulose and other hard paints can. Bob. Hi Bob, I notice that the smokebox door has dulled slightly now it's fully cured. I'm tempted to paint all of it with this amount of matt, it looks pretty good. The only worry is how to spray the more complex parts without being able to touch them up if I don't go for a full gloss. |
|
|
|
Post by chris vine on Jul 29, 2020 10:59:53 GMT
Hi Roger,
For touching up, if you only apply the paint with a brush to the very tiniest area it will hardly show.
The mistake is to "fanny" it in like decorators do. You might think that if you go for a large area with a rough/undefined edge then it will show less. The trouble is that if the surface texture is not the same as the original, then there is a very large patch for your eyes to find. A tiny spot where a chip happened is quite difficult to see, even if the texture if rather different.
Chris.
|
|
|
|
Post by Roger on Jul 29, 2020 18:06:53 GMT
I don't think I've shown this before, but this is the layer being printed where it's bridging the gyroid infill pattern. It was initially a surprise to me that you could bridge big gaps. These ones are only small. It's possible to bridge 20 or 30mm without too much sagging if the printer is set up well. You can see that it's sagged slightly because the gyroid infill pattern is showing through.  20200729_122931 20200729_122931 by Roger Froud, on Flickr Anyway, it's a holder for the AirBrush which doesn't sit very well on its glass jar.  20200729_154306 20200729_154306 by Roger Froud, on Flickr  20200729_154538 20200729_154538 by Roger Froud, on Flickr Here I've used the AirBrush at about 15PSI and a tiny spray pattern to get into all the corners and around the rivets and nuts of the steps. The pressure is so low that it doesn't want to restart if you stop spraying, so I just got it going how I wanted and kept it spraying as I moved around. The amount of paint delivered is tiny, so it's possible to get to within about 10-15mm of the work and still be able to stay there for several seconds as the paint finds its way into the required places. Maybe it's possible to do this with a larger gun, but this works a treat.  20200729_173113 20200729_173113 by Roger Froud, on Flickr I did the same thing which this...  20200729_173133 20200729_173133 by Roger Froud, on Flickr ... and the washouts on the boiler wrapper. I tried this before, but ran into trouble because I didn't reduce the pressure and paint pattern sufficiently. This time it worked out much better. It's only a light coating, just enough to colour in all the detail without causing it to show through when it's oversprayed with the larger gun. At least, that's the idea! I'll let it go off and then touch the edges with some very fine wet and dry to make sure it's not going to show if the paint looks like it might. I've decided that I'm going to use the Full Gloss from Precision Paints for this unless I run into trouble doing that. I've tried to source an alternative from Trimite, but the minimum order quantity is 5L at £22.06/L. The range that's suitable is Q58, which is available in full-gloss, semi-gloss, eggshell and matt. It's a shame that it's not sold in 1L quantities. There's an opportunity for someone to buy it and sell it on in small cans with a nice markup!  20200729_173141 20200729_173141 by Roger Froud, on Flickr |
|
|
|
Post by Roger on Jul 30, 2020 17:23:16 GMT
It's been a very productive day on the painting front, with far more accomplished than I could have hoped for. I mixed a 250mL can of Gloss Black with 62mL of thinners for all of this. I'd already done one coat of semi-gloss on these bands, so I finished them with a coat of full gloss after a very light rubbing down.  20200730_124348 20200730_124348 by Roger Froud, on Flickr I've also painted the throatplate, the four sets of steps...  20200730_124400 20200730_124400 by Roger Froud, on Flickr ... the firebox cladding...  20200730_124408 20200730_124408 by Roger Froud, on Flickr ... and the barrel wrapper. I'm staying out of there until tomorrow so as not to raise any more dust. We'll see how good or bad it all is then. I'm using a reasonable amount of side shaping air to make a tall elliptical spray pattern. I'm not using a particularly large delivery, it's taking about about 3 seconds to traverse 100mm, then overlapping about 30mm. I can see it laying down a continuous layer as I do each pass. I can see the spray landing gently on the preceding pass as I do, and that seems to produce a continuous film. The steps were done gingerly from about 120mm away, turning them to get at all the faces. If it didn't seem quite wet enough, I carefully dusted a bit more on, and that seemed to blend in and flow out. I've still got a lot to learn about the rate and manner of application, focusing on how it ought to look as it progresses. I'm still pretty nervous about spraying the bunker and tanks, but at least it does seem possible.  20200730_131548 20200730_131548 by Roger Froud, on Flickr I've ordered two of these tins of Black Enamel from eBay which is at least a third of the price of that bought from Precision Paints. I'll experiment with that to see if it's a viable and much more cost effective alternative. |
|
JonL
Elder Statesman
 WWSME (Wiltshire)
Posts: 2,907
|
Post by JonL on Jul 30, 2020 18:41:44 GMT
I'm hungry to see the finished locomotive now. It's like the conclusion to a long running drama! (I mean that in the nicest possible way, it's been great to follow)
|
|
|
|
Post by Roger on Jul 30, 2020 20:17:23 GMT
I'm hungry to see the finished locomotive now. It's like the conclusion to a long running drama! (I mean that in the nicest possible way, it's been great to follow) I'm keen to get it finished too, it's taken more time than I wanted to give up to any project. Still, once you've got so far, there's nothing for it but to dig deep and keep going. At least I can finally see the end, even though it's certainly a year away. |
|
|
|
Post by delaplume on Jul 31, 2020 2:39:38 GMT
Hi Roger,
Remember the old saying}---The night is darkest just before dawn ??..........Keep your eye on the ball and see the job through to the end...
Incidentally I was chatting with John Robinson recently.....He was SVR Bridgnorth Works Foreman until his retirement and I knew him also back in the early days as a volunteer.......I'm doing some work for him and his son involving overhauling a high mileage Simplex........the conversation came around to painting and as promised a while ago I asked about the livery worn by 1501 during it's lifetime..........He confirmed that in BR days it was all-over Black and unlined, then Red at the NCB ........... The lined livery you currently see it in was applied by the owning group at Bridgnorth...
|
|
|
|
Post by ettingtonliam on Jul 31, 2020 5:55:46 GMT
I don't know about 1501, but I've got a photo of 1504 in BR ownership, pre 1957, and its in gloss black, fully lined.
|
|
|
|
Post by Roger on Jul 31, 2020 7:14:35 GMT
Hi Roger, Remember the old saying}---The night is darkest just before dawn ??..........Keep your eye on the ball and see the job through to the end... Incidentally I was chatting with John Robinson recently.....He was SVR Bridgnorth Works Foreman until his retirement and I knew him also back in the early days as a volunteer.......I'm doing some work for him and his son involving overhauling a high mileage Simplex........the conversation came around to painting and as promised a while ago I asked about the livery worn by 1501 during it's lifetime..........He confirmed that in BR days it was all-over Black and unlined, then Red at the NCB ........... The lined livery you currently see it in was applied by the owning group at Bridgnorth... This is the only photo I have is of 1500 in BR days, and that locomotive just has the crest on the tank and no lining. So I guess they were all individuals, and you can't assume something about one from the other.  1500 - 004 1500 - 004 by Roger Froud, on Flickr Anyway, I'm modelling it as it is today, so it will get the lining treatment which I prefer anyway. It looks a bit plain with big slabs of Black without something to break it up. |
|
|
|
Post by delaplume on Jul 31, 2020 10:53:13 GMT
I don't know about 1501, but I've got a photo of 1504 in BR ownership, pre 1957, and its in gloss black, fully lined. That's interesting.......Any chance you could post it on here for us to have a look at ?? |
|
davidk
Active Member

Posts: 32
|
Post by davidk on Jul 31, 2020 12:05:41 GMT
I have a copy of Pannier Papers No.6 by Ian Sixsmith. This covers 1366 and 15xx loco's.
In the book there are photographs of 1503, 1504 and 1505 fully lined for part of their careers.
Ian says that just these three received their lining in the mid-1950s. They later returned to plain black.
Hope this is of interest!
David
|
|
|
|
Post by ettingtonliam on Jul 31, 2020 13:46:02 GMT
Hi Roger, Remember the old saying}---The night is darkest just before dawn ??..........Keep your eye on the ball and see the job through to the end... Incidentally I was chatting with John Robinson recently.....He was SVR Bridgnorth Works Foreman until his retirement and I knew him also back in the early days as a volunteer.......I'm doing some work for him and his son involving overhauling a high mileage Simplex........the conversation came around to painting and as promised a while ago I asked about the livery worn by 1501 during it's lifetime..........He confirmed that in BR days it was all-over Black and unlined, then Red at the NCB ........... The lined livery you currently see it in was applied by the owning group at Bridgnorth... This is the only photo I have is of 1500 in BR days, and that locomotive just has the crest on the tank and no lining. So I guess they were all individuals, and you can't assume something about one from the other. 1500 - 004 by Roger Froud, on Flickr Anyway, I'm modelling it as it is today, so it will get the lining treatment which I prefer anyway. It looks a bit plain with big slabs of Black without something to break it up. Absolutely, and it will look stunning lined. From that photo, its so filthy that it might be fully lined and you'd never know - the insignia is only just visible! |
|
|
|
Post by ettingtonliam on Jul 31, 2020 13:50:04 GMT
I don't know about 1501, but I've got a photo of 1504 in BR ownership, pre 1957, and its in gloss black, fully lined. That's interesting.......Any chance you could post it on here for us to have a look at ?? Sorry Alan, its in a book, its in 'An Outline of G.W Locomotive Practice 1837-1947' by Harold Holcroft, Locomotive Publishing Company, published 1957, page 152. |
|
|
|
Post by delaplume on Aug 1, 2020 10:40:00 GMT
That's interesting.......Any chance you could post it on here for us to have a look at ?? Sorry Alan, its in a book, its in 'An Outline of G.W Locomotive Practice 1837-1947' by Harold Holcroft, Locomotive Publishing Company, published 1957, page 152. Well, that was an useful trawl of my library and many thanks for the reference.........It must have been one of the first books I bought as it has 2/- marked in pencil within the tatty fly leaf.......... Yes, you're quite right......p152, centre photo which is attributed to a "G. Wheeler"...... ( Geoffrey Wheeler ?? ) and clearly shows lining on the boiler, cabside and cylinder covers.......the latter being a vertical pair at front and rear ends, ie}---the classic BR style......I tried to find any reference to that photo within the book but no luck I'm afraid.... I then looked at J.H.Russell's A Pictorial Record of Great Western Engines, Vol. 2....pages 228 / 229 which covers the 15xx class......Here we can see the Class leader, 1500 as outshopped in plain, gloss Black as you might expect...... Intriguing !!......... Let's not clog Roger's thread with this any more but maybe start a new thread to research it further ??...........Perhaps the Great Western Society people could lend a hand ?? |
|
|
|
Post by Roger on Aug 1, 2020 15:39:26 GMT
With a cool start to the day, I thought I'd finish pu rubbing down the frame and mask it up.  20200801_143114 20200801_143114 by Roger Froud, on Flickr  20200801_143124 20200801_143124 by Roger Froud, on Flickr  20200801_143132 20200801_143132 by Roger Froud, on Flickr  20200801_143142 20200801_143142 by Roger Froud, on Flickr  20200801_150057 20200801_150057 by Roger Froud, on Flickr However, sods law, the Sun came out with a vengence, and the temperature was too hot really by the time I'd mixed the paint and finally got ready. I should have just emptied the gun and put it off, but I'm busy tomorrow. Anyway, it didn't go well, there's too much paint on the top inside part of the buffer, but it did flatten out reasonably well. That part isn't seen, so it might be good enough to leave. I'll have to wait until it's dry so I can move it and get a really good look at the whole area.  20200801_153722 20200801_153722 by Roger Froud, on Flickr However, I abandoned this attempt at spraying the frame, it was drying too quickly to be able to get enough paint on and flattened. Sometimes you have to stop before you make it even worse. There's too much paint on the top edge and not enough elsewhere. I'll have to wait for that to fully harden and rub that back before having another go. I'm not convinced that I've got the right setup for the gun for this. The front had to have a fairly large spray pattern, because I'm trying to cover the various parts without being able to get very close. However, I think it might work out better to work with a significantly smaller pattern and get in closer where there's more detail to get around. Anyway, the takeaway from this is that it needs to be a lot cooler when I attempt this the next time so it's got more time to flatten out. You live and learn.  20200801_153732 20200801_153732 by Roger Froud, on Flickr P.S. The lighting on that last shot makes it look a lot worse than it does at other angles, but I wanted to show it at its worst. |
|
|
|
Post by 92220 on Aug 1, 2020 15:53:55 GMT
Hi Roger.
The ideal temperature for spraying is 15.6C or 60F. As it gets hotter the solvents flash off quicker and so the coating doesn't flow out. As long as it isn't too much hotter, you can use a higher flashpoint solvent to thin the paint. If you are using quick drying thinners, try using white spirit or turps sub instead. Same proportions but the sprayed coating will have a bit longer to flow out....not a lot but it will definitely help. Anything over 21 C (70F) really is no good for spraying.
Bob.
|
|


