|
|
Post by Roger on Jul 26, 2022 16:30:42 GMT
15xx locomotives were an odd bunch. There was no sense in making them at all really, when Diesels were already available and much better at the job. Normal GWR rules were torn up and discarded on many features.
|
|
JonL
Elder Statesman
 WWSME (Wiltshire)
Posts: 2,909
|
Post by JonL on Jul 27, 2022 19:28:28 GMT
They certainly had brass SV bonnets, which is also unusual for panniers. Gary I believe all GWR safety valve bonnets were made of brass - but the paintshop painted them all over green or black, depending on the loco colour, except for passenger classes. Of course, some keen types at the sheds duly scoured (some of) them back to brass when they could! But number plates could be brass or cast iron. They all cost a fortune on the relics market these days, but with a big premium for brass ones (so my rich friends tell me....). Malcolm [/quote] And great care needs to be taken if buying, apparently the market is flooded with replicas which far outnumber the originals. |
|
jma1009
Elder Statesman
Posts: 5,901
|
Post by jma1009 on Jul 27, 2022 21:38:57 GMT
I agree that all GWR safety valve bonnets (and later BR Western Region of same) would be brass. Whether painted over or not.
I don't know much about the number plates being made of cast iron and being painted as if they were of brass, or white paint, but I do know a bit about the period post WW2 of the backgrounds being painted red instead of black. This principally relates in my own respect to those survivors of the Dean Goods class.
|
|
|
|
Post by Roger on Jul 30, 2022 18:51:54 GMT
The 3D printed handle wasn't robust enough, so here's a Mild Steel one. It's just a piece of 8mm rod. I could sculpt the end and taper it, but it's just a tool that will only get used a few times, not a work of art. 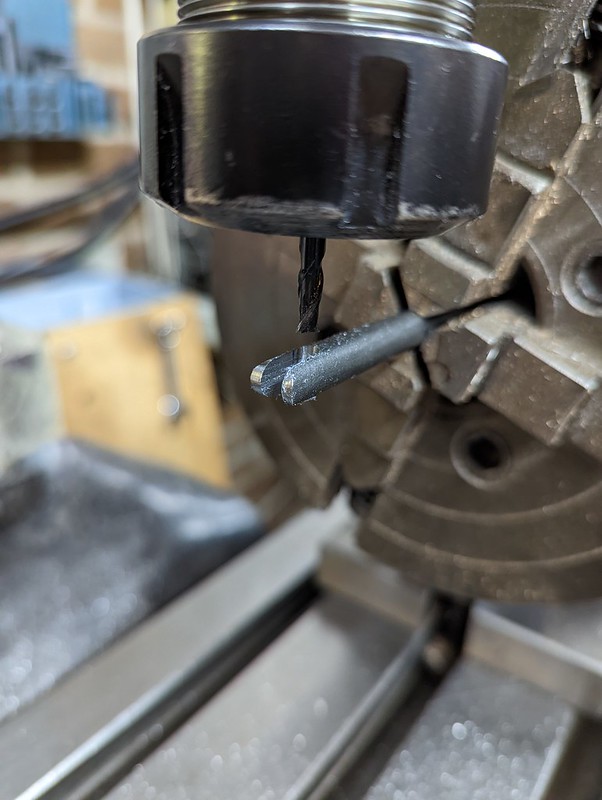 PXL_20220730_182543028 PXL_20220730_182543028 by Timothy Froud, on Flickr I made the slot nice and long so that the sides would easily be compressed by the M2 Cap Screw to form the friction lock. It's plenty good enough for what I need, and the needles just push in and twist to lock. Finally I can get on with some experiments.  PXL_20220730_184408421 PXL_20220730_184408421 by Timothy Froud, on Flickr |
|
|
|
Post by jon38r80 on Jul 31, 2022 10:17:56 GMT
Hope that works without blotting or for that matter blocking up. On the commercial ones the annoying little needle inside the the delivery tube usualy worked as a valve ( it stuck out a bit frome the bottom of the tube). Annoyingly they also used to seize pretty quicly on the smaller sizes as the ink dried up in the tube even when you were using them. Rotring pens were better than Uno but for vey fine lines and lettering neither stayed clean for long.
|
|
|
|
Post by Roger on Jul 31, 2022 11:32:24 GMT
Hope that works without blotting or for that matter blocking up. On the commercial ones the annoying little needle inside the the delivery tube usualy worked as a valve ( it stuck out a bit frome the bottom of the tube). Annoyingly they also used to seize pretty quicly on the smaller sizes as the ink dried up in the tube even when you were using them. Rotring pens were better than Uno but for vey fine lines and lettering neither stayed clean for long. It's just an experiment, if it works then all well and good. If it doesn't, even with modifications, I'll do something else. There are huge differences in the sizes that I need for this. The one shown is about 0.5mm, but the large one is much bigger. You know what I'm like, I enjoy a challenge and this is a tricky one. It may be that a Bow Pen is a better option for the really fine lines. We'll see. |
|
|
|
Post by Roger on Jul 31, 2022 15:51:12 GMT
I thought I'd try some lines with unthinned paint, fully expecting this not to work. I used the air line to get the paint to start flowing, and then did these lines at a variety of speeds. I even went back over the same line on one of them.  PXL_20220731_145545490 PXL_20220731_145545490 by Timothy Froud, on Flickr This is the same but on a painted surface with interesting results.  PXL_20220731_145533313 PXL_20220731_145533313 by Timothy Froud, on Flickr You do have to go very slowly, else the paint won't flow fast enough to form the line. The good thing about this kind of pen is that the reservoir can be filled with a syringe, and the paint forced through to start it. It can also be used to flush it through with thinners.  PXL_20220731_145600811 PXL_20220731_145600811 by Timothy Froud, on Flickr So my conclusion is that this is going to work. |
|
|
|
Post by chris vine on Jul 31, 2022 21:06:33 GMT
Hi Roger,
I found exactly the same thing with the Bob Moore lining pen.
If you use the paint unthinned, you have to move the pen very slowly and evenly. Otherwise the line doesn't fill out properly and varies in width.
I didn't want to add thinner because then the line didn't seem to be fully opaque in one application. Trying to put a second coat/line over the first didn't appeal to me!!!!
I keep wondering if you can make a sliding device to mount your pen in, and then put it in the milling head (not spinning). Then move the job around under CNC control at a suitably slow and constant speed.
I suggested this in the book, but you might be the first person to try it (and make it work of course!)...
Chris.
|
|
|
|
Post by Roger on Jul 31, 2022 21:33:03 GMT
Hi Roger, I found exactly the same thing with the Bob Moore lining pen. If you use the paint unthinned, you have to move the pen very slowly and evenly. Otherwise the line doesn't fill out properly and varies in width. I didn't want to add thinner because then the line didn't seem to be fully opaque in one application. Trying to put a second coat/line over the first didn't appeal to me!!!! I keep wondering if you can make a sliding device to mount your pen in, and then put it in the milling head (not spinning). Then move the job around under CNC control at a suitably slow and constant speed. I suggested this in the book, but you might be the first person to try it (and make it work of course!)... Chris. Hi Chris, The width of the line didn't seem to vary that much when I was going slowly, but that may have been more luck than skill. I'm afraid I can't automate this process because the lines go around the top and bottom curves. It's a great idea for flat surfaces though, and it would alleviate the need for a guide. I might be able to feasibly do that on the Pannier Tanks, but the Cab and Bunker lines go over the rivets in places so I don't think it would work there. |
|
|
|
Post by doubletop on Aug 1, 2022 9:06:06 GMT
Hope that works without blotting or for that matter blocking up. On the commercial ones the annoying little needle inside the the delivery tube usualy worked as a valve ( it stuck out a bit frome the bottom of the tube). Annoyingly they also used to seize pretty quicly on the smaller sizes as the ink dried up in the tube even when you were using them. Rotring pens were better than Uno but for vey fine lines and lettering neither stayed clean for long. I believe that is one of the reasons for the wire that goes through the tip is mounted the way it is. See here  The wire component sits in the tip and the little black cap holds it in place. However, it is a loose fit and the wire component rattles when you shake the pen. That keeps the ink flowing. I recall that constant shaking of the pens became an automatic response when using them. Pete |
|
|
|
Post by doubletop on Aug 1, 2022 9:32:19 GMT
Of course while on the subject of painting lines there are always these. I have one and they do a fantastic job. Apparently pretty tight radious corners can be done, but I've never tried it. www.beugler.com/Pete |
|
|
|
Post by Roger on Aug 1, 2022 9:54:28 GMT
Hope that works without blotting or for that matter blocking up. On the commercial ones the annoying little needle inside the the delivery tube usualy worked as a valve ( it stuck out a bit frome the bottom of the tube). Annoyingly they also used to seize pretty quicly on the smaller sizes as the ink dried up in the tube even when you were using them. Rotring pens were better than Uno but for vey fine lines and lettering neither stayed clean for long. I believe that is one of the reasons for the wire that goes through the tip is mounted the way it is. See here The wire component sits in the tip and the little black cap holds it in place. However, it is a loose fit and the wire component rattles when you shake the pen. That keeps the ink flowing. I recall that constant shaking of the pens became an automatic response when using them. Pete Hi Pete, I used to use those too, and can remember having to shake them like you say. The tube I've shown on my rudimentary pen is only 0.5mm bore, and I think a wire would only stop the thick paint from getting down to the tip. I guess you get a capillary action when the tube is small enough. On the bigger ones, I'm pretty sure it will need a wire. |
|
|
|
Post by Roger on Aug 1, 2022 9:56:11 GMT
Of course while on the subject of painting lines there are always these. I have one and they do a fantastic job. Apparently pretty tight radious corners can be done, but I've never tried it. www.beugler.com/Pete Hi Pete, That looks like a really useful tool for larger lines. being able to go round corners like that is really handy. I did wonder whether to make a wheel type of arrangement myself. I'll see how successful the simpler solution is and then decide on what to do based on that. |
|
|
|
Post by doubletop on Aug 1, 2022 10:03:30 GMT
Of course while on the subject of painting lines there are always these. I have one and they do a fantastic job. Apparently pretty tight radious corners can be done, but I've never tried it. www.beugler.com/Pete Hi Pete, That looks like a really useful tool for larger lines. being able to go round corners like that is really handy. I did wonder whether to make a wheel type of arrangement myself. I'll see how successful the simpler solution is and then decide on what to do based on that. Roger The smallest standard wheelhead is 1/64" (0.4mm) going up in 1/64" steps to 1/8", but appear to miss 5/64" for some reason. The largest single wheel is 5/16" and they also do a range of double wheels Pete |
|
|
|
Post by steamer5 on Aug 1, 2022 10:14:00 GMT
Hi Pete,
Now if you could use the double wheel one to do two paint colours at a time we would be on to something! Guess rivets are always going to be a problem!
Cheers Kerrin
|
|
|
|
Post by chris vine on Aug 1, 2022 10:15:23 GMT
Yes, the Beugler does make perfect lines and can go round quite tight radii too.
However, it is more difficult to guide these than the needle type pens. Especially if the guiding needs to be really accurate as when you are laying one line right next to another.
If there were any substantially straight lines, eg on edges of footplates and round boiler bands etc, then I used the beugler. You will have to check the width of the line it puts down as they tend to be a bit wider then the thickness of the wheel
Chris.
|
|
|
|
Post by doubletop on Aug 1, 2022 20:21:55 GMT
Yes, the Beugler does make perfect lines and can go round quite tight radii too. However, it is more difficult to guide these than the needle type pens. Especially if the guiding needs to be really accurate as when you are laying one line right next to another. If there were any substantially straight lines, eg on edges of footplates and round boiler bands etc, then I used the beugler. You will have to check the width of the line it puts down as they tend to be a bit wider then the thickness of the wheel Chris. Chris We had both suggested using the pens with CNC but how about CNC Beugler? OK it would need a 4th axis to turn the pen around the corners, but with the Beugler spring loaded a constant pressure could be applied and it wouldn't dig in. Now we just need someone to investigate....... Pete |
|
|
|
Post by doubletop on Aug 1, 2022 20:25:26 GMT
Hi Pete, Now if you could use the double wheel one to do two paint colours at a time we would be on to something! Guess rivets are always going to be a problem! Cheers Kerrin Kerrin Double wheel and two paint colours would be pushing the technology a bit. It could probably cope with rivets there would just be a small gap, as the roller lifted off the flat portion to ride over the rivet, that would need a bit of a touch up Pete |
|
|
|
Post by Roger on Aug 2, 2022 21:44:22 GMT
I 3D printed four flat templates with undercuts for guiding the pen on either side. I made those from PLA so that they would be fairly rigid, but also have a low melting point so I could form them with the aid of a hot air gun. Here's a 6mm thick former being machined from a piece of clear Acrylic sheet. 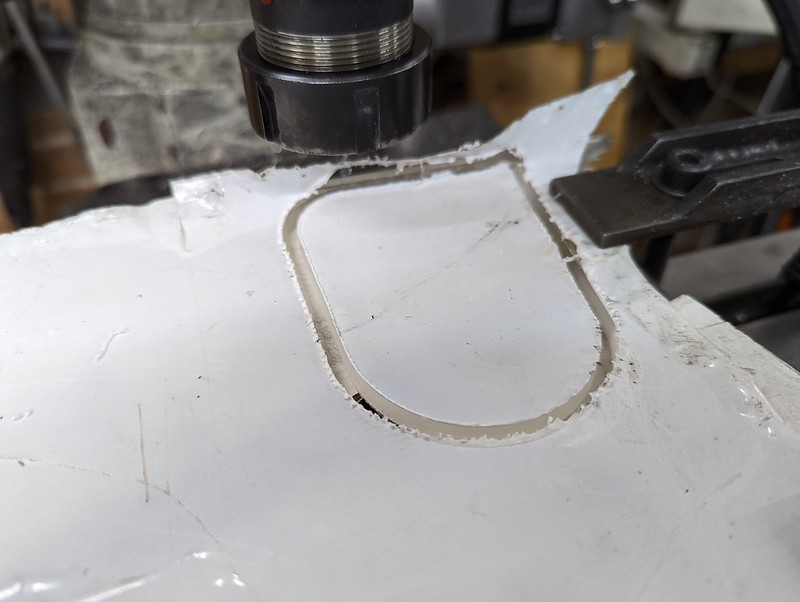 PXL_20220731_193424658 PXL_20220731_193424658 by Timothy Froud, on Flickr And here it is with a strip being held around the former with an elastic band after heating and encouraging it to follow the contours. I initially formed the strip around the cylinder, but it ended up being wavy. Doing it this way means I could heat the strip and press a second metal sheet on top to keep it flat. 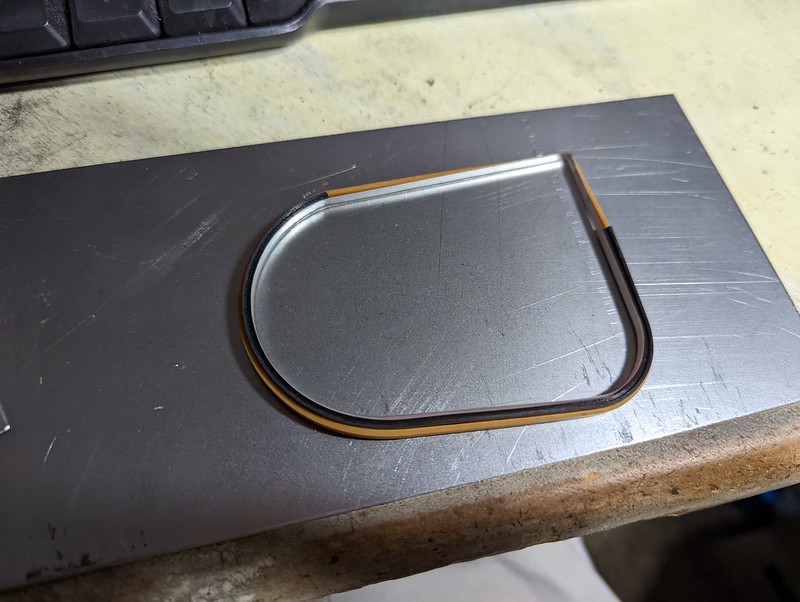 PXL_20220731_205643272 PXL_20220731_205643272 by Timothy Froud, on Flickr Here are the strips being held onto the Cylinder Wrapper with elastic bands. I set them 10.5mm from the ends using a Steel rule to measure them. Once that was done, I used some masking tape to hold the ends firmly so they don't move.  PXL_20220802_131033613 PXL_20220802_131033613 by Timothy Froud, on Flickr 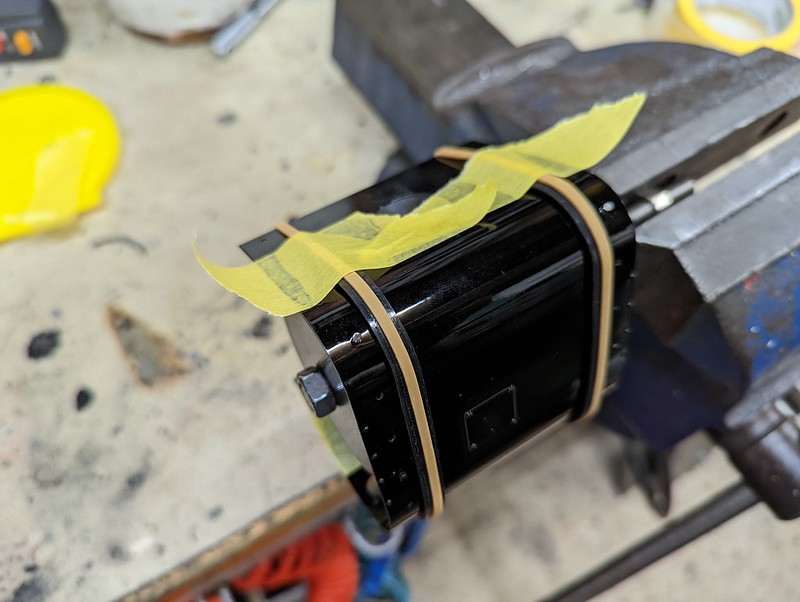 PXL_20220802_131043181 PXL_20220802_131043181 by Timothy Froud, on Flickr I used masking tape to remove any dust, and did the usual pre-painting precautions with the fans and filter and packing tape to remove dust and cobwebs on the lamps and ceiling. I tried a dry run using several ways to hold the pen, and ended up holding it to the front. That way the part I was lining was at about 45 degrees to the horizontal and I could see what I was doing. The technique was to hold the handle, out of view on the right, to carefully turn the assembly to bring each part to that angle. 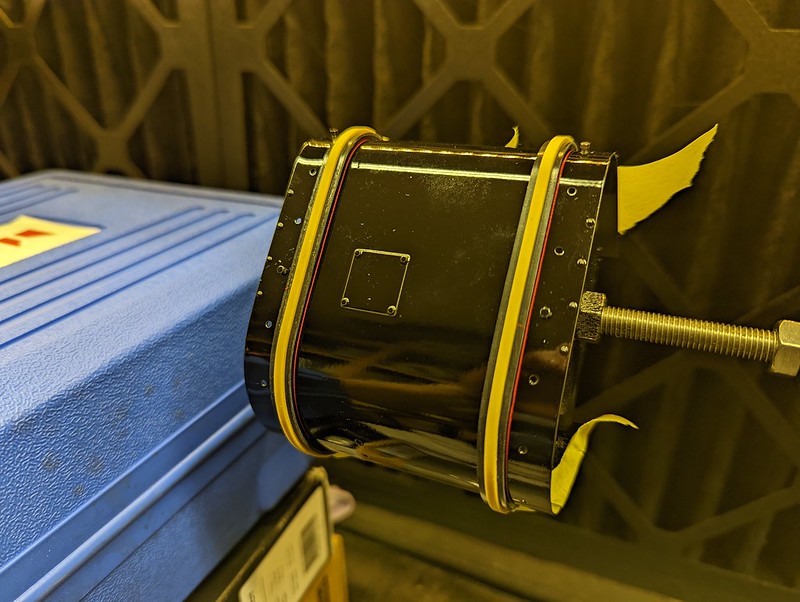 PXL_20220802_193351395 PXL_20220802_193351395 by Timothy Froud, on Flickr Ok, it's not the most precise job, but it's good enough. 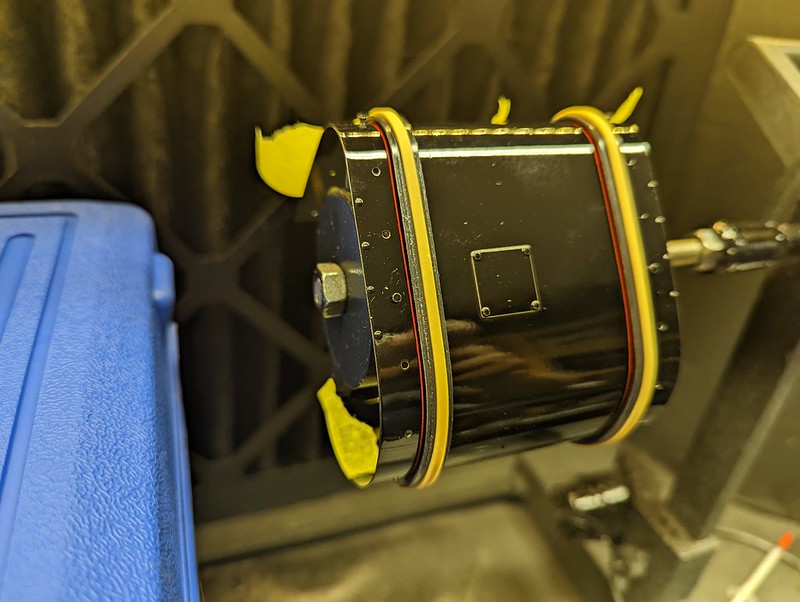 PXL_20220802_193402406 PXL_20220802_193402406 by Timothy Froud, on Flickr The idea is to carefully remove the guides in the morning. Hopefully they won't have marked the paint. 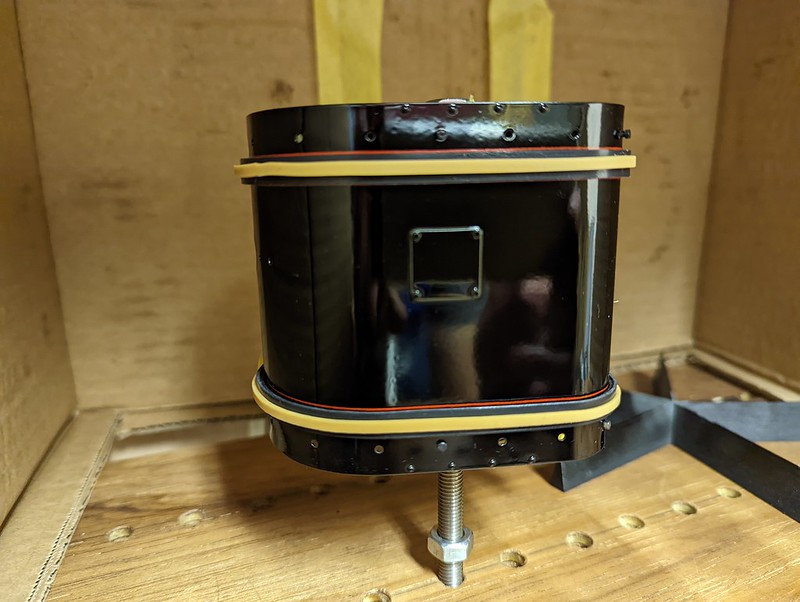 PXL_20220802_193419158 PXL_20220802_193419158 by Timothy Froud, on Flickr |
|
dscott
Elder Statesman
Posts: 2,438
|
Post by dscott on Aug 2, 2022 23:30:24 GMT
Only on here you can get away with a photo of a syringe full of red stuff!!!
Then again noting your neighbour Christs Hospital the pondering stopped.
All looking wonderful Roger.
David and Lily.
|
|


