|
|
Post by Cro on Feb 25, 2019 17:24:56 GMT
Well I just made a bit of a balls up! I went to clear our Flickr of unwanted photos in a certain album (sync'd from my phone so not needed) and I ended up deleting the lot! So most of this thread is a bit of a mess now but it seems to have left a few in there. I don't think I'll bother trying to fix it as well I will just have no idea which photos I actually want!
I will upload some photos this week of a new distraction and my current location, a hint, its very white!
Adam
|
|
JonL
Elder Statesman
 WWSME (Wiltshire)
Posts: 2,911
|
Post by JonL on Feb 25, 2019 20:05:40 GMT
Is it a Dishwasher? A Polar Bear? A Lighthouse? A Polo Mint?
The suspense is killing me!
|
|
|
|
Post by 92220 on Feb 25, 2019 20:12:38 GMT
Hi Adam.
I seem to have lost almost all your Flickr photos. Is there a problem with Flickr or is it my computer?
Bob.
|
|
|
|
Post by Cro on Feb 25, 2019 20:38:08 GMT
Hi Adam. I seem to have lost almost all your Flickr photos. Is there a problem with Flickr or is it my computer? Bob. Bob, nope simply my balls up! I went to delete all the ones from my account that were from my phone and just taking up space but turns out i deleted everything! Adam |
|
|
|
Post by 92220 on Feb 26, 2019 8:33:31 GMT
OUCH!!! That is very unfortunate Adam. I hope that doesn't mean you have lost them permanently. That would be a real disaster for you!
Bob.
|
|
stevep
Elder Statesman
Posts: 1,070
|
Post by stevep on Feb 26, 2019 9:13:55 GMT
...and for us!
|
|
|
|
Post by terrier060 on Feb 26, 2019 13:46:13 GMT
YES INDEED. Have you tried contacting Flickr to see if they are recoverable? I did a similar thing but managed to put them back on as I had them all in segregated folders and was able to identify most of them. I have said several times is there a simple way of each of us keeping a personal backup, because this site is very precious with tons of information? Most of us could write a book about our experiences - and I would consider it the best site out there for serious model engineers (being fair, I suppose, mostly locomotives). If this Forum, or image library ever closed down it would be a great loss. There have already been several scares with Flickr and Photobucket |
|
dscott
Elder Statesman
Posts: 2,438
|
Post by dscott on Feb 27, 2019 3:19:06 GMT
YES! With Alan Stepneys passing his super web site vanished sadly!
I have put our Photos onto three computers but have now begun to get a new memory card once I have filled one up!
You can't go wrong with saving these and if something happened!!!
I also take the external Hard Drive out with us.
Then I have one of these that failed with lots of drawings on!!!
Being Cautious!
David and Lily.
|
|
|
|
Post by doubletop on Feb 27, 2019 8:40:53 GMT
|
|
|
|
Post by Cro on Feb 27, 2019 14:14:28 GMT
Pete,
Sadly the second link dates back to 2011, I may contact them and ask but I fear they are gone for good....I have the originals, well most of them I imagine but it would take me so long to go back and try and replace them and it's time I just don't have. Such is life!
Adam
|
|
stevep
Elder Statesman
Posts: 1,070
|
Post by stevep on Feb 27, 2019 17:29:59 GMT
I guess it's a bit late now, but if I may, I will share with you what I do.
Having spent 30 years in the computer industry, I am very conscious of the need to have back ups. I have an external drive permanently attached to my computer, with a simple script that copies any files that have been altered on the main disk to the external one. As it only copies the altered files, it takes just a few seconds to run every day.
So if my main disk should crash, I have a copy on the external drive.
I have a second external drive that I keep in my workshop, and on the first day of every month, I bring it into the house and attach it to the computer. I then run another script that copies all the files on the hard drive to the second external disk. This takes several hours to run, and when it is completed, and I have flushed the buffers, I take the external drive back to the workshop.
As this is a separate building, if our house burnt down, I would have a copy of everything on the drive in the workshop.
|
|
|
|
Post by terrier060 on Mar 1, 2019 11:49:16 GMT
Please Adam try and spend a little time putting in the important images again - I, and I am sure most others love seeing all your miniature fittings in such wonderful detail. You have titles still on the thread and it would be good if you could replace the important ones which help your story. I replaced about 50 of mine when I made a similar balls-up and it did not take as long as I thought.
Ed
|
|
|
|
Post by 92220 on Mar 1, 2019 17:24:36 GMT
Hi Adam.
I can still see all your Photobucket photos up to page 35. Then you changed to Flickr and that is when the photos disappear, so luckily you do still have your Photobucket photos. Hoping you can get your Flickr photos back. It would be disastrous to lose them permanently and have that 'hole' in the photographic record of the development of your range of superb fittings.
Bob.
|
|
|
|
Post by Cro on Mar 9, 2019 11:33:05 GMT
Morning All, This update is not strictly "Scale Fittings" but I post most of what I've been up to on here so why not a bit more. Recently I acquired a 5" B1 from an old friend, finished running loco but has been stored in his shed for 5+ years now. Still in great condition but it does need some minor commissioning work. I collected it a couple of weeks ago and after a week Skiing last Sunday I set to work to get it ready for a steam up prior to getting it to the club for a full boiler test so I ordered 3 sets of rolling roads from CMD engineering whilst I was in Austria half way up a mountain and they were waiting for me when I got home. It's just as well I decided to try it on air first though, there was some mention of problems with regulator and it turns out Steve had tried to have a look himself under the dome to only find a very dome bush and pickup pipe but what he had forgotten to do was seal the dome back up! Anyway, now on air and in full gear and off she goes very slowly....but the regulator was shut or at least I thought it was, at this point it had very little movement and something didn't feel right anyway, so I moved it to other extreme and its still going - C*&p! So I set to removing the regulator as the most sensible course to see what was going on, drastic as it may sound there was no other options. First off, Dome back off to remove pickup pipe and this is where the fun(!) started. The builder in his ultimate wisdom decided a brass pickup pipe would be a clever idea, I disagree! We have a rather soft, rather stuck brass tube that has de-zinc'd over time and just falls apart if I try to unscrew it.  Untitled Untitled by Adam Cro, on Flickr After a few attempts it was clear this was going no where and the only real answer was the destroy it and fix it later. So yesterday I set about to do this with drill in hand not really knowing how it would go.  Untitled Untitled by Adam Cro, on Flickr But I won! Once this was out, superheaters came out and the regulator slide out the back which you would think would make it all obvious but no I was still clueless, its clearly not made to drawing. 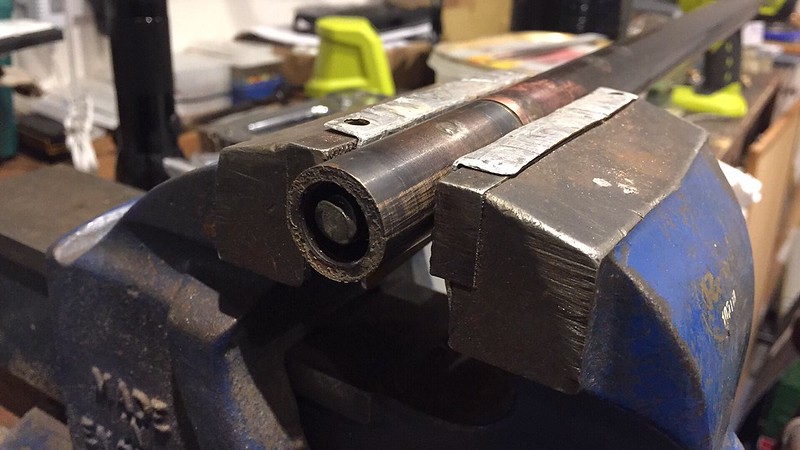 Untitled Untitled by Adam Cro, on Flickr As you can just see this is the rear of the regulator and it looks to have a 2 start LH style thread. This had a brass block on which the regulator handle was attached fitting inside the gland on the backhead, still I'm thinking this is a screw type valve. So I thought lets add some heat and see what happens....nothing! handle still solid and by this point I'm thinking I've got to make a new one but one more heat up (with more heat) led to a discovery. 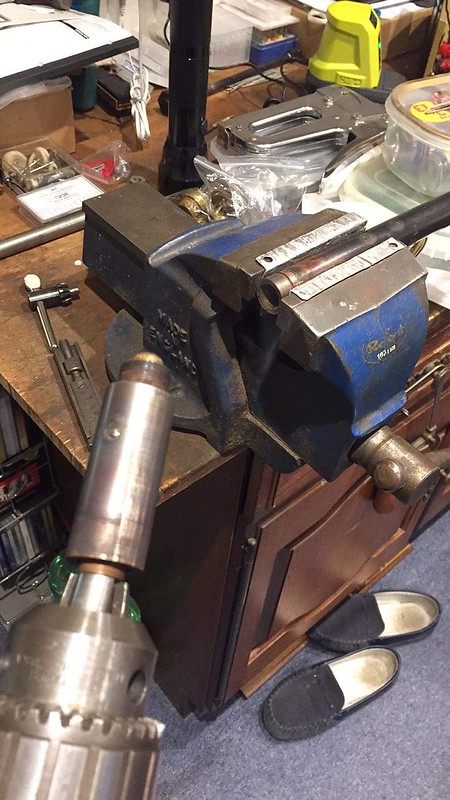 Untitled Untitled by Adam Cro, on Flickr Out the back came this bronze block revealing the valve seat and the tip of the spindle. I decided to just heat this part and try again but same thing, stuck solid! I then happened to be a bit clumsy and dropped it on the floor and suddenly the end of the spindle had disappeared.....this is no normal screw down valve, its a plunger on a LH thread. 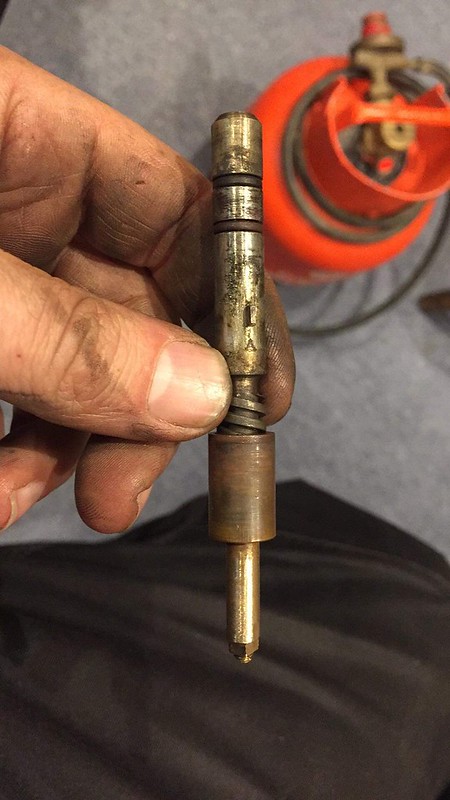 Untitled Untitled by Adam Cro, on Flickr Everything had become very clear now, the brass block held in its gland was in a fixed position allowed to rotate whilst the plunger slide in and out with a key way. Very clever, bit odd but clever. I'm happy I understand this now so 2 new O-rings, repair pickup pipe and this can go straight back in. I did have some other plans for the loco as the backhead is simply hideous at the moment. 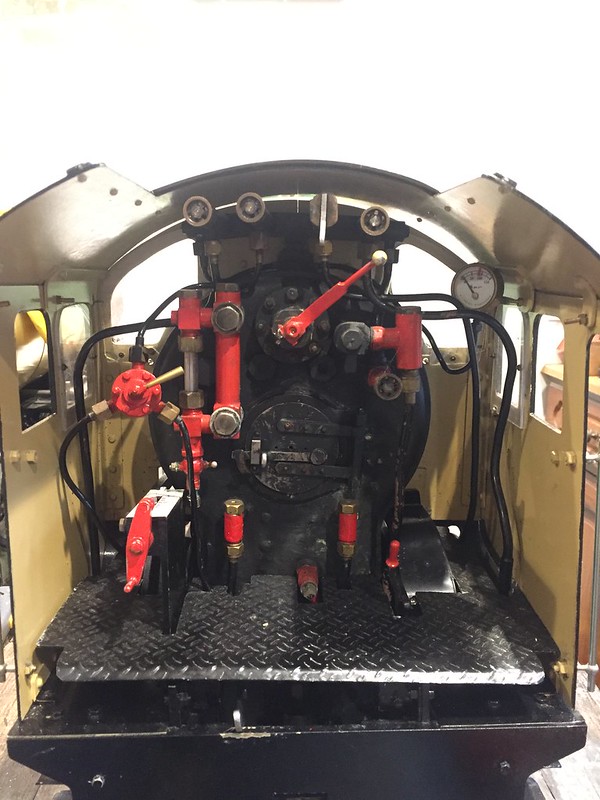 Untitled Untitled by Adam Cro, on Flickr I wanted to try be clever and cover it with a false backhead, add some nice scale fittings and jig things around a bit like this.  Untitled Untitled by Adam Cro, on Flickr But have since realised the blower valve has the longitudinal stay fitted to it and I am hesitant to remove it but left in place it will not let me do what I want. 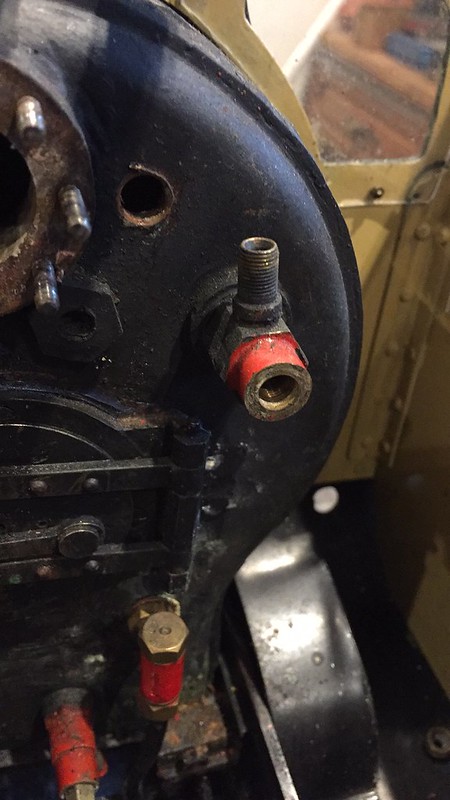 Untitled Untitled by Adam Cro, on Flickr Plus I would need to move the reverser to its correct position (left and forward in the cab) so for now I am thinking a simple tidy up (lose the red, new gauge glass, new regulator handle and valve handles possibly) and get it back on the rails. So thats where the new B1 stands at the moment, hopefully have it sorted soon! On other news Roger is not the only one tinkering with his 10x as John and I happen to have been working on our version MkII. You may remember last year I spent some time developing one without a visible clack valve with mixed success. Well the outcome was that it was possible, it does work but at the time I couldn't get it to pick up dry so John has set out to design a new, simpler version. He has produced a test body and proved the size and theory so he is now set to machining one up in casting. Here is the photo of the split turning fixture done on his CNC and he is ready to bore, sleeve (Due to a blow in the casting) and trial his design. 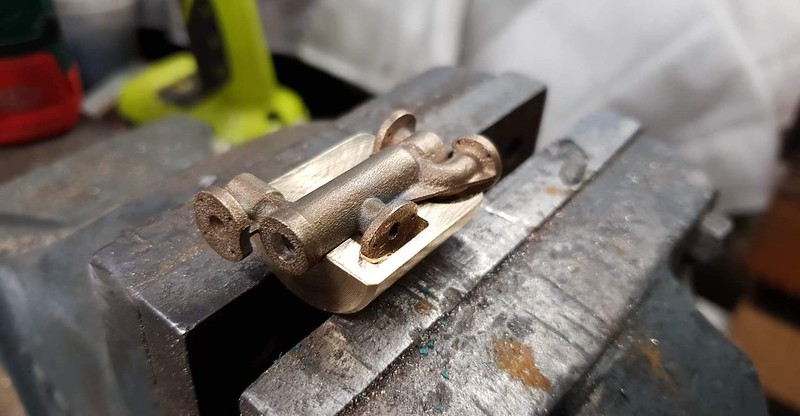 Untitled Untitled by Adam Cro, on Flickr Right, time to go look at Mortgages! Adam |
|
|
|
Post by 92220 on Mar 9, 2019 12:45:49 GMT
Hi Adam.
Looks like you have your hands full at the moment!! I'm sure you will win out in the end and end up with a much more realistic backhead!!
Hope the 10x works out because I want one when it's sorted.....please. You were also working on trialing an injector sleeve that carried all the cones, so that it could be fitted inside almost any outline injector body, such as the Type K exhaust injector, and end up with a fully working one.
Bob.
|
|
|
|
Post by Cro on Mar 9, 2019 19:34:20 GMT
Bob,
I think the backhead is easily doable but it's time at the moment, more important things first so just want to get it running for a while.
I'm confident this design should work for the injector and that means we wouldn't need the cartridge and oring seals I had on last one so it simplifies things a lot! That way the K Type can be a simpler casting using the same theory but bigger capacity.
Adam
|
|
dscott
Elder Statesman
Posts: 2,438
|
Post by dscott on Mar 10, 2019 0:20:54 GMT
I have one of your injector bodies and now have someone who needs it to complete a super to scale model!
Yes a large Prairie Tank by the man himself Trevor Shortland. Number 4121.
She is display only at the moment as she has boiler issues but once someone else is ready and in steam she can be
overhauled!
Looking good Adam.
David and Lily.
|
|
mbrown
Elder Statesman
Posts: 1,720
|
Post by mbrown on Mar 10, 2019 11:33:33 GMT
The regulator looks like a rather ingenious use of a standard domestic tap fitting (the post-1960s sort).
Malcolm
|
|
|
|
Post by Cro on Mar 19, 2019 6:41:41 GMT
Back in the workshop Sunday and a good day was had stood at the Myford on the manifolds. 6 standard in total (one I'm not speaking too until the drill removes itself from one of the holes) and 1 "super scale" as well as finishing off my super scale when I get that far on. Threads were machined over Christmas so it was a case of getting these in vertical slide and machining all faces, drilling all the holes and tapping any features that require it. Here we have one finished off ready for this particular customer who is happy to do the rest himself.  Untitled Untitled by Adam Cro, on Flickr And as a comparison between the super scale and standard here are two after being finished along side my one which is a little further on. 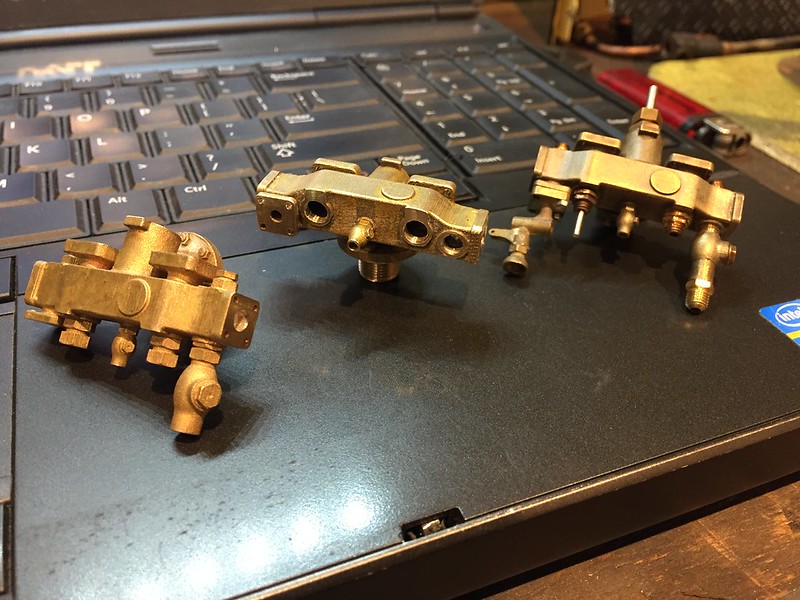 Untitled Untitled by Adam Cro, on Flickr And all of the work from Sunday. 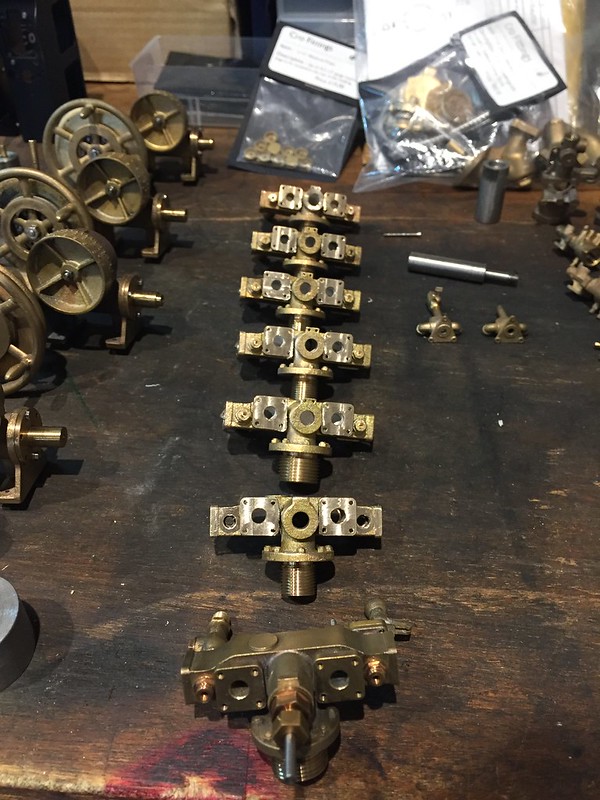 Untitled Untitled by Adam Cro, on Flickr As you can see above there are a few other things on the bench at the moment too. A few more sessions on the manifold then its time to complete gearboxes ready for paint before getting back to the steam brakes which will be seen through till the end before getting back onto anything else. 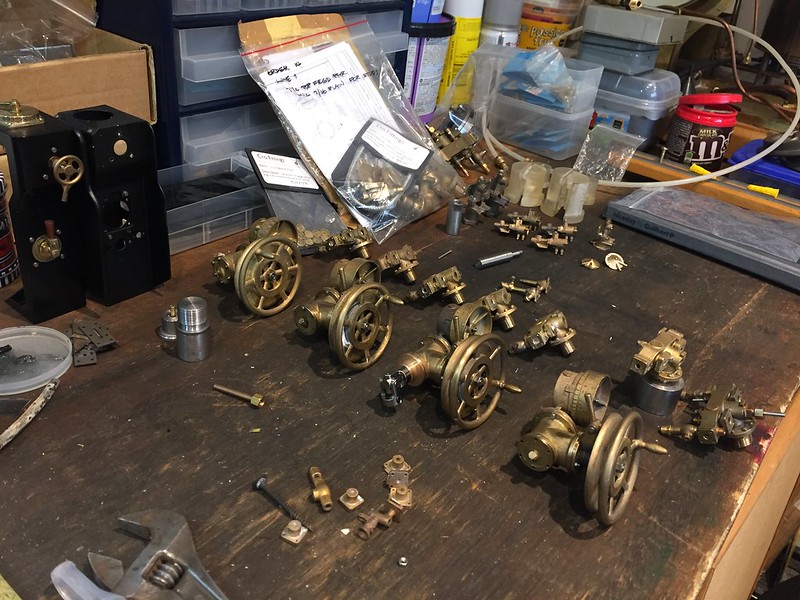 Untitled Untitled by Adam Cro, on Flickr Planned in for late April will be machining this lot of 5" BR Injector Steam Valves, I have all the required parts being CNC machined as a batch of 50 and a friend has made up a turning jig to make these a bit quicker and easier to machine so hopefully this lot won't take me too long to turn around. 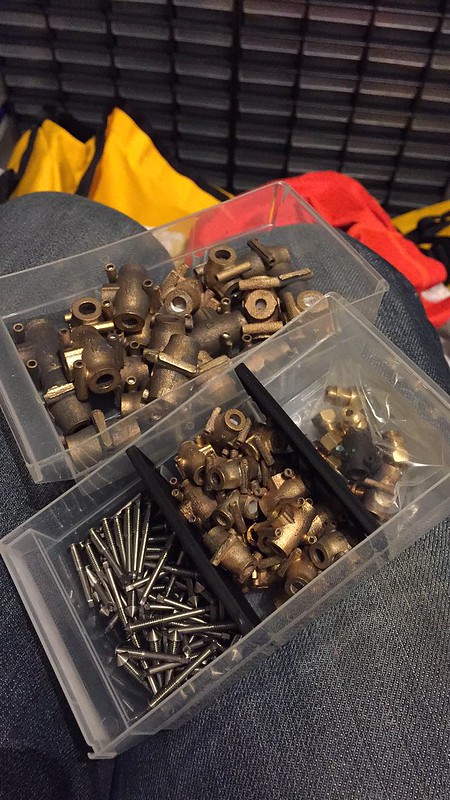 Untitled Untitled by Adam Cro, on Flickr I also had some news last night, the first cones were pressed into the 10x last night, watch this space! Adam |
|
|
|
Post by 92220 on Mar 19, 2019 9:28:53 GMT
Lovely work Adam......as always!
Bob.
|
|


