smallbrother
Elder Statesman
 Errors aplenty, progress slow, but progress nonetheless!
Posts: 2,269
|
Post by smallbrother on Jan 5, 2019 22:15:24 GMT
My workshop and storeroom are full. I need to get stuff moving out and sort out what direction to take. So, with a view to selling it, I have steamed up the Polly 1 on the rolling road. First steam up in more than 12 months, the regulator had seized. Anyway it raised steam in about 20 minutes, the regulator freed itself, everything worked, notched up forward and reverse, and I am now wondering whether to keep it and downsize..... In 7.25" I have a decent running Holmside and a Bagnall being put back together, the latter is proving much too big and heavy for me. Trying to mount the boiler, marking up/drilling the supports and the same with the smokebox is a small crane job. I don't have one, nor the room for one. I am in the early stages of building a 3.5" Juliet which is going nowhere with all the other stuff in the way. Decisions needed! Pete. Hi Pete, During last year I dabbled a bit with 7.25" gauge and bought a GWR 1366 tank loco on the basis that it was of the "small" type and would therefore fit in comfortably with my 5" gauge overall scenario........... Well, despite prior calculations re}---- weight and size, etc. the reality was such that it didn't pan out as expected so I sold it on and bought that 5" GWR Mogul instead.... Remember that in your case I'm mindful of the "Gobi Desert" your house and garden are part of ( LoL !!) especially the access passage, so would suggest the following}---- a) Keep Polly for this year's main running loco.... If you do need parts they are always available through the Post rather than taking time-out to make them.. b) you sell both of the 7.25"gauge items, using the income to upgrade the workshop and also treat yourself to some decent Hols ( A working week on the SVR for example !!)...... Then you will be ready to.. c1) Complete the Juliet in a nice, comfy workshop and with yourself in a great frame of mind as well, OR}---- c2) You buy a 5" gauge King or Castle and have a great time !!!! There you go, Best regards, Alan .. Hi Alan, I am ruling nothing out! One other factor in all this is the dreaded arthritis in my knee and now the ankle and big toe of the same limb. I am struggling big time, and for someone who loves the big outdoors this is getting serious. There is no point me having a great workshop or the most wonderful loco if I can't get out and enjoy the time spent doing these things. What went wrong with running the 1366? The ground level tracks are usually much bigger than the raised ones and I find myself drifting off into a wonderful relaxed state of mind. Only downside is loading the things! Pete. |
|
|
|
Post by Roger on Jan 5, 2019 22:57:19 GMT
This is the steam dome from my friend and neighbour's American 4-4-0 Locomotive which has a problem with one of the bolt hole pockets in the flange. It looked like the hole was made too deep and the bottom of the pocket was wafer thin and tore out. All of the pockets are different depths by the way. Anyway, here I've cleaned up the hole using a 3mm cutter and profiling it on the CNC, it was a bit of a mess.  20190105_210313 20190105_210313 by Roger Froud, on Flickr It's hard to be sure what the flange is made from, probably some sort of Bronze. Anyway, this is a Phosphor Bronze insert which has a small flange on the top to stop it pulling through.  20190105_210327 20190105_210327 by Roger Froud, on Flickr It's a light press fit and sits nicely on the surface  20190105_210848 20190105_210848 by Roger Froud, on Flickr The bottom is just shy of the flange face. We were going to Silver Solder it in place, but it's such a nice fit that it's not really necessary. The whole thing is hidden by a cosmetic cover, so Stainless Allen Cap Screws are going to be used in place of the old ones which appear to be Steel.  20190105_210859 20190105_210859 by Roger Froud, on Flickr |
|
|
|
Post by doubletop on Jan 6, 2019 8:14:48 GMT
This is the steam dome from my friend and neighbour's American 4-4-0 Locomotive which has a problem with one of the bolt hole pockets in the flange. It looked like the hole was made too deep and the bottom of the pocket was wafer thin and tore out. All of the pockets are different depths by the way. .......... The bottom is just shy of the flange face. We were going to Silver Solder it in place, but it's such a nice fit that it's not really necessary. The whole thing is hidden by a cosmetic cover, so Stainless Allen Cap Screws are going to be used in place of the old ones which appear to be Steel. Roger Not silver soldering it in place, really? If the hole in dome bush is say 1.5" across and the boiler is rated at 100psi that would be 176lbs force trying to rip it off Wouldn't it have been better to machine off the whole flange and replace it, forgetting the pockets? Like you I use stainless cap screws but with nuts under the cap screws. Rather than have the cap screws being tightened too hard against the boiler shell and risk damaging it I just thread in the cap screws as far as they can go and then pull down the dome against the gasket with the nuts. (no photo I'm afraid) Pete |
|
|
|
Post by Roger on Jan 6, 2019 9:02:33 GMT
This is the steam dome from my friend and neighbour's American 4-4-0 Locomotive which has a problem with one of the bolt hole pockets in the flange. It looked like the hole was made too deep and the bottom of the pocket was wafer thin and tore out. All of the pockets are different depths by the way. .......... The bottom is just shy of the flange face. We were going to Silver Solder it in place, but it's such a nice fit that it's not really necessary. The whole thing is hidden by a cosmetic cover, so Stainless Allen Cap Screws are going to be used in place of the old ones which appear to be Steel. Roger Not silver soldering it in place, really? If the hole in dome bush is say 1.5" across and the boiler is rated at 100psi that would be 176lbs force trying to rip it off Wouldn't it have been better to machine off the whole flange and replace it, forgetting the pockets? Like you I use stainless cap screws but with nuts under the cap screws. Rather than have the cap screws being tightened too hard against the boiler shell and risk damaging it I just thread in the cap screws as far as they can go and then pull down the dome against the gasket with the nuts. (no photo I'm afraid) Pete Hi Pete, It's been running since it was built without a screw there at all, so I wouldn't worry. The insert is remarkably strong, there's no way you'd be able to pull it through. The force on each bolt is pretty small since there are many of them. It passed the hydraulic test with it missing, but the owner wanted to improve it. |
|
|
|
Post by delaplume on Jan 6, 2019 16:32:08 GMT
Hello everyone, I think I may have mentioned before that you won't see much from me in the way of a "New Build" thread or Blog as most of my ME time involves restoring and / or repairing other peoples "efforts" either for reward or, as in this case, for re-sale later on..... It's why I enjoyed the 20 or more years at the SVR.....An urge to restore to running condition I suppose is the answer to the motivation question posed elsewhere.... This is a Simplex that has been a runner at some time but "In store" for many years and not moved at all during that time.... Like a lot of similar generic 0-6-0 locos the rear axlebox lubrication is not at all easy to get at, and suffers from firebox heat, so I like to convert to oiling through the end of the axle and a cross-drilling.. Normally I can do this with the wheelset removed and then use my pillar drill etc.... BUT...... there are NO CENTRES in the axles !!.........so they will have to be dismantled and then centre-drilled and cross drilled.........and before that I'll have to drill for keyways to maintain wheel quartering upon re-build.... So that's what these photos show....     |
|
|
|
Post by Deleted on Jan 6, 2019 16:41:25 GMT
Nice one Alan, it does beg the question, how the hell did the builder do the axles with no centers? of more relevance how did he true up the treads after the wheels had been assembled to the axle? Just goes to show how there are many ways to 'skin a cat'...  Pete |
|
|
|
Post by delaplume on Jan 6, 2019 17:11:52 GMT
Hi Pete,
Yes, over the years I've come across quite a few "interesting" problems to try and rectify....here's just one}----
3.5" Tich --- owner / builder says it keeps wearing-out the rod bushes very quickly.........I have it into the works and give it the visual "Once-over"..... At the same time I delicately enquire as to the methods used by the owner.....It's his first attempt apparently and he did it all "as per drawing"...
Just like your GP you develop a certain "Bedside manner" and learn which questions to ask in particular....My examination eventually showed that the mainframes appeared to be out of alignment, but not by much..........So I asked him how had he made them and he replied}----"As it says on the drawings....ie two off."
You've guessed it...he made 2 frame plates but SEPERATELY so errors of alignment had started to creep in.....Add on the LBSC method of using buffer beams to set up your frame and he was lucky that the motion revolved at all...........Which apparently it did do but stiffly so a file was put to use !!!
I re-built the chassis using BDMS blocks accross the hornguides for alignment and some machined thick wall steel tube clamped between the frames for parallel...with the frames upside down and stood on a milling table...
All was ok after that
Then there was the 57xx with a broken crank axle !! ( Arc welded no less and it had come apart !! ).....
But that's for another time....
Alan
|
|
|
|
Post by delaplume on Jan 6, 2019 18:58:25 GMT
------- and now it's off to the British Legion Club with Joyce for our weekly "Rock & Roll" workout..!!
|
|
JonL
Elder Statesman
WWSME (Wiltshire)
Posts: 2,912
|
Post by JonL on Jan 6, 2019 19:25:11 GMT
WRT Rogers dome fix: Quite an elegant solution, I like that.
I intended to do a fair bit in the workshop today but ended up going shopping to buy household items (soft furnishings etc). Managed to pick up two LED floodlights which have massively improved the lighting over one of my workbenches, and a lot of extra storage. I had no idea I had so many taps and dies until I sifted them into BA, Metric, english etc....
Also planned out my solution for mounting the cylinders for my lathe's carriage (correct terminology?) to carry out the boring. Another task where the tool making and setup take days and the actual task its relatively short I suspect!
|
|
|
|
Post by David on Jan 7, 2019 0:28:24 GMT
Very interesting Alan.
I don't think I did a finishing cut on my wheels with the axles between centres... I think I assumed being cast iron without steel tyres the wheels would wear quickly enough it wouldn't make a difference!
When I do have to put tyres on them I'll do the between centres work.
|
|
|
|
Post by Oily Rag on Jan 7, 2019 4:41:33 GMT
No ME work this weekend.
Friday, I gave the fireman's side of #974 a good going over while listening to the Indian batsman make a mess of Australia. That took 7 hours. The light up chap should do the other side but..............
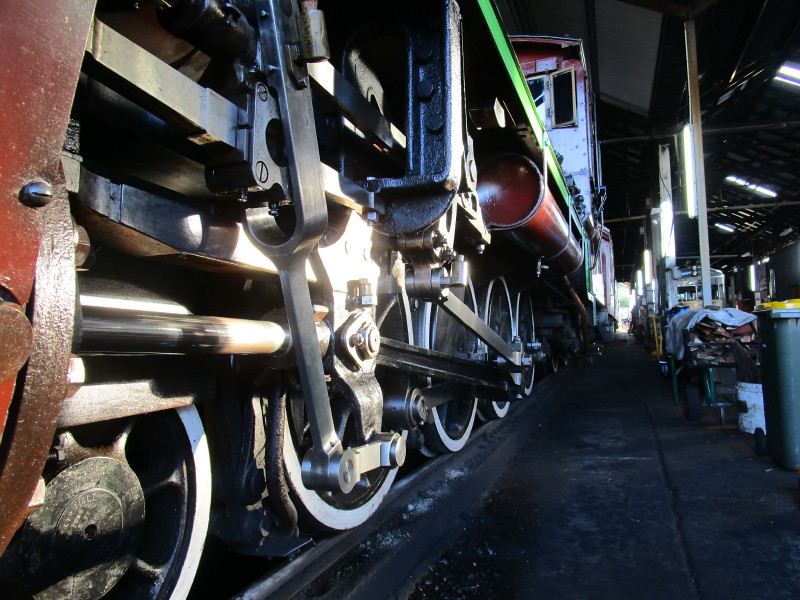
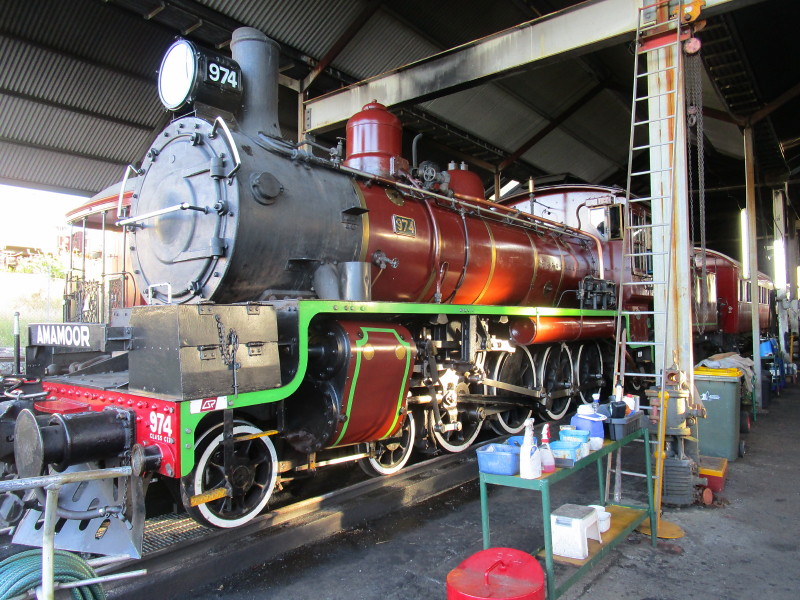
Saturday I got my first time on the R/H side (drivers side). Was on the driver's shoulder for the AM trip (as an observer), then I drove the PM trip with Adrian (Senior tutor driver) on my shoulder. 171 tons, 7 carriages, 170 punters on the cushions.
Did the shunt and stable. It is a twisty and up and down branch so learning the road takes a bit of time. A lot of momentum thought work-skill-process to learn, experience etc.
Sunday, lit up and then drove the AM trip with Adrian on my shoulder again. Slipped to a halt in a speed restricted section which had a load of grass on the track and a wee bit of mizzle about, it was a problem area the day before. Adrian lifted it and then I was back on the controls. I got an unexpected slip going onto a bridge but I caught it quickly and got it back as we were soon to go into a nob so had to try and not bog down. The weed train needs to get out there soon! Stuff grows here a foot every few days with the sun and if there is rain about which there is plenty of. I did not do the PM trip as I would be out of hours as I had lit up. Drove the 2 hours home, processing stuff in my head. Tutor was happy with my first trips and got me to book more shifts ASAP to keep my momentum going. That pleased me. A good weekend.
|
|
|
|
Post by delaplume on Jan 7, 2019 10:12:39 GMT
What a lovely bit 'o kit !!......A 4-8-2 ?....with a round top firebox as well.....Don't see many of those types these days I've just had a look at this}-- www.australiansteam.com/C17%20974.htmOne of the great things about world - wide steam is that you and I could swap Bridgnorth SVR and the Queensland Railway workshops and within a short time we'd feel at home, that's for sure.. Mainly for domestic reasons I rarely go to the SVR these days but I recognise every one of those experiences you just related !! That first wheel slip gets the sphincter twitching, doesn't it ??...LoL !!........going nowhere--fast, so to speak. What's she like for linking - up ?........Did you recognise that "Kick-back" feeling on the reach rod when you got to the optimum setting for speed / load ?? Yes--- you must keep on now with the tuition.....he sounds like a decent sort of guy ??.............Has he given you the} "broken gauge glass repair" test yet ?? Best of luck and do please keep the reports --- and the lovely clear photos coming.. Alan |
|
|
|
Post by delaplume on Jan 7, 2019 17:17:53 GMT
Hello all,
My earlier photos seem to have disappeared !!..............Any ideas why ??
and it seems I can't add any more on either....
Odd as it's supposed to be a free service...
Alan
|
|
stevep
Elder Statesman
Posts: 1,070
|
Post by stevep on Jan 7, 2019 19:29:08 GMT
Alan,
I am still seeing the pictures you posted at the top of this page.
|
|
|
|
Post by Deleted on Jan 7, 2019 19:31:13 GMT
Alan, I am still seeing the pictures you posted at the top of this page. I can see the pictures too Alan... |
|
|
|
Post by Deleted on Jan 7, 2019 23:41:33 GMT
Today I managed a 1/2 day in the workshop.. nothing on 4472, I refitted the DRO scales bracket for the Lathe longitude axis as the other was a half-hearted attempt that I made in a hurry. I had noticed that it had some play when changing direction giving me something like a 15 thou error, massive problem. I have now made the bracket out of thick alloy with 'zero' error...I will test it out on making the new caps for the trailing crank pins this week.
|
|
|
|
Post by delaplume on Jan 8, 2019 2:40:38 GMT
Hello everyone, well that's odd, those photos are back on again aren't they ??..... Just as a check I sometimes post on the Royal Enfield motorcycle forum hosted by Hitchcocks and I couldn't post a photo there either...but it's now showing there OK as well.....Most odd !!....( Honda XBR 500 for sale by Alan R----see last entry ) www.hitchcocksmotorcycles.com/message-board/bikes-for-sale |
|
|
|
Post by Oily Rag on Jan 8, 2019 2:48:38 GMT
What a lovely bit 'o kit !!......A 4-8-2 ?....with a round top firebox as well.....Don't see many of those types these days I've just had a look at this}-- www.australiansteam.com/C17%20974.htmOne of the great things about world - wide steam is that you and I could swap Bridgnorth SVR and the Queensland Railway workshops and within a short time we'd feel at home, that's for sure.. Mainly for domestic reasons I rarely go to the SVR these days but I recognise every one of those experiences you just related !! That first wheel slip gets the sphincter twitching, doesn't it ??...LoL !!........going nowhere--fast, so to speak. What's she like for linking - up ?........Did you recognise that "Kick-back" feeling on the reach rod when you got to the optimum setting for speed / load ?? Yes--- you must keep on now with the tuition.....he sounds like a decent sort of guy ??.............Has he given you the} "broken gauge glass repair" test yet ?? Best of luck and do please keep the reports --- and the lovely clear photos coming.. Alan 4-8-0 This loco has never been out of service since it was built in 1951. At the end of steam here in Qld this loco became part of the heritage fleet maintained at the Ipswich workshops. It is on loan to the Mary Valley Rattler until #967 (same class and same era) rebuild is completed some time this year. A very detailed and heavy over haul, new tyres, new axles, new roller bearings, new boiler. 974 and 967 were the last of this class to be built and they had the bigger sedan cab and roller bearing axle boxes. I have spent some days at the SVR, in 2015 and 2002. I had a personal tour of the shed and workshop at Bridgnorth which I enjoyed. I am impressed with the new build of #82045. I like that project a lot. In the UK, your heritage steam is on steroids compared to Australia and it is all so close by where ever you are in the UK. Not far to travel to find a railway. It was my first wheel slip on the road with seven carriages and 170 punters being entertained, on curves, pinch hill, speed restriction so less momentum onto the pinch, grass growth since I was there last 3 weeks ago when I was firing. It kept slipping and catching it and out with the regulator and I was working sand but we stopped. My lack of experience for the feel of it all. Adrian got it away again but it was not easy. Being the first trip of the day the grass- weed was not cleared. It did not trouble me at all or give me fright, I was expecting it when we saw the grass. When we pull out of the shed in the morning which is a heavy grade up to the yard and platform with twists through the points one gets a few slips. But I have only been out for two full trips on the controls. We have Westinghouse air brakes and the Auto brake and the independent, thus applications and bailing off the independent to keep the train stretched etc. I am not familiar with vacuum brakes, but I hear most like WHB rather than vacuum. Adrian is big wig with training in the rail industry with training, from diesel to electrics, steam to 10,000 ton coal trains. He gives the right gems and lets you make enough mistakes to learn but not ruin you. He also has 5" gauge locos and is a Gresley fan. True rail tragic and very very dry. His wife was one the first female train drivers in the 80's in Queensland. We have not done the broken gauge glass yet. One of the other tutors has threatened us with that, probably when the are due to be changed out just before the annual boiler test. I will keep the pics coming if they are being enjoyed. I am on high rotation, I am up at Gympie just about every fortnight. By the end of the year I may be passed as a cat 2 driver. I also have to get Diesel time as the qualification is "Driver, fireman Diesel and Steam". This full size stuff is my first priority and my ME and garden railway is behind this. While I have the cognitive function and physically capable to cope and be safe I want to give this a good nudge. I am living the dream and working with your mates is rewarding. |
|
|
|
Post by delaplume on Jan 8, 2019 2:53:32 GMT
OK, this is to-days belated report on a small amount work on the Simplex axles from earlier......Alas my main lathe has headstock bearing problems so I can't use the drawbar collet to ensure accurate concentricity and have reverted back to "basics" ie axle gripped in a 4-jaw independant chuck and centered with a TDI.. I hope you can see that with the axle running true there is a 0.006" error on the wheelseat ? I've now centre-drilled and gone through with a 1.5mm drill to meet up with the cross-drilling which I'll do on the mini-mill later on....   |
|
|
|
Post by delaplume on Jan 8, 2019 3:24:13 GMT
Here's the rear wheelset from the same Simplex loco......This axle had the centre drillings already done so no need to dismantle etc....As you can see I've already done the main and cross-drilling...The axleboxes have had their original oil holes filled in with J.B. WELD... I have several locos and projects on the go at the moment so horizontal bench space is at a premium----hence we see Simplex in "Reach for the Sky" mode !!    |
|


