adie
Member

Posts: 7 
|
Post by adie on Sept 2, 2015 19:57:45 GMT
what is the smallest hole a laser or water jet can do. ive forgotten how to work it out and im drawing up some 3mm thick frames
|
|
|
|
Post by vulcanbomber on Sept 2, 2015 20:12:37 GMT
You'd be better off getting the laser cutter to spot the holes and then drilling them at home, you get a much better hole.
|
|
|
|
Post by gall335i on Sept 2, 2015 20:22:14 GMT
I had some plates done and they cut 1.5 mm O/D holes out for me, asked them to spot them but never mind!!
HTH.
Andrew.
|
|
|
|
Post by Deleted on Sept 2, 2015 21:25:55 GMT
I agree with vulcanbomber..best get them spotted and drill yourself with the frames riveted together to ensure both are identical and to your satisfaction..if you do decide to get the holes cut use water-jet especially for any holes that need tapping as laser cutting hardens the edge.
Pete
|
|
|
|
Post by joanlluch on Sept 2, 2015 22:45:05 GMT
Hi Addie,
Please let me add my experience, which is contrary to what's posted here so far.
Laser cut holes are as dimensionally accurate as drilled ones, specially on the laser beam side. Also they are placed with great precision with respect to other features. Holes can be made with a diameter that is equal or above the sheet thickness, for example for a sheet thickness of 4mm you can make holes of 4 mm or above. On your 3mm thick frames you can make holes as small as 3 mm. Some services allow you to break this limitation and would make smaller holes for you, but they don't usually like to do so, so you must have worked with them for a while. The general rule is always this: minimum hole diameter equals to sheet thickness.
On the laser beam exit surface holes may have a slight distortion due to metal burning, but that's easily removed with just very slight filling. Hole inner surfaces are a bit rougher than drilled ones, but that's unimportant for most applications including the frames of a loco.
It's key to consider that precision of placement and hole diameter is VERY accurate. You will be absolutely safe by ordering two identical frames. Holes in them will be spot on exactly as drawn. There's no need to drill any holes yourself.
I am making a free lance loco by mostly using laser cut parts. I have the loco significantly advanced for everything that relates with frames, stays, wheel base and so on. I never felt the need to join and drill two parts together. All laser cut parts will assemble in the right places with no need of any adjustments whatsoever. Drilling holes on metal sheets is not necessary at all if you have drawn all the holes in them where they should be, and then you laser cut them.
Laser cut parts are ridiculously cheap as well.
About Water Jet cutting. This will allow you to have smaller holes in a thicker metal sheet. However this is a lot more expensive and you must be careful at asking for the cutting precision. They should show you samples. One problem with water is that the jet inclination must be dynamically adjusted to obtain perpendicular cuts. You must ask whether they have this technology. Even if they have it, the speed of cut highly influences cut surface quality, specially on the exit surface. Water jet cut quality falls thus on a wide range, from worse than laser cut to much better. However to obtain the better quality is really expensive because it takes a lot more time.
As said, I would just cut everything with laser, and would forget about the drill.
|
|
|
|
Post by Cro on Sept 3, 2015 9:20:27 GMT
Not sure I quite agree with you Joan on the necessity of the finish of the holes but each to their own.
I would chat to the place where you plan to get parts done and see what they recommend each place I have used are different. I would follow suit of spotting holes and drilling after as that is what I do on all my items.
Adam
|
|
|
|
Post by ilvaporista on Sept 3, 2015 9:37:44 GMT
Just to add some experiences to the above. I usually put a 0.5mm hole at the point I need a hole on the finished part. As a rule of thumb I try to keep to hole size = or > material thickness for for normal frame sizes up to 6mm. You will break drills if you try to put a 2mm hole in 3mm plate with a 0.5mm starter hole, this is because the divergent cone effect of the laser (which cuts bigger on the rear than the front) causing a heat affected zone which can harden the material. The burnt surface can also cause the drill to snatch, again with dire consequences for the drill bit.
On the thicker plates (8, 10mm) the burn away at the back is quite large (the laser I use is quiet old- but has the benefit of being cheap...) so I would not go for anything less than 6mm
I find that the best way is to use a centre drill to first spot the hole and then follow up with the required size (or step drill depending on final hole size)
For large hole in frames (blow downs, steam pipes etc I cut to final size or .5mm less and finish with a file or leave as is depending on function.
|
|
|
|
Post by joanlluch on Sept 3, 2015 13:59:37 GMT
The technology for cutting metal using laser beams has been in constant evolution over the last years. Cutting service prices have been consistently down as more competition appeared and the technology became a commodity. Evolution has brought thinner, more powerful, laser beams, which allowed much faster cutting rates. By increasing cutting rates with a thinner beam, metal would not heat that much. This improved dimensional precision, reduced the chances of heat based bends depending on shape, and reduced metal burns at the opposite side.
If you require a perfectly finished cylindrical hole on a thick flange, you will have to drill it. Next best option is to cut it by Water jet technology. Finally, laser will give the worse result. However, as you move to the thinner range of metal sheets, laser will bring better and better results until becoming unrivalled (in my opinion) by anything else, including drilling. Laser is ideal to create special shapes including holes on thin flanges, and I do not think that there's a better way to do so, or one that you can get more accurate results and even finish.
|
|
|
|
Post by Cro on Sept 3, 2015 15:19:16 GMT
But Joan you said above that the laser cut hole will leave rough edges so to me that doesn't exactly scream "accurate hole" if I am after mounting holes or pivot holes.
I agree its cheaper and an advantage to having to do most things by hand but I still wouldn't rely on it for a finished hole over a drilled or reamed hole.
Adam
|
|
|
|
Post by Roger on Sept 3, 2015 15:27:07 GMT
I'd be interested to see the sort of finish that the most modern equipment gives. I doubt if many Model Engineers achieve the kind of accuracy you can get with laser cutting, so it's probably beneficial to add through holes wherever possible and then open them out by the final 0.1-0.2mm to get the desired finish. I don't know how a spotted hole looks for those sizes that are too small to laser cut, but that sounds like it's worth doing too, especially if you're relying on a scribed line and centre popped location. Yes, I know these things can be done accurately, we spent weeks doing these things as apprentices.
Personally, I think of laser cutting as 'Precision roughing' process, I'm yet to see anything laser cut that I would just de-burr and use as finished.
|
|
|
|
Post by joanlluch on Sept 3, 2015 18:40:04 GMT
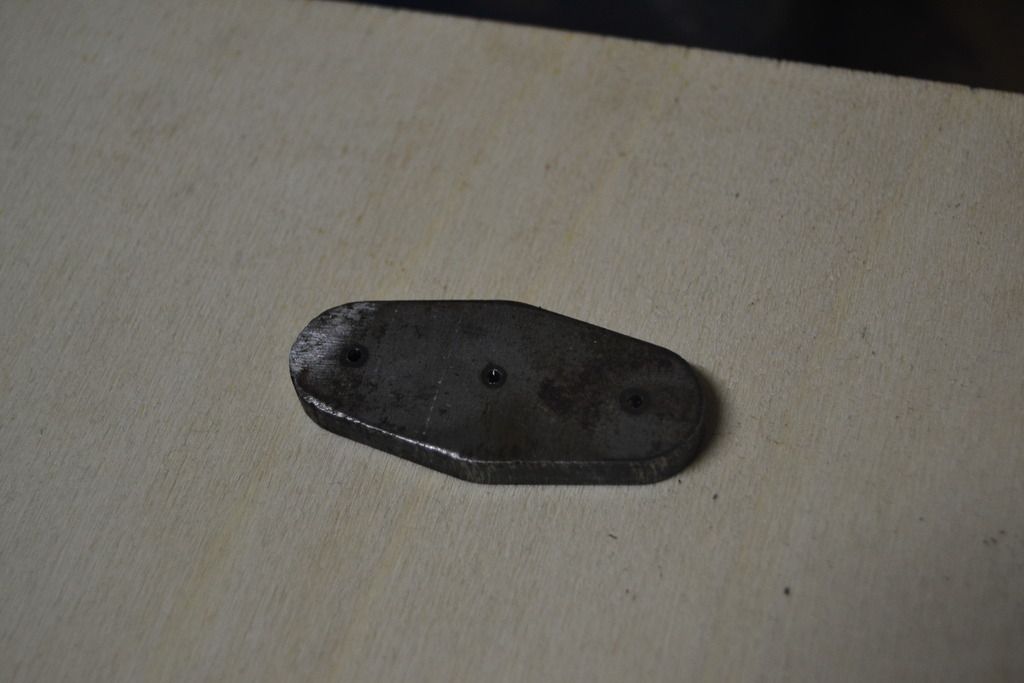
Hi Roger (and Adam) This is the kind of finish that I get from a service in the middle range of prices (still very cheap) 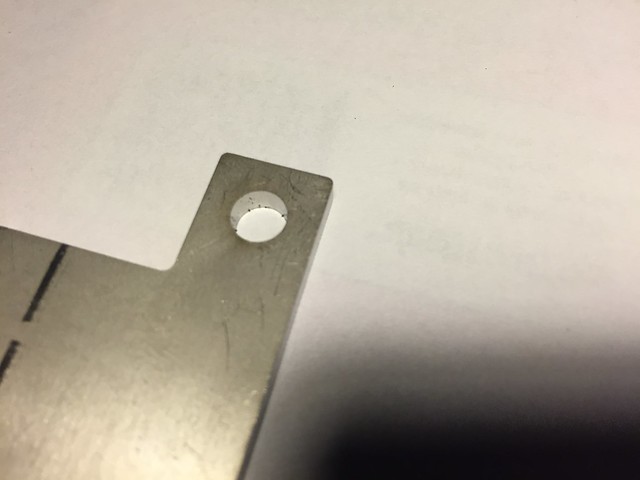 Forats Forats by joan lluch, on Flickr 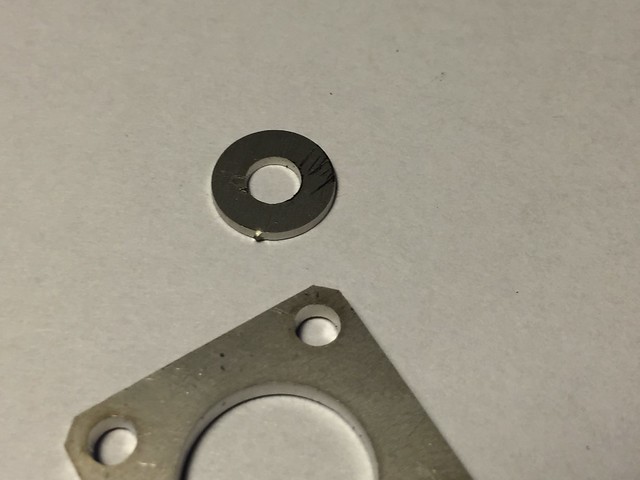 Forats Forats by joan lluch, on Flickr 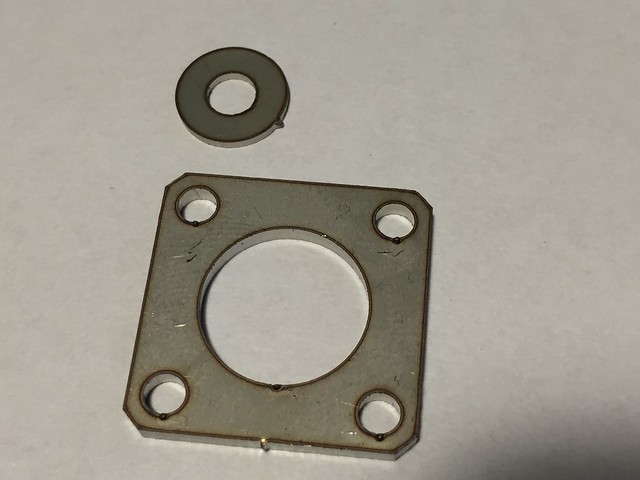 Forats Forats by joan lluch, on Flickr The first picture is a 6mm hole on a 4mm thick sheet. Laser beam side. The second picture shows a 3mm hole on a 2mm thick sheet and a 4mm hole on a 1mm thick sheet. Laser beam side. The third picture shows the thinner parts form the laser beam exit side. You can see signals of material burns, but they can be easily removed by just rubbing the part against a sheet of fine sand paper. The darkened outline marks shown on the third picture are reliefs on the surface of the part, they are not actual defects embedded in the part. If you look at the next picture you will see that the part does not touch the table surface.  Forats Forats by joan lluch, on Flickr The part is apparently floating above the table because of the un-removed burn outlines. Once you remove them, the part looks essentially the same from both sides. Note that the outlines are reliefs above the surface of the part, not anything that affects the holes or the sides. So the part is still perfectly accurate once you remove that. Of course, the thinner the metal sheet the better the result. I do not think that manual drilling will match the relative dimensional accuracy between features (exact positioning of the holes). Only CNC or a manual mill with DRO will match that. On the negative side, it's fair to mention that the cut surfaces present a slight roughness. I took a photo to show that. 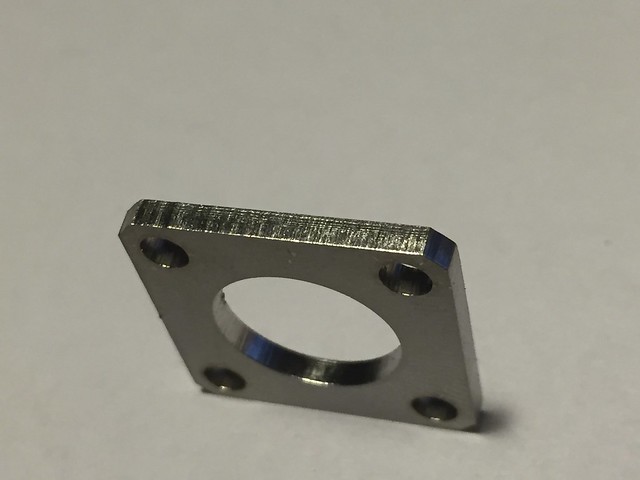 Forat Forat by joan lluch, on Flickr This shows the finish of the cut. Please be aware that I took some time to actually find the best lighting to make that visible. In reality, roughness is appreciable but not that bad. It can be removed by filling or polishing. Inner surfaces of holes are the same, but the upper edge is spot on. Such roughness may be important or not depending on the purpose of the holes. Laser cut holes are more than adequate for bolts and rivets, but of course if you require a bearing housing machined to H7 tolerance then you'll have to use the right tool. |
|
|
|
Post by Doug on Sept 3, 2015 20:23:26 GMT
I have been working with lasers since the mid 90's and there are lasers that can give you a very good finish as Joan points out you can also drill holes down to 70um and smaller even in thick material up to about 30mm it takes a lot of processing to get good quality holes that are parallel at depth though, we also now use lasers to "mill" shapes in jet engine blades and vanes, so really it's down to how much you want to pay, I have had some frames cut for my Buleid this was obviously done with a CO2 laser with inert assist gas as the surface finish is very good indeed without any oxidation and recast. Tolerances will be down to how good the machine is as the kerf width (dia of the beam) is constant so it can be very accurate. CO2 lasers struggle with holes as they don't pierce metal very well so any small holes will be splattered unless it is able to cut this messy bit out. A YAG or Fibre laser will be much better at drilling holes and so can make accurate ultra small holes however the running cost is a lot more for this type of laser.
|
|
|
|
Post by Roger on Sept 3, 2015 21:13:33 GMT
Those parts look pretty good to me, I'd certainly be happy with that sort of finish because there's very little finishing required. I still think I'd drill the holes to the final size, I'd prefer to size those and make sure they were parallel. They look better machined too in my opinion, even though most of them will be hidden. I guess that's more of an emotional choice, just as I dislike seeing the witness of an end mill on machined parts that are on show.
|
|
|
|
Post by Deleted on Sept 3, 2015 22:10:00 GMT
I'm all for laser cutting, after all i use it a lot on my build but I won't have holes laser cut....it's a personal choice due to how my own mind views builds and the various processes involved. As I already stated I wouldn't want to tap into laser cut holes especially those for 8BA and below. My own project has an awful lot of 8BA and also some 10BA holes to be tapped, it's tough enough doing this with normal holes let alone those that are both hardened and possibly tapered too. Also, erecting a set of frames truly square isn't as straight forward as one may think, bolts need to be done up carefully and with some forethought to their sequence to ensure the frames remain square and straight, it's possible to throw the squareness of a set of frames out just by not paying attention when bolting them together. For me, relying on laser cut holes alone just doesn't compute to my way of thinking, I need to do each hole for myself to know that they are correct and suitable for the job in hand. I centre drill each hole before drilling and step drill if the hole is large although I have a number of stepped (bullet) drills that can do this in one and if the hole is critical or a bearing journal it gets reamed, no drilled hole is totally round without being reamed, it may look like it but it's not.
Having said all of above I would state again that this is just the way that I do things, others will do it differently and that's fine, each to their own. As is often said in my line of work...do a job the method that you feel happy with, never do it in a way unfamiliar to yourself, it will go wrong if you do.
Pete
|
|
|
|
Post by joanlluch on Sept 3, 2015 23:32:22 GMT
Hi Pete. What you say is totally reasonable but to me the subject does not go down to just personal choice. I wouldn't make a thread on a laser cut hole either, not sure if that was implicit on my previous posts due to my possible poor use of English, but it wasn't intentional, I didn't want to mean that. However, making laser cut holes for the purpose of using them with bolts is perfectly fine. That's what I argued all the time. Bolts are never intended to position things, in fact holes are made sometimes bigger than the nominal diameter to help assembly. But laser cut parts accuracy exceeds what's required for this, so holes for bolts can be cut at the nominal diameter, and there's no need for any further drilling. The parts shown in my previous post contain holes to be used with bolts -well, one of the parts is just a washer, so that's obvious- and all the holes are cut at the nominal diameter.
|
|
|
|
Post by ilvaporista on Sept 4, 2015 7:39:15 GMT
I am at the very cheap end of the scale.. So the parts I cut are less detailed and more 'agricultural' than the work of Joan and Adam (if you get a chance have a detailed look at his stuff at the shows.....) I will try and get some pictures of some parts loaded. One item which I did not mention and is important is the start and finish of the cut. As Joan has shown above it is important to start and finish away from the final edge, as when you 'punch' through the material there is a larger entry point. Start away from the edge and this avoids leaving a trace. Those are the blips you see. For cleaning up the edges I built a linisher that cleans up the waviness quickly. My work tends to be in the 6 - 12mm range so the edges look rougher. On the running boards and other such items in 1.5mm these is virtually no fall away at the edges and you can go to finished size. I did not try to make finished size holes in these but following Joan's example I may give this a try.
Thanks to all who are contributing with innovation, knowledge, experience and points of view, that is what takes our hobby forward.
Edit
Just to add that the quality of the laser beam is key, the old CO2 laser I have access to is about 15 years old now and even with a service (5k Euro....) I would not pretend that it will compete with newer equipment. It does help to be very good friends with the local Trumpf service engineer... I machine him some parts and he helps me out...
|
|
|
|
Post by ilvaporista on Sept 6, 2015 15:45:16 GMT
|
|