|
|
Post by sideshow on Mar 4, 2008 15:04:16 GMT
Hi,
Iam well into machining a scratch built beam engine, loosely based on a stuart beam.
The problem Iam encountering is the machining of the parrallel motion links.
I have milled them out of 1/8th mild steel but Im struggling to mill the round ends, I have tried my rotary table with a little success but Im not happy with the end result.
Does any one know of a method or fixture for manufacturing motion links/conrods.
thanks.
|
|
|
|
Post by GWRdriver on Mar 4, 2008 15:35:48 GMT
IMHO these links can be finished off to a very high standard using a much simpler and quicker process, . . . . "filing buttons." Filing buttons are disks of silver steel drilled through and with their ODs turned to match the finished radius desired and hardened right out glass hard. These are then fastened on both sides of the link end (for instance) to be radiused by a through-screw. Commence filing until the file skitters off the hardened buttons and you have a perfect radiused end. The buttons can of course be re-used indefinitely. Various means, from a full shoulder to a small raised edge, can be turned on the disks to insure they are centered in the link hole. I prefer to undersize the button fixing screw and turn a small shoulder a slip fit into the link hole but with small link holes that that isn'r always possible and in those cases I fit the through-screw closely. This works for any material thickness as long as your file will span the distance between the buttons. If you have a on-off you can dispense with hardening out the buttons but one or two uses is all you can expect from those.
|
|
|
|
Post by sideshow on Mar 4, 2008 15:42:06 GMT
so i rough out the links and then fix a hardened button to the rough end and file it to the hardened edge of the button ?
|
|
|
|
Post by GWRdriver on Mar 4, 2008 16:03:20 GMT
Exactly . . . If done with reasonable care this will make a seamless transition from straight to curve and the radiused edges will be crisp and square (ie, perpindicular.) Here's a photo of some I've made. These buttons are 5/16" diam and the screw is the US equivalent of a 5BA. I have made these as small as 3/16" OD but at that point the screw becomes the weak link and I've had no reason to go smaller. 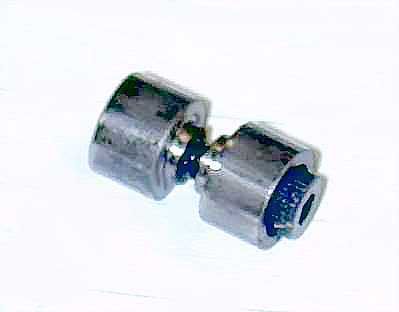 |
|
|
|
Post by sideshow on Mar 4, 2008 16:51:03 GMT
Thankyou GWRdriver,
I will give this method a try, I have 12 motion links to do in total, so thats 24 rounded ends to produce !
|
|
paul
Member

Posts: 8
|
Post by paul on Mar 4, 2008 21:20:13 GMT
|
|
|
|
Post by chris vine on Mar 4, 2008 21:23:50 GMT
Some people put a milling cutter in the lathe/mill and a pivot held in the toolpost/vice.
Tben with GREAT care and always working against the direction of rotation you can rotate the rod by hand and create the rounded end.
I now have a much simpler, faster and safer way. Again I use a pivot to work the rod around but I clamp it to the work rest on the linisher and use the belt. Works a treat. you just have to finish of with some tape on a file to get the marks to run the right way around the end....
Call me a cheat/heathen etc!!
Chris.
|
|
Myford Matt
Statesman
 There are two ways to run a railway, the Great Western way, and the wrong way.
Posts: 621
|
Post by Myford Matt on Mar 4, 2008 21:44:14 GMT
A gold-medal-winning heathen!  |
|
|
|
Post by GWRdriver on Mar 4, 2008 22:02:09 GMT
Chris and all,
I've seen the finger-fed end milling technique discribed and illustrated many times and knowing first-hand how destructive an end mill dig-in can be, even in a clamped operation, I cringe every time I see that advice. How any responsible author could recommend such a technique, especially to beginners, I don't know. All I see is disaster waiting to happen.
I don't follow the "tape on the file" bit, could you elaborate?
Cheers,
Harry
|
|
|
|
Post by sideshow on Mar 4, 2008 23:29:34 GMT
Hey, Im no beginner  , I served 15 years as a turner/miller, I just never made con rods before. |
|
|
|
Post by GWRdriver on Mar 5, 2008 0:18:45 GMT
I certainly didn't mean to imply that you were, or that anyone in this thread was, . . . . it just seems to me that the advice to form rod ends by hand-fed milling, when it appears, is in articles which have an appeal to the less experienced. I only ever tried it once and two of the three objects involved (work, cutter, fingers) were ruined. I still have the fingers and hesitate to gamble with them again, but then this is my preference. The linisher technique is a different animal altogether.
|
|
|
|
Post by Tel on Mar 5, 2008 9:26:42 GMT
Avoid that method like the plague - it's quicker and easier to do 'em with the filing buttons |
|
PH
Seasoned Member

Posts: 112
|
Post by PH on Mar 5, 2008 14:25:38 GMT
If they're only for one-off use, the filing buttons don't even need to be hardened - just make them out of thicker material than the rod you're working on, be careful when you get close to touching them with the file and move them round if you do put a flat on them.
|
|
|
|
Post by circlip on Mar 5, 2008 15:15:46 GMT
|
|
|
|
Post by chris vine on Mar 5, 2008 17:02:33 GMT
Hi Harry,
I don't really think I was recommending the finger fed milling cutter method, and yes, I have the greatest respect for rotating (and stopped) milling cutters. When I was an apprentice we were shown the carrot demonsteration (with apologies to Fred Dibnah). A carrot was put between milling cutter and workpiece to show what happens to a finger. We were all joking about it beforehand but were rather quieter afterwards......
My linisher method is pretty safe and gives much more predictable results.
Chris.
|
|
ianmac
Part of the e-furniture
Posts: 308
|
Post by ianmac on Mar 12, 2008 1:54:23 GMT
Thank you GWRdriver,
I have just finished machining the rods for 6 coupled wheels and i used your advice. What a breze it was!
Machined up the bits soft soldered them on, placed rod in mill and machined down the top of the rod so that it gets its dog bone shape if you like. After milling hacksawed the ends of the rod so that it was as close to the button as possible and then ground away most of the meat.
Filed around the button then used some sand paper to give a bright shiny finish.
After i finished i brought it inside showed the wife. "Lovley she said" not understanding that it took me two hours to complete.
I actually looked at the job and thought the Grand Father (loco builder now passed) would be proud.
Thanks for that advice as i would have never throught about doing ti that wayt.
|
|
|
|
Post by GWRdriver on Mar 12, 2008 3:19:11 GMT
Ian,
It is a simple and effective technique isn't it? I can't take credit for it though, that would belong to my first mentor who spent his working life in the aero tool & die trade. I'm glad to be able to pass on something useful.
|
|
|
|
Post by steammadman on Mar 12, 2008 23:04:23 GMT
all yer fancy methods may work but you can't beat a good old
fasioned FILE
|
|
ianmac
Part of the e-furniture
Posts: 308
|
Post by ianmac on Mar 13, 2008 1:31:12 GMT
A file was used ;D
|
|


 , I served 15 years as a turner/miller, I just never made con rods before.