|
|
Post by Shawki Shlemon on Mar 12, 2012 8:33:42 GMT
Jim , you are doing fine , only the first boiler seems  to be hard , from then your second boiler onwards will ba a breeze . ;D |
|
Andrew C
Part of the e-furniture

Posts: 447
|
Post by Andrew C on Mar 12, 2012 20:47:21 GMT
Shawki is right Jim you'll be fine. A few ales at appropriate times will be just right. I was wondering if you had decided to convert the loco to a boat with all that rain! Can you send some to the UK? Looks like we will have a hosepipe ban in April  Andrew |
|
|
|
Post by Jim on Mar 25, 2012 2:36:32 GMT
Boadicea's boiler has been slowly progressing. For those interested I have been using Alec Farmer's excellent book on Model Locomotive Boilermaking as the first point of reference and very handy it is too. Following Alec's example I made up a stand to hold the fire box tube plate at the right height and angle and with the help of my best mate who put down her knitting to take charge of the blow torch the job was started. The propane torch was used to apply general heat while I used the oxy torch to flow the silver round the individual tubes. With the tubes successfully silvered into the fire box tube plate a test fit of the smoke box plate was done using wooden guides to line the tubes up with the holes in the front plate. The guides were easy to make and worked a treat.  Jim The temporary tube plate holder. 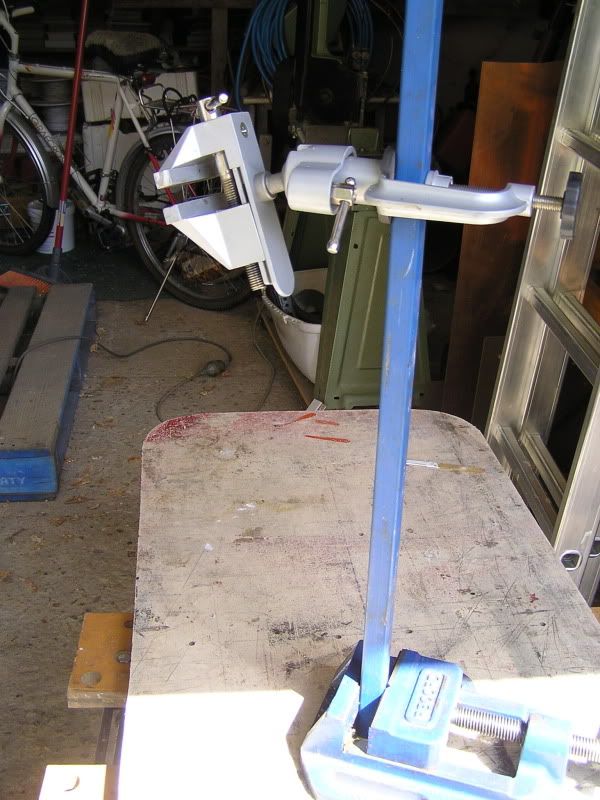 Some of the tube guides in place, 34 were needed but well worth the trouble. 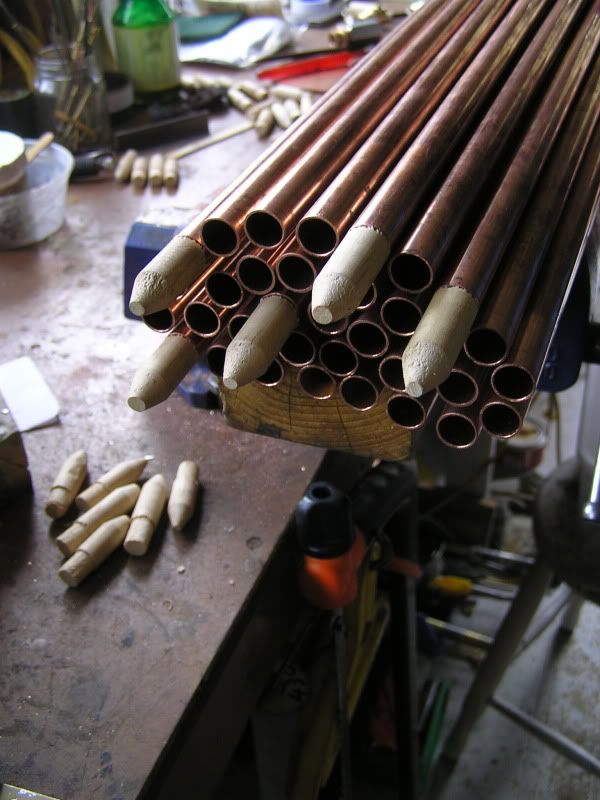 |
|
|
|
Post by Jim on Apr 14, 2012 5:13:05 GMT
Cold grey day today so decided to do a bit more to the boiler in setting out the fire box and back head. Both rear plates had to be trimmed first which called for some careful measuring and lots of re checking. Despite my worst fears that I'd overlooked a crucial factor and would trim off too much all went well.  The photos show the temporary lash up to check that everything will eventually come together without any dramas. At this stage I'm considering lowering the rear fire box plate to bring it into alignment with the top of the front plate while at the same time giving more room for the water gauges. If I do this I will want to be sure the fire hole can be located at the right height. Jim. 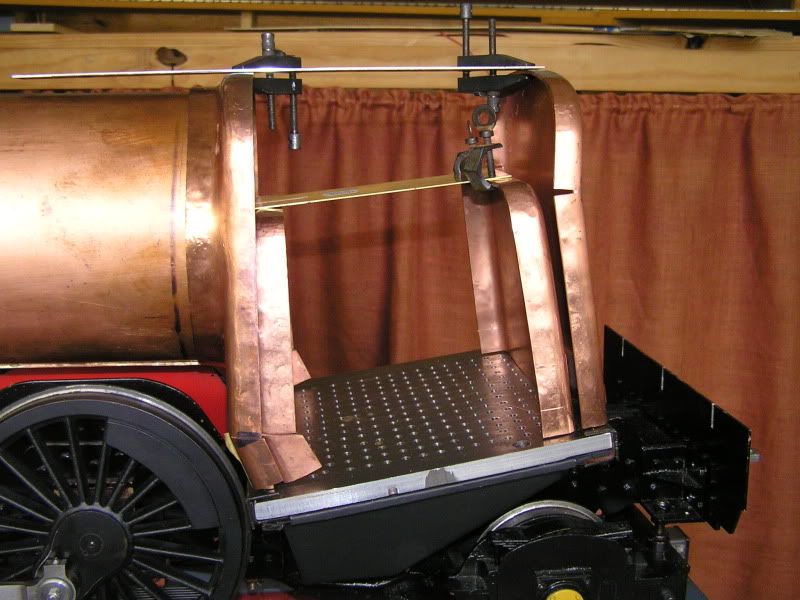 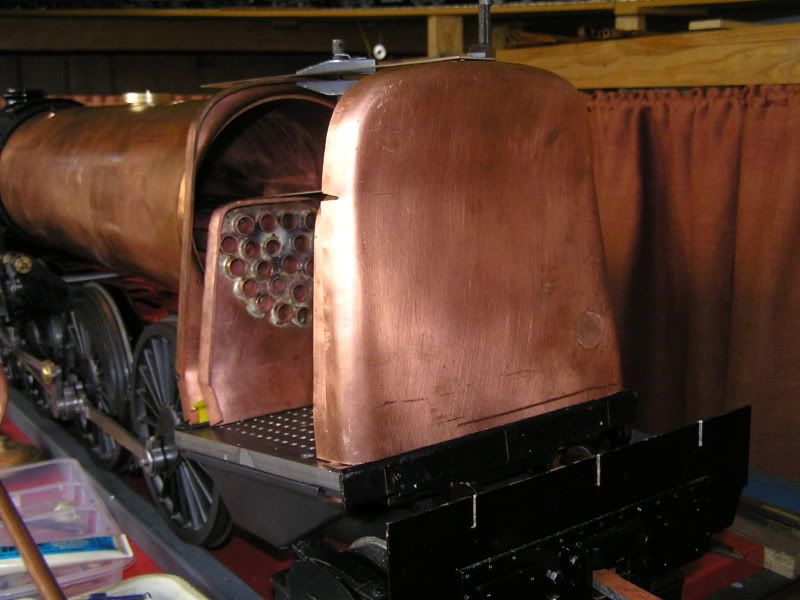 |
|
|
|
Post by mutley on Apr 14, 2012 18:22:33 GMT
Jim, the firebox on the Britannia's tapered towards the back in both height and width. You currently apear to have the top parallel to the ground.
Andy
|
|
|
|
Post by Jim on Apr 14, 2012 22:04:28 GMT
You're quite right Andy and that is the way it's shown in the original Perrier drawings for the boiler too. For various reasons I had to redesign the boiler resulting in my throat plate being further back than in the original design which had a combustion chamber. The plan at present is to recreate the proper outline when I come to the cladding. You've probably noticed I have a parallel boiler barrel too which will need the crinolines increased in diameter as they move back towards the throat plate so as to recreate the outline of the original tapered boiler. It's a great lesson in the 'knock on effect'  Jim. |
|
|
|
Post by Shawki Shlemon on Apr 15, 2012 9:33:22 GMT
Jim , you are doing very well , No model working boiler is exact scale down of the full size , far from it dare I say ;D ;D , the most important thing is that at the end it looks like the original and works well , Today I took the American Rogers to the track after sitting idle for over 1 year and gave her a run , most of the time I was running with the fire door open to prevent safety valves blowing , now this boiler inside the cladding is nothing like what it looks on the outside . You do what you think is the best for you .
|
|
jma1009
Elder Statesman
  
Posts: 5,922
|
Post by jma1009 on Apr 15, 2012 10:15:37 GMT
hi jim,
you are doing a wonderful job, and i cant praise enough your double flanged throatplate which is a work of art and also a very good design feature.
it may be the photos, but it appears that the firebox crown is going to be everso low in proportion to everything else.
i would have been tempted to form the bends in the flanged plates rather than cut the edges on the bends, as this is otherwise a source of weakness and trouble even when silver soldered as they must be.
i would also not silver soldered the tubes to the tubeplate until the inner firebox wrapper and front foundation ring and throatplate were all silver soldered. tempting as it may be to fit the tubes at this stage, i fit them at a later stage when the risk of damaging them and their joints is reduced .... the joints you have yet to do will require some really big heat ups that isnt required for fitting the tubes.
there should be plenty of room between the firebox tubeplate and the throatplate as this is where the largest heat transfer takes place and the boiled water needs to escape freely and circulate.
cheers,
julian
|
|
|
|
Post by Jim on Apr 15, 2012 11:24:51 GMT
Hi Shawki,
It sounds like you had a great run with your Rogers locomotive, it's not a Virginia by chance is it?
Jim
|
|
|
|
Post by Shawki Shlemon on Apr 16, 2012 9:30:44 GMT
I used Washington plans and basic castings but I didn't invest in expensive castings for the cab , the dome and sand box and few others , there were thousands of these built and thousands of versions , Reevs no longer made the name plates and therefore ended up an American 4-4-0 with Rogers stickers on cylinder side as it was on Washington .
|
|
steam4ian
Elder Statesman
   One good turn deserves another
Posts: 2,069
|
Post by steam4ian on Apr 17, 2012 22:45:53 GMT
G'day Jim
I am no expert, but I have learned from bitter experience, because not being an expert that is the only way I have learned.
Shawki mentioned your fire box height. I note your firebox seems to slope down forward, is this what will happen when you glue things together. Prototypically firebox crowns are either level or slope down towards the back. The reason for sloping to the back is that it gives more free board when going down grade when the water drops in the glass. Thermally and gas flow wise the back of the firebox doesn't do as much as elsewhere.
If you haven't yet cut your fire hole you could reduce the height of the back plate. You could also raise your tubes in the barrel.
Thanks for the inspiring pictures BTW.
Regards
Ian
|
|
|
|
Post by Jim on Apr 18, 2012 4:14:47 GMT
G'day Ian, Thanks for your input Ian, it's much appreciated. My apologies for not being a bit clearer in the first post that I was just trying things out to see how they'd fit and if any adjustments would be needed. As you correctly point out the crown of the fire box isn't sitting properly but it can be rectified in the ways you suggest. I'm a bit of a devil I know for lashing things together to see what it will 'look like' and of course there's the inevitable almighty crash as it all collapses usually a nano second before I've taken the photo!   Had some good news today from Dave Noble to say the BR Top Feeds are finished and will be on their way out as soon as he has my details. Perrier has a reasonable design from which to make your own but the lost wax castings of Dave's really look the goods.  Jim |
|
|
|
Post by Jim on Apr 30, 2012 8:10:24 GMT
Progress on Boadicea's boiler has been a bit slow of late due to work on household tasks like blocked drains and gutters etc. even so some boiler work has been done. The steam dome is now silvered in and Dave Noble's top feeds have been matched with their bushes for a trial fit to see how they look. I've also silvered on the throat plate and it's nice and square.  A test fit of the tube stack in the smoke box tube plate has confirmed that all will fit together nicely on the front end when it comes to silvering up that section. The next job now is to start on the fire box assembly. The first photo shows the top of the boiler with some of the external fittings The next photo is the fire hole ring in the first stages of being turned. 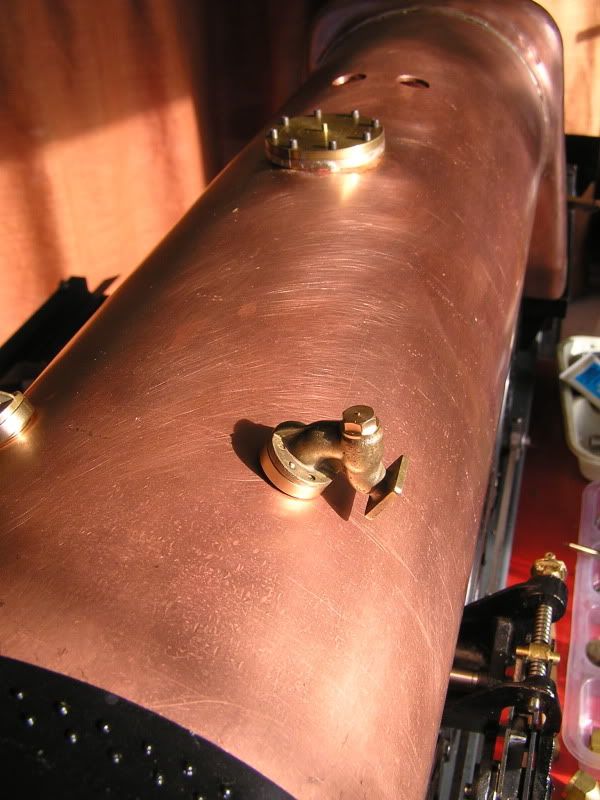  Jim |
|
|
|
Post by Geoff (Carlisle) on Apr 30, 2012 20:35:47 GMT
Jim , you are making a nice job and you don't hang about .
Geoff.
|
|
|
|
Post by Geoff (Carlisle) on May 24, 2012 21:32:16 GMT
Hi Jim You've been very quiet for a long time so i guess you must be nearly finished your boiler by now. As for me i started to build a jig for forming the tender side sheets. After it was made and the 16G brass sheet was squared up i thought i had nothing better to do than lift the arms up and bend the brass. Well, it did bend it a little but the 1" dia BMS bars started to bend,job stopped. Well we had to weld 2"x1/4" angle iron under the bottom bar and then bolted 2"x1/2" steel bar on top just to beef it up and stop it from bending.When the job is done is done photos will follow,but i did,nt know brass sheet was so hard to bend. Geoff (Carlisle)  |
|
|
|
Post by RGR 60130 on May 24, 2012 22:15:43 GMT
Geoff, I found exactly the same. The jig I made had ribs welded every few inches along the bottom to support the round bars and that was OK. The initial roller was 1 inch diameter but that bent up in the middle. It was replaced with a 2 inch roller as shown in the picture and even then I got some bending. A session involving 2 of us with 4lb hammers and blocks of wood followed before it came out OK. Having learnt with the Britannia I used 1.2mm brass for my BR1B tender on the Class 5 and even that is a bit of a struggle but no where near as bad as the 1.6mm. Reg Attachments:
|
|
|
|
Post by Jim on May 24, 2012 22:31:01 GMT
G'day Geoff and Reg,
Yes I have been a bit quiet re Boadicea but have been making progress with the boiler to the point where the fire box wrapper is now completed and fits nicely. In the next day or so will silver it to the tube plate. Then it's off to the boiler inspector for checking.
I haven't done much bending of hard sheet brass but found annealing it along the bend line eased the process.
Will post a photo of progress Geoff.
Jim
|
|
|
|
Post by Jim on May 25, 2012 8:29:21 GMT
Well Geoff after putting me on the spot I thought I'd better get out and show where I'm up to with a photo of the assembled components. By way of excuse for being slack I realised that I needed a way of fixing the grate assembly from moving under the firebox. I'd decided on a rosebud grate for Boadicea rather than the typical bar grate and that in turn led to a complete redesign of the grate ashpan system to allow for the rosebud grate to slide out for cleaning or dropping the fire. All is working well now so I'm back on task boilermaking. 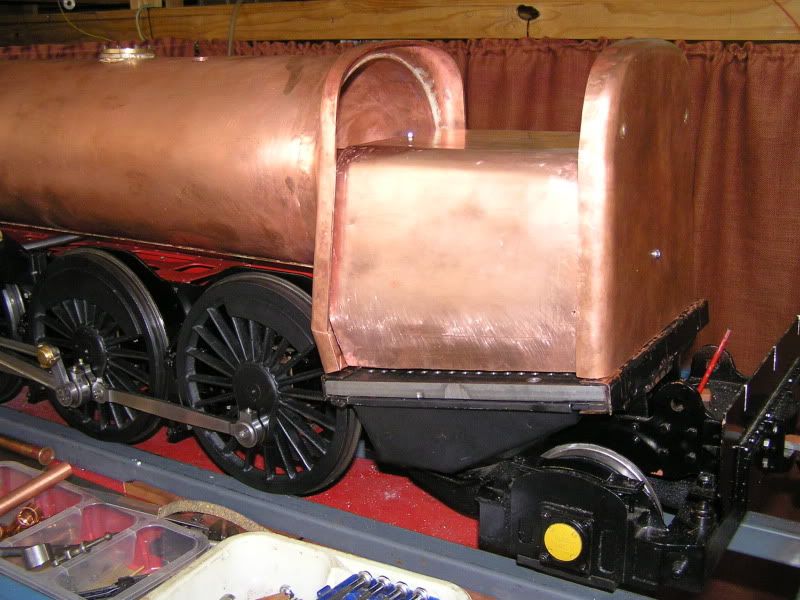 All going well tomorrow should see the tube plate and wrapper assembled and silvered in readiness for the boiler inspector to check. Jim |
|
|
|
Post by Jim on May 28, 2012 7:17:45 GMT
After yesterday's effort silver soldering the inner wrapper to the fire box tube plate I decided today to do the fire hole in the backhead for a change of activity. As it luck would have it I managed to make the flange on the fire hole ring the same diameter as a hole saw I had, wonders will never cease.  As a result only a few minutes with the file were needed to have the ring sitting nicely in the plate. This is all very exhausting work so a restorative soothing ale is very much order I think. ;D Jim 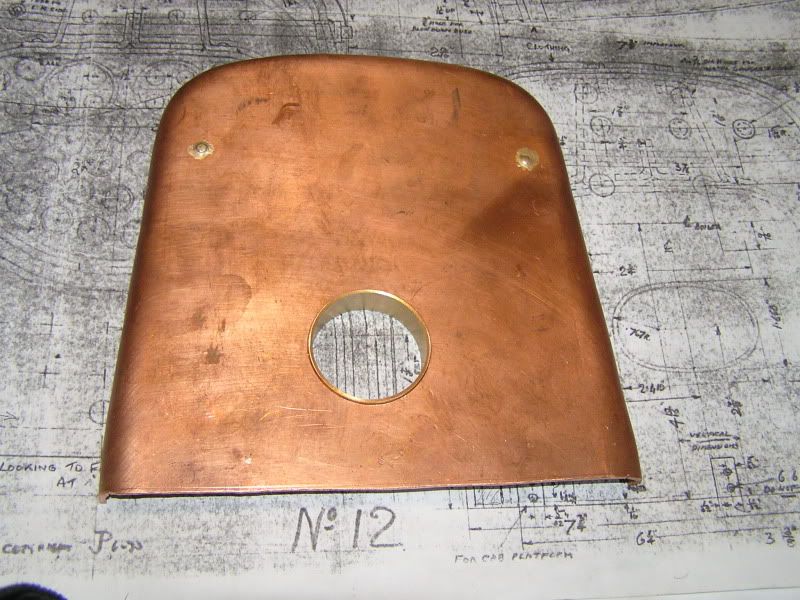 |
|
peteh
Statesman
  Still making mistakes!
Posts: 760
|
Post by peteh on May 28, 2012 8:20:50 GMT
Jim - as part of the exercise you must calculate the cost of your materials and castings - and then the cost of all those soothing ales  - no don't - you may decide that you only want the ales ! Love your work |
|