|
|
Post by Roger on Mar 16, 2019 22:25:22 GMT
This is the inner former for the 1.2mm thick Copper balance pipe. I had a half a metre of rusty 60mm x 20mm bar on my stock list, so thought it would be ideal for this. The thinking being that it needs to be held firmly in the vice in several orientations, and having the profile sticking out of the end of a bar would make life easier. So here I've sawn off a chunk and this is a 12mm Carbide Ripper taking 1mm cuts to a total of 20mm deep. I actually only need it to be 11.45mm deep, but it's going to be much easier to form if the excess material has somewhere to go. I also need to be able to get to the finished shape with mallets. 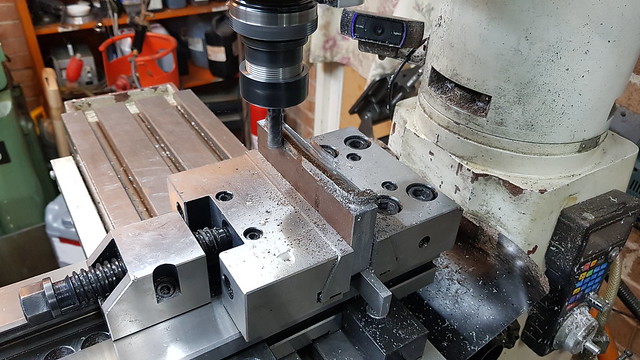 20190316_174448 20190316_174448 by Anne Froud, on Flickr Here's a wobbly video of the roughing operation. (if Flickr ever finish processing it!) I'm pushing it as hard as I can because I want to finish this today, and I didn't start machining until 3:30pm. It's running at 105mm/min I chose a 12mm cutter because it almost cleared all of the stock (there's a wafer left at the back) and I didn't want to use a 16mm ripper which was the next size up. That's because it's more prone to chatter due to its size. 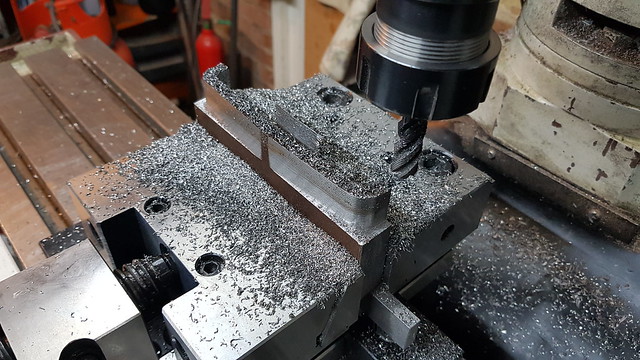 20190316_184534 20190316_184534 by Anne Froud, on Flickr 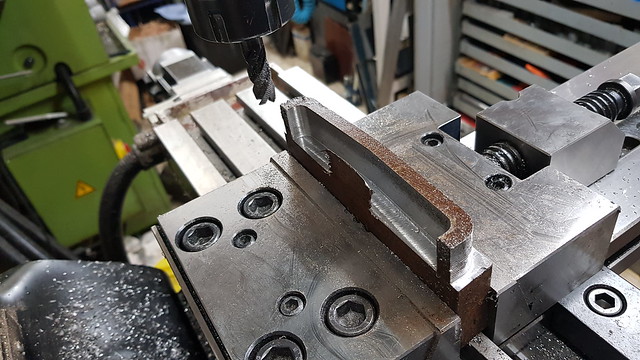 20190316_184622 20190316_184622 by Anne Froud, on Flickr A long series 8mm Carbide 4-flute so I can get into the smallest radius which is 4.5mm All of this could have been done using 3D machining, but it's much less efficient. Wherever possible, I use 2D machining to control the tool path and avoid cutting fresh air. 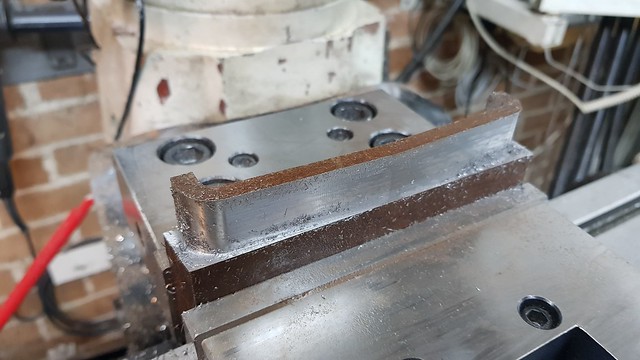 20190316_193025 20190316_193025 by Anne Froud, on Flickr This is the result of the 3D machining of just the top 3mm using Radial milling. You can see the lines radiating from an imaginary point in the middle and 30mm back from the centre line. That way you can profile up and over the edges tolerably well. I'm sure more sophisticated strategies are available on better CAM packages, but it works well enough. 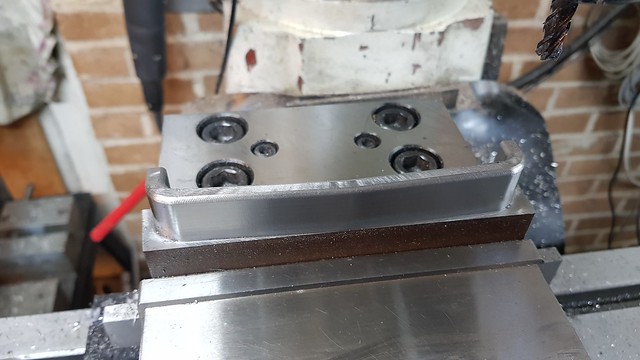 20190316_214549 20190316_214549 by Anne Froud, on Flickr I've cleaned up the worst of the rust so I don't get absolutely plastered in the stuff when I'm handling it. 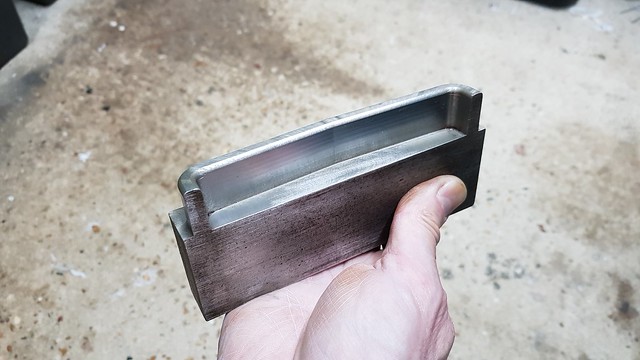 20190316_215756 20190316_215756 by Anne Froud, on Flickr I've since wiped the rusty part over with Fertan on a tissue to see if that will kill the remaining rust. 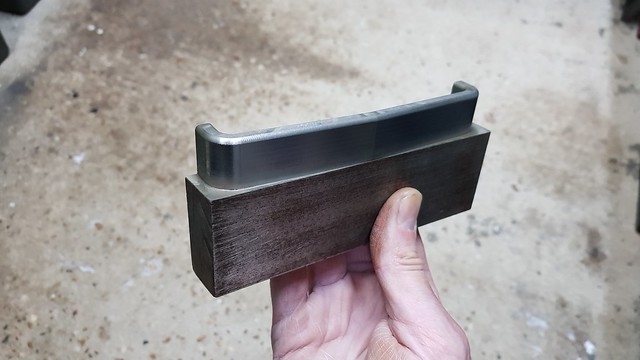 20190316_215821 20190316_215821 by Anne Froud, on Flickr I've ordered a small sheet of 1.2mm Copper sheet from eBay which should be here next week so I can crack on with this part. I'm much happier with this method of construction than the Stainless Steel welded version I had planned to do. This will have softer corners and look the part. |
|
|
|
Post by 92220 on Mar 17, 2019 9:07:35 GMT
Hi Roger.
If you want to get rid of rust on a piece of steel, or even a made part for the loco, you can do what I do...phosphate it. I have a small plastic crate that is filled with a 15% solution of phosphoric acid. I immerse any steel parts I want to kill rust on, or protect it from rust in the future, for 20 minutes. When done, I just take the part out and dry it off with paper towel/kitchen roll. The surface takes on a pale greyish colour which, when dry, doesn't rub off. If you don't leave it long enough, the phosphate coating rubs off. It actually adheres even better if the item is actually rusty!! It also gives an ideal surface for paint.
On a different subject, I can't find the part of your thread that says what thickness steel sheet you have used for the boiler cladding. I was thinking of using 0.5mm steel sheet. Where did you buy your cladding sheet?
Bob.
Edit: I forgot to include.....the phosphoric acid bath actually changes the ferric oxide (rust) to stable ferrous oxide which provides a protective coating.
|
|
|
|
Post by Roger on Mar 17, 2019 11:56:37 GMT
Hi Roger. If you want to get rid of rust on a piece of steel, or even a made part for the loco, you can do what I do...phosphate it. I have a small plastic crate that is filled with a 15% solution of phosphoric acid. I immerse any steel parts I want to kill rust on, or protect it from rust in the future, for 20 minutes. When done, I just take the part out and dry it off with paper towel/kitchen roll. The surface takes on a pale greyish colour which, when dry, doesn't rub off. If you don't leave it long enough, the phosphate coating rubs off. It actually adheres even better if the item is actually rusty!! It also gives an ideal surface for paint. On a different subject, I can't find the part of your thread that says what thickness steel sheet you have used for the boiler cladding. I was thinking of using 0.5mm steel sheet. Where did you buy your cladding sheet? Bob. Edit: I forgot to include.....the phosphoric acid bath actually changes the ferric oxide (rust) to stable ferrous oxide which provides a protective coating. Hi Bob, That's a handy tip. I wonder if that's one the ingredients of Fertan, I'll have to take a look. Fertain also claims to give an ideal surface for painting, so it sounds like it might be, although that goes black if you put enough on. The cladding is modelled as 0.5mm thick but I've used 0.6mm nominal sheet here from eBay. Sheet is always thinner than specified, so it's not far off 0.5mm thick which isn't a common size. I don't think you would want it any thinner. It's extremely rigid when it's formed into shape, and much easier to keep dent free than Brass. |
|
|
|
Post by 92220 on Mar 17, 2019 14:04:09 GMT
Thanks for that info Roger. That explains why I couldn't find 0.5mm sheet on any of the regular sites. I have half a sheet of 0.6mm anyway as it is what I bought to fabricate the cab floor and underframe. You are right. Anything but flat is very rigid. I agree with your reason for using steel as against brass. I had the same thought, hence the question.
I think you must be right about the Fertan being based on phosphoric because if the rust is thick, it will eventually go black if left long enough in phosphoric, because ferrous oxide is naturally black.
Bob.
|
|
|
|
Post by 92220 on Mar 17, 2019 14:12:52 GMT
Hi Roger.
I've just had a look at Fertan and phosphoric acid, on Ebay. It does look as if they are both offered for the same process i.e. rust conversion. The advantage of phosphoric acid is that it is a lot cheaper, and usually comes as a stronger concentration. I bought my 5 litre can and when it arrived I was surprised that it was 99% pure. To use it for rust conversion it needs to be diluted 15% acid to 85% de-ionised water. Strangely enough phosphoric acid is stronger when it is diluted! As an undiluted liquid it has very little effect on steel !
Bob.
|
|
|
|
Post by Roger on Mar 17, 2019 14:15:57 GMT
Thanks for that info Roger. That explains why I couldn't find 0.5mm sheet on any of the regular sites. I have half a sheet of 0.6mm anyway as it is what I bought to fabricate the cab floor and underframe. You are right. Anything but flat is very rigid. I agree with your reason for using steel as against brass. I had the same thought, hence the question. I think you must be right about the Fertan being based on phosphoric because if the rust is thick, it will eventually go black if left long enough in phosphoric, because ferrous oxide is naturally black. Bob. Hi Bob, Reading the label on the Fortan, it just says it's a Tannic Acid and it's non toxic. It claims to be better than shot blasting to SA2.5 whatever that is. It says that loose rust is washed off as dust and the remainder is converted to form a stable and inert surface suitable for coating/painting. The piece I've wiped over is slightly grey, but when I've put a bit more and let it dry on other jobs it goes black even if it's not rusty. |
|
|
|
Post by simplyloco on Mar 17, 2019 16:43:29 GMT
By the time my big Dutch steel boat was 12 years old I was starting to use quite a lot of Jenolite! Good stuff but not cheap...  John |
|
|
|
Post by 92220 on Mar 17, 2019 18:08:48 GMT
Hi John.
I have to admit I never got on with Jenolite. I tested a lot of rust stabilising products but ended up with Corroless 'S' Rust Stabilising Primer. When I ran Precision Paints, I sold Corroless 'S' and it was massivly popular with the boating fraternity for their boat trailers, as it could be painted directly onto rusty steel and it would convert the rust during it's drying time, and to caravaners for their caravan chassis. The fire service also bought it to protect large bolts buried in the ground, in the footings of a tall steel mast. It was brilliant stuff. I hasten to add, I didn't make it; Precision Paints were just stockists. I don't know what it is like now as the production was bought out by another company.
Bob.
|
|
JonL
Elder Statesman
 WWSME (Wiltshire)
Posts: 2,909
|
Post by JonL on Mar 17, 2019 19:36:51 GMT
Phosphoric acid is one of the ingredients of cola I believe, maybe dip it in that!  |
|
|
|
Post by Roger on Mar 17, 2019 22:56:46 GMT
You've seen all of these parts before, they're mountings for the pannier tanks and the bridge supports that go across the top at the front and back. This one is going to be screwed from the inside with M2 Brass screws which will be all soft soldered. On 1501 this pad is welded onto the bottom of the tank. 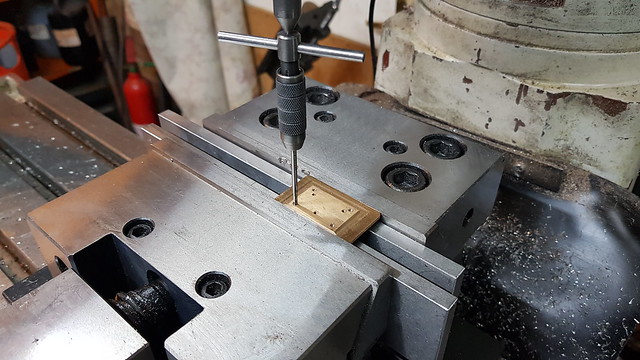 20190317_180318 20190317_180318 by Anne Froud, on Flickr Sometimes I envy those of you who can just read off the plans where all these damned holes have to go. I've had to carefully go back and make sure that everything is in the right position on the 3D model so I could be certain this is all going to line up when it's assembled. I'm trying to get to the point where I can machine all of the holes in the Pannier tanks, but that's still a little way off. I've defined the really awkward shape of the inside, leaving 4mm clearance for the Polystyrene insulation. I think I'm going to have to bit the bullet and have a go at making the inner sheet, but I might make it from something less expensive just to check it out and see how plausible it is to make it the way I've got it modelled. 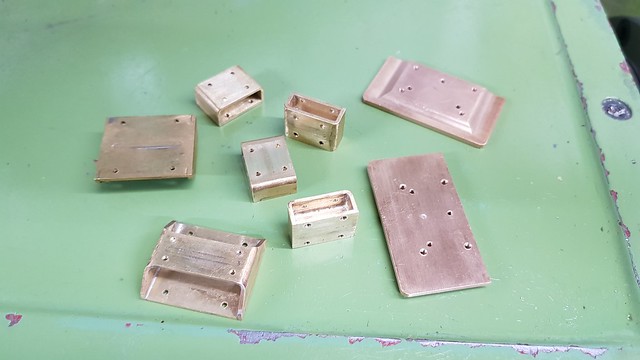 20190317_224536 20190317_224536 by Anne Froud, on Flickr |
|
|
|
Post by David on Mar 17, 2019 23:52:05 GMT
If you want to get rid of rust on a piece of steel, or even a made part for the loco, you can do what I do...phosphate it. I have a small plastic crate that is filled with a 15% solution of phosphoric acid. I immerse any steel parts I want to kill rust on, or protect it from rust in the future, for 20 minutes. When done, I just take the part out and dry it off with paper towel/kitchen roll. The surface takes on a pale greyish colour which, when dry, doesn't rub off. If you don't leave it long enough, the phosphate coating rubs off. It actually adheres even better if the item is actually rusty!! It also gives an ideal surface for paint. This is what I use for my pickle solution. It works really well on non-ferrous, and on silver-soldered steel joints too as long as you remember to take it out before it starts to eat into the steel. My pickling solution is mild enough that I can put my hand/arm in it to retrieve an item that has fallen to the bottom is necessary. Phosphoric acid is also an excellent soft-solder flux, and good for getting mill scale off black steel. I'm not game enough to clean my injectors with it, but for everything else it seems great! For flux I dilute it with demineralised water, for pickle I just fill a plastic garbage bin with tap water. |
|
|
|
Post by 92220 on Mar 18, 2019 9:11:46 GMT
Hi David.
Thanks for that tip. I had never thought of using it on non-ferrous. I'll give it a try next time I do some brass silver soldering.
|
|
|
|
Post by 92220 on Mar 18, 2019 9:15:54 GMT
Phosphoric acid is one of the ingredients of cola I believe, maybe dip it in that! Hi Nobby. Actually you are right. Coca Cola will clean up non-ferrous. It is sometimes used for cleaning coins. Not sure about ferrous though I suppose it should if it has phosphoric in it, though the reaction would be slow due to the probably low content. Bob. |
|
|
|
Post by delaplume on Mar 18, 2019 11:25:41 GMT
I like that idea for use as a soft solder flux------ god knows commercially that stuff is expensive enough.....Is phosphoric acid openly available or by special order only ??
Alan
|
|
|
|
Post by 92220 on Mar 20, 2019 17:59:31 GMT
Hi Alan.
You can get various size bottles of phosphoric acid on Ebay. It's not cheap though!! I'm glad I got my 5 litre can years ago when I bought it through the business. It wasn't anywhere near so expensive (relatively) then!
Bob.
|
|
|
|
Post by Roger on Mar 23, 2019 21:10:42 GMT
Having designed the balance pipe and sorted out the precise positions of the water outlets under the LH pannier tanks, it's finally time to machine the top and bottom of the tanks. I've only modelled the LH tank to date, they're just mirror images of each other with the exception of the injector valves. The outer wrapper is a sheet metal part on the 3D model, so views of the top and bottom were projected onto a flat sketch of the each as separate models so the CAM outputs could be generated relative to the outside front corner of the tank. Alibre doesn't have a CAM output for sheet metal. Here I've set up my giant paralells which will become the reference surface for the outside. The position of the end and the parallel are found with the wobbler and that corner set to 0,0 which is how it's defined in the CAM module.  20190323_095944 20190323_095944 by Anne Froud, on Flickr A pair of thin parallels and two sturdy toolmakers clamps hold it all in position. 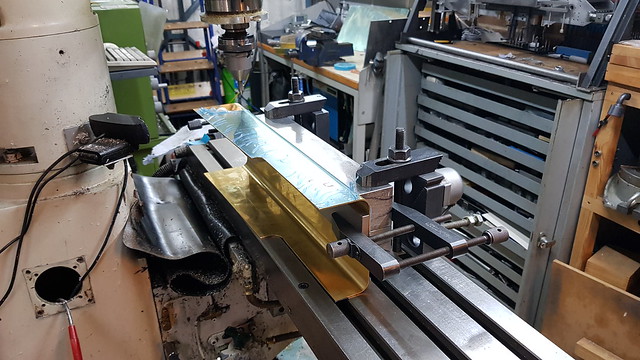 20190323_100317 20190323_100317 by Anne Froud, on Flickr An additional clamp on the end helped to stop the top from deflecting. 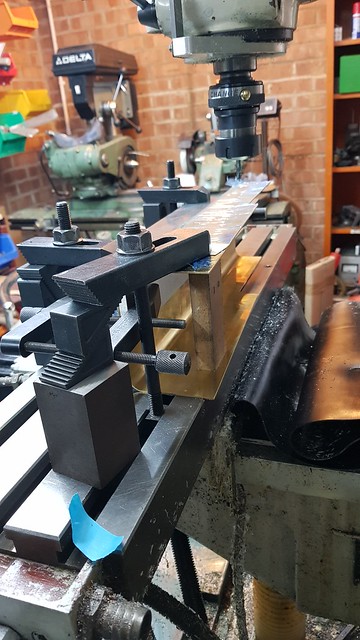 20190323_101613 20190323_101613 by Anne Froud, on Flickr The bottom of the LH tank was checked to see if it lined up with the mounting brackets... 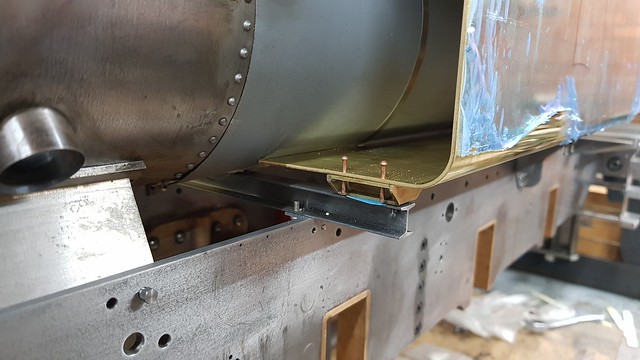 20190323_135500 20190323_135500 by Anne Froud, on Flickr ... which fortunately did. There's no need to spot things through if everything is machined to the model. The blue masking tape sandwiched between the bracket and the mounting pad simulates the wood packing that I haven't made yet. That will probably be tufnol. 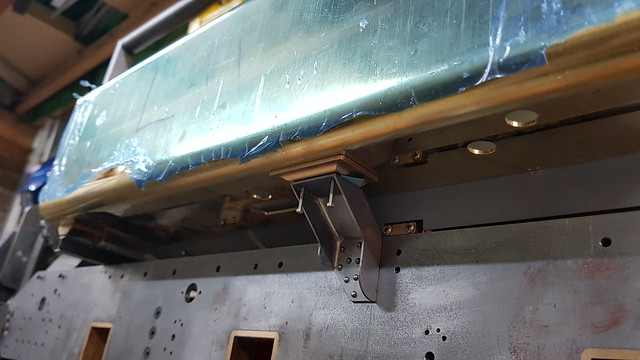 20190323_135514 20190323_135514 by Anne Froud, on Flickr This is the bottom of the RH tank getting the oblong opening for the balance pipe machine with a 3-flute 5.5mm diameter Carbide cutter. Each program had to have either no mirror, an X mirror, a Y mirror or an X and Y mirror to get the program in the right orientation. Everything was treble checked to make sure that it looked sensible before proceeding, it's very easy to get disorientated and make a mistake.  20190323_142533 20190323_142533 by Anne Froud, on Flickr 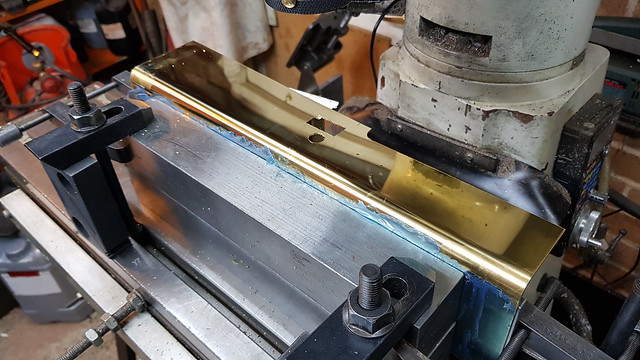 20190323_152439 20190323_152439 by Anne Froud, on Flickr 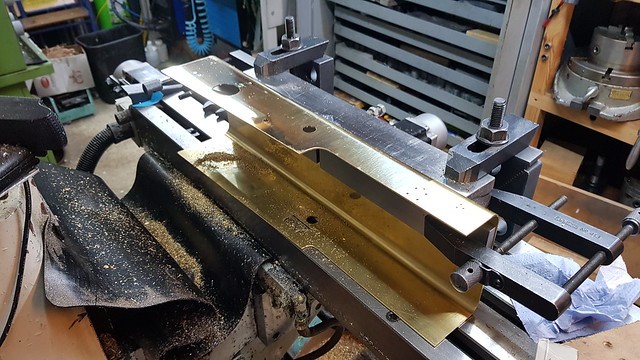 20190323_170053 20190323_170053 by Anne Froud, on Flickr  20190323_194535 20190323_194535 by Anne Froud, on Flickr Finally, both outer wrappers as in this state, here showing where all of the various bits and pieces go. 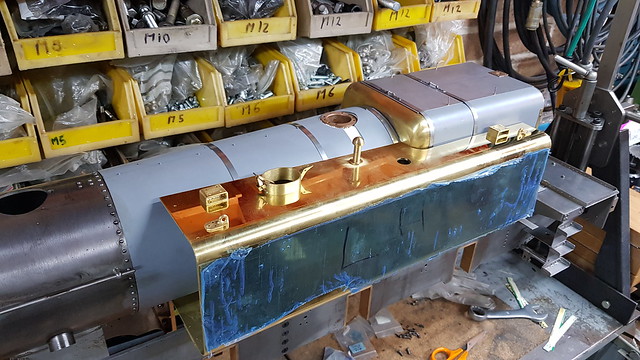 20190323_205004 20190323_205004 by Anne Froud, on Flickr Next up will be the inner wrapper which is far from easy. |
|
JonL
Elder Statesman
WWSME (Wiltshire)
Posts: 2,909
|
Post by JonL on Mar 23, 2019 22:45:00 GMT
I'm sure you will make it look easy! Making solid progress.
|
|
|
|
Post by 92220 on Mar 24, 2019 9:08:18 GMT
Looking good.....soon be steaming!!!!
Bob.
|
|
milky
Seasoned Member

Posts: 120
|
Post by milky on Mar 24, 2019 10:06:46 GMT
Roger, Keep up the fantastic work, it looks awesome..must find an excuse to pop in next time I am close by Philip |
|
|
|
Post by Roger on Mar 24, 2019 10:10:56 GMT
Roger, Keep up the fantastic work, it looks awesome..must find an excuse to pop in next time I am close by Philip Thanks Philip, Yes do, you're always welcome. Remind me to give you back the sleeves for your original arbour when you do, they're still sitting on my bench. |
|


