redmog
Part of the e-furniture
 Not Morgan weather
Posts: 461 
|
Post by redmog on Jul 11, 2010 19:09:39 GMT
Why not make it so that it can slide back into position once it has been cut off? That way you can fire it and still have a complete bunker when you're not running it. Yes. That's what I'm thinking of doing. The options are limited, so I'm in no rush. Chris |
|
redmog
Part of the e-furniture
Not Morgan weather
Posts: 461
|
Post by redmog on Jul 14, 2010 19:36:06 GMT
Cylinder Drain Cocks. Ok, so I've finished messing about with the recently obtained Simplex. I've sorted it's problems for now, and it seems to perform well, well enough to take it down the club every week and have a bit of fun passenger hawling. Having spent ages looking to see how I could link up a mechanism for the V4 cylinder drain cocks, without success, I have decided to make some automatic drain cocks. The members of my club swear by them. I used the drawing from this forum at this address - modeleng.proboards.com/index.cgi?action=display&board=general&thread=4894&page=1#47778and scaled them down for 3 1/2" by using 3/16" square brass instead of the 5/16" hexagonal recommended for 5". They seem to look OK, so I also had to start on the cylinder lagging before I screw them home for good. It's a bit of a game lining up the holes in the lagging to match the drain cock centres. The screws are temperary, it's a shame to cobble up small head hex screws at this stage, they can go in later. Chris 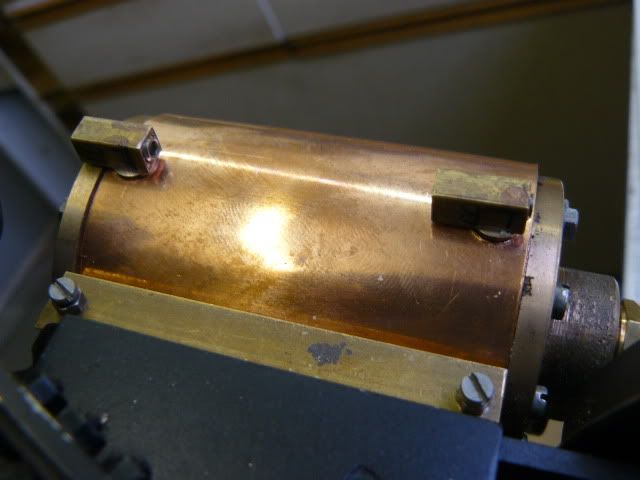
|
|
redmog
Part of the e-furniture
Not Morgan weather
Posts: 461
|
Post by redmog on Jul 15, 2010 10:27:30 GMT
V4 Axle Pump. Anyway, whilst we are on water pumps, I fitted this one up last night on the Gresley V4. I'm going to fix a pressure gauge to it and a water supply pipe for the weekend. Any bets on the pressure produced by pushing it on the track? I'll let you know. Chris 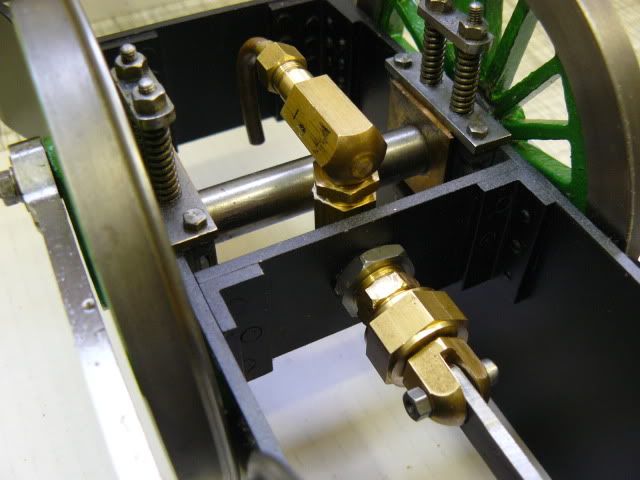
|
|
|
|
Post by baggo on Jul 15, 2010 15:08:06 GMT
Careful when you are doing that Chris. One of our Club members ruined a good pressure gauge doing this. Think it went round three times!
John
|
|
redmog
Part of the e-furniture
Not Morgan weather
Posts: 461
|
Post by redmog on Jul 15, 2010 16:21:21 GMT
With Care. Careful when you are doing that Chris. One of our Club members ruined a good pressure gauge doing this. Think it went round three times! John Thanks for thinking about my health and welfare John. Or even the price of a gauge. I'll be careful. Chris
|
|
redmog
Part of the e-furniture
Not Morgan weather
Posts: 461
|
Post by redmog on Jul 15, 2010 20:00:56 GMT
Axle Pump Test Rig. So here's this evenings lash set up. I've been trying to think what appliance I might have that carries a higher pressure gauge that I can rob. It would be interesting to have a pressure gauge that reads up to a much higher pressure. Any ideas? Chris 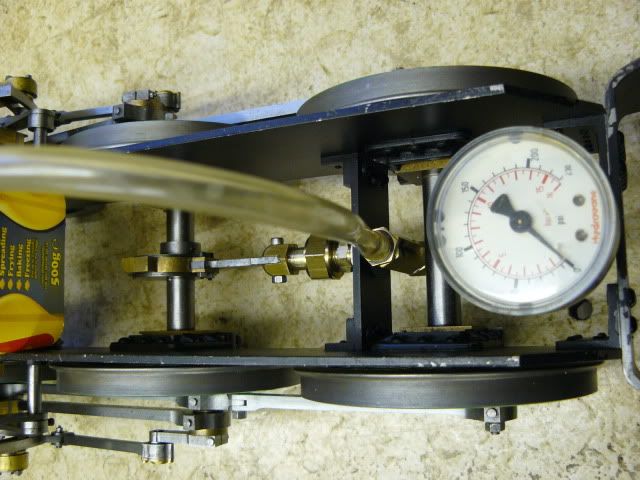
|
|
redmog
Part of the e-furniture
Not Morgan weather
Posts: 461
|
Post by redmog on Jul 23, 2010 20:04:00 GMT
Axle Pump OK. Careful when you are doing that Chris. One of our Club members ruined a good pressure gauge doing this. Think it went round three times! John Baggo was right. You do have to be very careful when testing an axle pump. The pump pressure flicked the pressure gauge needle to 250psi. with only three revolutions of the loco wheels. I'm glad I didn't use any PTFE tape on the pipework joints, which acted as a safety release for the high pressure. It means the pumps OK though. I started to clad the cylinders, but was unhappy with the way they didn't follow the cylinder cover profiles. So I've machined them, concentric to the bore. As with most jobs - the setting up takes longer than the machining. Chris 
|
|
redmog
Part of the e-furniture
Not Morgan weather
Posts: 461
|
Post by redmog on Jul 23, 2010 20:27:44 GMT
the administrator Andy Clark wrote -
--------------------------------------------------------------------------------
'Following a recent update you can now post images directly to this site without the need to host them elsewhere - there's a maximum size of 1MB, you just use the "browse" button on the "attachment" line to locate your photo and Bob's your uncle.'
Any ideas why this doesn't work for me?
Chris
|
|
|
|
Post by drjohn on Jul 23, 2010 23:19:16 GMT
the administrator Andy Clark wrote - -------------------------------------------------------------------------------- 'Following a recent update you can now post images directly to this site without the need to host them elsewhere - there's a maximum size of 1MB, you just use the "browse" button on the "attachment" line to locate your photo and Bob's your uncle.' Any ideas why this doesn't work for me? Chris It's a user-specific block ;D because we much prefer your big pictures instead of the little thumbs which when you click on them, opens the picture in the same page so you have to navigate back to where you were.  Keep your type pics coming! DJ |
|
Smifffy
Statesman
Rock'n'Roll!
Posts: 943
|
Post by Smifffy on Jul 24, 2010 19:46:12 GMT
DrJohn, just hold the Ctrl key when you click on the thumbnail, it will then open up the picture in a new tab or instance of IE but keeping the original thread for you to carry on purusing.
That may be dependent upon which version of windoze you're using though.
Smifffy
|
|
|
|
Post by drjohn on Jul 24, 2010 22:30:47 GMT
Great smiffy - that works - why did nobody mention that before?
DJ
|
|
redmog
Part of the e-furniture
Not Morgan weather
Posts: 461
|
Post by redmog on Aug 10, 2010 18:21:47 GMT
Blower - 3 hole or 1 hole. I've made the smokebox ring so that it can be removed with ease. It is secured by four socket cap screws that are easily accessible with an allen key. It'll make for easier access when plumbing in the pipework. Now - the blast pipe. Do I have one blower jet or three? Is there advantage to having three holes in the blower? My previous loco's only have one blower jet and have steamed very successfully. Is there anyone out there who has experience of a comparison of the efficiency of the two methods? Thanks Chris 
|
|
gwr1475
Seasoned Member
 "Make every part like its the only part"
Posts: 110
|
Post by gwr1475 on Aug 11, 2010 4:27:51 GMT
Hello Chris
What a fantastic job you are making of your v4. Please keep the pictures coming I look forward to seeing the next.
All the best
gwr1475
|
|
redmog
Part of the e-furniture
Not Morgan weather
Posts: 461
|
Post by redmog on Aug 13, 2010 20:03:59 GMT
Looking Like a Loco. Hello Chris Please keep the pictures coming I look forward to seeing the next. All the best gwr1475 Ok, so here's the next. I,ve gone for the 3 hole blower which is integral with the blast pipe. The blast pipe looks quite high though, and leaves only about 1/2" from the petticoat pipe. I'll have to check the drawings to see if there is a mistake. Now it's starting to look like a locomotive. Chris. 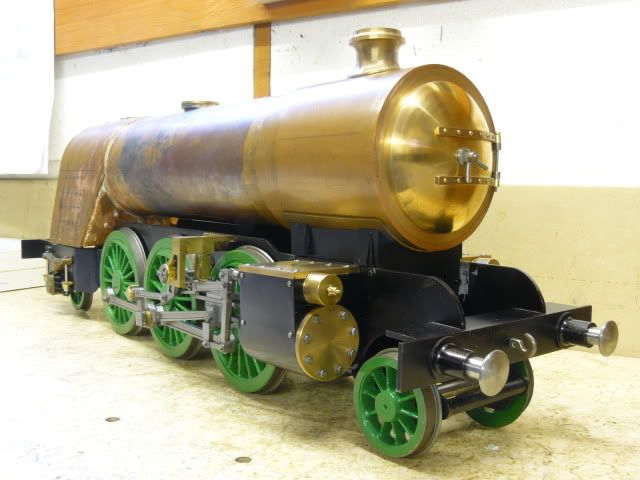
|
|
steam4ian
Elder Statesman
 One good turn deserves another
Posts: 2,069
|
Post by steam4ian on Aug 14, 2010 0:11:26 GMT
G'day Chris
The loco looks great, I really appreciate your sharing its progress with us.
Regarding blast pipe height don't forget the 1:3 and 1:6 cones relating to the chimney choke and top respectively.
Why don't you give it and American look? Have the running board high over the wheels with open steps down to a foot board on the pilot beam (buffer beam). You could put on a headlight with a generator under the smoke box and sand domes on top of the boiler. Then again! Oh, I forgot the pilot (cow catcher)!
Regards
Ian
|
|
redmog
Part of the e-furniture
Not Morgan weather
Posts: 461
|
Post by redmog on Aug 14, 2010 6:37:06 GMT
American Gresley, Oh no. G'day Chris Why don't you give it an American look? Regards Ian Nice idea Ian, but - I don't think Sir Nigel Gresley would have given his approval. I already stray away from the prototype and, 'Do my own thing'. It gives the 'rivet counters' fuel. Chris
|
|
redmog
Part of the e-furniture
Not Morgan weather
Posts: 461
|
Post by redmog on Sept 8, 2010 16:18:17 GMT
Firebox stays. Last month there was an excellent thread on here by 'paul1979'. It was the making of a 3 1/2" Brit boiler. It's here - modeleng.proboards.com/index.cgi?board=boiler&action=display&thread=4937&page=1So I thought I would try his approach for inserting the side stays. In the past I have used oxy-acetylene and fed the silver solder in. This time I used the 'silver solder in a ring' approach and positioned them, ready fluxed, before applying heat with a gas-air torch. The hardest part is bending the silver solder into 5/32" rings. The rest is easy, as can be seen. Thanks for sharing the photographs of the process Paul. Do you have any tips on making up the rings of solder. Chris 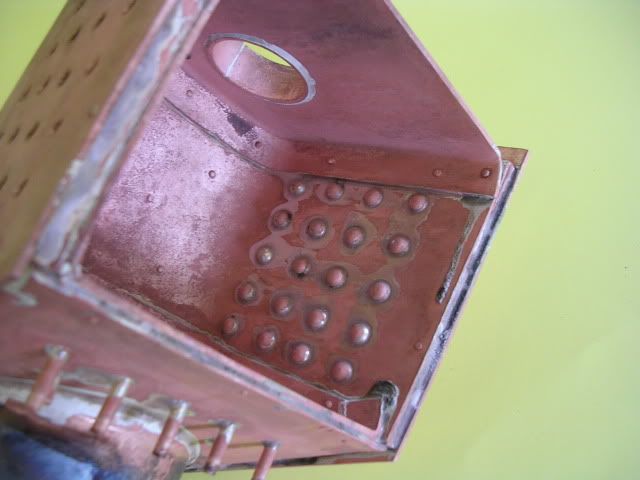 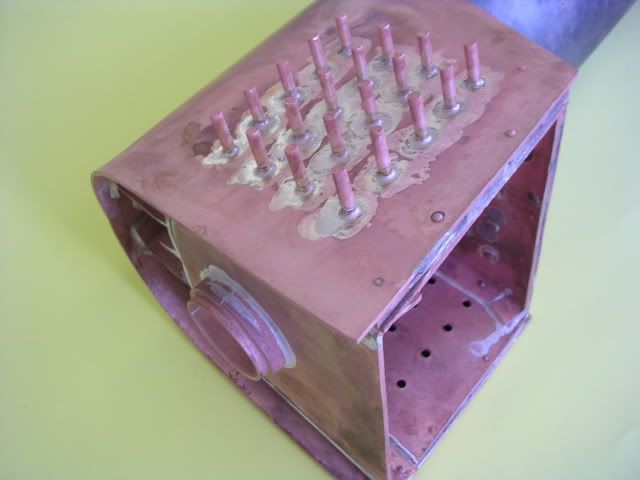
|
|
|
|
Post by drjohn on Sept 8, 2010 23:11:33 GMT
Hi Chris - you could try making it like a spring, then cutting the rings off that.
Looking excellent though.
DJ
|
|
|
|
Post by mutley on Sept 9, 2010 7:42:21 GMT
Thats the way I do it. Trap one end under a chuck jaw and with the lathe running slowly wrap it around a suitable sized bar. Snip to size at the end
Andy
|
|
redmog
Part of the e-furniture
Not Morgan weather
Posts: 461
|
Post by redmog on Sept 9, 2010 9:16:41 GMT
Silver Solder Rings. Thats the way I do it. Trap one end under a chuck jaw and with the lathe running slowly wrap it around a suitable sized bar. Snip to size at the end Andy Thanks Andy and DJ. I made some more up last night. Yes, that's the way I did it, and it worked well. I have a mandrel handle that I made years ago, It's very useful for a job like this, you can turn the mandrel at a slow speed to suit, and it seems a little safer. Chris
|
|


