redmog
Part of the e-furniture
 Not Morgan weather
Posts: 461 
|
Post by redmog on Jun 19, 2009 20:34:03 GMT
I can see it now.
- Got Ya
Thanks again Alan
|
|
|
|
Post by Shawki Shlemon on Jun 20, 2009 8:50:10 GMT
I checked the AMBSC OZ code , it states for boiler barrels from 96 mm to 127 mm one can use 1.6 mm thickness for up to 90 psi WP and for 100 psi WP the thickness must be min 2 mm .As your barrel is on the smaller side of the range your calculation is correct according to the above code . However here if one wants 100 psi WP we will insist on 2 mm . Good luck with it .
|
|
redmog
Part of the e-furniture
Not Morgan weather
Posts: 461
|
Post by redmog on Jun 20, 2009 14:37:16 GMT
Thicker Boiler Barrel. John Having downloaded this useful spreadsheet and played with it a little, I realised that by 'beefing up' the barrel and wrapper a little it increases the safety factor a lot. It also means that I have nothing to lose but a lot to gain. My previous boilers have 10 gauge barrels. It's made me realise how over designed this is, but not a bad thing. Chris
|
|
simonwass
Part of the e-furniture
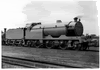
Cecil Pagets 2-6-2 of 1908. Engine number 2299. Would make a fascinating model....
Posts: 472
|
Post by simonwass on Jun 20, 2009 14:59:26 GMT
Dont want to sound too patronising but remember to make the smokebox tubeplate, throatplate and backhead a fraction smaller so your boiler isnt a fraction too big.
How does the barrel connect to the smokebox?
|
|
redmog
Part of the e-furniture
Not Morgan weather
Posts: 461
|
Post by redmog on Jun 20, 2009 17:11:10 GMT
Larger diameter copper tube. Dont want to sound too patronising but remember to make the smokebox tubeplate, throatplate and backhead a fraction smaller so your boiler isnt a fraction too big. How does the barrel connect to the smokebox? Yes - I will have to remember to make to the sizes of the material I'm using. I don't know if imperial sizes are available in larger diameter copper tube, or whether things have become metric. The nearest obtainable size will have to do. The smokebox is just a push fit onto the boiler, the same as on my Simplex and B1 'I don't foresee any problems', famous last words! Chris
|
|
|
|
Post by alanstepney on Jun 20, 2009 18:57:18 GMT
I did say in my "guess" that I thought 1/16" OK, but personally would use 1/8". But I do tend to over-engineer things. As you say, there is a lot to gain and little to lose, although, to be fair, the thicker wall will be more expensive.
(And harder to form, although that isnt important to the tube.)
When last I looked, imperial sizes were still available, although the range of wall thicknesses does appear to be less that it used to be.
As you say, making sure all the other parts fit is important.
|
|
|
|
Post by baggo on Jun 20, 2009 21:07:49 GMT
You may be struggling to get tube of 4¼" Dia. in any thickness actually. As Alan says, the range of sizes available now is quite limited.
I've had a quick look and the nearest seems to be 4 3/8" dia. You could always roll the barrel from sheet and fit a butt strap on the joint. You can keep the boiler to the size on the plans then. Might even be cheaper!
John
|
|
redmog
Part of the e-furniture
Not Morgan weather
Posts: 461
|
Post by redmog on Jun 23, 2009 16:42:53 GMT
Fabricated Motion Brackets. Because I wasn't happy with the Motion Bracket castings I decided to fabricate and silver solder my own. It has taken me longer than expected to shape the end plate and assemble the bracket ready for silver soldering but it's been worth the trouble. They might look a little untidy now that they have been soldered up, but they have turned out as expected. Just the final process of machining square and to size ready for positioning on the frames. 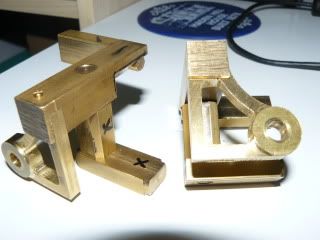 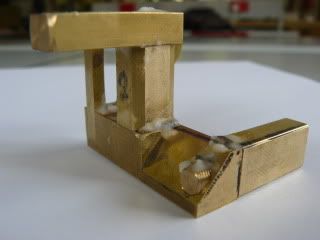 Assembled with flux and the Easiflow penetrated the joints 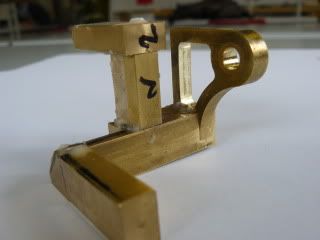 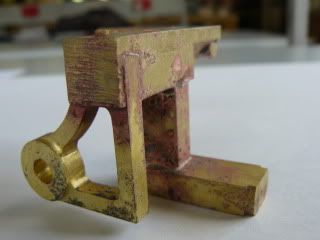 Chris
|
|
redmog
Part of the e-furniture
Not Morgan weather
Posts: 461
|
Post by redmog on Jul 12, 2009 20:43:14 GMT
Hello Ace.
I like the crosshead you made.
Did you manage to cut the slideway in it without too much trouble?
It looked very LNER ish, very much the same as my V4 crosshead.
Chris
|
|
ace
Statesman
Posts: 528
|
Post by ace on Jul 12, 2009 21:27:20 GMT
Hi redmog
Not managed to cut these out yet, I held back on the order of stuff from Chronos and the replacement slitting saw arbor was on the list. I have one set back on my V2 and that is the motion bracket, after making most of the valve gear - connecting rods etc it appears I made an error in the measurements and its to short by 2/32nd on each side. Tried to make alter it but made it look crap, so I am now cutting out a new one -- measuring twice this time though.
Your motion bracket looks good, more complicated than mine how it coming on.
|
|
redmog
Part of the e-furniture
Not Morgan weather
Posts: 461
|
Post by redmog on Jul 12, 2009 21:40:29 GMT
Ace - slow progress.
Yes, It's making slow progress.
I've finished machining the one motion bracket,
but have been held up by preparing my workshop for a roof replacement tomorrow.
I'm praying for NO RAIN, otherwise there could be some wet machinery by tomorrow night.
I'm hoping not to be crying in my beer in 24 hours.
Chris
|
|
ace
Statesman
Posts: 528
|
Post by ace on Jul 12, 2009 21:49:43 GMT
Sorry mate but I fear that wet weather is coming in over night, some plastic sheets might be in order, best of luck.
|
|
redmog
Part of the e-furniture
Not Morgan weather
Posts: 461
|
Post by redmog on Jul 14, 2009 19:34:43 GMT
Boiler Bushes - Rattle Threads.
I've been getting some bits together for when I'm ready to start on the boiler.
Today I received a 1/2" x 40 tpi tap and die.
I like to make a thread gauge for sizes that are important ie. boiler bushes,
It helps prevent 'rattlie threads' you can use the ring and plug to get the thread 'just right'.
I've made an external and internal thread with the new tap and die.
- What a 'rattle fit'!
The tap is 2 thou over size - seems common with carbon M.E. taps.
The die is undersize. I've expanded it as much as I can but it still rattles.
I'll have to make an oversize die holder and try straining it.
I like a good close thread fit for boiler bushes - for obvious reasons.
Do others have this problem? or am I being too fussy.
And, is it that - 'you only get what you pay for' with M.E. carbon
taps and dies.
Well I can't justify HSS for one off's
Chris
|
|
ace
Statesman
Posts: 528
|
Post by ace on Jul 14, 2009 21:17:16 GMT
Hi redmog
I had problems like that with the first set of BA taps n dies I bought, I have since purchased a better set. I have done in the past as you say forced open dies before to get a tighter thread, but broke one as well.
ace
|
|
redmog
Part of the e-furniture
Not Morgan weather
Posts: 461
|
Post by redmog on Jul 29, 2009 18:50:29 GMT
Motion Brackets In Place. Chris, I agree about other people's photos, I've learnt a lot from your motion bracket fabrication etc, how's the V4 coming on ? Ian. Ian, I'm pleased with what I've done on the Motion Brackets. They are more 'in the spirit of things' than the castings I had. I think LBSC would have approved. But - I like to see nice polished brass, so - Do I polish them? - which is NOT in keeping with the original, or - paint them black? as they were on Gresley's V4. All comments welcome. Chris 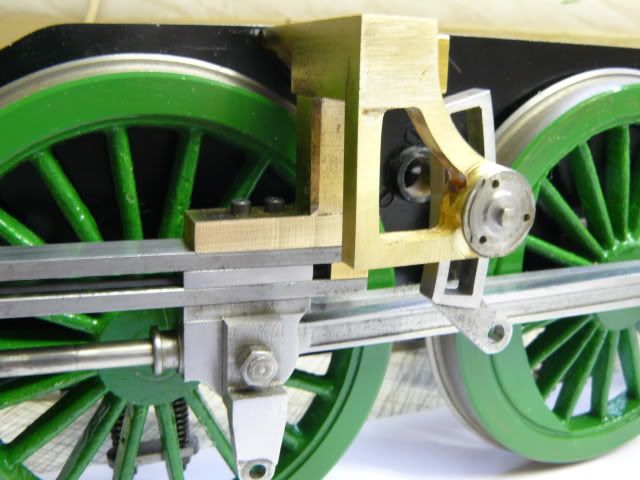
|
|
ace
Statesman
Posts: 528
|
Post by ace on Jul 30, 2009 8:36:43 GMT
Great bit of work there, yes its a shame to paint over it but then a good paint job may enhance your work even better.
I wouldn't polish the brackets but simply leave a brushed finish on the brass work for now whilst its in the build stage.
Good progress through mate.
ace
|
|
abby
Statesman
Posts: 927
|
Post by abby on Jul 30, 2009 11:02:05 GMT
Redmog if you like polished brass then that's what you should do , nice work by the way, rather than make a o/s die holder why not just cut the thread in the lathe which would produce as tight a fit as you wanted it .
I keep the change wheels for 40 tpi cable tied together because I use them so much , I don't have any dies finer than BSF.
Did you get the shed roof fixed by the way ? I managed to sort a couple of annoying leaks whilst we had the hot weather , if you remember it.
|
|
redmog
Part of the e-furniture
Not Morgan weather
Posts: 461
|
Post by redmog on Jul 30, 2009 12:10:03 GMT
Paint Later.
Abby - Thanks for the encouraging words and advice.
I also cut most of my threads in the lathe,
and my lathe is either set up for 40tpi or 32tpi.
Then I usually follow up the thread form with a die.
It follows the lathe cut thread nicely and forms the crests.
Yes - I had the complete workshop roof replaced, and 'just in time to' from the weather we have had the last week or so.
Ace - You're right I can always paint later, if I wish.
Chris
|
|
redmog
Part of the e-furniture
Not Morgan weather
Posts: 461
|
Post by redmog on Aug 11, 2009 9:51:29 GMT
Fixing the Return Crank. This is my first build in 3 1/2" gauge. My previous locomotives are 5"gauge. I've tested it all and the valves open and close in the correct position. I'm ready to 'Fix' the return cranks. The little 10 BA Hex screws impose no force to close the return crank slot, and have even sheared. On my 5" I used taper pins - no problems. There might just be enough 'meat' for a 1/16" taper pin all the way through the centre. Does anyone have any other ideas for 'Fixing'? All comments welcome. What do the 2 1/2" boys use? 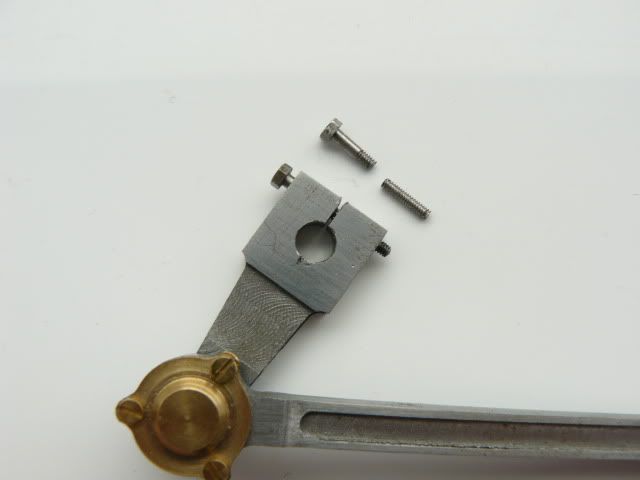 Chris
|
|
ace
Statesman
Posts: 528
|
Post by ace on Aug 11, 2009 10:55:58 GMT
Hi Chris
I have done the same thing on my G1 Green Arrow sheared the bolt, lucky for me there was enough thread sticking out for me to be able to grip it and remove the broken off piece. I have knurled the shaft and this appears to work, its a tight fit but it will just about allow me to adjust for timing. then I don't have to tighten the 10 mm bolt to tight.
|
|