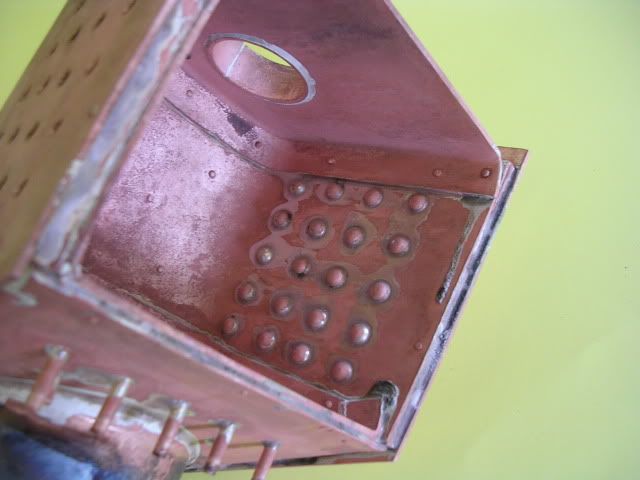
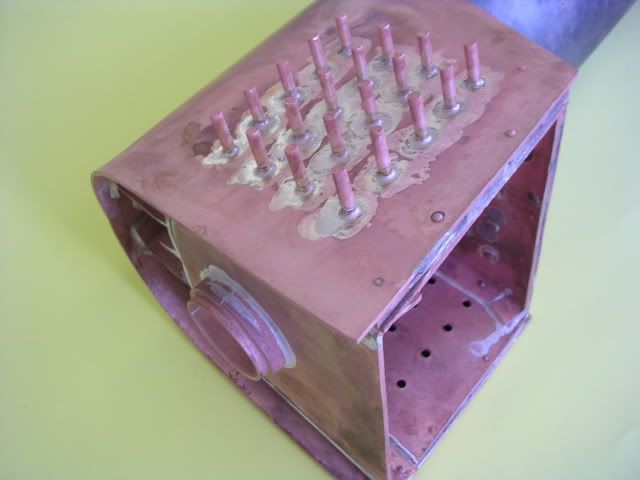
|
|
Post by Deleted on Mar 12, 2010 17:33:50 GMT
Excellent! They don't look beaten at all: more like they were done on a 100 tonne press!
JB
|
|
|
|
Post by drumkilbo on Mar 12, 2010 22:33:00 GMT
Lovely bit of work Paul, look forward to seeing more.
Ian.
|
|
|
|
Post by Shawki Shlemon on Mar 13, 2010 5:31:19 GMT
An excellent start , as you say boiler making needs patience and cleanliness . Don't forget to use cadmium bearing silver solder which flows better than the new cadmium free stuff .
|
|
steam4ian
Elder Statesman
   One good turn deserves another
Posts: 2,069
|
Post by steam4ian on May 30, 2010 4:11:38 GMT
G'day Paul.
What a truly beautiful piece of work!
Is that one piece or a top and bottom welded together?
Did you say it was 2.5mm thick?
You have inspired me just at the right time with the design of the throat plate for my new boiler; I was going to do something different with the barrel to throat plate joint.
Regards
Ian
|
|
|
|
Post by Shawki Shlemon on Jun 1, 2010 9:32:22 GMT
The safest and the best way to make a throat plate is using double flange process . A nice job done and you will reap the rewards at the conclusion of the boiler making .
|
|
|
|
Post by Shawki Shlemon on Jun 12, 2010 4:37:35 GMT
This thread is not only interesting and educational but the job is well done as well . Thanks Paul for that .
|
|
redmog
Part of the e-furniture
 Not Morgan weather
Posts: 461 
|
Post by redmog on Jun 14, 2010 19:50:25 GMT
Snipped Side Stays.
Paul, thanks for sharing the excellent photographs
of your boiler build.
I notice you have snipped off the side stays.
Is there a reason for this?
If so, do you cut them off before or after soldering?
I always leave mine full length, as a heat sink, to
encourage the fillet around the base of the stay.
Do you think I would be better cutting then down before soldering,
as I might try that approach this time.
Thanks - Chris
|
|
|
|
Post by drumkilbo on Jul 31, 2010 7:46:03 GMT
Lovely bit of work Paul, well done and thanks for showing us all the stages.
Ian
|
|
|
|
Post by Shawki Shlemon on Jul 31, 2010 10:05:16 GMT
Congratulations are in order for such a good job and great description of the process . This is an evidence that one can do anything that he/she is willing to do as long as one should believe in himself and have a go . This reminds me with my experience a long time ago when I built the Cal no 2 Shay , one of my early engines , I went to buy two pieces of copper tubes to build a T type boiler with round fire box , the gentleman behind the counter said most people would build a square fire box because it is easier to join to the barrel , my comment was , what is the worst thing that can happen ? , his reply was spoil the tube , well that is the risk I accept I said , you know what !!, it was difficult but I did it , you can see that on my website page 2 .
It is a hobby we will succeed most of the times but we also will have a difficult experience in other times ( I will not call it failure because is a learning experience ) .
Thanks Paul .
|
|
redmog
Part of the e-furniture
 Not Morgan weather
Posts: 461 
|
Post by redmog on Aug 1, 2010 15:31:34 GMT
Step in the Flange Plate. Very nice work Paul, you must be proud of the result. Boiler making creates a great sense of achievement. May I ask, what is the reason for the step in the front of this flange plate? Thanks Chris Hi All,  cheers Paul
|
|
|
|
Post by GWRdriver on Aug 1, 2010 17:05:53 GMT
Paul,
That's about as well-executed a bit of copper bashing as I've ever seen. This one will go in my "Just when I thought I was getting good at this!" file. (It's a very large file.)
|
|
russell
Statesman
  Chain driven
Posts: 762
|
Post by russell on Aug 1, 2010 17:46:23 GMT
I use 'its a knock out' drain cleaner, it is 98% sulphuric acid, but thanks to health and safety sulphuric is very difficult to dispose of, drain cleaner isn't! Not really difficult to dispose of sulphuric acid. Just add washing soda until it stops fizzing then chuck it down the drain. The washing soda converts it into sodium sulphate which used to be used as a mild laxative and is quite harmless. More harmful will be the dissolved copper ions but in the quantity used by model engineers it will not cause a problem. Russell. |
|
redmog
Part of the e-furniture
 Not Morgan weather
Posts: 461 
|
Post by redmog on Aug 1, 2010 20:04:39 GMT
Hi Chris, I work with flange depths that are minimum 3 X material thickness not including the rad. The barrel was cut to a certain length so the underside of the throat overlapped the required amount, but the top had a radius which I dont include so the flange sat forward the radius amount to achieve the 3X material thickness on the top. I hope that makes sense! cheers Paul Thanks Paul. I've got it. It compensates for the loss of contact area caused by the curve in the upper flange. Chris |
|
chiptim
Part of the e-furniture

Posts: 270
|
Post by chiptim on Aug 20, 2010 18:30:55 GMT
Great work Paul. Very Neat. I take it this isn't your first boiler?
This is the second fantastic boiler I've looked at tonight on this forum.
Tim
|
|
|
|
Post by simmo on Feb 19, 2012 17:35:59 GMT
hi paul great work one of the best i have seen ? where can i buy drawing of your boiler if at all thanks dave
|
|
|
|
Post by Jim on Feb 22, 2012 0:12:35 GMT
Hi Paul,
I'm about to start soldering up the boiler for Boadicea so your thread is both timely and I must say absolutely brilliant, thank you.
If possible could you please provide a bit more detail regarding the heating techniques you use? You say 'propane is king' and 'a nice gentle heat' and 'no acetylene' but if it's not asking too much, a photo of the propane burners you use and your heating techniques would be very helpful as I suspect many of us come to grief when it gets to silvering up the work.
Thanks again Paul for what must be one of the best and most informative boiler builds around.
Jim
|
|
robmort
Hi-poster
  3.5" Duchess, finishing 2.5" gauge A3 and building 3.5" King
Posts: 174
|
Post by robmort on Mar 29, 2014 17:19:11 GMT
Just came across this. Great example and beautiful work.
Did you also make silver solder rings for doing the outside of the stays?
I find that's necessary, as trying to do each stay by hand feeding takes too long and the flux goes off before you can do more than a few.
|
|
redmog
Part of the e-furniture
 Not Morgan weather
Posts: 461 
|
Post by redmog on Mar 29, 2014 18:25:06 GMT
Just came across this. Great example and beautiful work. Did you also make silver solder rings for doing the outside of the stays? I find that's necessary, as trying to do each stay by hand feeding takes too long and the flux goes off before you can do more than a few. Yes ... There's a lot to be learned from this thread. I certainly did when I did my V4 boiler. Countersink the outside 1/4 of the material depth and make up some rings to sit in them. Screen off with firebrick or whatever to bounce the heat back and to protect the surroundings joints then just watch them flow with a good fillet up the uncut stay which act as a heat sink to draw up the solder. Chris Firebox stays. Last month there was an excellent thread on here by 'paul1979'. It was the making of a 3 1/2" Brit boiler. It's here - modeleng.proboards.com/index.cgi?board=boiler&action=display&thread=4937&page=1So I thought I would try his approach for inserting the side stays. In the past I have used oxy-acetylene and fed the silver solder in. This time I used the 'silver solder in a ring' approach and positioned them, ready fluxed, before applying heat with a gas-air torch. The hardest part is bending the silver solder into 5/32" rings. The rest is easy, as can be seen. Thanks for sharing the photographs of the process Paul. Do you have any tips on making up the rings of solder. Chris   |
|
robmort
Hi-poster
  3.5" Duchess, finishing 2.5" gauge A3 and building 3.5" King
Posts: 174
|
Post by robmort on Mar 30, 2014 9:50:26 GMT
Chris,
Thanks. The main problem is making such rings, as normal 1.5mm solder is too thick and brittle to make 1/8" or so inside dia rings. I've tried hammering the solder thinner but it still breaks on bending. 1mm solder is difficult to obtain. What size solder did you use?
|
|
redmog
Part of the e-furniture
 Not Morgan weather
Posts: 461 
|
Post by redmog on Mar 30, 2014 10:44:17 GMT
Chris, Thanks. The main problem is making such rings, as normal 1.5mm solder is too thick and brittle to make 1/8" or so inside dia rings. I've tried hammering the solder thinner but it still breaks on bending. 1mm solder is difficult to obtain. What size solder did you use? You're right. I'd forgotten.... that's the hard part. I've got access to some bench shears which makes cutting 5mm by 1mm silver solder reasonably easy. But some won't cut it is too brittle, I don't know why there's a difference. I then wrap it around a piece of silver steel sticking out of the vice, whilst wearing thick leather glove. It can be very sharp and hard on the hands. I then slice down the coil that has been created with side snips. The photo will give an idea, but it is difficult.  |
|