|
|
Post by daveburrage on Oct 13, 2010 20:33:56 GMT
I'm flanging a throatplate for a belpaire firebox. I've flanged the firebox side ok using a conventional former; but I'm unsure how to flange out the ring that joins on the barrel. The barrel ring is almost the same size as the firebox flange for a lot of its circumference. So how to how do you support the firebox flange when forming the barrel ring? Presumably the firebox flange will just fold inwards. Keeping the former in would prevent access to the barrel flange.
Anyone care to explain a technique for forming this part?
regards
Dave Burrage
|
|
|
|
Post by jgb7573 on Oct 14, 2010 5:47:47 GMT
You're probably not going to like me saying this, but I would have flanged the barrel ring first, using a flanging plate consisting of a suitable sized hole  I would then make up a standard firebox flanging plate with a circular piece of plate that fits nicely in the flanged hole fixed on one side. Put the copper over the circular piece and form the firebox flange in the normal way. I would point out that I haven't done this, but this is how the job was described to me by our club boiler inspector. |
|
russell
Statesman
 Chain driven
Posts: 762
|
Post by russell on Oct 14, 2010 8:39:32 GMT
|
|
|
|
Post by daveburrage on Oct 14, 2010 19:11:40 GMT
Yes : I think with hindsight I'd have flanged the barrel joint first.
The link to the Spencer build is interesting. I'll have to see if Halfords have one of thore conical hammers!. I might see if i can make a simple press tool (disc to go underneath the plate and an annulus to press down on the outside) - to a least get the flange started. Thanks for the comments so far - any more ideas welcome!
regards
Dave Burrage
|
|
brozier
Part of the e-furniture
Posts: 335
|
Post by brozier on Oct 15, 2010 9:06:25 GMT
Glad you like the Spencer site :-) Doing the barrel joint first seems to be the preferred option. See the Didcot build. members.chello.nl/e.stroetinga/Didcot%20page%202.htmSome panel beating sets have a pointed dome hammer which is not quite conical I found that useful once it was started. You could start it off by gently prising up the lip a little at a time annealing regularly. You really do have to keep the other former in place whilst you do the boiler barrel joint or it soon goes to pot! Good Luck Bryan |
|
|
|
Post by Nigel Bennett on Oct 15, 2010 13:03:03 GMT
Well, Dave, it's possible to do it barrel-flange last, because I've just done it with Tom Rolt. (Case of "Doh"! when I thought how much easier it would have been to do it barrel first!)
Anyway, the way I did it was to bore a hole in a chunk of oak the inside diameter of the barrel (use whatever you have available!) and drill out a suitable-sized hole in the throatplate - i.e. barrel bore less twice the flange length you need. Then, using a variety of bashing implements, (including a foot length of 2" diameter steel bar as an extempore mallet), I battered the flange into submission in the former. I annealed the copper frequently, and kept checking my flange was coming out in the right position!
Occasionally I'd stick it back on the firebox former and batter it into shape again where it had distorted slightly.
Finally I turned up an aluminium slug and thumped that into the barrel flange to size it snugly to the barrel.
It all ended up as it should, and it's now firmly stuck in place on the barrel.
Another option is to flange up an L-section ring and bore a plain hole in the throatplate. The L-section ring is then brazed into position to simulate the one-piece part it ought to be. Don Young's Tom Rolt drawings show it that way - but I went for the more interesting method.
Good luck!
(Edit in red!)
|
|
|
|
Post by Shawki Shlemon on Oct 19, 2010 8:29:15 GMT
I have done a few of these over time , I do it exactly as John B said but remember one little point , the sides will pull in ( don't ask me why ) so leave sides larger than needed until the barrel flange is made and then trim as required . I am talking from bad experience .Don't hesitate to anneal as many times as required , if the the wooden mallet bounce , it is too hard .
|
|
|
|
Post by GWRdriver on Oct 21, 2010 13:21:17 GMT
Dave, Here are a few pics of how I did one for a 6" barrel (7.5"ga TICH). I elected to fit the barrel-side flange inside the barrel rather than out side because I wanted the barrel OD and firebox surface to be flush. The firebox side flange was flanged in the conventional way and as you will see, was done first. The first step was to make the female form, I had a piece of steel plate on hand, and the form will have to resist quite a bit of pounding, so I used steel. Attachments:
|
|
|
|
Post by GWRdriver on Oct 21, 2010 13:24:46 GMT
Now I have the female form ready to center over the plate-in-progress and its former. Getting the female form centered was important because if it missed a bit one side or the other the barrel would end up off-center to the firebox. Attachments:
|
|
|
|
Post by GWRdriver on Oct 21, 2010 13:26:33 GMT
The copper has been well annealed (the first of several times) and the female form is centered and clamped. Attachments:
|
|
|
|
Post by GWRdriver on Oct 21, 2010 13:31:01 GMT
Using a couple of smooth and steel wedges (the first very thin - think wide screwdriver blade) and hammer I begin to lift the inner flange, working all around until I have it lifted to about 45 degrees. At about this point I begin to use an automotive body "dolly", a block of steel with one side radiused, to continue to working the flange over. I anneal as often as the metal tells me it's time to anneal. Attachments:
|
|
|
|
Post by GWRdriver on Oct 21, 2010 13:33:07 GMT
Eventually we are all the way over and banged snug to the form. A few taps here and there to correct stress movement to get the plate snug to all form surfaces and that's all there is to it. Attachments:
|
|
|
|
Post by GWRdriver on Oct 21, 2010 13:34:53 GMT
A little pickle, cleaning, and buffing and walllah! . . . flanged plate. Attachments:
|
|
abby
Statesman
Posts: 927
|
Post by abby on Oct 21, 2010 19:43:49 GMT
Or you could do it like this 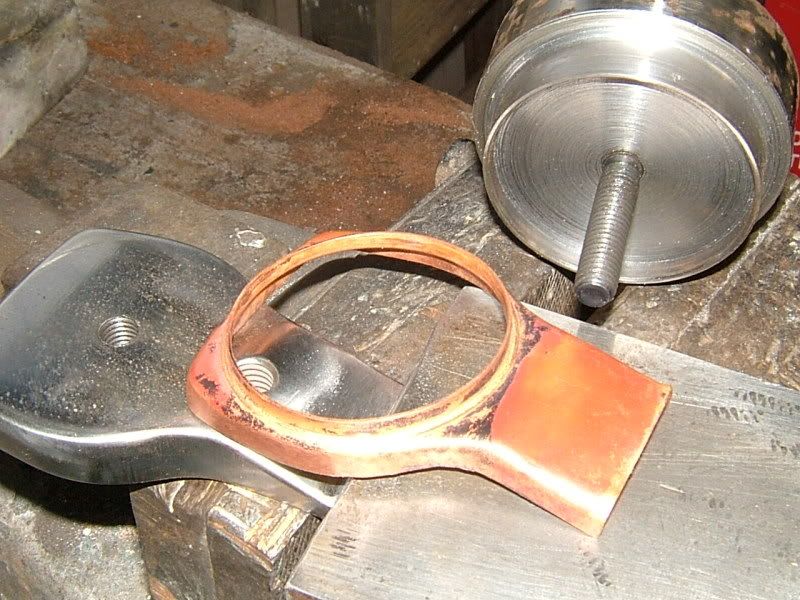  |
|
|
|
Post by daveburrage on Oct 23, 2010 19:44:25 GMT
I'm forming the plate as suggested several of the members. I've got a female plate made; got thro the levering up stage (a mixture of levering with screwdrivers and bending with mole grips). I'm now hammering on to the female ring. Lost count of the no. of annealings!
I'm fascinated by abby's method but can't quite see how it pulls the flange up from flat. How exactly does it work?
Thanks for all the ideas and suggestions.
regards
Dave Burrage
|
|
kwil
Part of the e-furniture
Posts: 383
|
Post by kwil on Oct 24, 2010 15:53:47 GMT
I would guess there is a circular former that the throatplate is being forced down upon?
|
|
|
|
Post by daveburrage on Oct 27, 2010 19:47:43 GMT
Nearly there! Pic att. Its taken a bit of a bashing and more annealings than I care to remember. Still needs a bit more cleaning up and the flanges levelling out a bit. Formers are 3mm laser profiles screwed to MDF. Barrel flange is about 7". Copper is 4mm. Formed the firebox flange. Lifted up the barrel flange away from the former with screwdrivers & mole grips. Bashed out the barrel flange into the annulus shaped former. Finished using the original former with a wood disc crewed to it. Wood disc is sized to match the bore of the barrel flange. Thanks for all the suggestions & advice. regards Dave Burrage Attachments:
|
|
|
|
Post by jgb7573 on Oct 28, 2010 18:32:33 GMT
Looking good. Well done!
|
|
|
|
Post by GWRdriver on Oct 30, 2010 0:59:19 GMT
Yes, well done!
|
|


 I would then make up a standard firebox flanging plate with a circular piece of plate that fits nicely in the flanged hole fixed on one side. Put the copper over the circular piece and form the firebox flange in the normal way.


