|
|
Post by arch1947 on Oct 9, 2013 22:48:56 GMT
Hi Sean, For what it is worth, you might try water-jet profiling instead of Laser. My experience is that laser cutting can leave localised hard spots and overall the finish is not as good. Water jet is more expensive but the results are worth is. You can also cut hardened materials with water jet. If your profile cutter person has some samples it would be worth checking out.
Cheers,
Arch
|
|
bhk
Part of the e-furniture

Posts: 458 
|
Post by bhk on Oct 10, 2013 21:00:30 GMT
Cheers arch,
I'm looking into getting the connecting and coupling rods water jetted, last time I picked up some stuff from the cutters they showed me a 300mm thick profile they had just water jetted out...Impressive!!
So got the buffer beam in place today, but not happy with it, looks like the angle I machined up is not square, over 12 inches I'm getting 1/16 of deflection, have waked away for now, look at it with a set fresh of eyes tomorrow
|
|
bhk
Part of the e-furniture
Posts: 458
|
Post by bhk on Oct 12, 2013 9:04:49 GMT
Frames are going together well, last stretcher and drag beam to go on tomorrow, I completely underestimated just how time consuming this job would be, it's been a challenge but I have learnt so much from it. Also picked up a few errors on the drawing.
I think when I do frames for the next engine I'd build a jig to assemble the Stretchers in, square and to size before assembly with the frames, further a large surface table with some large knee's would have been a huge help.
|
|
bhk
Part of the e-furniture
Posts: 458
|
Post by bhk on Oct 15, 2013 10:07:39 GMT
Just a photo for tonight Attachments: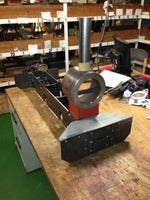
|
|
|
|
Post by andrewsleigh on Oct 17, 2013 21:48:04 GMT
looks grand
|
|
bhk
Part of the e-furniture
Posts: 458
|
Post by bhk on Oct 17, 2013 23:05:19 GMT
Picked up the laser cutting I've had done for my wheels today, the counter weight is 5mm and the crank pad is 6mm, the wheel will be turned from solid dished on the front face 6mm deep, these parts will then be secured using counter sunk screws with the heads filled in. Attachments:
|
|
|
|
Post by benlmaggi on Oct 31, 2013 17:03:18 GMT
Late to the party, of course! When I did my frames I built up the stretchers as one solid piece of steel with the steel angle running down the two sides. This was then put in the mill and each side was milled a little bit- both to ensure perfectly straight sides and to allow me to exactly measure the width of the stretchers. These were then cut into five pieces for the stretchers, and the cut edges cleaned up.
The two end ones went on first, with some checking with a square and straightedge. The middle ones then fit or "dropped" into place.
The end bufferbeams were added last, because the frame involved a lot of moving to my mate's workshop whenever I wanted to work on it. They added 20+ pounds so there was no reason to bolt them on for no reason. The four pieces of angle at each end that had the bufferbeams bolted to them were attached as described in the link to the chaski thread- the bufferbeam was clamped to the frame, the four angles were "slid" into place so that they made perfect contact with the bufferbeam, and then marked/drilled/mounted. By drilling the clearance holes in the frame angles a little oversize some "adjustment" could be made to the bufferbeams before they are bolted on for good.
As for the wheels, if I had to fabricate them myself I would do it in three pieces as you did.
For assembly, I used square-headed bolts wherever possible (and SHCS with a square nut showing on the other end) when I needed extra strength or extra bolt length. I don't know if Bagnall used square headed hardware but it has its charms.
Keep up the good work!
|
|
bhk
Part of the e-furniture
Posts: 458
|
Post by bhk on Nov 7, 2013 9:28:26 GMT
Hi Be thanks for your reply, things have came to a slow crawl at the moment, mainly due to other workload and having had two potentially serious accidents in the past two weeks, one was an eye injury which resulted in a A&E visit and the other a hand injury from the lathe which i'm lucky not to have broken, thankfully nothing too serious that modern health care cant sort out but a reminder to me that i need to be more careful.
|
|
bhk
Part of the e-furniture
Posts: 458
|
Post by bhk on Nov 9, 2013 3:31:52 GMT
Hornblocks bolted in and ready for the axle boxes to be machined. Attachments:

|
|
bhk
Part of the e-furniture
Posts: 458
|
Post by bhk on Nov 13, 2013 22:37:58 GMT
Feeling somewhat frustrated today, been looking for a good smart & brown 1024 lathe for some time, recently a chap was selling one in the UK in top condition, he was a asking a little high for it but then suddenly dropped the price to £95 and it went very fast, sadly I missed out. Turns out it was bought by home based machine dealer who has now put it back on eBay for £600 starting price but in between buying and selling it has removed the bed from the base, smashed the oil sight glass, cut the flat drive belt and broken a oil feed pipe!
|
|
bhk
Part of the e-furniture
Posts: 458
|
Post by bhk on Dec 5, 2013 23:54:45 GMT
Well my engine is off into storage for a while, sadly work and wedding need to take priority for the next few months.
Hopefully the new year will bring with it the opportunity to get a lathe set up in the garage so I can make some real progress when I restart.
|
|
|
|
Post by benlmaggi on Jan 14, 2014 21:30:06 GMT
Also picked up a few errors on the drawing. I would love to know what errors you discovered. To this point I have found one (if I recall correctly it involved the front deck mounting angle holes). Also, there are two pairs of very small holes above each axle and they are for axlebox lubricators- which aren't shown on any of the prints or described in the book. They are available on a separate plan and were designed by the chap who runs Blackgates Engineering- the vendor of the Sweet Pea castings. I don't plan to use the lubricators and wish I had known about the holes' purpose before I drilled them, but they aren't really an "error" as much as a variation that isn't described in the plans. |
|
|
|
Post by Deleted on Jan 14, 2014 21:50:42 GMT
Hi guys----------- just to add that my Great Bear mainframes were "Water-jet" cut to my supplied dimensions by MAIDSTONE ENGINEERING and have turned out very well indeed............
|
|
bhk
Part of the e-furniture
Posts: 458
|
Post by bhk on Jan 14, 2014 22:04:10 GMT
Also picked up a few errors on the drawing. I would love to know what errors you discovered. To this point I have found one (if I recall correctly it involved the front deck mounting angle holes). Also, there are two pairs of very small holes above each axle and they are for axlebox lubricators- which aren't shown on any of the prints or described in the book. They are available on a separate plan and were designed by the chap who runs Blackgates Engineering- the vendor of the Sweet Pea castings. I don't plan to use the lubricators and wish I had known about the holes' purpose before I drilled them, but they aren't really an "error" as much as a variation that isn't described in the plans. Hi Ben, I'm away with work at the moment and away from the drawings, I will revert the soonest. Cheers Sean |
|
bhk
Part of the e-furniture
Posts: 458
|
Post by bhk on Apr 8, 2014 23:01:27 GMT
Hi all, it's been two months since I last posted on my build thread, work is still at a stand still though my brain has been planning the next stages.
My real job has been intense over the past few months, but with one last hurdle we are getting there and getting the ship back to NZ soon in top condition!
But big news is that in 10days I get married! This being done it will clear a lot of funds up so hopefully a lathe in the garage is not to far away
Cheers
Sean
|
|
peteh
Statesman
Still making mistakes!
Posts: 760
|
Post by peteh on Apr 9, 2014 11:04:26 GMT
Congratulation Sean!
|
|
bhk
Part of the e-furniture
Posts: 458
|
Post by bhk on Dec 21, 2014 7:01:26 GMT
Been a long time since I last updated this, but it's also been a long time since I've done anything with the engine. The lathe is now up and running so no excuses, any milling I need to do I'm just going to have to beg steel and borrow time on a machine as its off the budget till end of 2015. So today I got back in the garage and started to work out the boiler. I wanted to get away from the marine type for various reasons so have came up with a modified version of the romulus boiler that I can use, to visualise what I'd come up with I used.....cardboard! And my fag packet drawing. Of course all this will be made into a more formal affair over the holidays. [img src=" ![]() i1369.photobucket.com/albums/ag214/seanbryant88/5B4AD7A2-6AA2-4D40-BB93-8EDD3492305A_zpscg4jdssu.jpg i1369.photobucket.com/albums/ag214/seanbryant88/5B4AD7A2-6AA2-4D40-BB93-8EDD3492305A_zpscg4jdssu.jpg"][/IMG] [img src=" ![]() i1369.photobucket.com/albums/ag214/seanbryant88/B51101C3-43E3-4FBE-BA8D-01E5D0FC014A_zpsooqwfbdk.jpg i1369.photobucket.com/albums/ag214/seanbryant88/B51101C3-43E3-4FBE-BA8D-01E5D0FC014A_zpsooqwfbdk.jpg"][/IMG] I was at first worried about cutting out a large section of the frame, but plan to put a lot of strength back in when I make the frame on which the boiler will sit.....the beauty of freelance, chop here, put this there, don't like that, make that bigger I've also measured up for the axle box castings, which I'll make a pattern for and get cast in the new year. |
|
|
|
Post by benlmaggi on Dec 23, 2014 20:41:29 GMT
For what it is worth, you can purchase from Blackgates Engineering a steel boiler print that is for a "regular" boiler (if I remember correctly). I plan to not build a marine style boiler either.
|
|
bhk
Part of the e-furniture
Posts: 458
|
Post by bhk on Dec 23, 2014 21:30:11 GMT
For what it is worth, you can purchase from Blackgates Engineering a steel boiler print that is for a "regular" boiler (if I remember correctly). I plan to not build a marine style boiler either. I've just sent them an email asking....be interesting to see there solution. I presume most boilers will have to be modified regardless from as drawn to comply with the code down here in NZ Cheers Sean |
|
bhk
Part of the e-furniture
Posts: 458
|
Post by bhk on Jan 6, 2015 20:56:40 GMT
I contacted Blackgates and quote there reply below.
"Hi Sean
Thank you for your email enquiry regarding the Sweet William Boiler Drawing (Conventional Type - Non Marine). Unfortunately this is something that we have never done.
Regards
Jacquie"
So will continue designing my own, I'm away with work at the moment, but I know the the AMBSC code part 2 is in the postbox waiting for me when I get back.
|
|


