|
|
Post by Roger on Jul 23, 2020 21:37:21 GMT
This is the sprung mount for the inside of the throatplate cladding. You can see that the areas adjacent to the spokes has been lowered so that the outside doesn't touch there. The contact area between the spokes is flexible which allows it to accommodate the slight roundness errors on the cladding. I made the OD half a millimeter over size so it's a nice tight fit.  20200723_122451 20200723_122451 by Roger Froud, on Flickr  20200723_122915 20200723_122915 by Roger Froud, on Flickr So this is the first use of the new spray gun and I really like it. It's just the right size and it's easy to control the size and shape of the spray pattern.  20200723_213336 20200723_213336 by Roger Froud, on Flickr So it's back to bare metal again on the smokebox and start again. I wasn't happy with the first coat of black enamel applied with the AirBrush, and trying to tidy it up with wet & dry would have taken way too long and not been worth the effort.  20200723_122921 20200723_122921 by Roger Froud, on Flickr The boiler cladding came out pretty well, but then again, it's dead easy to get a reasonable Matt finish. Still, it's good practice for when I do the enamel. I used a vertical spray pattern and turned the piece to bring about 30mm round for the reverse pass. Quite how well this will go with the enamel is anyone's guess. Doubtless I'll have more than one go at it!  20200723_213913 20200723_213913 by Roger Froud, on Flickr Oh, and this is what happens when you unscrew the top, but don't realise that you're unscrewing the whole of the reservoir! Doh! There's a neat little strainer that sits in the pocket and is retained by the reservoir. It's not particularly fine, but every little helps.  20200723_214028 20200723_214028 by Roger Froud, on Flickr |
|
|
|
Post by chris vine on Jul 24, 2020 0:49:26 GMT
Hi Dave and Roger,
If you put the regulator at the gun, then the air in the pipe is still at some 100+ psi. So the volume flow rate in pipe is quite slow so the pressure drop is also low.
If you put the regulator at the compressor end, then the pressure in the pipe will only be some 20 psi maybe. Then the volume flow rate and so air velocity in the pipe will be much higher and the pressure drop will be higher.
Also, you will get a variation in the pressure - as you pull the trigger it will flow faster for the first moment and then the pressure will reduce. Of course all this depends on how long the pipe is and what diameter it is!
When I got my gun, the rep from the company said he would do everything he could to help me as long as I fitted pipe from the compressor with no restrictions (IE to use push in connectors on the outside of the tube, not inside as normal) and put the regulator on the gun.
Chris.
|
|
barlowworks
Statesman
 Now finished my other projects, Britannia here I come
Posts: 874 
|
Post by barlowworks on Jul 24, 2020 8:22:19 GMT
For an airbrush it is possible to buy a MAC valve, a kind of screw in regulator that screws into the airbrush air intake. High end airbrushes have them built in. I suppose they serve the same purpose.
Mike
|
|
|
|
Post by Roger on Jul 24, 2020 21:24:00 GMT
It seems to me that painting is like a game of Snakes & Ladders. You get so far, then have to go back. Then you get a bit further, only to get back to the start again. So today I tried to carefully use the AirBrush to get into the tiny deep recesses of the washouts on this backhead cladding, and that ended up as a disaster. There was nothing for it but to clean the whole lot off, back to bare metal and start again. The trouble with Brass is that you can't clean it up with the Shot Blaster because it's too easily damaged. I quickly dumped a load of thinners on it and got 95% of it off, including the primer, with some blue tissue roll. Anyway, I've primed it again, and decided to make it easier to paint by mounting it on the spit too.  20200724_214130 20200724_214130 by Roger Froud, on Flickr You'll notice that I've also swapped the motor to the other side of the bearing. That's because it's counter productive to have all the load pulling down on that side. The M8 thread was also damaging the bearing, so I've made a plain shaft with threaded ends to solve that too. So it now moves much more smoothly.  20200724_220814 20200724_220814 by Roger Froud, on Flickr I also made a few more mounts. This one is for the thin cover sheet on the back of the Reverser...  20200724_220844 20200724_220844 by Roger Froud, on Flickr ... and this is the main quadrant bracket.  20200724_220902 20200724_220902 by Roger Froud, on Flickr I also fitted the Firebox Cladding to the mounts I made some time ago. I've used a piece of Florists wire wrapped around an M1.4 bolt screwed into one of the bushes to stop it from pivoting on the main fixing screw. The bush in the middle is for one of the Cladding Bands.  20200724_220938 20200724_220938 by Roger Froud, on Flickr When things don't go well, I like to improve things to try to make it easier next time. 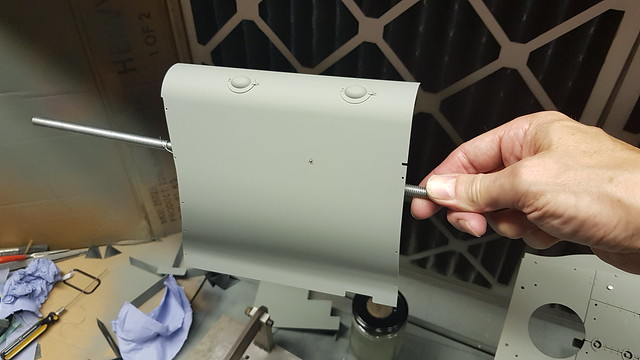 20200724_220953 20200724_220953 by Roger Froud, on Flickr |
|
|
|
Post by jon38r80 on Jul 25, 2020 18:20:55 GMT
I see that you have been introduced to the pleasure of cleaning up with a vengeance. You soon learn to hold the cup to unscrew the lid rather than the gun.
I have one gun with a cup that is screwed on to the side which increases the the torture. its an odd gun that has a nozzle that works more like an airbrush but has a trigger like a spraygun which I find very usefull for spraying precatalysed laquer on medium sized bits and pieces. Its an Auarita K3, the K3 seems to be used by a number of manufacturers. , It has a round spray pattern rather than the fan that is created by having a spray gun with horns to the side of the paint orifice like the one you have. I have one of those too which is great for touching in scrapes the wife makes on the bumpers of her car!.
|
|
|
|
Post by jon38r80 on Jul 25, 2020 18:28:54 GMT
I put the regulator at the end of a large diameter hose from the compressor to near where I work and then a much smaller hose from there to the gun. I dont like the heavy hose on the gun so use a whip hose from the regulator to the gun, quite often I use a short airbrush hose, it makes it easier to waggle the gun about on awkward shapes. Havent had problems with lack of presuure or air volume doing that. The regulator is on a small stand and includes a moisture trap (not that I have had any trouble with that either).
|
|
|
|
Post by Roger on Jul 26, 2020 16:15:00 GMT
Here's the simple 3D printed stand for the new Spray Gun. It's just a simple horseshoe shape extruded to make the base and a block at the top to hold the gun. Joining the two together was done with a sketch on the top of the horseshoe and another under the top block. Those two were blended using a Loft and a couple of angle and magnitude modifiers to improve the way the shape left the attachement points.  20200726_161918 20200726_161918 by Roger Froud, on Flickr That was a 6-1/2 hour print done overnight, and here's the result. It's very strong and stable, so I'm pleased with that. 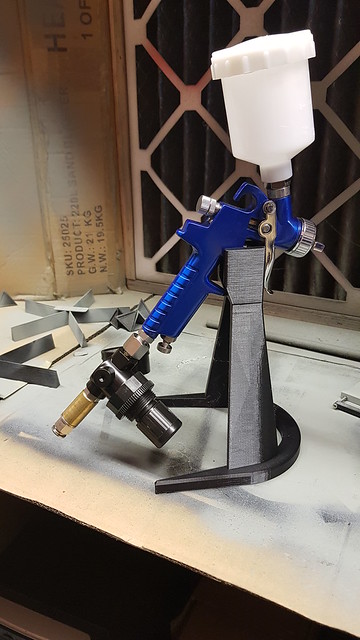 20200726_161858 20200726_161858 by Roger Froud, on Flickr |
|
|
|
Post by jon38r80 on Jul 26, 2020 21:06:10 GMT
Nice and stable it may be but if you are like me you will manage to turn round and knock it on the floor if its not clamped down, inevitably it will be full of paint without the lid on and splatter everywhere   . Been there and cleaned up the mess, just because I was too lazy to clamp it with the clamp provided to the bench edge. I would be tempted to reprint with a bar across the bottom so you can clamp it down  . |
|
|
|
Post by Roger on Jul 26, 2020 21:45:16 GMT
Nice and stable it may be but if you are like me you will manage to turn round and knock it on the floor if its not clamped down, inevitably it will be full of paint without the lid on and splatter everywhere . Been there and cleaned up the mess, just because I was too lazy to clamp it with the clamp provided to the bench edge. I would be tempted to reprint with a bar across the bottom so you can clamp it down . I think it's usefulness would be somewhat reduced by not being able to move it around. I'll just have to be careful. |
|
|
|
Post by steamer5 on Jul 27, 2020 0:46:21 GMT
|
|
|
|
Post by Roger on Jul 27, 2020 6:31:36 GMT
Hi Kerrin, That does sound like I'm tempting fate, only time will tell. I don't see the need to make the gun any lighter, it's really not a problem. It's a small gun to start with, and it balances nicely in the hand. It's not as if you have to wildly move it about. Smooth, gentle movement is all that's required. A heavy inflexible hose wound be more of a problem, but I'm using 8mm diameter which is fine. That's a neat little unit you've linked to though,I haven't seen one like that before. |
|
|
|
Post by andyhigham on Jul 27, 2020 7:49:40 GMT
If you put a steel sheet in the base of your spray "booth" and embedded a couple of magnets in your stand, you would have the extra security yet be easily movable
|
|
|
|
Post by 92220 on Jul 27, 2020 8:00:34 GMT
Hi Roger.
Nice idea but I agree with the others....there is a very real risk that the stand will get knocked over because it is unstable weight-wise. The hose and regulator makes it difficult to stand it further back on the bench so it is always going to be in a risky position. One option would be to fix a heavy lump of steel across the bottom to hold it steady. The risk of knocking the gun over is why they have a hook cast into the body, at the top, to hang it up with. The gun manufacturer is very aware of the problem of the gun getting knocked over. That is why the hook is designed with a longer than normal downward outer end. It means the gun has to be lifted to get it off the support it is on and can't easily be knocked off.
Bob.
|
|
|
|
Post by Roger on Jul 27, 2020 8:55:51 GMT
Hi Roger. Nice idea but I agree with the others....there is a very real risk that the stand will get knocked over because it is unstable weight-wise. The hose and regulator makes it difficult to stand it further back on the bench so it is always going to be in a risky position. One option would be to fix a heavy lump of steel across the bottom to hold it steady. The risk of knocking the gun over is why they have a hook cast into the body, at the top, to hang it up with. The gun manufacturer is very aware of the problem of the gun getting knocked over. That is why the hook is designed with a longer than normal downward outer end. It means the gun has to be lifted to get it off the support it is on and can't easily be knocked off. Bob. Hi Bob, I think if you could handle it and see how stable it is on the stand, you would think otherwise. It would need to be tilted at a very large angle before it would be in any danger of falling over. The stand is tall enough to allow it to sit back on the bench with the 8mm hose still connected. I designed it that way so it wouldn't need to perch on the edge. This really isn't a problem looking for a solution, I think it's fine as it is. |
|
barlowworks
Statesman
Now finished my other projects, Britannia here I come
Posts: 874
|
Post by barlowworks on Jul 27, 2020 9:05:44 GMT
The problem isn't the gun, it's the hose. It might be nice and stable on your stand but you put the hose on and it becomes an uncooperative monster fighting you all the way. Ok, a little over the top but you get my drift.
Mike
|
|
|
|
Post by jon38r80 on Jul 27, 2020 9:40:07 GMT
My problem with my gun stand is not instability, that hasnt been a problem whether the hose is connected or not, its that I have turned to get something to one side or behind me and in turning back clouted the stand with an elbow. Mabe I am just a clumsy B*****d but Murphy's or just about any law of unintended consequence has now been invoked  |
|
|
|
Post by Roger on Jul 27, 2020 10:17:23 GMT
The problem isn't the gun, it's the hose. It might be nice and stable on your stand but you put the hose on and it becomes an uncooperative monster fighting you all the way. Ok, a little over the top but you get my drift. Mike I'm only using an 8mm hose, so that's not really a problem. I guess you could trip over the hose, but with the top on that's not going to be a huge issue either. To be honest, I think the problem is being blown out of proportion. |
|
|
|
Post by Deleted on Jul 27, 2020 11:43:50 GMT
|
|
|
|
Post by chris vine on Jul 27, 2020 13:26:20 GMT
I turned round while holding the gun and the air hose touched the side of the just finished job. Ruined!!
Chris.
|
|
|
|
Post by Roger on Jul 27, 2020 13:47:56 GMT
Yep, it's easy to ruin a job with a moment's inattention. We've all done it, and we take note not to make the same mistake again.
Mistakes will happen, regardless of what measures you take. You bolt a spray gun down, and now you go over like a skittle because the hose doesn't move when you trip over it!
In the workshop, I do my own risk assessment for myself and for the job, then work with a level that I'm prepared to live with. Some are happy to hold sheet metal on the pillar drill by hand. I'm not. Some use sketchy setups that can potentially damage the work or allow it to fly out and hit you. I'm not.
I think I've got a pretty good track record in these matters, and calamities with a spray gun don't feature high on my list of potential dangers.
Now, can we please stop fretting about things that are probably never going to happen, and are hardly a disaster if they do?
|
|


 . Been there and cleaned up the mess, just because I was too lazy to clamp it with the clamp provided to the bench edge. I would be tempted to reprint with a bar across the bottom so you can clamp it down
  .
.

