|
|
Post by andyhigham on Sept 21, 2021 12:01:42 GMT
"I've doubled up on tools"
You need to more than double up on 10mm sockets
|
|
|
|
Post by Roger on Sept 21, 2021 18:37:04 GMT
The M2.5 Stainles Steel studs I'd made for the Piston Rod Gland are now too short because I've added the Oling Box, so here are four more being made. The parallel section is pretty short, and it takes a lot of force to thread these with a die. Putting enough force on the ER32 collet is a problem because the back tends to close down, gripping it with tapered jaws. That not only fails to grip it tightly enough, but also damages the thread in the collet.  20210921_164338 20210921_164338 by Georgia Montgomery, on Flickr They've turned out a bit long, so I'll shorten those in a minute.  20210921_164354 20210921_164354 by Georgia Montgomery, on Flickr The solution to the collet problem was to make a close fitting plug that engages with the very back of the collet.  20210921_192116 20210921_192116 by Georgia Montgomery, on Flickr The short shoulder supports the back, preventing it from closing too far. Obviously you can't then use the collet for something that's significantly different to the nominal size, in this case 2.5mm. However, for that size, I can really tighten the collet and it holds the stud really tightly without marking it. I'm holding a piece os 2mm Silicone O-ring cord in the groove that will take a proper O-ring when they arrive. The idea is to make sure that the plug stays in place while changing the part. Simple but very effective. I'll definitely use this idea again. In the past I'll used a scrap of material behind the part I'm gripping, but that's fiddly. It also has to be in the fairly short jaw section. This is much more satisfactory.  20210921_192147 20210921_192147 by Georgia Montgomery, on Flickr |
|
|
|
Post by Roger on Sept 21, 2021 19:34:40 GMT
The M2.5 nuts and bolts need a 3.5AF spanner which is a size I didn't make in the last batch, so here it is now. It's machined from Gauge Plate with a 1.5mm cutter using the High Speed Spindle, the jaws being finished with a 1mm cutter.  20210921_195626 20210921_195626 by Georgia Montgomery, on Flickr That was hardened and tempered after cleaning up and attached to a chain so I don't lose it. All that's needed now is to add the Blue nail varnish which is the colour code for this size. I've already made box spanners this size.  20210921_202749 20210921_202749 by Georgia Montgomery, on Flickr |
|
|
|
Post by steamer5 on Sept 21, 2021 23:55:38 GMT
Hi Roger,
Any tips on how to make the plug? Ie how did you decide what diameter to make the short shoulder? Do you think it would be possible to have a couple of different sized plugs for one collet, ie say a 3 to 2 have 3 at 0.5mm different diameters?
Cheers Kerrin
|
|
dscott
Elder Statesman

Posts: 2,438
|
Post by dscott on Sept 22, 2021 0:20:22 GMT
"I've doubled up on tools" You need to more than double up on 10mm sockets  Yes I keep one hanging up in case of emergency's... All other times it comes in handy to switch the light on. We are still coming down from our last spirited journey behind 1501. Hanging on to the carriage with one hand and the new phone in the other, shot a shaky record of the events. She was never designed for passenger comfort or space for crew. David and Lily. |
|
|
|
Post by 92220 on Sept 22, 2021 8:32:00 GMT
The M2.5 Stainles Steel studs I'd made for the Piston Rod Gland are now too short because I've added the Oling Box, so here are four more being made. The parallel section is pretty short, and it takes a lot of force to thread these with a die. Putting enough force on the ER32 collet is a problem because the back tends to close down, gripping it with tapered jaws. That not only fails to grip it tightly enough, but also damages the thread in the collet. 20210921_164338 by Georgia Montgomery, on Flickr They've turned out a bit long, so I'll shorten those in a minute. 20210921_164354 by Georgia Montgomery, on Flickr The solution to the collet problem was to make a close fitting plug that engages with the very back of the collet. 20210921_192116 by Georgia Montgomery, on Flickr The short shoulder supports the back, preventing it from closing too far. Obviously you can't then use the collet for something that's significantly different to the nominal size, in this case 2.5mm. However, for that size, I can really tighten the collet and it holds the stud really tightly without marking it. I'm holding a piece os 2mm Silicone O-ring cord in the groove that will take a proper O-ring when they arrive. The idea is to make sure that the plug stays in place while changing the part. Simple but very effective. I'll definitely use this idea again. In the past I'll used a scrap of material behind the part I'm gripping, but that's fiddly. It also has to be in the fairly short jaw section. This is much more satisfactory. 20210921_192147 by Georgia Montgomery, on Flickr Hi Roger. Interesting. I've also found that my ER32 collets don't hold as tightly as a 3-jaw Griptru, and wondered why. Collets are supposed to be the ultimate for grip and accuracy of holding. I never use a collet in my lathe these days. I have a couple of Griptru chucks that are accurate enough that a 0.0005" DTI doesn't move when the chuck is set up properly, and I can take a piece of silver steel and clock it up true, take it out and put another piece, double the diameter, in it's place, and the new piece still doesn't move the dti. The Griptrus were worth every penny!! When I need to turn down the end of a double ended stud, or shorten it, I tap a piece of scrap brass or steel rod, and screw the stud into the tapped hole, (which should be dead centre if not removed from the chuck after tapping) using a thin locking nut to lock the thread into the tapped hole. That way, I can just loosen the nut, after the turning ops, and the stud unscrews easily, by hand. Bob. |
|
|
|
Post by Roger on Sept 22, 2021 9:13:27 GMT
Hi Roger, Any tips on how to make the plug? Ie how did you decide what diameter to make the short shoulder? Do you think it would be possible to have a couple of different sized plugs for one collet, ie say a 3 to 2 have 3 at 0.5mm different diameters? Cheers Kerrin Hi Kerrin, It was a bit crude really. I just measured the ID of the back part when there was a piece of 2.5mm rod in the collet on the bench. I made the plug to the same diameter and decided on 3mm as a sensible length of register. I didn't want it to keep coming out. Then I thought of using an O-ring to make sure of that. Now you mention it, there's no reason why you couldn't have say three shoulders on the one plug, each a different size. The O-ring could make sure that the one you push it in to is the one it uses. I should have thought that through a bit further, because that's a really useful modification. |
|
|
|
Post by Roger on Sept 22, 2021 9:30:01 GMT
Hi Roger. Interesting. I've also found that my ER32 collets don't hold as tightly as a 3-jaw Griptru, and wondered why. Collets are supposed to be the ultimate for grip and accuracy of holding. I never use a collet in my lathe these days. I have a couple of Griptru chucks that are accurate enough that a 0.0005" DTI doesn't move when the chuck is set up properly, and I can take a piece of silver steel and clock it up true, take it out and put another piece, double the diameter, in it's place, and the new piece still doesn't move the dti. The Griptrus were worth every penny!! When I need to turn down the end of a double ended stud, or shorten it, I tap a piece of scrap brass or steel rod, and screw the stud into the tapped hole, (which should be dead centre if not removed from the chuck after tapping) using a thin locking nut to lock the thread into the tapped hole. That way, I can just loosen the nut, after the turning ops, and the stud unscrews easily, by hand. Bob. Hi Bob, I think this is why the collets with a long body that pull into the mandrel with a drawbar perform better for short items. Even then, you'd probably benefit from supporting the back. The ER32 collets are really flexible because of the way they're slit. The small sizes have pretty a short contact length, and I reckon the back of the collet beyond the contact length moves in more than the front when it tightens, even when you have a long piece of rod in there. There's nothing to support the back, and I think that's why you're not getting it to grip as tightly as with the GripTru. This simple idea makes a huge difference, I can really put some force on the closing nut with it not feeling soft, and I can easily get it tight enough to grip that short length of 2.5mm diameter so I can run a die down it. There's no way that would be possible otherwise. I don't find my GripTru to be any more accurate than a normal 3-Jaw, certainly nothing close to what you're getting. However, it's really not an issue because I clock everything up anyway. Although I could probably have used it for threading the second end, I think the jaws would have put three flats on the part because you need a lot of force to cut the thread. I keep a standard threaded bush of each thread size for the sort of thing you mention. However, you can't use that when you're trying to thread the second end of a stud. |
|
|
|
Post by 92220 on Sept 22, 2021 12:40:18 GMT
Him Roger.
I think you are right about the collets flexing. As far as threading the second end of a stud goes, I make the first thread twice as long, or as much as is needed to grip a portion tightly, then I turn down the extra length to core dia which allows me to hold it very tightly. I can then thread the sceond end. When finished, I just pull the chucked end out about 4 or 5mm and then part off the first threaded end, to length. That way I never have to hold on to a thread, which, as you say, gets flattened if 'chucked'.
If your Griptru doesn't hold any more accurately than a standard chuck, then it sounds as if there is quite a bit of wear inside, or a tiny bit of swarfe has got in. I have 3 Griptru chucks. One I bought brand new from Myford, years ago. The other 2 I bought off Ebay. They all hold repeatedly at almost no visible DTI movement, regardless of diameter. One I keep with outside jaws and the other 2 I keep with the standard outside jaws. They do eventually lose their accuracy, and then I just re-adjust them. I probably don't have to do that more than twice in any one year, depending on how much turning I am doing. If I want a particularly accurate grip then I always check with the DTI, for that job, but most times the hold is still within 2 or 3 tenths, which is generally good enough for most jobs.
I know you do a lot of commercial work so have to constantly have very accurate holding. I don't know if you know of these (you probably do though), but I have seen the ER32 collets and chucks, offered by one of my suppliers, to a guaranteed DTI accuracy of 5 micron, though they are more expensive than the standard ones.
Bob.
|
|
|
|
Post by Roger on Sept 22, 2021 13:33:56 GMT
Him Roger. I think you are right about the collets flexing. As far as threading the second end of a stud goes, I make the first thread twice as long, or as much as is needed to grip a portion tightly, then I turn down the extra length to core dia which allows me to hold it very tightly. I can then thread the sceond end. When finished, I just pull the chucked end out about 4 or 5mm and then part off the first threaded end, to length. That way I never have to hold on to a thread, which, as you say, gets flattened if 'chucked'. If your Griptru doesn't hold any more accurately than a standard chuck, then it sounds as if there is quite a bit of wear inside, or a tiny bit of swarfe has got in. I have 3 Griptru chucks. One I bought brand new from Myford, years ago. The other 2 I bought off Ebay. They all hold repeatedly at almost no visible DTI movement, regardless of diameter. One I keep with outside jaws and the other 2 I keep with the standard outside jaws. They do eventually lose their accuracy, and then I just re-adjust them. I probably don't have to do that more than twice in any one year, depending on how much turning I am doing. If I want a particularly accurate grip then I always check with the DTI, for that job, but most times the hold is still within 2 or 3 tenths, which is generally good enough for most jobs. I know you do a lot of commercial work so have to constantly have very accurate holding. I don't know if you know of these (you probably do though), but I have seen the ER32 collets and chucks, offered by one of my suppliers, to a guaranteed DTI accuracy of 5 micron, though they are more expensive than the standard ones. Bob. Hi Bob, That's a good way of making the studs. The chuck may be worn, dirty, but it's more likely that the scroll is slightyl deformed. Repeating at the same diameter is good, but not so when the diameter changes. I would never rely on anything put in any sort of 3-jaw chuck without clocking it, unless it was very rough work. For the bulk of my work, I like to get it within 4microns, or a couple of tenths. If I'm being really fussy, I'd not want to see the clock move at all. I only use a DTI with a 2micron (1/10th) division. My mantra is that if you don't clock it, you don't know what you've got. |
|
|
|
Post by Roger on Sept 22, 2021 16:13:47 GMT
The crosshead on 1501 uses a Cotter to secure the piston rod. However I'm using a thread to hold them. I've thought long and hard about how to make sure these stay put, and also to make it look right. You'll also notice that there's a small curved oil pipe on the bottom RH corner of the picture
 2015-05-02 10.45.22 2015-05-02 10.45.22 by Georgia Montgomery, on Flickr I needed to hold the Crossheads at an angle, so the easiest way to do that was to make a dummy piston rod end. I don't have a die for that size, and it's easy to screw cut something like that quickly anyway. I'd probably have done that even if I had a die.  20210922_091143 20210922_091143 by Georgia Montgomery, on Flickr The Cotter is going to be a dummy, so here's a 1mm deep pocket being machined with a 1mm carbide cutter. It's a bit tight, but there's just room to get in there with care.  20210922_100510 20210922_100510 by Georgia Montgomery, on Flickr The pocket was machined with 0.2mm deep cuts and only 5mm/min  20210922_140257 20210922_140257 by Georgia Montgomery, on Flickr The curved Oil pipes are going to be Copper and secured with Loctite. Here I'm drilling a 2mm deep pocket with a 1.6mm drill.  20210922_141901 20210922_141901 by Georgia Montgomery, on Flickr  20210922_144806 20210922_144806 by Georgia Montgomery, on Flickr The dummy Cotter is a simple 'Part on a stick'...  20210922_161550 20210922_161550 by Georgia Montgomery, on Flickr ... which was parted off to length and tidied up with needle files.  20210922_164320 20210922_164320 by Georgia Montgomery, on Flickr I've made them a snug fit, so they can be pressed home. I'll put a drop of Loctite on them, but it's not really needed. The thread is going to be secured with a Loctite thread locker.  20210922_165139 20210922_165139 by Georgia Montgomery, on Flickr |
|
|
|
Post by 92220 on Sept 22, 2021 18:20:51 GMT
Hi Roger.
I fitted cotters on mine, as fullsize. I did lock them in with Locktite 290...the very low viscosity Retaining Loctite. As long as the cotters have no fore and aft movement, sideways clearance, if kept to a minimum, has no effect on whether it stays put or not, and will ensure there is no 'racking' to allow the cotter to work loose. I did need to dismantle the cotters a month or so after fitting. I had to make up an extractor to get them out, and even then they needed quite a force, so I am sure they will be fine in service. The piston rod is stainless and the cotters are gaugeplate.
Bob.
|
|
|
|
Post by Roger on Sept 22, 2021 18:28:58 GMT
Hi Roger. I fitted cotters on mine, as fullsize. I did lock them in with Locktite 290...the very low viscosity Retaining Loctite. As long as the cotters have no fore and aft movement, sideways clearance, if kept to a minimum, has no effect on whether it stays put or not, and will ensure there is no 'racking' to allow the cotter to work loose. I did need to dismantle the cotters a month or so after fitting. I had to make up an extractor to get them out, and even then they needed quite a force, so I am sure they will be fine in service. The piston rod is stainless and the cotters are gaugeplate. Bob. Hi Bob, I did consider using Cotters, LBSC shows taper pins I believe. I just thought the whole thing would be more rigid with a thread, and It's a lot easier to do. Hopefully it won't need to come off once it's finally fitted. At least it looks right now. I'm sure you're right about them staying put, if it's a nice close fit, there shouldn't be any movement. |
|
|
|
Post by Roger on Sept 25, 2021 21:25:02 GMT
I hadn't made the oiler on the front, or the flat bracket that it's mounted on.  DSCN5620 DSCN5620 by Georgia Montgomery, on Flickr The body is made from Colphos, using a large radius tipped tool to get the radius to the flange. The M2.5 hole through the middle is for the dummy outlet fitting on the bottom, it's tapped right through.  20210925_113849 20210925_113849 by Georgia Montgomery, on Flickr The flat plates are made from 0.6mm thick Steel Sheet with a 1.5mm cutter. The middle one was profiled slightly too deep, and that detached before it was complete.  20210925_120630 20210925_120630 by Georgia Montgomery, on Flickr 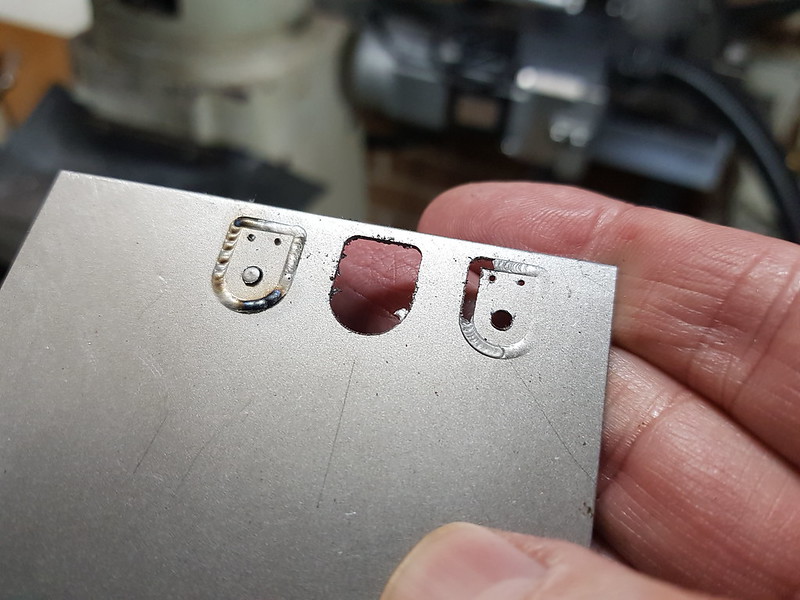 20210925_120800 20210925_120800 by Georgia Montgomery, on Flickr The hinged cover is an M1 bolt, so this is the tapped hole for that.  20210925_125624 20210925_125624 by Georgia Montgomery, on Flickr There are a couple of small flats on the flange, added like this.  20210925_131508 20210925_131508 by Georgia Montgomery, on Flickr The thin cover plate is going to be made from the brass strip I cut for the boiler banding before I decided to make that from Steel instead. I'm Soft Soldering that to a slug of Brass to it can be machined.  20210925_171526 20210925_171526 by Georgia Montgomery, on Flickr The pieces are just set up by eye.  20210925_204335 20210925_204335 by Georgia Montgomery, on Flickr  20210925_213250 20210925_213250 by Georgia Montgomery, on Flickr The PCB hot air gun is an ideal way to manage the soldering without having a flame to oxidise everything.  20210925_213600 20210925_213600 by Georgia Montgomery, on Flickr They're pretty small, I'll bolt them on as soon as possible else I'm going to lose them!  20210925_220706 20210925_220706 by Georgia Montgomery, on Flickr |
|
|
|
Post by 92220 on Sept 26, 2021 8:24:00 GMT
Hi Roger.
I found that my Bosch hot air gun actually worked better at raising something to soldering heat much better than my PCB hot air gun.
Bob.
|
|
|
|
Post by Roger on Sept 26, 2021 8:46:15 GMT
Hi Roger. I found that my Bosch hot air gun actually worked better at raising something to soldering heat much better than my PCB hot air gun. Bob. Hi Bob, That's interesting, I wonder what the difference is? I've got a series of different nozzles for the PCB hot air gun, and it has a speed control for the fan as well as temperature control. You get very different results by changing these things. |
|
|
|
Post by 92220 on Sept 26, 2021 11:42:28 GMT
Hi Roger.
Perhaps I have a different PCB gun to yours. Mine came with only one nozzle. The Bosch gets a lot hotter than the PCB heat gun too. I almost always use it on max heat, and just use it further away from the job, if I don't want too much heat. It does get a great deal hotter than the PCB gun as the element is just inside the nozzle, and glows bright. It can get too hot and discolour the metal, but as long as one is aware of this, it's no great problem. It can also be used for much bigger jobs that the PCB gun would not have the capacity for.
Bob.
|
|
|
|
Post by Roger on Sept 26, 2021 12:22:29 GMT
Hi Roger. Perhaps I have a different PCB gun to yours. Mine came with only one nozzle. The Bosch gets a lot hotter than the PCB heat gun too. I almost always use it on max heat, and just use it further away from the job, if I don't want too much heat. It does get a great deal hotter than the PCB gun as the element is just inside the nozzle, and glows bright. It can get too hot and discolour the metal, but as long as one is aware of this, it's no great problem. It can also be used for much bigger jobs that the PCB gun would not have the capacity for. Bob. Hi Bob, It sounds like your PCB heat gun isn't as powerful as the one I have. It's rated at 6 amps, so that's about 1300Watts. I don't know what the maximum temperature is though, but I run it at 350C for most things. I don't know how it would cope with something much bigger though. |
|
JonL
Elder Statesman
WWSME (Wiltshire)
Posts: 2,911
|
Post by JonL on Sept 26, 2021 19:51:38 GMT
By the time you've filled all the oilers it will be time to pack up and go home!
|
|
|
|
Post by Roger on Sept 26, 2021 20:23:31 GMT
I'm going to have to remake the piston rod covers because they are now too short. Originally they were flush against the end piece of the piston valve, but now there's additional cladding thickness and that stands almost 1.7mm clear of the mounting face. I've also noticed that the RH side and... DSCN5620 by Georgia Montgomery, on Flickr ... the LH side are done differently! This side uses the small boss which is central, while the other uses the larger boss that's offset. I get the impression that one of these has been fitted incorrectly, but which one it is, is anyone's guess. I believe this is an SVR addition, so maybe someone knows why they are different.  IMG_1398 IMG_1398 by Georgia Montgomery, on Flickr Anyway, here's one of the locknuts for the oiler... 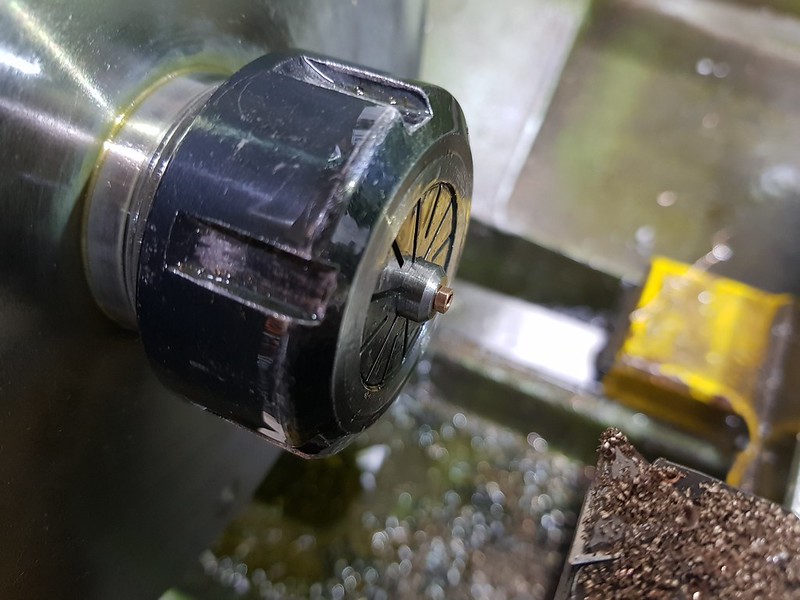 20210926_110839 20210926_110839 by Georgia Montgomery, on Flickr ... and here's one of the dummy union nuts.  20210926_112106 20210926_112106 by Georgia Montgomery, on Flickr The oilers are held on using an M2.5 stud. I'm addind a hole in the end to allow the dummy copper pipe to slide upwards to assist dismantling.  20210926_124417 20210926_124417 by Georgia Montgomery, on Flickr This is one of the tabs on the lid being bent over...  20210926_152311 20210926_152311 by Georgia Montgomery, on Flickr ... and here's the flat that the bracket will be riveted to...  20210926_161538 20210926_161538 by Georgia Montgomery, on Flickr ... with 0.8mm Steel Rivets.  20210926_163927 20210926_163927 by Georgia Montgomery, on Flickr There's no room to get the rivet press in there, so this was done with a piece of bar on the inside and a flat drift. It's got to end up flush because the original has them welded on.  20210926_201809 20210926_201809 by Georgia Montgomery, on Flickr 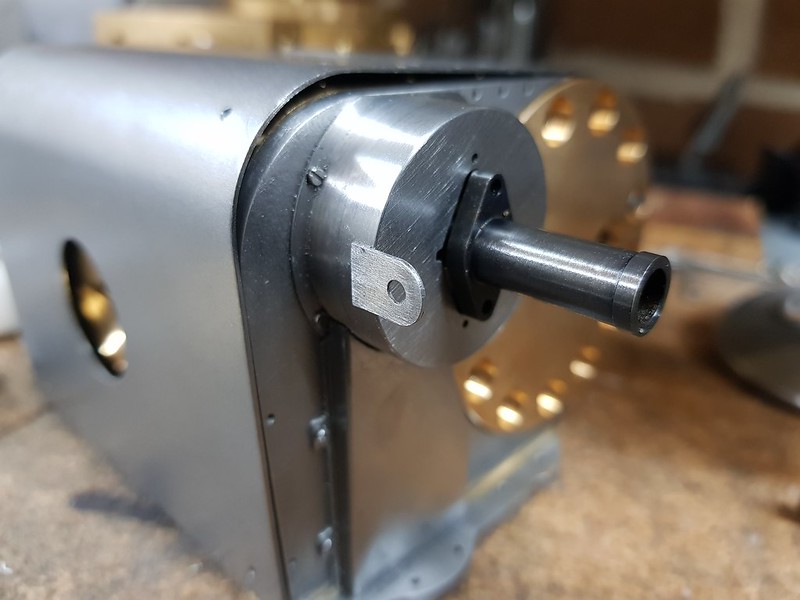 20210926_205732 20210926_205732 by Georgia Montgomery, on Flickr The dummy copper pipe is a piece of Earth wire from a short length of Twin and Earth household lighting wire.  20210926_205844 20210926_205844 by Georgia Montgomery, on Flickr |
|


