|
|
Post by chris vine on Oct 20, 2021 10:01:55 GMT
I think that even Roger will just have to accept the oil as it is!!
Chris.
|
|
|
|
Post by Roger on Oct 20, 2021 12:33:45 GMT
Will you have to use a very temperature stable oil for the dampers closer to the firebox? I'd imagine all of them will be getting quite warm Hi Jon, If you used oil, that would be an issue. However I don't think Silicone oil changes much with temperature. |
|
|
|
Post by Deleted on Oct 20, 2021 12:49:05 GMT
Will you have to use a very temperature stable oil for the dampers closer to the firebox? I'd imagine all of them will be getting quite warm Hi Jon, If you used oil, that would be an issue. However I don't think Silicone oil changes much with temperature. From my experience using silicone oil many years ago in R/C racing, the temp has a big effect on the oil viscosity and thus its dampening. I would suggest using a fairly thick oil in such an application as it's never really going to be cold when in steam. Pete |
|
|
|
Post by Roger on Oct 20, 2021 13:38:54 GMT
Hi Jon, If you used oil, that would be an issue. However I don't think Silicone oil changes much with temperature. From my experience using silicone oil many years ago in R/C racing, the temp has a big effect on the oil viscosity and thus its dampening. I would suggest using a fairly thick oil in such an application as it's never really going to be cold when in steam. Pete Thanks for that Pete, I'll have to look at the figures. It would be interesting to see what temperature variations there are between the frames. It's obviously going to be above ambient, with the boiler in close proximity. I imagine that it will settle out at a stable value that will give consistent results. |
|
|
|
Post by Deleted on Oct 20, 2021 13:56:54 GMT
Hi Roger, as I say it's many years since I raced R/C cars and I don't think it's as popular today as when Phil Greeno won the first world championships in Monaco back in the 80's but I'm sure the info must still be valid today... this may help  ![]() I note that the rule of thumb given for this chart is.. quote: 'So a "Good Rule of Thumb" is to adjust your shock oils by 2.5wt or 50cst for every 10 degrees in temperature change...' Kind regards Pete |
|
|
|
Post by Roger on Oct 20, 2021 14:26:24 GMT
Hi Roger, as I say it's many years since I raced R/C cars and I don't think it's as popular today as when Phil Greeno won the first world championships in Monaco back in the 80's but I'm sure the info must still be valid today... this may help ![]() I note that the rule of thumb given for this chart is.. quote: 'So a "Good Rule of Thumb" is to adjust your shock oils by 2.5wt or 50cst for every 10 degrees in temperature change...' Kind regards Pete Thanks Pete, that's really useful. I also found this comment in an article comparing three different viscosity Silicone Oils... " P10 silicone has the highest viscosity and the lowest increase proportional to the decrease in temperature, that is, its curve is proportionally less steep when compared to the others." So I take that to mean that you're better off starting with a thicker oil because the changes with temperature are less pronounced compared to thinner oils. The working conditions in this application are nothing like they are with RC cars though. The shocks I've seen are very lightweight, with long strokes and frequent large movements. The ones I'm making are the exact opposite. However, the same general rules are going to apply ie there will be internal heat generated, and the temperature they end up running at will be above the ambient. As long as it doesn't very too much, it should be fine. It will be fun experimenting. I can heat them up on the bench and see how they feel. |
|
|
|
Post by Deleted on Oct 20, 2021 16:19:51 GMT
Yes, that's how most hobbyists use silicone oil with the 3 basic viscosities which you can buy at your local R/C shop, I think I have some medium left somewhere?... admittedly the type of R/C car bought from the model shop has long shock absorbers but they are mainly for offroad. The cars that Phil drove were in a different league altogether, look at them as the model equivalent to an F1 car, very low, raced on proper tarmac race circuits, and could reach over 100mph, yep.. 100 real mph...  their shocks were much shorter, although I doubt as small as yours? BTW, the world speed record for an electric R/C car today is 202mph... Some of those guys took things far too seriously... Pete |
|
|
|
Post by Roger on Oct 21, 2021 8:11:49 GMT
Yes, that's how most hobbyists use silicone oil with the 3 basic viscosities which you can buy at your local R/C shop, I think I have some medium left somewhere?... admittedly the type of R/C car bought from the model shop has long shock absorbers but they are mainly for offroad. The cars that Phil drove were in a different league altogether, look at them as the model equivalent to an F1 car, very low, raced on proper tarmac race circuits, and could reach over 100mph, yep.. 100 real mph... their shocks were much shorter, although I doubt as small as yours? BTW, the world speed record for an electric R/C car today is 202mph... Some of those guys took things far too seriously... Pete I had a good look for RC shocks to see if there were any that were short enough, but I couldn't find any. I think they're also too lightweight to deal with the duty on a heavy locomotive. In the end, I concluded that it's a pretty simple thing to make, there's not much to them really. I've got one grade of Silicone Oil, but there are loads of different grades available here on eBay. Those RC cars are mighty impressive, I can see why people like them. |
|
|
|
Post by Deleted on Oct 21, 2021 9:49:55 GMT
Hi Roger Sorry, I didn't mean to imply that you could use a shock from an R/C car, those, in general, are made from alloy or plastic and not at all suitable for your application. I was just saying that they can be a lot smaller than seen on something like a Tamiya R/C car. Rs do a pretty large range, you've made yours now so not really relevant but some of the tech stuff may be of interest. The RBQC range is very small, going down to 4mm stroke, and has a working temp range of -10 to 80c. RS is the first go-to supplier in films Details below docs.rs-online.com/65cf/A700000006735518.pdfkind regards Pete |
|
|
|
Post by Roger on Oct 21, 2021 10:07:39 GMT
Hi Roger Sorry, I didn't mean to imply that you could use a shock from an R/C car, those, in general, are made from alloy or plastic and not at all suitable for your application. I was just saying that they can be a lot smaller than seen on something like a Tamiya R/C car. Rs do a pretty large range, you've made yours now so not really relevant but some of the tech stuff may be of interest. The RBQC range is very small, going down to 4mm stroke, and has a working temp range of -10 to 80c. RS is the first go-to supplier in films Details below docs.rs-online.com/65cf/A700000006735518.pdfkind regards Pete Hi Pete, Ah I see. As you say, RS do have a very good range by the look of it. I've used a lot of SMC products over the years, and they're excellent quality. They look to be unidirectional though, I think they're intended for end stops rather than continuous bi-directional damping. Still, it's good to know. |
|
|
|
Post by Roger on Oct 21, 2021 21:32:36 GMT
Continuing slow progress I'm afraid, due to a large influx of work and walking with friends. A healthy work/life balance is what I aim for these days. However, I did get an hour or so this evening to add the spanner flats to the bottom caps of the Hydraulic Dampers. These just need parting off and facing to length to finish them, but the Lathe has a commercial job set up in it at the moment. The top of the turned section is the CAM reference, as is the end. To set up each one, the Wobbler touches the end which is then set to -3.5mm on the X-axis DRO. The Z-axis is then set to zero and the tool brought down to touch the turned section. The Quill is then locked in position, the tool jogged up clear of the work and the program is run again. The program cuts the flat in one gentle pass, and the A-axis then indexes 180 degrees and repeats automatically. I could have parted these off first and then added the flats on the end. However, that means they have to be held in the collet with a very short length, so it's just easier to hold them while they're still on the stock.  20211021_213255 20211021_213255 by Timothy Froud, on Flickr The third one is on the opposite end of one of the bars.  20211021_221949 20211021_221949 by Timothy Froud, on Flickr |
|
|
|
Post by Roger on Oct 24, 2021 21:39:00 GMT
I've now made the piston rods and end caps for all of the Hydraulic Dampers, and here's the first one with the piston attached. I've peened the end of the thread over after securing it with Loctite 601 High Strength retainer. Here I've turned the OD so it's concentric with the rod, and I'm adding the O-ring groove. I've gone for just 10% compression on the O-ring section because 15% gave too much resistance. I'm using Silicone O-rings because they're softer than Nitrile ones.  20211024_120801 20211024_120801 by Timothy Froud, on Flickr Here's a video of drilling the Oil holes that go through the piston. I've guessed that two 0.4mm diameter holes might be a good starting point for the 100CST Silicone Oil. You can see it withdraw rapidly every 0.3mm as it pecks it's way through.  20211024_123022 20211024_123022 by Timothy Froud, on Flickr The springs are centred by the Hexagonal piece that has a flange on the bottom. This has a length of M2.5 threaded rod Loctited in so that it becomes the bleed screw. The flange stops the Belleville washers falling off when that's unscrewed. I experimented with various arrangements of the Bellville Washers, and settled on them being arranged in four groups of three springs. In other words there are three washers the same way round, then three the other way round and so on. That gives a strong spring and the required amount of movement.  20211024_222929 20211024_222929 by Timothy Froud, on Flickr And finally we get to try it out. I've only got 100CST Silicone Oil at the moment, so I thought I'd try it with that first. As it happens, that feels pretty good. It offers little resistance if you move it slowly, but really changes when you try to move it faster. That's exactly what it's supposed to do, so I'm very pleased with it. Here's a video of the first trial...  20211024_220906 20211024_220906 by Timothy Froud, on Flickr I just need to make the other bodies and finish the pistons, and then I can move on. I'm going to need something to stop the bearing from sliding along the axle on one side though. |
|
|
|
Post by Roger on Oct 29, 2021 21:21:48 GMT
I've finally managed a few hours on the Locomotive, after another very busy week with commercial work. I've still got more to do, but I should be clear of that in a few more days. I find it more convenient to work through the evenings and weekends to get that done, and then spend whole days on the Locomotive. Hopefully I'll get these finished over the weekend. These are two long bodies and one short one for the Hydraulic Dampers. I've left them on the stock so I can easily machine the spanner flats. The threads are screw cut as usual, those being M14 x 0.75 (fine)  20211029_221211 20211029_221211 by Timothy Froud, on Flickr |
|
|
|
Post by Roger on Nov 2, 2021 21:44:29 GMT
Time to finish off the bodies of the Hydraulic Dampers. I'm still swamped with business, so progress is slow. This is the reason, not because this is either difficult or that much work. So this is the rod end with the 'O' ring pocket and ready the preparation for the M11 x 0.75 (fine) external thread...  20211031_122748 20211031_122748 by Timothy Froud, on Flickr ... which ends up like this. 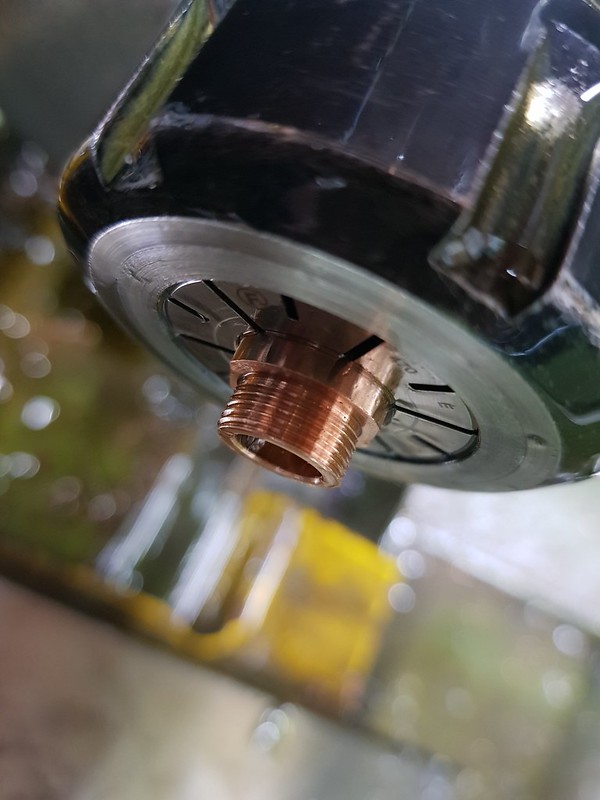 20211031_124731 20211031_124731 by Timothy Froud, on Flickr Here, the narrow piston for the short version is being turned to diameter and the O-ring groove added. I use calipers in the groove to check the diameter when I start.  20211031_203223 20211031_203223 by Timothy Froud, on Flickr The same process is done with the longer version for the front dampers.  20211031_204028 20211031_204028 by Timothy Froud, on Flickr I'm pocketing all of the holes at 1mm diameter and then just spotting through the last 0.5mm with the 0.4mm hole.  20211102_204836 20211102_204836 by Timothy Froud, on Flickr And here are the components completed so far. I still need to make the floating pistons, which I'm going to modify so the bleed screw can be tightened more easily.  20211102_213049 20211102_213049 by Timothy Froud, on Flickr I also need to make the top barrel to attach to the top mount, and then it's almost complete. |
|
|
|
Post by Roger on Nov 3, 2021 22:28:22 GMT
This is the first of the four Floating Pistons, this time made from PB102 because the M2.5 thread isn't that long and I want to make sure it doesn't strip when I tighten the breather/spring centring screw. Again, I'm only using 10% compression on the O-rings so they move easily.  20211103_211100 20211103_211100 by Timothy Froud, on Flickr The pocket is now a rounded hex so that I can use a tool to stop it from turning when I tighten the bleed screw.  20211103_214504 20211103_214504 by Timothy Froud, on Flickr  20211103_215243 20211103_215243 by Timothy Froud, on Flickr One down, three more to go.  20211103_220834 20211103_220834 by Timothy Froud, on Flickr |
|
|
|
Post by Roger on Nov 4, 2021 22:54:15 GMT
The revised design for the Floating Piston has a rounded Hexagonal pocket, and here's the tool that engages with that. The cutter is pretty blunt, but good enough for a job like this. It's a tough piece of Steel too, definitely not free cutting Mild Steel. It might be a piece of the EN8 I bought some time ago.  20211104_221908 20211104_221908 by Timothy Froud, on Flickr I already have the 3.5AF box spanner that fits the Bleed Screw/Spring centring hexagonal piece, and that goes inside the new tool. This is needed because the Floating Piston is free to rotate in the cylinder, so it's not possible to securely tighten the bleed screw when it's in place.  20211104_224103 20211104_224103 by Timothy Froud, on Flickr The bleed screw has a long tapped M2.5 thread inside it so it's got a decent length to Loctite the Steel threaded rod into. I need to make sure this is tight, I don't want this coming loose when it's in use. In reality, all that would happen is that the Silicone Oil would leak out and the Damper would stop working. I don't think there's any way it could cause any damage. The top part locates in the clearance pocket in the Top Cap, and the Belleville washers would keep it in place. Still, it's better to make sure it's tight.  20211104_224150 20211104_224150 by Timothy Froud, on Flickr So now I've just got three more top barrels to make where it connects and that's all of them finished. I'll probably black the Steel parts. |
|
|
|
Post by Roger on Nov 5, 2021 22:39:48 GMT
I made the three rod ends in the foreground tonight, so these are now complete except for applying a finish.  20211105_213104 20211105_213104 by Timothy Froud, on Flickr |
|
|
|
Post by Roger on Nov 7, 2021 20:47:37 GMT
Here are all of the various components, tidied up and blacked. I also blacked the tool for good measure.  20211107_200235 20211107_200235 by Timothy Froud, on Flickr Here they all are filled with the 100cst Silicone Oil, waiting for the air bubbles to rise. I've moved the pistons up and down several times, and I'll do that again when it's all settled. This is how they show it being done on the RC channels.  20211107_202455 20211107_202455 by Timothy Froud, on Flickr |
|
JonL
Elder Statesman
 WWSME (Wiltshire)
Posts: 2,909
|
Post by JonL on Nov 8, 2021 0:22:09 GMT
Thats what we do with the RC buggies certainly. In that case we tune it either with different oil weights or with holes in the piston to allow the oil to pass. A rubber diaphraphm at the top gives a little flex to allow for the movement of the piston rod taking up capacity.
Interestingly (to me) the carpet racers my son now races just use a dab of 1000cst silicone oil on the kingpins to provide friction damping.
|
|
|
|
Post by Roger on Nov 8, 2021 8:31:30 GMT
Thats what we do with the RC buggies certainly. In that case we tune it either with different oil weights or with holes in the piston to allow the oil to pass. A rubber diaphraphm at the top gives a little flex to allow for the movement of the piston rod taking up capacity. Interestingly (to me) the carpet racers my son now races just use a dab of 1000cst silicone oil on the kingpins to provide friction damping. I will probably tune them with different weight oils. It think it feels somewhere near the resistance required with the 100cst weight, but if anything it's slightly on the light side. I guess these carpet racers are really light, so things that you mention with the heavy oil make a difference. For a heavy beast like a Locomotive which has very little travel, the damper needs to be pretty stiff else it's not going to do anything. |
|


 their shocks were much shorter, although I doubt as small as yours? BTW, the world speed record for an electric R/C car today is 202mph...