paul
Member

Posts: 8
|
Post by paul on Apr 22, 2007 20:57:01 GMT
Daft question #842:
What's the best way to mark off a length of circular section bar all around it's circumference?
Seems to me the options are:-
Use a height-gauge thingy (I don't have one of those)
Use odd leg calipers (seems a bit hit and miss)
Use the lathe (that's what I did in the end - used the dial on the topslide to measure from the faced end to the position required then wound the tool in to just contact and rotated the chuck by hand to scribe a line)
Is there another/better/easier/accurate/cheap way to do it?
|
|
|
|
Post by modeng2000 on Apr 22, 2007 21:19:06 GMT
Wrap a sheet of paper round the bar and having aligned the edges where they overlap, mark the bar using the paper edge as a guide. Rough and ready but useful just the same.
John
|
|
|
|
Post by NigelMuskett on Apr 22, 2007 21:32:50 GMT
wrap a strip of paper around the bar after a couple of turns you can see very easily if it is straight.
Nigel
|
|
paul
Member
Posts: 8
|
Post by paul on Apr 23, 2007 7:39:38 GMT
Good tips - thanks!
|
|
|
|
Post by Shawki Shlemon on Apr 23, 2007 8:52:52 GMT
It depends on how accurate one wants the marking and if the ends will be machined .For general use I have a home made surface plate on the bench, on it I have a set of V blocks and a verity of brass squares from 1/8" to 1 1/4" . For short distances I stack the required pieces of brass next to the job and mark the hight.For long pieces I put the rod against one V block and place the other V block on the bar approximately in the wright place and use the vernier to move it to correct place and mark the line rotating the shaft .These brass bit survive until I desperately need them !!
|
|
|
|
Post by Tel on Apr 23, 2007 9:12:50 GMT
You can also do a pretty credible job with one (or more) of those screwy-uppy-stick-the-screwdriver-through-your-finger hose clamps
|
|
|
|
Post by steammadman on Apr 23, 2007 21:26:21 GMT
or even learn to saw square
a good hacksaw and a sharp blade held square will work wonders,
and remember NOT MUCH PRESSURE (dont go to sleep non the hacksaw)
AND TAKE YOUR TIME
remember only mistakes and babies are made by rushing things
and both of them can be expensive.
|
|
|
|
Post by Tel on Apr 24, 2007 7:08:42 GMT
Ah Madman, but you are assuming he wants to cut the bit of bar off. Not wot he asked.
|
|
paul
Member
Posts: 8
|
Post by paul on Apr 24, 2007 17:07:24 GMT
Well spotted Tel  I wanted to mark the bar in a couple of places to be able to turn a simple 'cotton-reel' shape and thought it would be easier to work to scribed lines than try to keep track of the depth of cut AND the left/right (start/end) points. The hose clamp (or jubilee clip as my dad used to call them) idea is pretty neat too. Shawki & SMM - thanks for those tips too. |
|
|
|
Post by dickdastardly40 on Apr 25, 2007 17:16:50 GMT
Provided the end of the bar is square before you put it in the chuck, a 6" ruler and pencil marks often suffice. You can then chuck it and touch a pencil to your marks, rotate the chuck by hand or slowly under power to extend the line all the way around. When the lathe is running under power it shows up fairly well
If you're using hexagonal bar stock a tight fitting rubber band or o'ring is more convenient than a jubilee clip, though not as rigid and only as a rough guide.
Are you cutting the 'cotton reel' shape with a parting tool ground square?
|
|
|
|
Post by chris vine on Apr 25, 2007 17:42:59 GMT
Hi Paul,
If you use a parting tool with a square (as opposed to angled) end, you can use it to face the end of the bar (if you are careful and it does not bend the parting tool away from the work.
Then if you know the thickness of the tool, it is an easy matter to traverse the tool, either with the top slide or the lead screw (if you have a micrometer handwheel), the correct distance in for the start of the cut and the end.
When doing this I find it best to cut the two rings at the ends of the turned section and then use them as a guide.
It's just the way I do it!
Incidentally the replaceable tip carbide parting tools work very well for this type of turning.
Chris.
|
|
paul
Member
Posts: 8
|
Post by paul on Apr 25, 2007 20:29:05 GMT
dd40: more useful tips - cheers! Chris: I used a sharp tool to scribe the circumference (carefully lined up with some small scribed marks). My first attempt was pretty close but left too little 'spare' and after sawing off the piece and tidying up the sawn face I found I was 0.25mm out on the overall width - not really critical but annoying, so I decided to make it again. For my second attempt I used a parting tool to cut the bar but it was taking forever (and making me sweat!) so I sawed it off again with plenty of 'slack' this time. The dimensions were better on this piece so I filed off the two 'sides' to make the basic shape for the crankhead bearing, leaving a little spare material in each dimension for finishing. I just (!) need to make some accurate holes and fit a bronze bearing now.  |
|
|
|
Post by chris vine on Apr 26, 2007 21:26:02 GMT
Hi Paul,
As always there is more than one way to skin a cat (I like them by the way).
If you have not got one already you will find that the replaceable carbide tip parting blades are a revelation. I forget what lathe you have, but a decent turn of speed and enough power are helpful. Fine on a super 7. The shape of the top of the tip is hollow so that the chip comes off and is slightly pressed into the dip, making it narrower. Apart from the perfectle formed shape of the tip, I think it is largely this which makes them so successful.
Chris.
|
|
paul
Member
Posts: 8
|
Post by paul on Apr 29, 2007 9:22:36 GMT
Cheers Chris, I'm using a HSS parting off tool (width maybe 3mm?) at present and it takes forever - too much pressure and bang it 'locks up' - not a nice experience! I'll add one of the blade type to my shopping list |
|
|
|
Post by Tel on Apr 29, 2007 10:42:05 GMT
I only ever use a plain, parallel, parting tool, about 3mm wide - they are all I can get locally - and don't have much trouble. Run the machine at a reasonable clip (flat out) and take light cuts. 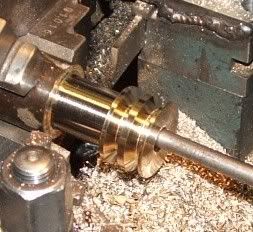  |
|
paul
Member
Posts: 8
|
Post by paul on Apr 29, 2007 15:03:11 GMT
Ah, maybe that's where I'm going wrong - all the advice I've seen says "take it slowly" so I assumed that applied to the rpm too! I'll test it out at warp factor 8 later ;D
|
|
SteveW
Elder Statesman

Posts: 1,397
|
Post by SteveW on Apr 29, 2007 23:40:12 GMT
Paul,
I bought myself a Greenwood TCT parting tool and made a rear tool post that mounts it at the right height. Brilliant but expensive!
With the cheaper blade/holder type the major grief when parting off comes from an unexpected dig-in of the tool. Unless you are also very careful sharpening the tip it's very easy to get the cutting edge narrower than the blade and it'll cut behind the edge as well. Generally the swarf ribbon is wider than the slot being cut and can jam big-time.
Looking at the way the swarf runs off the Greenwood tool and the tool shape gave me an idea. It rolls the swarf so that it's narrower than the groove being cut and does this by having a bowl depression behind the cutting edge. This is easily produced on the cheap long blade type tooling using a dremmel (or similar) drill and a small grinding tool.
Instead of grinding a simple top rake in the top the the blade and making a flat topped hook cutting edge use the dremmel to grind a bowl that just breaks into the front face of the tool also giving a concave edge with the forward top corners being the original blade top but only just.
|
|
S.D.L.
Seasoned Member

Posts: 107
|
Post by S.D.L. on May 2, 2007 17:55:23 GMT
George Thomas goes into great detail about putting a groove in the top of HSS blades in of his books.
For a cheaper carbide parting tool buy a 20mm double ended blade holder off e-bay, cut in half with the angle grinder and screw to 12mm square bar. buy tips of correct width to match.
Steve Larner
|
|
|
|
Post by chris vine on May 2, 2007 21:44:27 GMT
Good Idea S.D.L but they are also available from J & L supplies. New, without the haggling!
Chris.
|
|