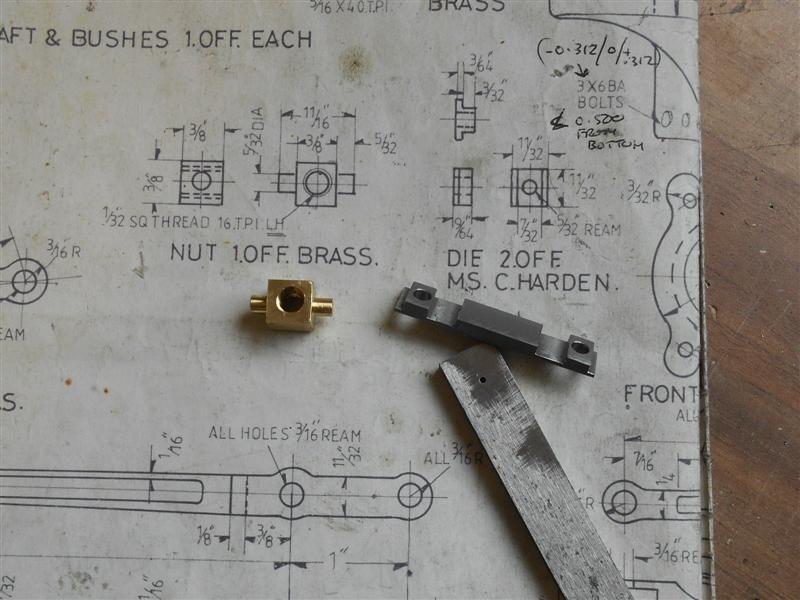
I have been finishing off a few items related to the motion, notably the reversing screw that operates the lifting link bellcrank. The two bushes are simple turnings from brass bar and I had already made the screw from some 1/4" dia silver steel, cutting a 1/16" pitch acme-style thread and now needed to produce a matching nut.
After spending quite some time grinding a very fine internal screwcutting tool, I promptly broke it after a couple of cuts. My lathe is a bit too cumbersome for such delicate work. Instead, plan B was implemeted, which was to cut another leadscrew and make it into a tap. This went well until I came to tap what I thought was brass but turned out to be phosphor bronze. Broken tap!!
Plan C was to hurl the whole lot at the workshop wall and buy a 1/4" x 20 Whitworth left-hand tap and button die, and these duly arrived last week. Remaking the reversing screw and the nut, now in bronze, was relatively easy.
I also made the tiny dies that sit in the bellcrank, finding it easier to make them as a pair by milling down a length of ground flat stock and separating them with a junior hacksaw at the end. It was also much easier to maintain accuracy like this. Unfortunately, the picture I took of the setup became corrupted but here the next one shows them unseparated.
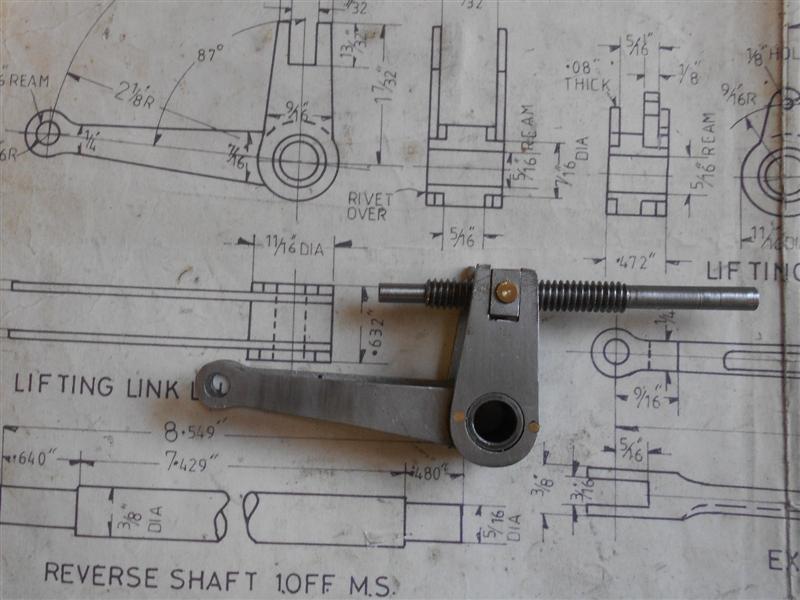
Here the parts are assembled leaving just the cross-drilling and reaming of the taper-pin hole that will fix the universal joint to the end of the shaft.
Whether or not this is a good idea only time will tell. At the moment there is absolutely no backlash in the nut and screw but it may be too stiff to turn in normal operation. I'm not worried about how it looks, however, it's buried under the running plate and can't be seen.
Steve, Great work sir, and screw cutting an acme thread and in this size. Pity the tap wasn't a success but you showed what this hobby is all about by finding an alternative solution. As my old boss used to say " anybody can get into the mire but the clever person is the one that gets out" ( well not exactly those words he used more expletives) Regards Paul
3 1/2" Juliet 2 (Shortly to be named GWR 101), 7 1/4" Bridget & Class 07 type electric. Resumed work on late fathers 3 1/2" BR Std class 4
I had forgotten that I had left the slidebar brackets unfinished and this became evident when I mounted the cylinders and tried to align the crossheads. They are in line vertically but need more machining on the slidebar mounting face.
It was simple to measure the difference in height between the two rods so the slidebar bracket was duly dismantled and taken to the milling machine. The angle is already correct so it was only neccessary to clock the face true and remove the extra material.
The observant amongst you will note the use of a lathe boring bar held in a 20mm collet - much cheaper than special milling tools and just as effective.
After removing the surplus, seventy-two thou on the first one, it was remounted but still just a tiny bit sticky. The frame-mounting holes were opened up an extra 0.1mm - four thou - and this allowed enough adjustment to get a nice smooth action through the piston rod. This was then repeated for the other side.
I will now recheck the front and back dead centres, in case they have changed after re-aligning the slidebars.
I have been finishing off a few items related to the motion, notably the reversing screw that operates the lifting link bellcrank. The two bushes are simple turnings from brass bar and I had already made the screw from some 1/4" dia silver steel, cutting a 1/16" pitch acme-style thread and now needed to produce a matching nut.
After spending quite some time grinding a very fine internal screwcutting tool, I promptly broke it after a couple of cuts. My lathe is a bit too cumbersome for such delicate work. Instead, plan B was implemeted, which was to cut another leadscrew and make it into a tap. This went well until I came to tap what I thought was brass but turned out to be phosphor bronze. Broken tap!!
Plan C was to hurl the whole lot at the workshop wall and buy a 1/4" x 20 Whitworth left-hand tap and button die, and these duly arrived last week. Remaking the reversing screw and the nut, now in bronze, was relatively easy.
I also made the tiny dies that sit in the bellcrank, finding it easier to make them as a pair by milling down a length of ground flat stock and separating them with a junior hacksaw at the end. It was also much easier to maintain accuracy like this. Unfortunately, the picture I took of the setup became corrupted but here the next one shows them unseparated.
Here the parts are assembled leaving just the cross-drilling and reaming of the taper-pin hole that will fix the universal joint to the end of the shaft.
Whether or not this is a good idea only time will tell. At the moment there is absolutely no backlash in the nut and screw but it may be too stiff to turn in normal operation. I'm not worried about how it looks, however, it's buried under the running plate and can't be seen.
Thanks for looking in,
Steve
For something like that, I would have made 3 taps, each with increasingly deep threads. Its pretty much impossible (IMHO) to make a one pass square or Acme thread tap out of silver steel and not break it, especially in phosphor bronze. For a one use only tap, I tend to harden and temper for toughness rather than hardness, and shock, horror, when I've fluted the tap, I don't clean the burrs off, they cut better that way. No way I would have tried screwcutting a 1/4" Acme nut, though I believe there are some out there who have.
You could have got the Whitworth tap, run it through the nut followed by an Acme form tap, a bit of a bastard thread form, but it would have worked with your Acme screw. Still, what you have done looks just fine to me.
I have been finishing off a few items related to the motion, notably the reversing screw that operates the lifting link bellcrank. The two bushes are simple turnings from brass bar and I had already made the screw from some 1/4" dia silver steel, cutting a 1/16" pitch acme-style thread and now needed to produce a matching nut.
After spending quite some time grinding a very fine internal screwcutting tool, I promptly broke it after a couple of cuts. My lathe is a bit too cumbersome for such delicate work. Instead, plan B was implemeted, which was to cut another leadscrew and make it into a tap. This went well until I came to tap what I thought was brass but turned out to be phosphor bronze. Broken tap!!
Plan C was to hurl the whole lot at the workshop wall and buy a 1/4" x 20 Whitworth left-hand tap and button die, and these duly arrived last week. Remaking the reversing screw and the nut, now in bronze, was relatively easy.
I also made the tiny dies that sit in the bellcrank, finding it easier to make them as a pair by milling down a length of ground flat stock and separating them with a junior hacksaw at the end. It was also much easier to maintain accuracy like this. Unfortunately, the picture I took of the setup became corrupted but here the next one shows them unseparated.
Here the parts are assembled leaving just the cross-drilling and reaming of the taper-pin hole that will fix the universal joint to the end of the shaft.
Whether or not this is a good idea only time will tell. At the moment there is absolutely no backlash in the nut and screw but it may be too stiff to turn in normal operation. I'm not worried about how it looks, however, it's buried under the running plate and can't be seen.
Thanks for looking in,
Steve
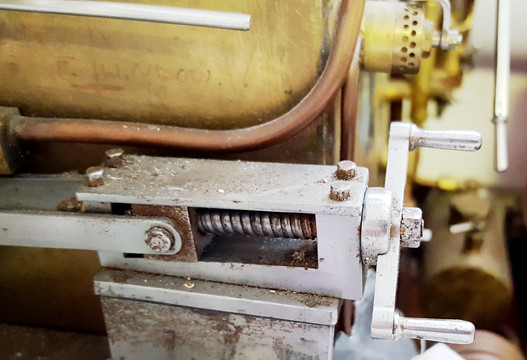
Steve - I very much like the use of the acme thread, which I used for my 'Princess'. However, I was always irritated by the difficulty in changing from forward to reverse gear, particularly on portable tracks when passenger hauling at fetes etc. Sweat poring from the driver on a hot summer's day as he/she violently 'whirls' the screw-reverse at each end of the track.
So I made a two-start acme thread, which not only was a challenge, but helped alleviate the above problem (sorry about the state of it, but the bath overflowed and soaked the workshop causing quite a bit of damage)!
I agree, ACME thread form is best because of it's lower resistance. However, I'm not as clever as you guys and my machine is a bit too antiquated for this sort of thing.
It's all about cost versus benefit for me. I can't be bothered to waste shed-loads of time to create an ACME thread if a tapping set isn't available. One doesn't stop a project this size for a poxy little threaded item. I will keep what I've made.
Steve
Edit: seems I got something right. Anyone wanting to continue the journey may like to visit my website.
Last Edit: Dec 1, 2018 9:43:41 GMT by springcrocus
Seems to have purchased a slightly better camera, probably to his own disadvantage.
Steve
Agreed, good to see you sir, look forward to a long overdue Brit update please!
Adam
I've brought this quote into my own thread to stop Bob's thread continuing to go off-topic. Adam, others have mentioned the same in private correspondence.
The trouble with my Britannia thread is that it keeps getting trashed by well-meaning contributors who misunderstand my feelings about my "diary". For me, it ceases to be a diary when it includes work undertaken by others and, excellent though most of this work is, I feel it should be recorded in a thread authored by the respective members.
For example, page 30 of the diary could be ripped out almost completely and the reader would hardly be aware that anything was missing. I had already made my smokebox door but the world and his wife wanted to explain their own methods. I couldn't care less about alternative ways of doing the job after the event, if I wanted guidance I would have searched the forum or asked a question of the membership BEFORE I started the job. However, if someone else has a different way to make a smokebox door, a short post saying something like "To see an alternative method, members might like to look HERE" and provide a link to their own thread. Far more thread-friendly, and how I've posted in other people's build threads in the past.
I'm not complaining or pointing fingers, it's just how it is. The definition of a forum is a place for discussion. My basic error was assuming that a personal record would be allowed to flow smoothly without (much) interuption but it's too easy to forget the thread title when a discussion gets going. However, the practice of others posting freely in build logs needs to be rethought by the membership and more consideration given to the author of the thread. Questions and comments are fine but remember whose story you are reading. It probably doesn't bother most members but I find it quite demoralising to see one's long-term narrative go wildly off-track because of the thoughtlesssness of others.
I've pretty much lost interest in recording progress here because I'm not convinced that this is the correct platform for a build log. A website such as I have provides the same record without the diversions although it probably has a much smaller audience and you can never be sure that anybody is actually interested unless the occasional email of encouragement arrives.
First off it's very good to see you posting, I for one and I know others miss your updates. I hear what you are saying in regards to other pictures being posted in your thread, sometimes I feel the same but then sometimes I find the 'extra' content very useful and thus have no issue with it. I truly hope you reconsider and return to giving updates to your fabulous build. Whether you do or not I wish you well and hope to see both you and your fine model one day at a meet somewhere.
I do remember why you stopped posting and as Pete says I get it but the only issue I have with your website, and what prompted me to make the comment, is that I went on the website the other day to see what you had been up to and I had to look through every page to see what was new and then I still wasn't sure. At least this way we see the most up to date progress so I guess its my laziness more than anything!
Please do bring the updates back, it was a thread I enjoyed reading and hopefully commented on with foresight rather than hindsight.
Adam
Trying to Finish 5" 9f Producing Scale fittings using 3D wax printing and lost wax casting - www.crofittings.co.uk/ Renovating house stopping all of the above!
Perhaps a compromise - post here with a link to each new website update? That way those that want to see progress and methods can, but separation of content may discourage discussion.
Like Pete and Adam I have missed your updates, a very fine build and another reference thread for this learner.
your problem is a consequence of providing good pictures and informative narratives on an excellent workmanship build that it attracts more readers than a lesser work in progress build would. More readers increases the potential for some to post 'see what I've done', giving them a degree of exposure that they otherwise would not realize.
It's a pity that you don't wish to continue posting here as the thread is incomplete. Your build diary is a uncluttered statement of what you have achieved but it is exactly that there is no interaction with the forum members. I waited a whole year looking for the start of the boiler.
Brian
Built 3 1/2" Gauge LBSC's LMS Black 5 Doris and Martin Evans Rob Roy Building Don Young's Black 5
I've enjoyed this recent series of posts and I'm glad you posted the info about finding front and back dead centre, that's really useful and I'd not seen it before. If you can't see the thread on your reversing mechanism I don't blame you for going with whitworth. Plenty of people in Australia do that and don't find it too difficult to move.
I'll add to the chorus requesting you to keep posting here but I can imagine it's a pain updating a website and then doing long posts on here too.
This thread did take a sudden turn to the left - threads, compliments, handedness (I'm another one!)
Thank you, gentlemen, for your replies. I admit to having missed the banter and cameraderie usually experienced on the forum but it is extremely dishearting to see ones efforts sidelined in cavalier fashion by extended discussions of barely-related items or a market stall of other products. I will often spend anywhere between thirty minutes and one hour just composing a single post that will take someone about a minute to read and even less if they just look at the photos. Preparing those photos, proof-reading the content and changing word choice or word order to try and ensure a "good read" are part of the process, as is trying to ensure continuity so that the reader can flow smoothly through the narrative. Maybe I'm just being too fussy, I'm not sure what others do.
I notice that one of our more argumentative collegues has not logged in since Christmas, something positive to be taken into account.
I think I will modify the title slightly and try to continue the thread but where do I restart? I could play catch-up and dripfeed articles in until we reach the current state of the build (which wouldn't take more that a few weeks) or I can forget the last eight months and start with where I'm at now which is commencing to build the boiler. In this instance, I would genuinely appreciate some opinions from those who would like to see a continuation.
I will be guided by those who are interested.
Regards, Steve
Last Edit: May 31, 2019 8:03:17 GMT by springcrocus
Hi Steve, I think it's inevitable that deviations and unnecessary interjections are going to happen, so personally I gloss over anything that isn't going in the direction I'd like. However, I've found that some of the diversions have been useful and interesting. I'm more relaxed about these things now I accept they are going to happen so long as it doesn't completely take over what I'm doing. For me, my thread is part diary, part exploring ideas and methods, and part building lasting relationships and making friends.
If your plan is to strictly follow the diary route, I'd suggest that it's not going to work and history will repeat itself. Tolerance and tongue biting is sometimes required to make this work. For me, the minor irritations are outweighed by the other aspects. My thread is very much a two way street for information flow, I don't see it as an 'instructional' thread or simply a record of what I've done. Sharing helps me stay motivated and the feedback of ideas and encouragement gives me a bigger sense of purpose.
It's a very personal thing, and only you can decide what you want to get out of it and what 'costs' you're prepared to pay for it to work for you. I very much hope you do decide to continue, your methods are of interest to everyone including myself. My personal preference is to let the pictures to the bulk of the talking. I never read anything that goes beyond more than a few lines unless I'm particularly interested in the topic. I expect most people are the same. It's a win-win situation for both content makers and readers if you rely on pictures for the bulk of the posts. It takes much less time to caption photos and it keeps the reader's interest. It's also easy to remember the sequence of events if you're just taking photos in order and explaining them simply.
As a fellow Britannia builder I see your thread as a valuable resource and, along with Jim's thread, constantly reread it for inspiration. I know it will be more work but I would love to see it continue rather than have an 8 month gap. You can bet there will be something in that 8 months that I will probably have a real problem with. Good to see you back either way.
… where do I restart? I could play catch-up and dripfeed articles in until we reach the current state of the build (which wouldn't take more that a few weeks) or I can forget the last eight months and start with where I'm at now which is commencing to build the boiler. In this instance, I would genuinely appreciate some opinions ...
Regards, Steve
I would certainly like to see you restart the thread. A suggested compromise between the two approaches you suggest: Start now with your boiler build, but have flashbacks to the missing parts as the opportunity arises. "Here's a bit I made earlier".
Wilf
Agreed, certainly would like to know what else you have been up to.
Adam
Trying to Finish 5" 9f Producing Scale fittings using 3D wax printing and lost wax casting - www.crofittings.co.uk/ Renovating house stopping all of the above!