|
|
Post by Deleted on Apr 7, 2019 20:43:19 GMT
another + for bakers fluid, I use it on all my soldering, soft soldering that is...  |
|
|
|
Post by Cro on Apr 7, 2019 20:58:10 GMT
Good trick I saw once and have tried for large flat parts is get a camping stove and a large thick plate, 8-10mm, warm in the oven and then pop on the camping stove and place part on top. This will give a nice even heat and then using plumbers torch warm the area and solder as you like but without having to heat areas too much.
Adam
|
|
|
|
Post by Roger on Apr 7, 2019 21:29:36 GMT
|
|
|
|
Post by Roger on Apr 7, 2019 21:31:19 GMT
It's decades since I did any soft soldering, but I was always in favour of tinning the joint surfaces before assembly. Then the heat up afterwards just fused it all together. Wilf PS and I used a big iron, heated with a blowlamp, or on a gas ring. Thanks Wilf, I certainly could Tin the surfaces, I'll chew that over. |
|
|
|
Post by ettingtonliam on Apr 7, 2019 22:27:12 GMT
You don't need to tin faces as suggested by Wilf. Bakers Fluid will clean everything up as it gets hot for the soft solder, and the soft solder will then flash around. Stepney's side tanks were heated up gently with a waving diffuse propane flame. Years ago I heated this sort of thing up in the domestic oven, then after removing from the oven added the Bakers Fluid flushed about using asbestos gloves then added large sticks of old fashioned plumbers solder adding the propane torch gently and from a distance. An ordinary small paint brush soaked in Bakers Fluid moves stuff around if it is being awkward. An old no longer wanted electric domestic iron can also be of use clamped upside down in the vice. I am not very good at soft soldering. Bakers Fluid is quite corrosive and if you use it Roger you will need to have your garage door open and prevent it dripping onto anything of value or importance. But it is very effective with old fashioned lead solder, and also Jim Scott's Arax 96 (which I can highly recommend and is well worth using as I did all the awkward joints on Stepney's side tanks with it where extra strength is required). Cheers, Julian It'll have to be a really old iron, Julian, the more recent ones tend to have an automatic safety cut out which switches them off if they are in any position other than that for mormal ironing. Richard |
|
barlowworks
Statesman
 Now finished my other projects, Britannia here I come
Posts: 874 
|
Post by barlowworks on Apr 7, 2019 22:46:34 GMT
Hi Roger
I use a small gas torch similar to the ones used by chefs sold by Marlins before they went belly up. Really useful for localised heat and it doesn't buckle the plates. I use Phosforic acid flux and 188 degree 1mm solder wire, works a treat. Remember solder won't flow over a pencil line(say 4b) if you can't get in with tippex.
Mike
|
|
|
|
Post by 92220 on Apr 8, 2019 7:56:16 GMT
Hi Roger.
Another way of heating it up evenly is to use a cheap (about £25/£30) single element induction hob, with a disc of steel on it, insulated off the surface with a sheet of ceramic fibre. Place the brass on the steel disc and heat that up. There are usually a number of different heat settings on the induction hob so you should be able to heat it all up quite gently and evenly, to no more than the melting temperature of the solder. I will try and do an experiment today and let you know how it works. I've got a 8" disc of steel so will give it a try. If it works, soft soldering becomes really easy. I'll let you know how it goes.
Bob.
Hi Mike.
Thanks Mike.That's a handy tip about the solder not flowing over a 4B pencil. Not heard of that one before. It must allow very accurate control of the solder flow.
Bob.
|
|
|
|
Post by Roger on Apr 8, 2019 8:00:01 GMT
Great tips guys, those are just the sort of hints I'm looking for.
I'm not sure how important it is to get it all hot, but I can see that it would make localised heating less of a problem. I don't have a hob or iron to sit it on, but I could cover it with a File blanket after gently wafting a flame all over it so it was fairly hot. I've seen what happens when you get Brass sheet Red hot, it bends all over the place, so I can see that Silver Soldering any of the fittings in place isn't going to be viable. It was only the outlets for the valves I would have done that way. I'll have to decide whether to key those in some way, or just peen them over on the inside to grip the Brass sheet and give a bit of mechanical strength.
It looks like it's going to be an outdoor job, I've seen what Bakers Fluid does to Steel parts if they are close to the action.
Great tip about the pencil line Mike, I've not heard of that one.
|
|
stevep
Elder Statesman

Posts: 1,070
|
Post by stevep on Apr 8, 2019 8:16:12 GMT
I soldered the joints on the tanks of my Stanier, and IIRC I used Bakers fluid and, like Julian, a soft flame on my propane torch.
I also soft soldered the beading, which I held in place with old fashioned wooden clothes pegs. They charred a bit, but that wasn't a big deal.
I wouldn't tin the surfaces before joining. That's a perfectly acceptable practice for getting a strong joint, but when you want to have a water-tight joint, it's better to rely on the capillary action of the flux and solder.
|
|
|
|
Post by silverfox on Apr 8, 2019 10:28:45 GMT
Would these induction hobs cover silver solder?
|
|
|
|
Post by 92220 on Apr 8, 2019 12:30:09 GMT
Hi Roger.
I've just done a test on the induction hob. I put a 8" diam x 10mm mild steel disc on the hob, with 3 pieces of ceramic fibre insulation to protect the surface. On top of the steel disc, I put a piece of 10 swg brass strip, and on top of that I stood a brass tube that was 30mm diam x 70 mm long, and set the hob as if heating soup. The power was 1300w..... Maximum power is 2000w, which would have heated it up quicker but may not have been quite so controllable. If it heated too quick it might not have been so controllable, and may have overheated. I hung a piece of 0.7mm cored soft solder wire over the top rim of the brass tube, to indicate when it had reached melting temperature. This took about 10 minutes from cold to molten solder because the contact between the pieces of brass and the steel, was a bit rough. I did actually leave it 'cooking' for about 15 minutes to see what would happen. The brass tube eventually got so hot it's surface colour changed to a dark brown, so it got way hotter than molten solder, and that was with it just sitting on the other bit of brass strip, for contact. From this test, I think this induction hob is going to be quite a useful tool alongside my gas torches.
Bob.
Hi Ron.
I have done a few tests with mild steel and have got it up to red heat. The ceramic fibre was not quite man enough to fully protect the hob surface, which got marked by the heat, so I still have a bit of experimenting to do. The hob will certainly heat steel up to red heat though. I haven't yet taken it up to silver-solder melting temp because I didn't want to damage the hob too soon. I do actually have another, slightly more expensive and more powerful (2500w) one, than the Aldi hob (2000w), but I want to sort the insulation problem before I try the more expensive one (£45 against £25 for the Aldi).
Bob.
|
|
|
|
Post by Roger on Apr 8, 2019 12:57:29 GMT
Hi Bob,
That does indeed look like a very useful tool.
|
|
|
|
Post by delaplume on Apr 8, 2019 15:13:42 GMT
Hello all,
was just wondering if anyone had given some thought to using a brush-on solder paste prior to assembly and then a gentle heat to activate it ??...after all it's the water tightness we're interested in as the brass angle and rivets will be bearing the actual stresses..
A friend of mine recently assembled a 5" GWR Castle's speedometer drive bracket in this manner and it looked just right..
I like the idea of using wooden clothes pegs for clamping beading.... or any other small, delicate item for that matter...
|
|
|
|
Post by ettingtonliam on Apr 8, 2019 16:10:49 GMT
Alan
Thats what I used when I did Locomotion's tank. I think it might be a problem if Roger is going to rivet his tank, and maybe several days elapse between putting on the paint and heating the joint. Its also jolly expensive.
Richard
|
|
|
|
Post by Roger on Apr 8, 2019 16:46:47 GMT
Hello all, was just wondering if anyone had given some thought to using a brush-on solder paste prior to assembly and then a gentle heat to activate it ??...after all it's the water tightness we're interested in as the brass angle and rivets will be bearing the actual stresses.. A friend of mine recently assembled a 5" GWR Castle's speedometer drive bracket in this manner and it looked just right.. I like the idea of using wooden clothes pegs for clamping beading.... or any other small, delicate item for that matter... Hi Alan, That's good stuff but I don't think I'd want to rivet onto it because it's going to relax as it melts and the rivets will possibly become slack. I also agree about the corrosion issue unless you do it right away. It does have its uses though, and it's the way PCB components are soldered onto the boards these days. In that case they use a very fine laser cut Stainless Steel stencil and screen print the solder paste onto the boards prior to automatic component placement. It's sticky enough to retain the components and then it's all passed through a vapour bath to melt all of the joints in one pass. Just pity the poor components that have to withstand that sort of treatment. |
|
jma1009
Elder Statesman
Posts: 5,901
|
Post by jma1009 on Apr 8, 2019 18:49:43 GMT
My old ex-domestic iron I guess dates back to 1962 and has that old fashioned corded covering to the lead! Never knew modern irons had some sort of cutout if inverted, so thanks for that info Richard.
I do rough up the joint faces of brass angle and also to remove some kind of anti tarnish finish that can create problems. Quite a lot of brass angle these days isn't true.
A further thing to watch out for is 1/16th copper snap head rivets vary in diameter - at least those I have do! I mike them up as I use them and use a small round needle file used only on non ferrous stuff with a swirl to enlarge holes for slightly oversize rivets.
Cheers,
Julian
|
|
|
|
Post by Roger on Apr 8, 2019 20:55:12 GMT
This is the balance pipe connection arrangement, the top piece that attaches to the Pannier Tank is what's being made here.  Balance pipe flange seal Balance pipe flange seal by Anne Froud, on Flickr I bought a piece of PB102 strip which was just big enough to make the parts. It's miles too long, but I'll use it for other parts too.  20190408_152151 20190408_152151 by Anne Froud, on Flickr It was too thick, so it was machines to thickness first and the location hole for the 'O' ring was put in. The fixture is so I can machine around the outside to make the location for that tank.  20190408_214307 20190408_214307 by Anne Froud, on Flickr 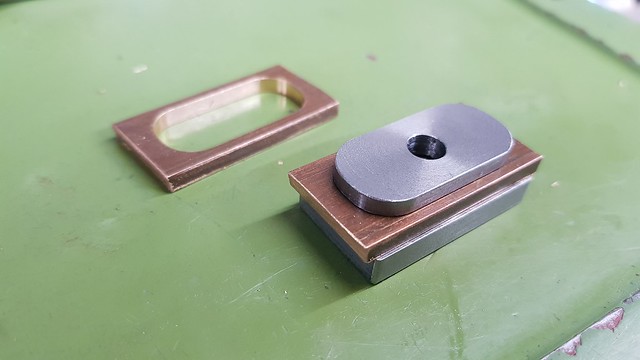 20190408_214218 20190408_214218 by Anne Froud, on Flickr |
|
|
|
Post by delaplume on Apr 8, 2019 22:27:47 GMT
Alan Thats what I used when I did Locomotion's tank. I think it might be a problem if Roger is going to rivet his tank, and maybe several days elapse between putting on the paint and heating the joint. Its also jolly expensive. Richard Yes, it is--isn't it !!...........What's best to dilute it with ??...........I have a small tub that's starting to go-off as it were.. |
|
|
|
Post by ettingtonliam on Apr 8, 2019 22:57:45 GMT
When I got mine I was disappointed to find that it was virtually just a solid blob of metal paste, as if it dried out in storage. I spoke to the makers, and they told me to add Bakers fluid and stir it up, which is what I did. So - Bakers fluid.
|
|
|
|
Post by delaplume on Apr 9, 2019 1:17:35 GMT
When I got mine I was disappointed to find that it was virtually just a solid blob of metal paste, as if it dried out in storage. I spoke to the makers, and they told me to add Bakers fluid and stir it up, which is what I did. So - Bakers fluid. Thanks for that-------I suppose it's a bit obvious come to think of it------I'll splash some on my little blob and give it a stir... |
|


