|
|
Post by Roger on Nov 29, 2019 11:05:21 GMT
It can be a problem getting parts off. You certainly don't need as much as you'd think. I often stick them to a plate which can be unclamped and the parts pushed off through holes from the back. Or, on the grinder, I would tape them to transfer blocks which in turn are held by the magnet. Cheers, Mike I may well try that if I've got something large enough. For most things I can get away with clamping it, but that's not always the case. |
|
|
|
Post by Roger on Nov 29, 2019 22:05:42 GMT
On the face of it, these looked ok, so I took them off the machine...  20191129_084944 20191129_084944 by Timothy Froud, on Flickr ... only to realise that the second pass had somehow not gone low enough to clean up the bumps. So I thought I'd set it up again and rectify that...  20191129_090531 20191129_090531 by Timothy Froud, on Flickr ... except I reworked the toolpath because I wasn't happy with it diving in and out of the cutout. In the process I went about it the wrong way, confused myself as to why it wasn't cutting and basically screwed it up. Such is life. I realised the error and now cover the surface with Black marker to make sure I can see it's actually cutting. Lesson learned.  20191129_110818 20191129_110818 by Timothy Froud, on Flickr Those two are now finished, but still on the machine with another plate so I can't show them just yet. I've been agonising as to how to split the cab, spectacle plate and bunker so I can easily remove these things for access and if necessary remove the boiler. In the end, I've settled on splitting it in the way it's done on 1501. The assembly below shows where the split lines are. The whole top section in Blue will be a single assembly with the roof to stiffen it all up. There will be a generous cutout in the cab, I can't be doing with struggling to see where the controls are. So the spectacle plate will have removable plates that come off with 6 x M1 nuts attached to studs. The side plates are slightly more awkward because the plates that bridge the gap are riveted permanently to the bottom plate. I think there will be enough flexibility in the side plates to stretch them so they clear the bolts. Ideally I'd like to keep the bolts attached to the plates so they can be painted over. The nuts on the inside don't matter as much. The side screens come off with the top, they are only retained on the bottom by the bent strip. The split line in the spectacle plate is at the widest point so the boiler can lift straight up and clear, leaving the bottom half in place. Obviously care needs to be taken to avoid damaging the cab sides if the boiler is removed with those in place.  Cab assembly split arrangement Cab assembly split arrangement by Timothy Froud, on Flickr |
|
|
|
Post by lankyyorky on Nov 29, 2019 22:26:51 GMT
It can be a problem getting parts off. You certainly don't need as much as you'd think. I often stick them to a plate which can be unclamped and the parts pushed off through holes from the back. Or, on the grinder, I would tape them to transfer blocks which in turn are held by the magnet. Cheers, Mike I use a hot air gun to melt the adhesive and drop the parts into a tray of white spirit, if using carpet tape a ten minute soak removes most of the residue, the stronger tapes by 3m can be difficult to clean off though.
Regards
|
|
|
|
Post by Roger on Nov 29, 2019 23:03:19 GMT
It can be a problem getting parts off. You certainly don't need as much as you'd think. I often stick them to a plate which can be unclamped and the parts pushed off through holes from the back. Or, on the grinder, I would tape them to transfer blocks which in turn are held by the magnet. Cheers, Mike I use a hot air gun to melt the adhesive and drop the parts into a tray of white spirit, if using carpet tape a ten minute soak removes most of the residue, the stronger tapes by 3m can be difficult to clean off though.
Regards
I've seen that technique used for removing labels or packing tape from cardboard, that works like a charm. The liquid form of label remover that you usually get in a spray can is very good at dissolving those glues that don't respond to White Spirit. I think double sided tape is a method of last resort though, clamping is preferable if you can get away with it as it solves the problem of removing the part. |
|
milky
Seasoned Member

Posts: 120
|
Post by milky on Nov 30, 2019 16:03:35 GMT
Lighter fluid, also works well ..available at your local 99p shop. It also evaporates and leaves little or no residue.
|
|
|
|
Post by lankyyorky on Nov 30, 2019 21:57:01 GMT
Thanks for the tips Roger and Milky, I'll give them a try. I mostly use carpet tape for profile milling 0.6mm brass sheet where clamping isn't always practical and the heavier duty tapes for thin steel sheet with additional clamping where possible.
Regards
|
|
|
|
Post by Roger on Nov 30, 2019 22:03:53 GMT
Thanks for the tips Roger and Milky, I'll give them a try. I mostly use carpet tape for profile milling 0.6mm brass sheet where clamping isn't always practical and the heavier duty tapes for thin steel sheet with additional clamping where possible. Regards Out of interest, I have a customer who uses water soluble wax to attach delicate plastic parts to a mandrel for CNC turning. This is used in mass production, so it's not a curiosity. I imagine you could use something like this to hold down a very thin sheet metal part, using a hot air gun and a flat weight to press it down while it sets. In his case, a machine appies the hot wax and presses the two parts together briefly while it sets. Obviously you wouldn't be able to take liberties with the feedrates, but it would be dead easy to remove the part when it was finished. Cleaning the part would just require a rinse in hot soapy water. |
|
|
|
Post by lankyyorky on Nov 30, 2019 22:17:53 GMT
Thanks Roger, that could be very useful where a lot of small parts were being cut from a sheet, tape sometimes gives way in these circumstances.
Regards
PS Just thought, that sounds very similar to the shellac techniques used by watchmakers.
|
|
|
|
Post by Roger on Nov 30, 2019 23:14:45 GMT
Thanks Roger, that could be very useful where a lot of small parts were being cut from a sheet, tape sometimes gives way in these circumstances.
Regards
PS Just thought, that sounds very similar to the shellac techniques used by watchmakers.
They're all pretty similar and have the same limitations. If you're machining right through it's not a big issue, but getting things flat where that's important can be problematical. |
|
|
|
Post by Roger on Dec 1, 2019 16:23:59 GMT
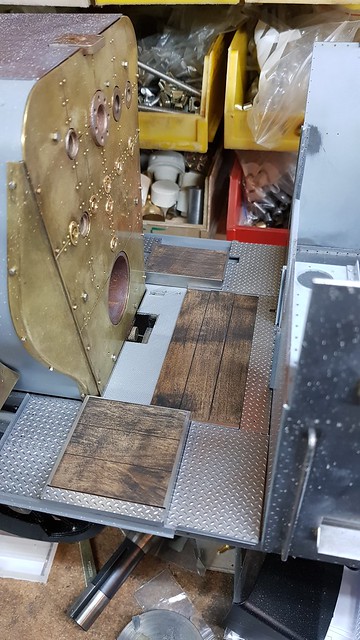
There's a small infill of chequer plate at the back of the LH plinth, so I've made that thick enough so it can rest on the same face as the planking.  20191130_144707 20191130_144707 by Timothy Froud, on Flickr It's made from 4mm plate.  20191130_150302 20191130_150302 by Timothy Froud, on Flickr This is where it goes...  20191201_155746 20191201_155746 by Timothy Froud, on Flickr ... and the larger of the two plates here will go on the bottom of all of that to aid assembly. The smaller one is for the other side. 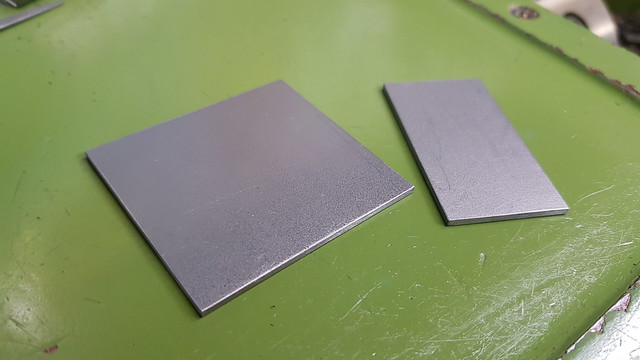 20191201_115006 20191201_115006 by Timothy Froud, on Flickr The middle planking looks like this, with a strip either side to contain three planks. There's a cutout in the middle to allow for the planks to be removed.  P1010041 P1010041 by Timothy Froud, on Flickr The strips are only 1.8mm thick and 2.4mm wide...  20191130_160416 20191130_160416 by Timothy Froud, on Flickr ... with a 1mm wide slot for the wood, so it's pretty thin. Holding it is tricky, so I machined that 5mm plate to have a rebate the right depth and just short of the width so I could trap it in the vise on parallels.  20191201_102843 20191201_102843 by Timothy Froud, on Flickr 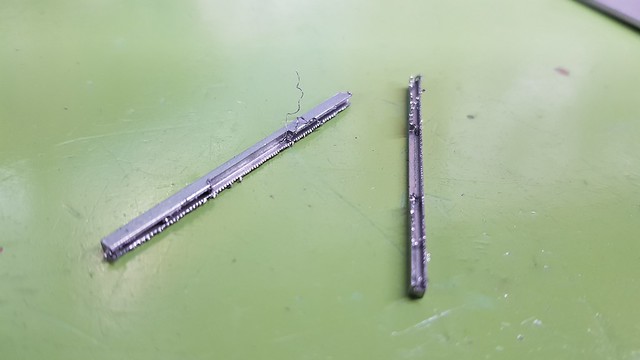 20191201_115024 20191201_115024 by Timothy Froud, on Flickr The sacrificial fixture ends up being machined into to get that top opening.  20191201_120621 20191201_120621 by Timothy Froud, on Flickr The wood is 6mm thick, and I need it 1.4mm thick, so here's it's getting faced off before getting the edge detail sorted.  20191201_125714 20191201_125714 by Timothy Froud, on Flickr 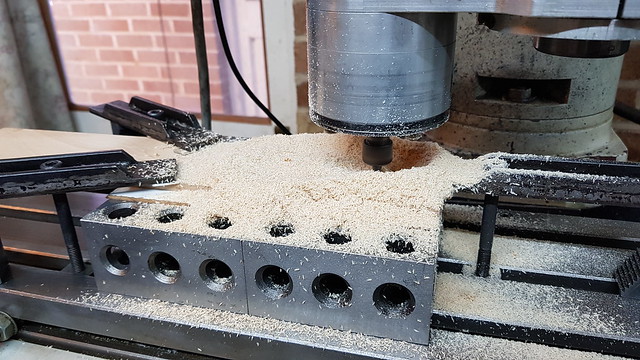 20191201_131021 20191201_131021 by Timothy Froud, on Flickr I'm using a 2mm cutter to rebate the edge and also that clears the area where the facing was done. 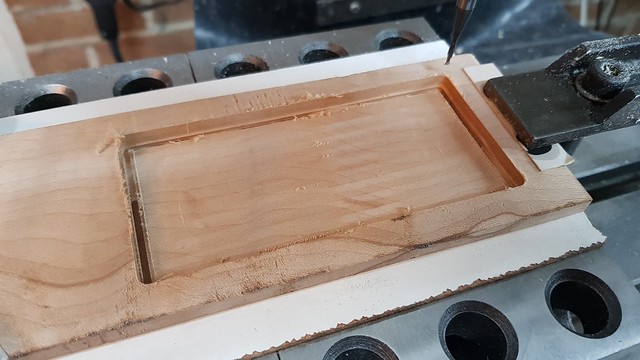 20191201_151350 20191201_151350 by Timothy Froud, on Flickr I've left nibs, but deliberately gone 0.5mm too deep either side of them so I get a nice clean edge. I've used new cutters for this, they need to be razor sharp for machining wood.  20191201_151507 20191201_151507 by Timothy Froud, on Flickr The edges are pretty thin, but they look the part. I've just indented a line to make it look like three planks. It makes the whole piece much more robust.  20191201_155332 20191201_155332 by Timothy Froud, on Flickr I don't know what stain they would have used, if any, but it's going to end up pretty black after a little use. I've got some Deep Mahogany wood stain, if that's any good? I've also got some Teak Oil Gel that was bought for the garden bench, that might be worth using to seal it. |
|
|
|
Post by delaplume on Dec 1, 2019 17:20:49 GMT
Quote}--- "I don't know what stain they would have used, if any, but it's going to end up pretty black after a little use"......
Hi Roger, when I was at the SVR we didn't...........The new planks were fitted without any staining ( why would they do that anyway ?? ) and yes, they do get black fairly quickly with normal use...
My suggestion is make the planks and then rub some fine coal dust into them.....They'll soon look the part..
PS}--- in your cab photo don't forget that the slacking pipe usually takes it's feed water from a tapping into the L/H injector outlet pipe..... unless the 15xx are different ??
Will you be making a "Bucket-on-a-stick" in the vertical mill ??
Alan
|
|
don9f
Statesman
 Les Warnett 9F, Martin Evans “Jinty”, a part built “Austin 7” and now a part built Springbok B1.
Posts: 960 
|
Post by don9f on Dec 1, 2019 18:16:06 GMT
Yes, planks will soon get dirty and a tip I picked up on a model railway signalling forum, was to “weather” planks (on signal landings or access platforms) using some very dirty white spirit. Seems to work well, although could easily catch fire in a loco cab !
Cheers Don
|
|
|
|
Post by Roger on Dec 1, 2019 22:20:52 GMT
Quote}--- "I don't know what stain they would have used, if any, but it's going to end up pretty black after a little use"...... Hi Roger, when I was at the SVR we didn't...........The new planks were fitted without any staining ( why would they do that anyway ?? ) and yes, they do get black fairly quickly with normal use... My suggestion is make the planks and then rub some fine coal dust into them.....They'll soon look the part.. PS}--- in your cab photo don't forget that the slacking pipe usually takes it's feed water from a tapping into the L/H injector outlet pipe..... unless the 15xx are different ?? Will you be making a "Bucket-on-a-stick" in the vertical mill ?? Alan Hi Alan, I thought they might have treated the planks in some way to make them impervious to water, but perhaps not. I'm not sure what other pipes and detail I've going to fit to the backhead. I'll try to do as much as I can, but some might have to wait until it's up and running. A bucket made from solid is definitely on the cards at some point! |
|
|
|
Post by Roger on Dec 1, 2019 22:22:52 GMT
Yes, planks will soon get dirty and a tip I picked up on a model railway signalling forum, was to “weather” planks (on signal landings or access platforms) using some very dirty white spirit. Seems to work well, although could easily catch fire in a loco cab ! Cheers Don Hi Don, I might just grind up some coal and add it to that gel I've got. If I can get a reasonably even finish across the whole wooden area I'll be happy. Good point about the fire risk! |
|
Gary L
Elder Statesman

Posts: 1,208
|
Post by Gary L on Dec 2, 2019 2:12:32 GMT
Yes, planks will soon get dirty and a tip I picked up on a model railway signalling forum, was to “weather” planks (on signal landings or access platforms) using some very dirty white spirit. Seems to work well, although could easily catch fire in a loco cab ! Cheers Don Hi Don, I might just grind up some coal and add it to that gel I've got. If I can get a reasonably even finish across the whole wooden area I'll be happy. Good point about the fire risk! FWIW I'm certain they would not have stained or treated the planks in any way. There were several reasons for preferring wood floors, one of which was to be reasonably non-slip with all that water from the pet pipe sloshing around. Ships' and yachts' wooden decks are generally untreated for the same reason, as are scaffolding planks. So the authentic colour after a few days use is dirty black. -Gary |
|
|
|
Post by mugbuilder on Dec 2, 2019 6:35:39 GMT
Stunning work Roger.
Barry
|
|
jem
Elder Statesman
Posts: 1,067
|
Post by jem on Dec 2, 2019 16:39:01 GMT
Wouldn't soot be easier than coal dust, mixed in with a bit of wood stain, and not very evenly?
best wishes
Jem
|
|
|
|
Post by Roger on Dec 2, 2019 17:21:08 GMT
|
|
JonL
Elder Statesman
WWSME (Wiltshire)
Posts: 2,912
|
Post by JonL on Dec 2, 2019 20:12:19 GMT
That looks excellent.
|
|
mbrown
Elder Statesman
Posts: 1,723
|
Post by mbrown on Dec 2, 2019 21:32:53 GMT
Now you need to machine a scale size boot sole and put a few boot prints on the sooty planks... If you can do non-slip chequer plate, a Doc Martens boot print should be no problem!
Frankly Roger, nothing you do would amaze me - you are pushing all the envelopes.
Malcolm
|
|