dc309
Seasoned Member

Posts: 146 
|
Post by dc309 on Nov 13, 2014 21:12:18 GMT
I decided to unpack the wheel castings tonight to have a look at them and think how I'm going to machine them. They are very nice by all accounts! Although when I measured them up, there is very little meat on them to machine them to finish size. On the diameter of the tread of the wheel, there is less than a 1/16" to take off to bring it down to size - Is this normal?  |
|
jma1009
Elder Statesman

Posts: 5,901
|
Post by jma1009 on Nov 13, 2014 22:21:03 GMT
yes, that's normal and in fact i would take the minimum off the treads to get a slightly larger wheel diameter. use the 4-jaw for chucking same after taking a skim off the backs and flange edge (under the cast iron skin).
cheers,
julian
|
|
|
|
Post by GWR 101 on Nov 13, 2014 22:49:51 GMT
Not sure where you sourced your castings from but if I remember correctly there was not a lot of material on mine and they cleaned up ok. I machined them to the drawing because that was all the information I had to work to, but I can see the logic in Julian's advice and would almost certainly use that approach on my next build. Regards Paul
|
|
dc309
Seasoned Member
Posts: 146
|
Post by dc309 on Nov 13, 2014 22:57:32 GMT
Thanks for your advice chaps. I've never used a 4 jaw before, so this will be a good experience! Is there any profile at all to follow for 3 1/2" gauge, as I know the bigger gauges so from reading various things?
|
|
|
|
Post by Deleted on Nov 13, 2014 23:06:31 GMT
I just checked my Juliet2 castings and there is very little extra meat there either ... virtually skim the skin and go.
Tom
|
|
|
|
Post by Roger on Nov 13, 2014 23:14:24 GMT
Thanks for your advice chaps. I've never used a 4 jaw before, so this will be a good experience! Is there any profile at all to follow for 3 1/2" gauge, as I know the bigger gauges so from reading various things? Hopefully you have a lever dial gauge for setting these up? If not, now may be the time to get one. I use a 2 micron ( a tenth of a thou) clock on everything. You still get +/- 0.1mm reading on that so one does for the super accurate and the regular work. |
|
|
|
Post by Deleted on Nov 13, 2014 23:19:07 GMT
|
|
|
|
Post by Roger on Nov 13, 2014 23:22:07 GMT
That's a new one on me Alan, I wonder what circles those are.... very small ones perhaps?
|
|
dc309
Seasoned Member
Posts: 146
|
Post by dc309 on Nov 13, 2014 23:22:46 GMT
Thanks for that Tom! Roger, I have got an imperial clock but I haven't got a bloody clue how to set the wheels up in the 4 jaw - I'll have to figure it out sharpish I guess!
|
|
|
|
Post by Rob on Nov 13, 2014 23:43:28 GMT
The basic gist is moving opposing jaws in turn to reduce the runout, using your DTI. Bearing in mind of course, any movement one way makes an equal movement in the opposite direction for the other side, so move things in halves, if that makes sense. There are lots of youtube vids out there with tips and tricks on setting up things in the 4 jaw, but it's really quite intuitive when you do it  |
|
|
|
Post by ejparrott on Nov 13, 2014 23:45:40 GMT
Set the wheel in the chuck, use the jaws to push it around until true. you get used to it, I use 4-jaws almost exclusivly in my work. The trick is to measure the chuck jaws with a rule to get it roughly right, then only set opposite jaws. If you try adjusting it in both directions at the same time you'll get confused. You have to adjust it until the clock reads the same on opposite pairs of jaws. I bought a digital clock a few years ago and it makes life very easy. You might find that the casting isn't round, and therefore you can't get the same reading on the clock at all four jaws. don't worry about it. Just set it so opposite pairs are equal, unless there is a massive discrepancy. I would assume there is still remains of the 'in' gate somewhere, set this between jaws so it doesn't throw the clock out.
|
|
|
|
Post by doncaster on Nov 14, 2014 0:02:30 GMT
You will be able to set the wheels up using a fixed datum pointer or the tool bit set near the edge of the wheel. Firstly just nip up the 4 jaws lightly around the wheel as equally concentric to the chuck as you can see by eye, put your datum point at centre height and turn the chuck by hand watching the gap between the datum and wheel as it turns, when the gap is at its widest stop turning and slacken off the jaw nearest to the gap and tighten the jaw directly opposite continue turning the chuck and the gap should decrease, repeat this until the wheel is running true, you should be able to getting it running very true by eye. once running true tighten nip up the 4 jaws. As Julian mentions face the back of the wheel and outer side of the wheel rim first and then reverse the casting to skim the front face and bore the axle hole. (or you can bore the axle on the first setting). Once the axle hole is bored the wheel can be mounted on a mandrel to finish turn the tread etc.
Hope this makes sense.
Mike
|
|
|
|
Post by Deleted on Nov 14, 2014 0:18:05 GMT
Try using the curved end of the scriber, set in a scribing block which is resting on your lathe's bed to "see" the gap, until you have it turning within 0.030" ( 1/32" ) by Mk1 eyeball, then put a clock on it for final adjusting.....You'll also "see" if it's oval without having to read a jumble of constant changing numbers all the while.................. something liked this >>>>>>>>>>>>>>>>>>>>>>>>>>>>>>>>>>>>>>>>>>>>  |
|
|
|
Post by Deleted on Nov 14, 2014 0:23:15 GMT
Don't worry too much about the finished outside diameter. It's only a freelance after all. The most important thing is to get the inside of the rim running true. Nothing looks worse than that running eccentrically!
John
|
|
jma1009
Elder Statesman
Posts: 5,901
|
Post by jma1009 on Nov 14, 2014 0:27:09 GMT
the reason for using a 4-jaw for the fronts of the wheels is to get the edge of the wheel/simulated tyre running concentric with the ends of the spokes. i agree this can be done mostly by eye and bringing a lathe tool up to the offending part of the wheel casting. nothing is more annoying or displeasing to the eye than a wheel turned with different depth gouges around the inside of the 'tyre' when the wheel hasnt been set to run true for this part. as mike then says when faced off the front you can then bore the axle hole and then ream plus do the cut for the inside of the tyre, then mount on a mandrel for completing the tread and truing up the outside of the flange.
it is often the potentially most difficult jobs that take less time, and the what may seem simple jobs that take ages! i can usually do a whole set of wheels completely finished in an evening. filing all the lumps and bumps off the spokes can take the best part of a week!
cheers,
julian
|
|
dc309
Seasoned Member
Posts: 146
|
Post by dc309 on Nov 14, 2014 11:35:48 GMT
Wow - Many many thanks for your replies. I will put the 4 jaw up this weekend and have a go at it, I'll hopefully have them finish machined by Sunday night Thanks again for all your help and advice, I really appreciate it  |
|
|
|
Post by Deleted on Nov 14, 2014 11:56:11 GMT
---------- use a large COPPER hammer to gently "tap" when needed.....
|
|
|
|
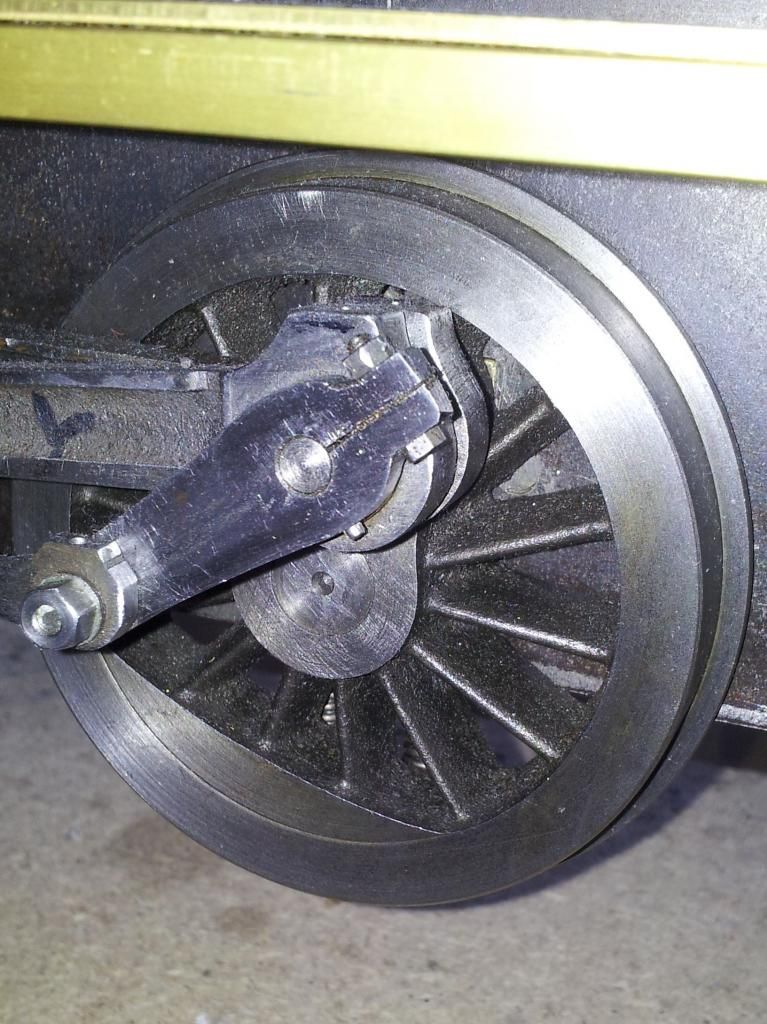
Post by GWR 101 on Nov 14, 2014 13:33:21 GMT
Hi, hope all goes well with the wheels. Just took a photo of mine sorry about the quality of the photo and the wheel, I did machine them a few years ago on a "home made" lathe.  They are exactly to the drawing including the groove to highlight the counter weight, which is another reason to get the inside of the wheel running true. Hope this is of some small help. Regards Paul They are exactly to the drawing including the groove to highlight the counter weight, which is another reason to get the inside of the wheel running true. Hope this is of some small help. Regards Paul
|
|
|
|
Post by Roger on Nov 14, 2014 14:30:14 GMT
You might want to read the long discussion we had on a thread I started about Tapered Wheel Treads, that's interesting reading. The treads in the picture look parallel to me but I may be wrong.
|
|
|
|
Post by Deleted on Nov 14, 2014 16:38:22 GMT
Blimey matey--- can you actually see a 2 degree taper (or not) from that odd angle ??...  |
|


 They are exactly to the drawing including the groove to highlight the counter weight, which is another reason to get the inside of the wheel running true. Hope this is of some small help. Regards Paul