|
|
Post by builder01 on Jan 6, 2019 1:06:03 GMT
The radius of the flange on the axle box should equal the distance between the outside faces of the horn blocks. On a 5" gauge loco, this will be about 4-3/8". Measure yours to see what it is. This radius is not critical, but, the flanges should be relieved somewhat so they don't bind on uneven track. My loco is set up to run on 4-3/4" track, so the radius is 4-1/8". My wheels and suspension work just fine using this method of figuring out the radius. I machined this radius on my flanges using a vice clamped to a rotary table. The axle block must be centered so the radius is the same above and below the center line of the block, assuming your axles are in the center of the block. You can see in the photo that the layout dye shows how much material has been removed. Leave just a little of material at full size toward the center of the block. 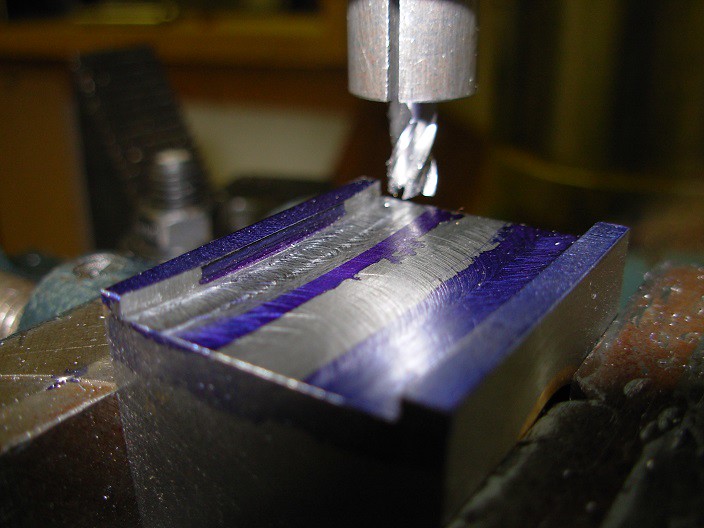 DSCN0745 - reduced DSCN0745 - reduced by Builder16, on Flickr |
|
|
|
Post by builder01 on Dec 20, 2018 19:01:22 GMT
PM received and sent!
David
|
|
|
|
Post by builder01 on Dec 20, 2018 17:18:49 GMT
A Sievert burner? Infidel!!!
David
|
|
|
|
Post by builder01 on Dec 20, 2018 17:16:40 GMT
I have copies of both 14 and 22. PM me and I can get you what you need. (High res scan too!).
David
|
|
|
|
Post by builder01 on Dec 17, 2018 21:32:12 GMT
I got my laser cut parts from Malcolm. I have no idea if there is any protective oil treatment or not. In any case, you usually machine these pieces on all sides and all surfaces will be removed to a certain degree anyway. Even if these parts do no need to be annealed, it certainly makes cutting through the laser cut edge with HSS much easier. Here's an example of two parts from Malcolm, as received, and then after being completely machined: 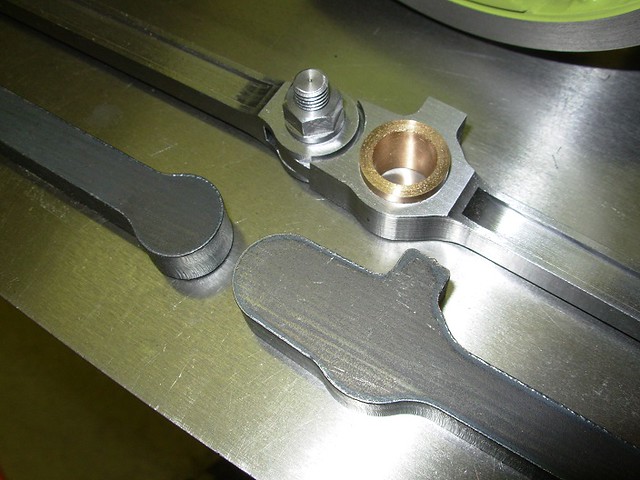 DSCN0778 - reduced DSCN0778 - reduced by Builder16, on Flickr |
|
|
|
Post by builder01 on Dec 17, 2018 19:01:06 GMT
I annealed all of my laser cut parts in the same way. I also attempted to straighten these parts before any machine work began. I did the straightening before the annealing. After the machine work was complete, the parts remained quite straight and flat. annealing also has the benefit of softening up the laser cut edge, which is sometimes quite hard.
David
|
|
|
|
Post by builder01 on Dec 11, 2018 1:54:20 GMT
Here's the one I made for working on my Super Simplex. I did not design this stand, the credit goes to a clever person, Colin Abrey. If you want the drawings, they are at the bottom of the page of my website. Scroll all the way down, and the links to the drawings are there. supersimplex.yolasite.com/Construction-Stand.php![]() ![]() ![]()  DSCN1011 DSCN1011 by Builder16, on Flickr |
|
|
|
Post by builder01 on Nov 30, 2018 17:09:54 GMT
Hi Tony,
Oh, okay!! I have completely forgotten! I guess then you already have my regular email address. Good deal!
David
|
|
|
|
Post by builder01 on Nov 30, 2018 14:45:26 GMT
One of the many reasons I chose to build a Super Simplex was because it would be easy to re-gauge for the 1" scale track in the U.S. (4-3/4" gauge). Outside cylinders and valve gear was a requirement! It has worked out quite well even with the slightly narrower grate.
David
|
|
|
|
Post by builder01 on Nov 30, 2018 2:49:35 GMT
Hi Tony,
Glad to see you are still around. Since you are in the U.S., are you planning to gauge your Simplex for 4-3/4" track? That is what I did when I built mine. I have even had the opportunity to take it to the St. Croix track in WI. I will send you a PM with my email address, and thank you so much for the offer! You will have to post a few photos when progress is made.
David
|
|
|
|
Post by builder01 on Nov 10, 2018 15:38:48 GMT
twombo, I glad to hear you are going to have a go at making your own boiler. Good for you!
As for step soldering, it is less necessary than you might think. Once silver solder has been melted, it takes a much greater temperature to get it molten again. This is part of the beauty of using silver solder. I did my entire boiler with 45% silver solder, no step soldering. As my boiler build progressed, there were no problems with previous assemblies coming apart.
I did have copper screws holding sub-assemblies together, so, even if previous joints softened, nothing was going to come apart or go anywhere. These copper screws are soldered over and are left in place, and become part of the boiler. Small copper screws also allow you to completely assemble the boiler, test fits parts, make adjustments as needed, and then reassemble.
The order of assembly is important. Boilers are built from the inside out. I started at the throat plate and completed the firebox all the way to the back head. The smoke box tube sheet and tubes should be done last. Once the fire tubes are soldered at both ends, it is difficult to do more soldering on the boiler as the barrel and tubes will change dimensions due to the inability of getting them both to the same temperature at the same time. This will stress the joints at the ends of the tubes and tube sheets with potentially disastrous results.
David
|
|
|
|
Post by builder01 on Nov 7, 2018 17:24:35 GMT
The valve gear for the Super Simplex seems to work well also. I built mine exactly as drawn and it works well forward and reverse.
David
|
|
|
|
Post by builder01 on Nov 6, 2018 0:19:56 GMT
You can certainly get laser cut formers, but, you will still have to make the radius on the corner of each. If wooden, a router with a radius bit does this job in a few seconds. In steel, maybe a little longer.
David
|
|
|
|
Post by builder01 on Nov 6, 2018 0:08:31 GMT
Well, I am certainly glad your boiler has turned out okay. Congratulations! It is a good feeling to know you made it yourself.
As far as copper crystallizing from over heating, I have never heard of this. When you over heat copper, it simply melts! If you only use propane, it will never get hot enough to melt. Otherwise, it is annealed and soft, ready for the next forming. What does harden copper, is work hardening from using your mallet on it. This truly makes the copper hard and can allow it to crack. But, overheating? Not sure where that idea came from.
I made my formers from hard maple. It is in good enough shape to use several more times. I don't think the time taken to make formers from steel is worth the effort. The maple formers were easy to make.
If you make formers to press the copper, you will still have to anneal it several times during the process. Also, if you press the plates, you will not only have to make the male former, but, a female former for it to press into. All of this from plate steel will be a lot of effort.
David
|
|
|
|
Post by builder01 on Nov 5, 2018 23:30:41 GMT
Very interesting comments from your boiler inspector. I have never heard of butt straps lifting off because it distorts more than the barrel. I would really like to see examples of this. Also, rivets conducting heat to the barrel during soldering? The heat should always be played on the larger of two parts allowing the heat to transfer to the smaller part, rivets have nothing to do with this. Oh well, as long as you play by his rules, no matter what he thinks, you will be fine.
David
|
|
|
|
Post by builder01 on Nov 3, 2018 22:23:40 GMT
ha! i have successfully made the ‘telly’ connect to the “ Mother “ country !! I may just see if I can “ throw money at the problem”. And have it proffesionally completed. You sound as if you are going to have your boiler completed my someone other than yourself? Sorry to hear this, unless, of course, I have misunderstood you. David |
|
|
|
Post by builder01 on Nov 3, 2018 13:17:23 GMT
|
|
|
|
Post by builder01 on Nov 2, 2018 23:26:08 GMT
If I remember correctly, Lisa mentioned that a simple angle vice is out of the budget. I would imagine that a band saw would exceed the cost of a vice.
David
|
|
|
|
Post by builder01 on Nov 1, 2018 18:02:36 GMT
I'm not sure why you would need an O ring. A flange, as you are thinking, a few screws, and a gasket works just fine. There are no leaks with this type of attachment and easy to do. - David In terms of what they achieve, I don't see the difference between using an 'O' ring or a gasket really, except you can buy 'O' rings off the shelf. You are correct Roger, I'm not sure what I was thinking!  |
|
|
|
Post by builder01 on Nov 1, 2018 17:57:14 GMT
Hi Malcolm I believe that the two ends that join are cut away and silver soldered together, looking at David's lovely piece of work, it looks like he's also made use of the collar to keep everything in place before soldering takes place. I would assume that some form of jig was also used to keep things aligned. I'm sure that when David sees your question he'll give you details as to how he did it. Regards Pete Yes, as Pete has described, this was made from two pieces of copper pipe with the sides machined away, then brought together and fitted into the larger piece of pipe (tube). The entire assembly was brought up to temperature and silver soldered. It was pretty much self supporting before soldering, so, no jig was needed. The tubing is ordinary copper tube from the hardware store. It is thick wall copper water pipe. It is also quite soft. I made a wooden wheel of the correct radius and has a groove in the edge of it the same size as the pipe. I pushed the pipe into the groove until it matched. What is not shown, is the section of copper that is silver soldered into to other end of the collar and it is threaded to accept the blast nozzle and blower ring. ![]()  DSCN1416 - reduced DSCN1416 - reduced by Builder16, on Flickr |
|


