|
|
Post by Cro on Nov 17, 2020 16:02:40 GMT
A few late nights lately and a free weekend has seen the regulator finally fitted to the 9f and I'm very happy with how its turned out. The focus now is to get the boiler steam tight again so I can pop a fire in and see how it runs. I'll post some photos of the regulator another time, for now I wanted to show an update on the water valves which I made in June but never completed as I was waiting for the small indicator stop castings to arrive. I spent Sunday working on these and I'm happy to say they are done all they require now is the studs to be fitted. First up was to remake the internal spindles as I had misread my own drawing originally and made them too short. A simple turning job on the Myford before setting up the dividing head to produce the head for driving the PTFE block and square for the spindle extension. These are offset by 30deg. so it was important to do it all at once so another reason to re-make the spindles as I had only done the hex the first time round. I machined one on to each end of the bar so I still had something to hold in the collet and it meant a quick turn around when one end was done to start the other. Here is the little stop casting on the square.  Untitled Untitled by Adam Cro, on Flickr I had the spindle extensions cast in a white bronze as the female square at the bottom was 45deg. out from the male square at the top and although I'm sure I could find a fairly simple way to do all of that it was just easier to cast these. Here they are with the handles fitted and you can also see the hex pocket in the PTFE for driving the valve itself.  Untitled Untitled by Adam Cro, on Flickr Next up was the stop pins themselves, another little turning job but to give you an idea of size the OD is .08" and the end is tapped 12BA bottom and top is .05".  Untitled Untitled by Adam Cro, on Flickr  Untitled Untitled by Adam Cro, on Flickr Now all that was done onto the cab they went.  Untitled Untitled by Adam Cro, on Flickr I also soldered up the bracket for in the cab with some brass bushes to line it all up.  Untitled Untitled by Adam Cro, on Flickr Lastly the drivers view of the valves.  Untitled Untitled by Adam Cro, on Flickr They had a really nice feel to them so I am pleased with how they have turned out. Next up will be fitting the injector steam valves and bracket whilst I carry on working through 8 vacuum brake valves. Thanks, Adam |
|
|
|
Post by Deleted on Nov 17, 2020 16:18:22 GMT
Lovely detail Adam, they look superb.....meanwhile in PSH works I'm currently machining 0.5 mm sheet stainless... I've clearly lost the plot....  |
|
Gary L
Elder Statesman

Posts: 1,208
|
Post by Gary L on Nov 17, 2020 17:26:00 GMT
Yes, really nice! Not so very different from GWR water valves that are also very visible under pannier tanks...  Gary |
|
barlowworks
Statesman
 Now finished my other projects, Britannia here I come
Posts: 874 
|
Post by barlowworks on Nov 17, 2020 17:59:21 GMT
They are absolutely gorgeous. I can see a couple of those on a Britannia of this parish at some point in the future. One one each side on a Brit though.
Mike
|
|
|
|
Post by Cro on Nov 17, 2020 18:31:02 GMT
Thanks chaps the PTFE idea is nothing new but the hex pocket is thanks to Roger as it gives a much better drive but rather than machining the hex pocket I used the spindle to press into a machined hole and cut the hex itself.
Gary if you need castings I’m sure with some help on drawings we can sort something out! I’m just having the 10x castings done as patterns are at the foundry now.
Mike they are the same as the Brit but as you say one either side, one is larger than the other to suit an exhaust style injector. You have the fun of all the linkage under the cab floor!
Adam
|
|
|
|
Post by 92220 on Nov 17, 2020 19:35:35 GMT
Superb detail Adam. If I didn't know better, I'd have said they must be full size !!
Did I ask you to add me to your list of 10x casting customers? If not, please can I have a casting set?
Bob.
|
|
44767
Statesman
Posts: 529
|
Post by 44767 on Nov 18, 2020 10:43:01 GMT
They look great, Adam! Incrementally, you're getting there!
Mike
|
|
|
|
Post by Cro on Nov 18, 2020 11:09:53 GMT
Thanks buddy, some late nights last week got the enthusiasm going!
You need to update us all on the 3s soon!
Adam
|
|
44767
Statesman
Posts: 529
|
Post by 44767 on Nov 19, 2020 6:29:00 GMT
Ah, yes, the Class 3's! They're going well. Sorry that I haven't updated the thread here regularly; it's just a time thing really. For those interested have a read here for the background and I'll update the latest very soon. Cheers, Mike |
|
|
|
Post by Cro on Nov 23, 2020 11:56:39 GMT
Nothing too exciting this weekend as only managed a few hours yesterday afternoon after work on the house and domestic duties. Boring stuff like batch production of injector valves was the order of the day using the new 3D printed fixtures. I think next time I'll add 1-2% increase to the fixtures as they are a very snug fit and this material although very accurate is brittle and damages easily when the fit is tight but they are doing the job and makes the machining really easy now.  Untitled Untitled by Adam Cro, on Flickr A quick tidy on the bench for a photo opportunity - I then found one last pair of castings to machine after tidying up, typical but I was given permission after cooking dinner to go and finish them.  Untitled Untitled by Adam Cro, on Flickr Which also gave me time to fit these.  Untitled Untitled by Adam Cro, on Flickr Once the current batch work is done its time to attempt a couple of these SSJ ejectors and duplex valves.  Untitled Untitled by Adam Cro, on Flickr Still working towards steaming the 9f again but I think now I'll get more of the fittings on and try a few bits out and put a proper fire in rather than just the gas burner. Big casting order going in this week including some new 7 1/4" Wakefield lubricators for a Class 4 tank and hopefully prototypes of the LMS manifolds and injector valves - update very soon! Thanks, Adam |
|
|
|
Post by Cro on Nov 29, 2020 21:34:44 GMT
Decided to finish the injector valve machining off this weekend before doing some more on the 9f Injector valves. The new fixtures made life so easy, got it down to 2:20 per casting for machining, drilling and tapping both ends of a casting. The bit that takes the time is all the cleaning up and sorting out ready to assemble things. These need to go through ultrasonic cleaner at work this week to remove the last casting residue then they are ready to assemble. 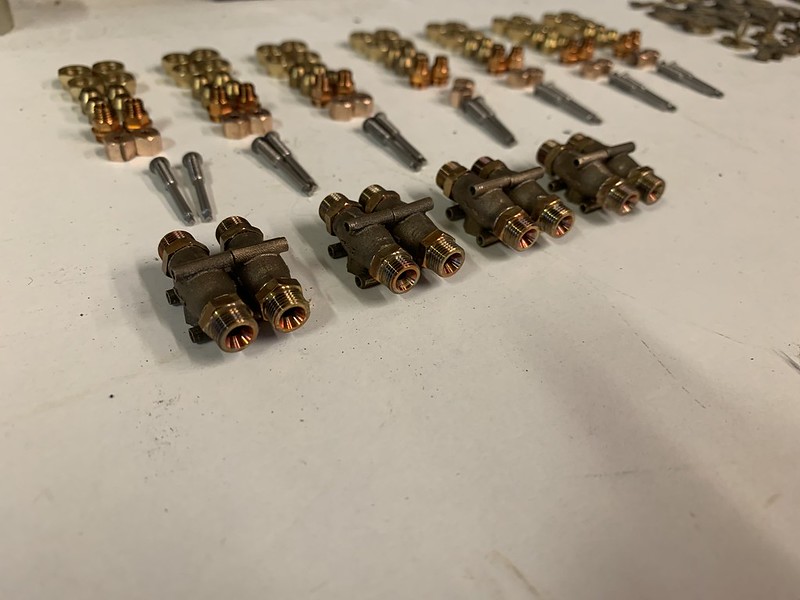 Untitled Untitled by Adam Cro, on Flickr I also packed all the glands with graphite string ready for assembly. 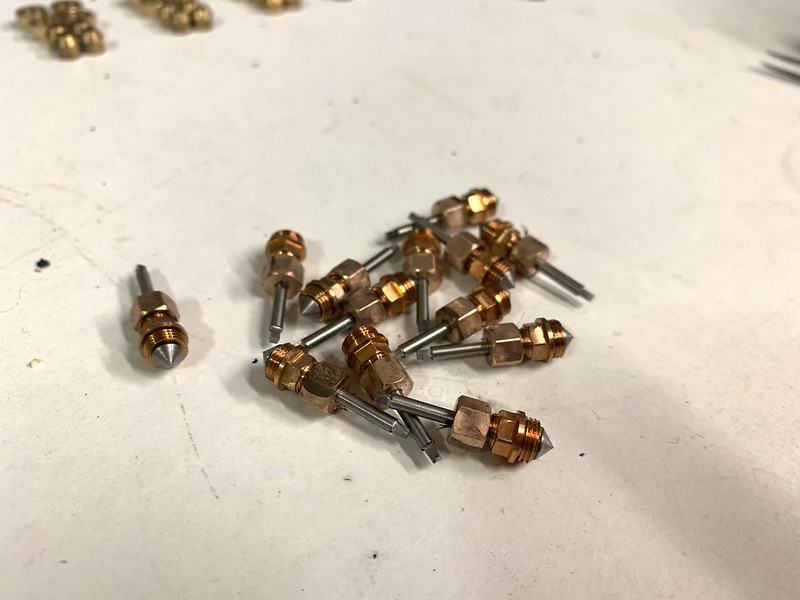 Untitled Untitled by Adam Cro, on Flickr As I said, time also spent on the 9f, first up was to assemble the laser cut spindle brackets and turn up the little guide collar before silver soldering. 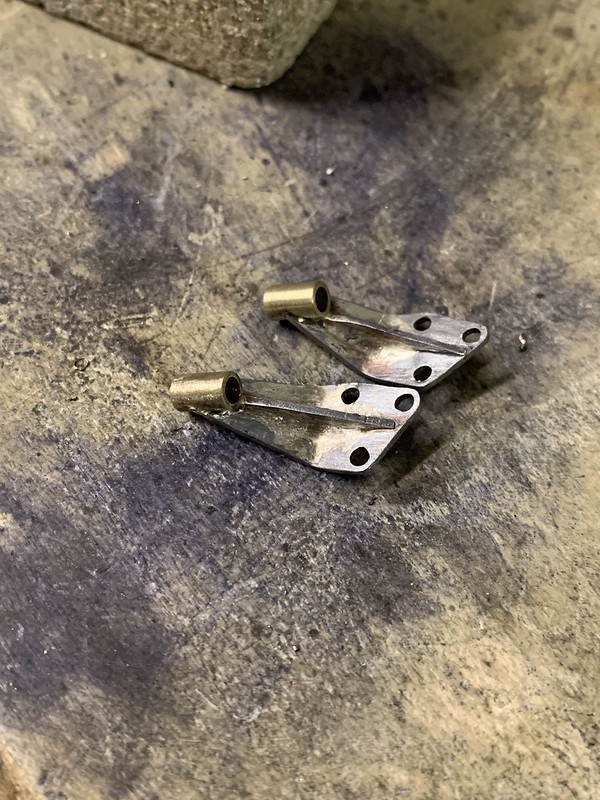 Untitled Untitled by Adam Cro, on Flickr Next up was the spindles themselves soldered to the Universal Joints.  Untitled Untitled by Adam Cro, on Flickr Once all loosely assembled on the valves I trimmed the spindles to length, machined the square on the BCA and finished them off by turning the 12ba thread. Once all done, holes were spotted onto plate work and 10ba holes drilled and tapped for the studs. 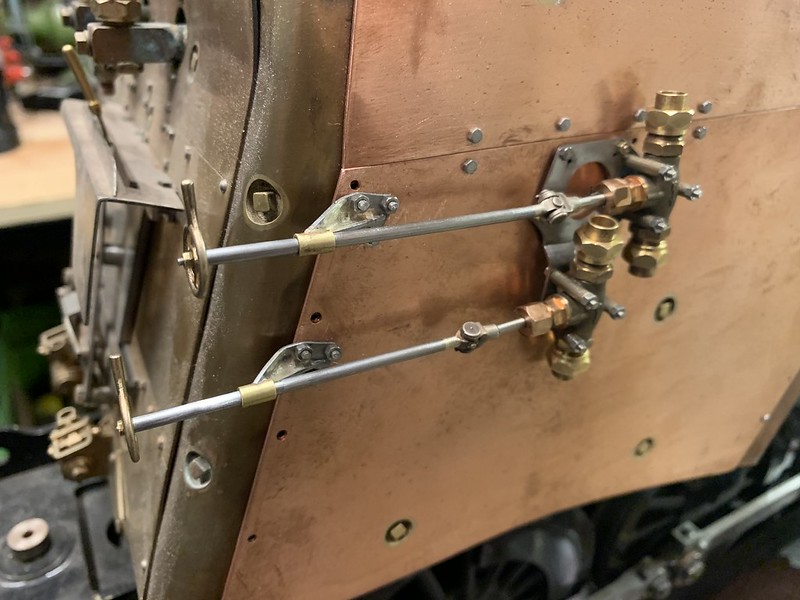 Untitled Untitled by Adam Cro, on Flickr Cab back on, its pretty tight in there. Once the window runner goes on the lower handle will have to be trimmed (like full size!)  Untitled Untitled by Adam Cro, on Flickr 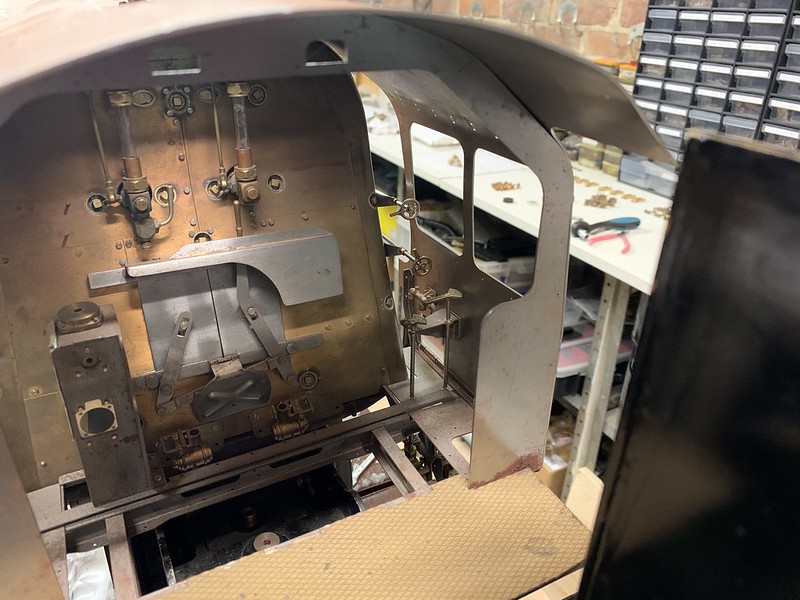 Untitled Untitled by Adam Cro, on Flickr Duplex valves will be next on the list but first its getting the Injector valves are all assembled and tested and back on the vacuum brakes for a little bit. Back to work, big day tomorrow on my latest project! Adam |
|
|
|
Post by Deleted on Nov 29, 2020 23:25:43 GMT
Looking great Adam...I like the idea of 3D printed fixtures to hold parts for machining. Perhaps when you have time you could take a look at the cost of fixtures for the parts I have, manifold and steam valves come to mind.
Keep up the great work mate.
Pete
|
|
oldnorton
Statesman
5" gauge LMS enthusiast
Posts: 693
|
Post by oldnorton on Nov 30, 2020 10:04:55 GMT
Superb Adam, always a delight to look at. Leaving the cab spectacle plate off, until you have positioned the hand wheel rods, is a very good move. Wish I had thought of that  Norm |
|
|
|
Post by silverfox on Nov 30, 2020 11:28:06 GMT
Ooooooohhhhhh....lovely
|
|
|
|
Post by Cro on Nov 30, 2020 14:02:04 GMT
Superb Adam, always a delight to look at. Leaving the cab spectacle plate off, until you have positioned the hand wheel rods, is a very good move. Wish I had thought of that Norm Got to make the spectacle plate fit yet, the first one I did was miles off........! Didn't want to tempt fate on this so spindles and brackets in first and I'll use the brackets to spot through onto the spec. plate once it's fitted. Adam |
|
|
|
Post by Cro on Jan 6, 2021 12:37:40 GMT
Just a little update In the background the printer has been working overtime for a delivery later this month. Here is a quick photo of the latest batch. Here are some bits for the 9f but more importantly the long long awaited (for me at least as i could never find a drawing) the LMS manifold injector valves (top right).  Untitled Untitled by Adam Cro, on Flickr Hopefully see the manifold soon and these will find their way to foundry on Monday! I've had 5" and 7 1/4" Scale done and can't wait to get them here. Adam |
|
|
|
Post by Cro on Jan 10, 2021 16:37:13 GMT
Another little update from New Zealand before Mike heads to the foundry tomorrow. A large selection of items in either Silicon Bronze or White Bronze. There is till more to be printer but lots going on right now.  Untitled Untitled by Adam Cro, on Flickr Here we have the regulator handle for the 9f, water valve quadrants in 5" and 7 1/4" and some wing nuts. 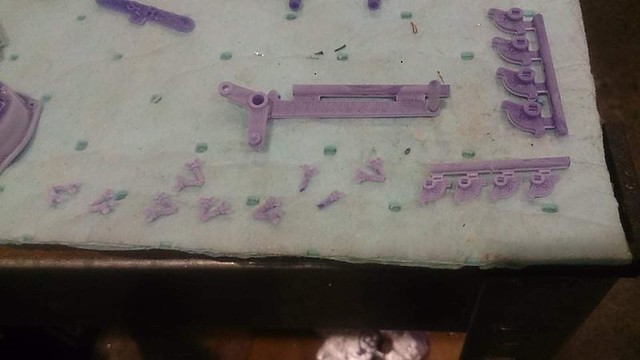 Untitled Untitled by Adam Cro, on Flickr Last two show the two LMS manifolds, the 5" one is held behind Mikes Black 5 boiler and the "assembly" is the 7 1/4".  Untitled Untitled by Adam Cro, on Flickr  Untitled Untitled by Adam Cro, on Flickr Right, break from the lathe over, onto the next parts. Adam |
|
|
|
Post by Cro on Jan 31, 2021 22:20:50 GMT
Aside from more demolition of the house this weekend I have been stuck infront of the laptop but making great progress. A full set of machining drawing and assembly drawings to suit an LMS Vacuum Brake Valve were complete and now I can finally say the Davies & Metcalfe Class K Exhaust Injector the BR Std locos is complete! I started this model in March 2017 but after getting 75% the way through I decided I wasn't happy with the shape I had so I put it to one side and it has taken until now to get round to learning a better way to model these types of shapes and complete it. To get a feel for the real thing here is one of Paul Orrells photos of Britannia. www.fraserker.com/britannia/orrells/img_0864.htmlThis was the effort from 3 years ago. 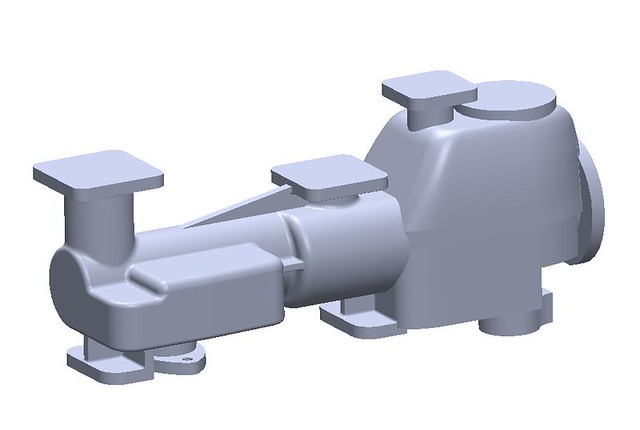 K Class K Class by Adam Cro, on Flickr It's all to do with the sort of free form shape at the end that was never right, too bulky and not a smooth transaction between curves. This is what I have now, a much better shape and one I'm happy to call complete.  K Class Final 2 K Class Final 2 by Adam Cro, on Flickr I also spent yesterday evening completing the laser cut bracket that holds both injectors to send over to Ed for laser cutting, couldn't resist a little assembly.  9f Injectors 9f Injectors by Adam Cro, on Flickr Hopefully we will see this in real life on the 9f later this year when the loco returns to the workshop after the building work is complete. The builders start digging the foundations tomorrow, I'll post some updates as things progress for those interested. Adam |
|
|
|
Post by 92220 on Jan 31, 2021 23:41:06 GMT
Hi Adam.
That Type K injector looks fantastic. Great job!! Please put me down for one when your get them cast. Are you intending following up on the idea of a slide-in cone cartridge for the Type K and the 10X?
Bob.
|
|
|
|
Post by Cro on Feb 1, 2021 6:08:33 GMT
Hi Bob, glad you’re like it.
I will be planning to get them working eventually yes.
The cartridge idea is out the window now but have a plan that should work ok following on from what we are currently trialling in the 10x.
Adam
|
|